Packing for Storage
General Principles
Packing techniques are as many and as varied as the objects for which they are designed and practitioners will develop techniques with experience. While the general principles outlined in this section can be extended to most objects it would be wise to consult a conservator when packing very fragile objects.
Packing Materials and Tools
While packing materials and tools are discussed below, further information is available elsewhere (see Appendix 6).
Objects of different material types have specific requirements for safe storage. These are described in other chapters that discuss particular material types. As micro-climates are established within boxes it is important that the packing materials within the box assist preservation rather than cause deterioration. The following table gives parameters for the pH and environmental preferences of some of the more common materials.
Table of Materials and Preferred Environments
| Material | pH 6 - 7 | pH 7 | pH 7 - 8 | Non-sensitive | Low oxygen, light and temperature |
|---|---|---|---|---|---|
| Aluminium | X | ||||
| Animal fibres | X | ||||
| Ceramic | X | ||||
| Copper alloys | X | ||||
| Film | X | ||||
| Glass | X | ||||
| Iron alloys | X | ||||
| Lead | X | ||||
| Leather | X | ||||
| Marble | X | ||||
| Paper | X | ||||
| Photographs | X | X | |||
| Plaster/gesso | X | ||||
| Plastics | X | ||||
| Rubber | X | ||||
| Shell | X | ||||
| Stone | X | ||||
| Wood | X | ||||
| Vegetable fibres | X | ||||
| Zinc | X |
Paper-based Packing Materials Include:
- acid-free unbuffered tissue paper;
- archival acid-free unbuffered tissue paper;
- buffered acid-free tissue paper;
- foam core board (Fomecore™);
- library board;
- multi-purpose archival corrugated board; and
- rising museum board.
Plastic-based Packing Materials Include:
- cellular polyethylene sheet (Bubble wrap™);
- polyester fabric (Parsilk or lining materials);
- polyester film (Mylar®/Melinex®);
- polyester wadding (Dacron™);
- polyethylene foam (Ethafoam™ 220);
- polyethylene foam (Ethafoam™ PE30);
- polyethylene foam backing rod;
- polyethylene foam sheet (Cell-Aire®);
- polyethylene sheet;
- polyethylene zip lock bags;
- polypropylene board or sheeting;
- polypropylene corrugated board (Coreflute®);
- polystyrene bean bags;
- spun bonded polyethylene sheet (Tyvek® sheet 1085D); and
- spun bonded polyethylene fabric (Tyvek® 1443R).
Polyvinylchloride (PVC), polystyrene and polyurethane products are generally not used in conservation because they are less stable than the above plastics and off gas detrimental acidic vapours as they break down. Despite this, polystyrene beads are used as a bean bag fillers and insulation for transport crates and water-based polyurethane paints are recommended as sealants for wooden surfaces. These products are not recommended for general use in conservation however.
Vegetable foam chips are unsuitable as a packing material for cultural heritage objects as the chips are water soluble and attract and harbour insects.
Restrainers and Tapes Include:
- cotton tape;
- double sided tape;
- paper tape;
- polyethylene self adhesive tape (Tyvek® tape);
- poly strap and poly strap buckles;
- velcro dots; and
- webbing tie downs.
Useful Tools Include:
- adhesives to secure overlapping parts of box construction;
- carpenter’s right angle or large set square to check right angles;
- cutting mat - the larger the better;
- cutting knife with replaceable blades;
- protective glove - available in different sizes from butcher suppliers;
- steel rule with a 6 mm vertical edge is the safest type to use;
- sharp scissors of different sizes;
- hot glue gun (3M Scotch-Weld™ recommended) to construct boxes, adhere support components within a box and a multitude of other uses; and
- folding tool (bone or wood, not metal) to mark boards for folds and then to establish them.
Packing Techniques
As the packing of any object involves a significant investment of time and money it is important to make the end result as good as possible. Take time to properly support an object and apply the following general principles:
- KIS – Keep it Simple;
- assess every object carefully;
- aim to be able to view each object without having to remove extraneous packaging;
- restrain objects so that they do not move in the box in any direction (see Figure 9);
- avoid having loose packing parts that will inevitably move within a container. Use hot glue to adhere cotton tape restrainers in place and machine stitch cotton tapes onto Tyvek® covers etc;
- avoid using heavy permanent markers (‘textas’) to label stock as the marks are disfiguring to the overall appearance of the packing. If necessary use a soft pencil instead;
- describe packing/unpacking procedures (including photographs if necessary) and adhere unpacking instructions to the outside of a packed object to minimise potential damage when complex procedures have been used for a particular object; and
- aim at high standards of presentation.
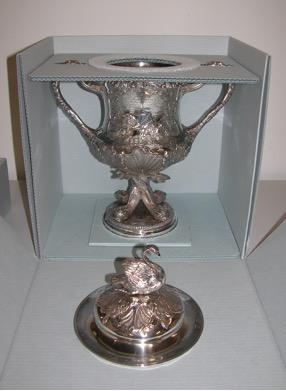
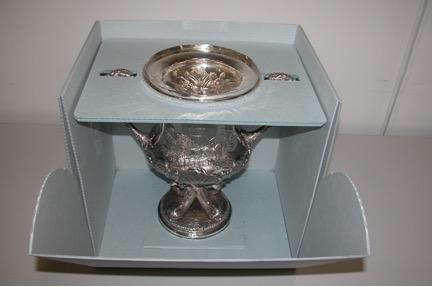
Figure 9: (a) Silver cup and lid in a custom-made box constructed from archival multi-purpose corrugated board with a hinged front flap.
(b) Board has been cut to restrict movement of the base and the handles with Cell-Aire® padding to cushion the base and lid.
Lining a Box
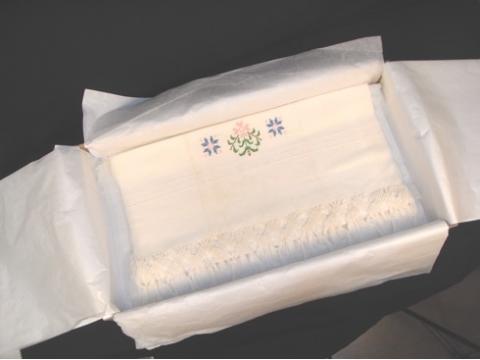
If sensitive materials require a box to be lined then it is important to line it with the correct tissue paper. Decide whether acid-free tissue or buffered tissue is the correct lining for the material being stored (see the Table of Materials and Preferred Environments above). Line the box using the tissue length ways to cover the base of the box, cover the sides and have enough to fold over the top (Figure 10). Repeat this along all sides. If necessary fold the tissue to the dimensions of the box rather than cutting the tissue as it is quicker and reduces the amount of small loose pieces of tissue that will move about in the box. Fit the tissue carefully into the corners rather than bunch them up. If the box format is large, the base may need to be covered with a full piece of tissue with the start of the lining tucked under the base tissue before covering the box sides. The tissue that will fold over at the top remains splayed out around the box perimeter until the box is packed.
Figure 10: A brown cardboard box lined with buffered acid-free tissue paper for the storage of linen and cotton objects (image courtesy Maggie Myers, WA Museum).
Ball Packing
This is a simple method of holding objects within the confines of a box with balls of tissue [see Figure 6 (a) above]. The object is well displayed and this method can be used for small to large lightweight objects. This method is not suitable for heavy objects that will not be restrained by the tissue balls. The format for the tissue paper is dependent on the size of the object to be packed. For instance the ball might be the size of an egg made from half a piece of tissue paper for a small toy being packed in a specimen tray. The area surrounding a costume however might be blocked out with larger balls each made from two or three sheets of tissue paper. The aim of the balls is to have an inner crushed structure covered with a smooth tissue finish that is closed at the bottom. These balls are suitable for blocking out objects within a box but the ball nature of them makes them unsuitable internal supports for materials like textiles. More open crushed tissue or crushed rolls of tissue are preferable for internally supporting textiles.
Base Board Packing
Base board packing is suitable for many small to medium-sized objects. The object is restrained and fully visible (Figure 11). Cut a base board of either single or double blue-grey corrugated multi-purpose board to fit the base of a box. Place the object on the board and mark the strongest anchor points of the object on the board. Cut slits at the anchor points and thread cotton tape down through one side and up through the other. Hold the centre point of the tape in place with a touch of hot glue on the underside. Cut strips of Cell-Aire® about 30 mm wide (the width depends of the scale of the object and the tape width) to ‘bridge’ the object. Cut a slit in each end of the Cell-Aire® bridge and thread the tape through, place the object on the base board and tie the tape in a bow over the Cell-Aire® bridge.
Figure 11: Base board packing showing strips of Cell-Aire® and tape restraints.
Cell-Aire® Lining
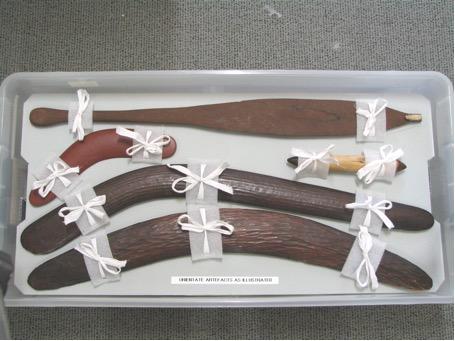
The Cell-Aire® lining method is suitable for many small objects, with the object restrained and fully visible. Line a tray or a box with 2 mm Cell-Aire®, cut using the box as the template (Figure 12). Identify the strongest part of the object and the number of anchor points that are needed. Mark the position of the anchor points on the Cell-Aire® with a soft pencil, remove the object and cut slits at each anchor point. Thread cotton tape through the slits using tape of a width that is most appropriate for the object in question - narrow for small objects, wide for larger objects. Don’t skimp on the tape and leave approximately 35 cm of tape for a bow. Use hot glue to tack the centre point of the tape to the underside of the Cell-Aire® to hold it in place. Thread the tape through the anchor point slits, then hot glue the Cell-Aire® base into the box. If needed, make Cell-Aire® bridges as described above.
Figure 12: Multiple objects tied onto a base of Cell-Aire® with room for an additional object of the same classification (image courtesy Jon Carpenter, WA Museum).
There are a multitude of variations of this method including shaping the Cell-Aire® base to support a 3D object and hot gluing Ethafoam™ supports or polyethylene backing rod bollards to support the object. The tape can pierce the box itself if additional strength is needed or preferred.
Note that Ethafoam™ 220 is very rough and should never be in direct contact with an object. Cover Ethafoam™ 220 either by hot gluing 2 mm thick Cell-Aire® over the contact surface or by covering with Parasilk or Tyvek®1443R. A variation of this method is to cut a slot around the supporting Ethafoam™ 220 and push Parasilk or Tyvek®1443R into the slot to hold it in place.
Foam Blocks
Heavier objects or objects that need to viewed without handling can be restrained with foam blocks attached either directly onto the base of a box or preferably onto a board cut to the dimensions of the base of the box (Figure 13). Identify the strategically important points of an object, taking into account the shape and the strength of all parts of the object. These might be the four corners of a square shaped object or they might be the ends of an object and a strategic depression in the object that if restrained would prevent the object from moving. Every object is unique and has to be assessed individually. Cut the Ethafoam™ 220 blocks to the appropriate size needed, shape if necessary, hot glue 2 mm thick Cell-Aire® over the contact surface and hot glue the block into place. The object can be tied with cotton tape through the board as described above or a foam block covered with Cell-Aire® can be fitted to the lid to prevent the object bouncing up.
Figure 13: Objects supported with Cell-Aire® covered Ethafoam™ 220 supports and tied down onto a multi-purpose corrugated board base (image courtesy Maggie Myers, WA Museum).
In some cases it is prudent to mark the orientation of an object on the base of the box so that it will be replaced correctly. This is very relevant when a suite of objects are boxed together. Knowing the orientation and which object goes where will save a lot of guess work at a later date!
Foam Cradle
This is a variation of the above, where the object has a sculptured shape and a cradle is needed to support it (e.g. a model boat). The object is usually mounted on a board that fits the base of the box. If light in weight the base board and mounted object can be lifted out using cotton tape handles. If the base and object are heavy however, then make the front of the box so that it can ‘flap down’ to allow the base and object to slide into place (see Figure 8 above). The box is either custom made or an adapted standard box. The object on the board can be pulled out of the box by Tyvek® tape tabs self adhered onto the base board.
Determine the number of cradle supports required and the strongest points of the object. Carve Ethafoam™ 220 blocks to shape and cover the contact surfaces with 2 mm thick Cell-Aire®, adhered with hot glue. Use hot glue to adhere the cradle supports in place on the base. As mentioned above, it may be prudent to show the orientation of the object on the base board so that it can be replaced correctly.
Objects on Pallets
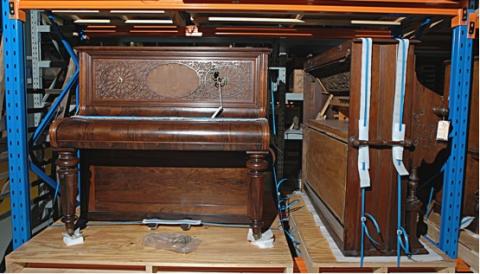
Objects stored on pallets need to be strapped onto the pallet as they will be moved by forklift and possibly stored at high levels. Hot glue Ethafoam™ 220 blocks onto the pallet to hold the corners of the object in place. Use poly strap to strap the object to the pallet (Figure 14). Use strips of Cell-Aire® to separate and cushion the object from the abrasive poly strap and Ethafoam™ 220. To stop the Cell-Aire® strips from moving, cut slits at each end of the Cell-Aire® and thread the poly strap through. Tighten the poly strap with poly strap buckles.
Figure 14: Objects strapped onto modular pallets with poly strap, Cell-Aire® protecting the edges of the object and Ethafoam™ 220 under the wheels of the piano (image courtesy Jon Carpenter, WA Museum).
Labelling
It is imperative to label a storage box with a list of its contents and describe the box’s location in an object registration system. This will allow objects to be easily retrieved when required. Each organisation will have its own methodology and practices which need to be followed. Attach a label or write on the side of the base of the box and on the lid, giving the object’s name, its registration number and if possible a photograph of the object.
Use a numbering system to identify shelving units and shelves within the units. Record the position of an object in an object registration data base or in a manual registration document. Update this information if an object is moved to a new location.
Packing for storage check list
- Has the object been packed in pH-appropriate packaging for the materials present?
- Is the object supported on its strongest points?
- Is the object restrained?
- Is the packaging simple but effective?
- Are instructions for access required?
- Is the presentation good?
- Has the box been labelled according to the institution’s protocol?

