Paper and Books
U. Broeze-Hoernemann
Introduction
Paper is one of the most commonly used materials, with much of the history of mankind recorded on this medium. While the introduction of computers heralded promises of a ‘paperless society’ this has not happened. Hard copy back-ups are still used and stored in archives, printing, copying and scanning of documents has continued and paper waste has continued to increase.
Paper Making
The word paper is derived from papyrus, a long-stemmed plant Cyperus papyrus. The method that used this plant as a writing support was developed by the Egyptians about 4000 years ago. Although paper, as it is known today, was developed by the Chinese around 2000 years ago, it was not introduced into Europe until the 12th century. The Chinese used the mortar and pestle method of paper making, where cloth or bark was rinsed with water and then reduced to a pulp by grinding with the mortar and pestle. In Europe, hammers driven by water power were used to produce pulp from cotton or linen and water by beating these materials in stone or metal-lined wooden troughs.
Beating is a very important part of the paper making process as it increases the area for inter-fibre bonding, the strength and the flexibility of the paper. Paper made without mechanical treatment is usually weak. Occasionally straw from wheat and rice plants was added to cotton and linen but this produced an inferior, weaker paper. Very high quality paper is produced from cotton or linen and because of a shortage of the raw materials this type of paper was highly valued.
It was not until the 1850s that paper was produced from ground wood pulp. Wood pulp consists of both fibrous and non-fibrous components. This wood pulp paper, which usually consisted of 80 % ground wood and 20 % cellulose, was both cheap and of low quality.
The low quality and low durability of wood pulp paper are due to the rapid breakdown of the non-fibrous components when exposed to air and light. Newspaper, for example, which is made from low grade wood pulp, yellows very rapidly when exposed to light. Prolonged exposure leads to increased yellowing and brittleness.
Techniques developed in the early 20th century to separate the fibrous and the non-fibrous components of wood pulp led to the production of higher quality paper.
Paper Chemistry
Usually paper is made up of the following combination of materials:
- raw plant matter;
- sizing agents;
- fillers; and
- brighteners and colouring agents.
The basic raw materials of paper are fibres derived from wood and other plants. Good quality paper contains a high proportion of cellulose molecules with a correspondingly low lignin content. Cellulose is a polymeric substance made up of linked glucose units. The arrangement of these units and of the resultant polymeric chains determine the overall quality and mechanical properties of a paper sheet. In good quality rag paper about 1000 glucose units are linked.
High cellulose, low lignin papers are usually prepared from cotton rag or linters, whereas paper with a higher lignin content is derived mostly from wood pulp. Depending on the required use for the paper, wood pulp may be chemically treated to produce papers of varying qualities.
Paper is sized so that it repels liquids such as inks, making it suitable for writing and printing. A higher degree of size is used for the purpose of writing, to prevent ink from feathering with a lower degree used for printing so that ink can be absorbed as quickly as possible.
Traditionally sizing was carried out as a separate step. By the second half of the 19th century however, it became possible to add the sizing agents directly to the pulp (internal sizing). Combinations of alum and rosin were originally used in this process, but as these sizing agents elevated acid levels in the paper, the paper deteriorated more quickly. Synthetic cellulose components are now used as sizing agents to overcome the acidity problems, allowing pH neutral and alkaline papers to be produced.
Clay, titanium oxide and calcium carbonate are among the most commonly used fillers. These materials, added during stock preparation, serve to produce different finishes including calendared paper.
Although indigo was used originally as a colouring agent it has been replaced by synthetic fluorescent dyes and optical brighteners.
Types of Paper
Paper types are many and varied. Paper quality depends on the raw materials and chemicals used in processing and the actual production practices used. Archival quality papers, made from rag material and which use an alkaline processing system, last longer than those made from the low quality wood pulp used for newspapers. As described earlier, the latter discolour and degrade rapidly.
A list of paper and board types, which describes their components and chemical characteristics, is supplied in Appendix 6.
Deterioration
Paper is prone to attack and subsequent degradation by chemical, biological and environmental agents. Deterioration may be caused by:
- the presence of potentially damaging chemicals within the paper;
- exposure to external pollutants;
- environmental factors such as light and relative humidity;
- biological attack by moulds, insects and rodents; and
- inappropriate intervention or lack of care by those responsible for collections.
High levels of acidity in paper may be brought about by the presence of material introduced both during and after processing. These materials include alum or rosin sizing agents, high lignin pulp material, coatings and certain inks such as iron gall ink. Acidic substances attack the long cellulose chains, causing them to break into smaller units. A more brittle paper, or one containing holes, may result. Absorption and chemical reaction with oxides of nitrogen and sulphur from the air, combined with the natural ageing of paper components, may also contribute to increased acidity levels in paper.
Chemical processes can affect the appearance as well as the mechanical structure of paper. Oxidation of cellulose, catalysed by iron or copper impurities or by the presence of atmospheric ozone produced as a by-product of the photocopying process, may lead to the development of foxing stains similar to those produced by moulds. High relative humidity levels enhance this type of degradation.
Light-induced photochemical degradation, initiated by exposure to both white light and UV radiation may either yellow or bleach paper. Heating of paper, caused by overexposure to light further accelerates deterioration processes.
Dust and dirt may lead to a combination of chemical, biological and mechanical damage. The abrasive nature of dirt particles may cause physical damage to fibres. Dirt particles also act as nucleation centres, encouraging condensation, chemical attack and mould development.
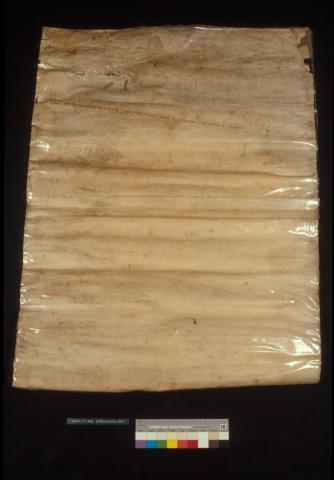
Mould formation is enhanced by high relative humidity. Moulds which develop on paper cause stains known as foxing. These stains are usually brown in colour and are especially disfiguring to works of art on paper (Figure 1). Fluctuating relative humidity levels can cause physical damage to paper. Under conditions of high relative humidity swelling of paper may lead to cockling, while low relative humidity can result in paper becoming brittle.
Figure 1: Map – Shark Bay. Laminated in self-adhesive contact. This shows staining and mould as well as folds and creases.
Insects such as silverfish, cockroaches, flies and book lice and rodents such as rats and mice cause physical damage by feeding on paper. Additional damage is caused by their excreta.
Do not underestimate the influence that careless handling or treatment can have on the deterioration processes that affect paper. Some examples of this type of damage include:
- the application of adhesive tapes to paper;
- the use of metal paper clips or pins;
- the inappropriate use of backing and other materials;
- poor quality framing or mounting;
- rough and inappropriate handling; and
- deficient storage conditions
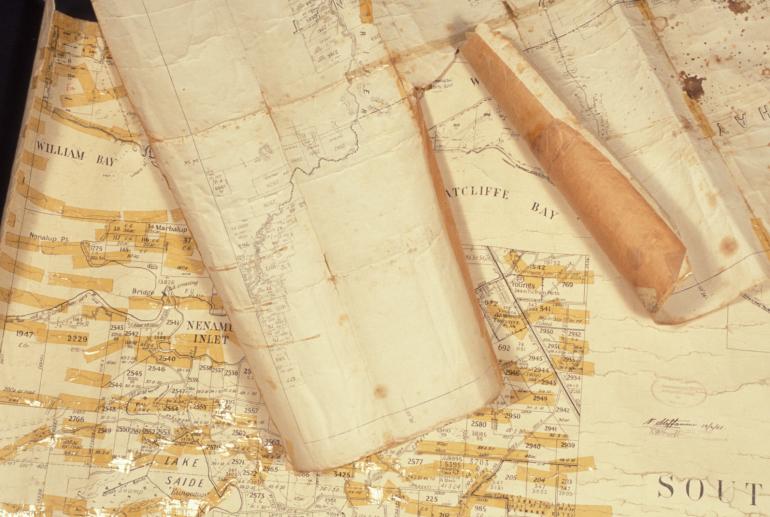
Do not use adhesive tape as a means of repair. Inevitably the adhesive tape fails, leaving behind a yellow stain that is very difficult, if not impossible, to remove (Figure 2).
Figure 2: Maps showing damage from adhesive tape and acidic backings.
Do not use pressure-sensitive or gummed tapes, sold as archival repair tapes, without first consulting a conservator.
Metal paper clips and pins are prone to rusting, cause indentations in the paper and have sharp ends with the potential to tear paper. Pins leave holes.
Acidic mount boards and inappropriate backing (such as plywood, cardboard, chipboard and straw boards) can destroy or discolour the paper objects they were meant to support. They can also cause mat burn, the brown line that imprints itself into the artwork along the window mount.
Poor framing, in which there is direct contact between the work of art and the glass or acrylic, may lead to the transfer of part of the image to the glass or acrylic. An obvious loss of part of the original image is the result.
Rough and inappropriate handling can cause tears and creasing. Stains such as fingerprints will deface paper and may be irreversible.
Deficient storage such as in damp cellars or attics, inappropriate shelving and cabinets or acidic boxes can all permanently harm a collection of paper-based objects.
Preventive Conservation
Preventing damage to artefacts must always be the highest priority. Any treatment involves intervention, which may alter the originality of an artefact or contribute to changes within its constituents.
Preventive action does not have to be complex. Simple measures and precautions go a long way toward protecting paper objects. Some of these measures include:
- hygiene and regular, careful cleaning of storage and display areas;
- storage and display under appropriate environmental conditions;
- regular monitoring of objects;
- careful handling;
- use of archival quality materials for storage and display; and
- use of appropriate storage and display techniques.
Environment
Maintaining appropriate environmental conditions within storage and display areas will enhance the longevity of paper-based materials.
Light levels of about 50 lux, with no or very low UV content (30 to a maximum of 75 µwatts/lumen), are recommended if photochemical degradation is to be minimised (see the chapter Preventive Conservation: Agents of Decay). Do not expose paper objects to direct sunlight nor place light sources close to these items and monitor light levels carefully. Limit light exposure for paper artefacts to minimise their deterioration.
As light levels associated with photocopying are very high, indiscriminate photocopying will damage paper objects. If copying is necessary, as in the case of materials needed for study or viewing (for example, newspapers, certificates), only copy the documents once. Observe copyright restrictions and use archival quality paper for copies. Some papers may yellow, even after only one exposure. Never put original documents through the feeder of a photocopier.
Maintain relative humidity (RH) levels within the range 45 – 55 % and temperatures of 15 - 25 °C with maximum variations of 5 % and 4 °C within any 24 hour period. Information on temperature and relative humidity control has been provided earlier (see the chapter Preventive Conservation: Agents of Decay). Buildings have zones that tend toward dampness and zones in which conditions fluctuate more often. Doorways, chimneys, areas near heating and air conditioning vents and exterior walls are examples of such zones. Avoid placing valuable objects in these areas.
Should it be difficult to establish the above environmental conditions, strive to maintain conditions that are as stable as possible. Slow changes during seasonal variations should allow most objects to adjust accordingly and will minimise damage. Rapid and frequent fluctuations in relative humidity levels, in which paper objects swell and contract repeatedly, will increase the rate of deterioration. Elevated relative humidity levels will increase the risk of mould development while conditions that are too dry and hot will cause brittleness and distortion.
Handling
Paper is particularly susceptible to physical damage. Careful handling and a common-sense approach is necessary to minimise damage to paper and paper products:
- wear disposable latex (rubber) or cotton gloves when handling books, documents and paper artefacts to prevent the transfer of oils, fats and acids from the skin;
- pick up paper objects with both hands, not by one corner;
- keep fragile papers secured, covered and on a suitable support until treatment begins;
- place books flat, not upright, to prevent damage to the spine;
- unfold folded papers if the condition allows; and
- use pencils for documentation purposes since accidental marking with inks, biros, felt pens or similar may prove indelible.
Storage and Display
Hygiene and regular, careful cleaning are important to maintain paper artefacts in good condition. Guidelines for storage and display of paper artefacts include:
- keep storage areas clean, dry, well ventilated and free from insect and rodent infestation;
- regularly inspect stored material;
- do not store items in cellars and attics as they are likely to be overlooked or forgotten and these areas also tend to have greater extremes in temperature and relative humidity levels; and
- do not store collections close to food sources.
Depending on the type of paper object the following storage and display techniques and media may be appropriate:
- archival quality boxes or folders;
- cardboard boxes lined with acid-free tissue or barrier paper;
- flat storage in metal drawers;
- rolled storage on the outside of large diameter, acid-free cylinders (although flat storage is preferable);
- mounting;
- framing; and
- encapsulation.
Archival quality boxes or folders provide protection for paper artefacts. In addition to providing support, protection from dust and the danger of being squashed, boxes act as buffers to environmental fluctuations.
Do not use alkaline-buffered boards and paper for the protection of paper materials that also have leather, parchment, photographic, woollen or silk components. Use neutral, acid-free materials instead.
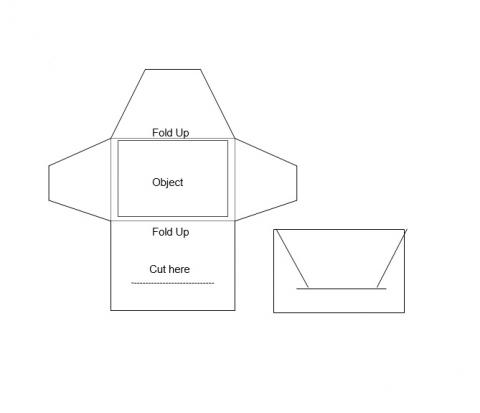
Although archival storage boxes, made from either acid-free paper board, polyethylene or polypropylene, are commercially available, they tend to be expensive and may not be of the desired size. A do-it-yourself box is a perfectly acceptable alternative. Acid-free boards such as foam core, archival mount and corrugated boards are all suitable and pre-gummed acid-free paper can be used for their manufacture. Storage folders can be manufactured from a variety of suitable buffered and unbuffered acid-free card (Figure 3).
Figure 3: Template diagram for a storage folder.
Should the above not be applicable, or if suitable materials are not available, store artefacts in ordinary cardboard boxes, provided these are lined with acid-free tissue, special barrier paper or archival plastic liners. The lining papers must be changed at regular intervals (every 12 months). Items in boxes are not immune from danger and should be checked regularly for insect infestation and for any changes in condition.
Flat storage, preferably in metal drawers, is recommended for items such as documents, maps, newspapers and certificates. They should be stored flat, unfolded and interleafed with acid-free tissue paper, which is slightly larger than the items themselves. Do not fold aged paper as in time the creases become tears.
Take special precautions with documents that contain attachments like seals and ribbons. Ensure these are not crushed or allowed to imprint themselves onto other documents. Place these items on top of a stack to avoid damage.
To reduce pressure on items on the bottom of a box or drawer, do not cram in too many items. Arrange items according to size so large ones are beneath smaller ones. Store objects of a similar nature, size and condition together.
If an item such as a map is too large to store flat, roll it onto either a large acid-free cylinder or a large cylinder (minimum diameter of 150mm) covered with acid-free tissue or Tyvek. Cover the entire object with acid-free tissue paper or Tyvek before rolling to prevent individual layers from pressing or rubbing against each other. Protect the outer surface of the item with a further layer of acid-free paper or Tyvek. Do not roll painted or fragile objects, or those that are thick and inflexible. Use Tyvek in preference to tissue paper as it does not tear and is easier to handle.
Framing is a useful method of storage and display as it protects paper from outside influences such as dirt and handling. To reduce the amount of damaging UV light reaching the item, use UV-absorbing acrylic in preference to glass. Unfortunately, framing is often expensive or impractical, especially for large items like maps.
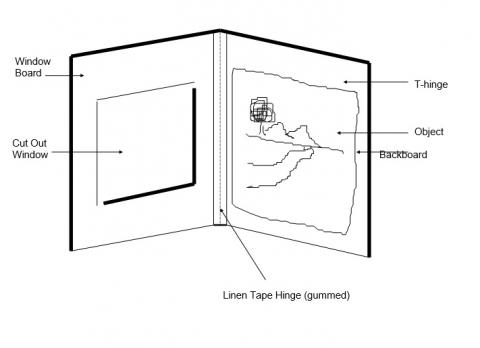
Mounting (matting) provides safe support for flat paper objects such as watercolours, engravings, drawings and documents (Figure 4). When mounted, they can be handled and viewed without being touched. Use acid-free mount board, preferably 100 per cent rag mount or alkaline-buffered rag mount board for this purpose. The latter will be able to counteract acidity (present or latent) in the paper item. When choosing coloured board make sure that it is 100 per cent acid free.
Figure 4: A standard window mat support.
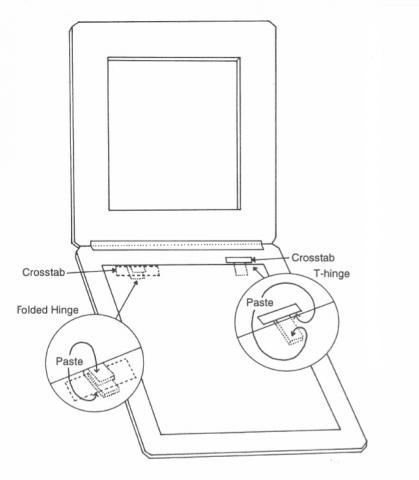
Use acid-free hinges or make them using bookbinders’ pre-gummed (not self-adhesive) paper tape or Japanese tissue paper and starch paste, depending on the weight and condition of the paper. Consult a conservator before attempting this.
Examples of two different types of hinging are shown below (Figure 5). The T-hinge can be used when the edges of the object are to be covered by a window mount. Since they are covered by the object itself, folded hinges allow the edges of the object to be exposed.
Figure 5: Examples of a T hinge and folded hinge.
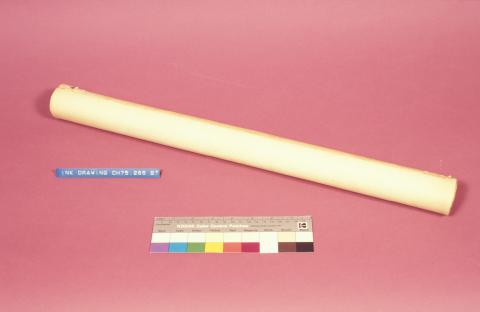
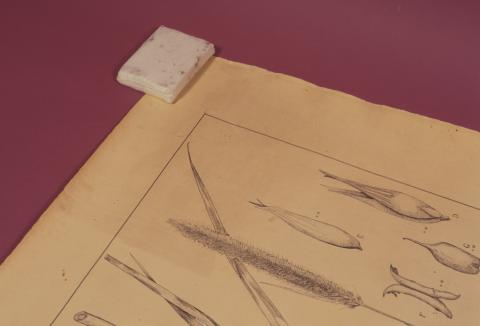
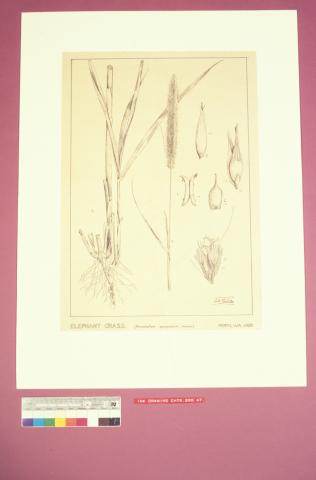
Never glue paper objects to their backings as many adhesives change their composition, turn yellow and may become insoluble as they age. Gluing also restricts the natural movement of paper. Hinging allows objects to move freely while they are held securely in place. Treatment of a previously rolled paper is shown below (Figures 6 a, b and c).
Figure 6: (a) Example of tightly rolled paper after being stored in a tube.
(b) Paper unrolled after humidification and during dry cleaning.
(c) After treatment and mounted for storage or display.
For storage and protection, cover artefacts with acid-free tissue paper. Alternatively, insert a sheet of mylar the size of the mount between the window mount and the artefact. Do not use mylar in the case of flaking paints, chalk, powdery pastels or charcoals as its electrostatic nature may dislodge pigments from the paper support. It also may burnish some surfaces. In these cases, use acid-free tissue paper instead.
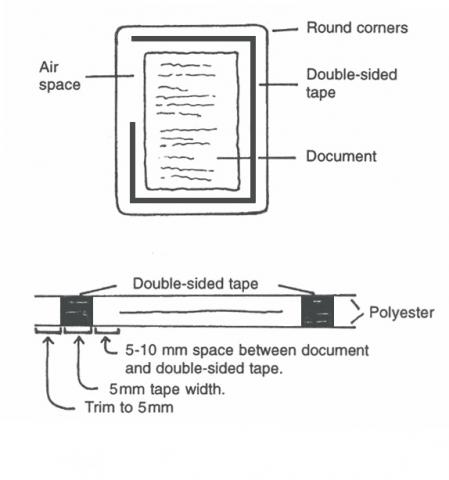
A cheaper alternative to framing or mounting is encapsulation. In this technique, the paper artefact is sandwiched between two pieces of mylar or polypropylene film. Cut these pieces about 15 – 20 mm larger than the paper on all sides. Use clear, acid-free double-sided tape to join the two pieces of film on all sides apart from leaving a small uncovered length, about 20 – 25 mm (minimum), along one corner for air circulation and exchange (see Figure 7). For increased air circulation, leave one entire side un-adhered.
Figure 7: Demonstration of the encapsulation a document.
Do not encapsulate highly acidic material as the restricted air movement will accelerate deterioration. In some cases an alkaline buffered sheet can be inserted behind a document that is being encapsulated. Although this will assist in countering acidity, it has the obvious disadvantage of obscuring one side of the document.
Because of mylar’s electrostatic nature, encapsulation is not appropriate for chalk drawings, pastels, charcoals and watercolours. Materials which have attachments such as seals and ribbons are also not suitable for this method of storage. Disadvantages of encapsulation include the glossiness of mylar and its lack of UV protection.
Photographs may be encapsulated in mylar or polypropylene film. Store them upright in a box, folder or file so that they are not placed on top of each other and there is no weight pressing the encapsulating film against the photographic emulsion. Ensure that they are held in place to prevent sagging.
Tracing Paper
Tracing papers are usually translucent and have a smooth and hard surface, making them very receptive to aqueous inks. Of the variety of available tracing papers the most commonly used ones are:
- prepared tracing paper;
- parchment paper; and
- natural tracing paper.
Prepared tracing paper is manufactured from cotton pulp. The transparency of this paper is due to its impregnation with assorted gums, oils and resins.
Parchment papers (also known as pergamyn and papyrine) are produced by a process in which un-sized sheets are immersed briefly in sulphuric acid and then neutralised with ammonia. This treatment alters the cellulose structure. Sometimes glycerine or glucose is then used to coat the paper. Parchment papers are grease proof.
Natural tracing papers are produced by physically modifying the cellulose fibres. This treatment increases the surface area of the fibres without shortening them. Heat and compression treatment produce a very dense paper free of internal gaps. The surface is usually sized to make it more receptive to inks (Dobrusskin 1991).
Due to their high densities, tracing papers are very susceptible to damage caused by either exposure to high relative humidity conditions (greater than 60%) or by contact with water. These factors cause expansion, deterioration and permanent damage.
Tracing papers are among the most difficult to treat since all repairs will be obvious, due to the transparency of the paper. Any treatments must be carried out by a conservator.
Because of the difficulty of treatment, preventing damage carries even greater importance. Keep tracing papers flat and fully supported in an environment in which relative humidity and temperature fluctuations are minimised.
Books
Handling
Do not remove books from shelving by pulling the head-cap or spine. Rather, ease them out by carefully grasping them around the centre of the spine. Wear gloves when handling books.
Minimise photocopying pages of books, as the process places the spine of the book under stress. In addition, the very high light levels associated with photocopying increase photochemical degradation of the paper. If a copy needs to be obtained, taking a photograph may be a better option.
Storage and Display
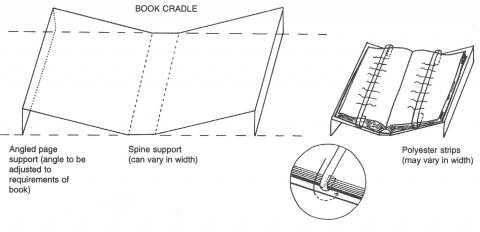
Should it be desirable or necessary to display certain pages of a book, then use book cradles or blocks. These support both parts of the book, preferably on a slight angle, to avoid stress on any part of the book or spine. Keep the spine itself flat. These cradles or blocks can be bought or made using acrylic or acid-free card (Figure 8).
Figure 8: Book cradle and display.
To hold pages flat while on display, use Mylar strips, made into hoops, to ‘strap’ particular pages, including the cover. Form the loop by applying a small piece of acid-free, double-sided tape to one end of the Mylar strip. This join can be hidden underneath the book. A thin, flexible version of mylar (0.002 - 0.003 mm) is suitable for this purpose; thicker versions may damage the paper. Polyester or polypropylene films are also suitable. Turn pages regularly to avoid overexposure of any particular page.
Enclosed steel shelving is ideal for book storage. Use a curtain made from washed calico, Tyvek or similar material if enclosed shelves are not available. Store books vertically and according to their size unless they are large volumes or soft covers; store the latter flat, with minimal stacking.
Do not pack vertically-stored books too tightly, otherwise they will not be able to be removed easily by grasping around the centre of the spine. Bookends offer good support, preventing books from falling over or sagging.
To prevent the migration of acids from timber shelves, cover them with acid-free card (for example, mount board), Cell-Air or similar, cut to the width of the shelf. The card, or similar, can be replaced when dirty, worn or damaged. Treat new timber shelving with a water-based polyurethane to seal the surface.
Do not put shelving against outer walls as these areas are prone to dampness and temperature and relative humidity fluctuations.
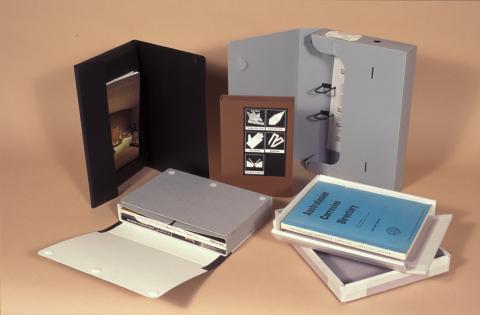
Store pamphlets, magazines, brochures and journals in special archival folders or pamphlet boxes. These are commercially available or may be tailor-made (Figure 9).
Avoid the use of dressings on leather-bound books as their presence often complicates future conservation treatments. Always consult a conservator about the suitability of any dressing.
Figure 9: Some examples of storage boxes for paper material.
Stamps
History
The first adhesive postage stamp, the famous Penny Black, was produced in the United Kingdom in 1840. This stamp carried the head of Queen Victoria of England as its central design. The image was hand engraved, while the background was produced by a mechanical engraving process. To achieve the high detail in the printing a very smooth, good quality paper was needed. The individual corner letters in this very early example served as a precaution against forgery. Stamps were usually coated with a starch adhesive after printing. They were not perforated.
Use of the cancellation mark, to prevent the re-use of stamps, was soon introduced. Initially these marks were produced using red, water-soluble dyes (the Maltese Cross hand stamp). To minimise the opportunities for the removal of the cancellation mark and re-use of the stamps, these early dyes were replaced with carbon black printers’ ink.
Modern stamps are printed by offset lithography or photogravure techniques. Sometimes oxide pigments are added to create a holograph-like effect. The tiny pigment particles act like prisms and produce different patterns when the angle of light is changed.
Until recently stamps were usually adhered by wetting their gummed, water-soluble adhesive backings. Stamps are now usually produced with self-adhesive backings. These may cause future problems for conservators and collectors alike when the adhesive starts to break down.
Environment
Control of both relative humidity and light conditions is critical to prevent damage to stamps.
As some cancellation marks are water soluble and many of the adhesives (usually starch or gum arabic) used on stamps are hygroscopic (attract or absorb moisture), relative humidity control is important. Damage to the adhesive usually devalues the stamp. If relative humidity is not controlled, the stamp may become distorted.
Storing stamps in albums ensures that they are not overexposed to the fading influences of strong lights. If stamps are put on display, exert strict control over the level and duration of light exposure. A maximum intensity of 50 lux and 30 µwatts/lumen of UV radiation are recommended.
Storage
Although traditional stamp albums are both widely available and used, they are often not of archival quality. Plastics used to cover stamps can have serious effects. Plasticisers have the potential to act as solvents for stamp printing and writing inks.
Philatelic pages and folders manufactured to archival specifications are now commercially available. These materials provide full protection and support to the stamps without affecting the original adhesive.
Treatments
Stamp conservation treatments are extremely specialised and require the attention of a conservator.
Treatments
Using quality materials and adopting practices which minimise damage to paper-based materials are preferable to applying remedial treatments to these objects. The susceptibility of paper to deterioration however, means that a discussion of some of the available treatments is necessary.
As with all conservation treatments, a thorough assessment of an artefact's condition is essential before any treatment is applied. It is also important to test any potential treatment on an inconspicuous part of the object to minimise further damage or loss.
Familiarise yourself with the particular technique to be used by applying it to an expendable piece. Where there is any doubt about the condition or the treatment of an object, consult a conservator.
Invasive techniques such as washing, de-acidification, bleaching and use of solvents should be left in the hands of a conservator. De-acidification can cause certain papers to darken and bleaching may fade colours or delaminate certain paper types. Do not use ordinary household bleaches and peroxides under any circumstances. Approach the numerous published recipes with care as they may no longer be appropriate due to continuous modification of treatment procedures. Consult a conservator before attempting any treatment.
There is no such thing as a routine or standard treatment. Each object deserves special attention that takes into account condition, age, constituents, manufacture, origin, colour or discolouration and so on.
Carry out pre-treatment tests carefully to ensure that the object can withstand a particular action. For example, test each colour and ink individually to assess the solubility of dyes and to ascertain the suitability of the proposed treatment. Some colours may be stable at low relative humidity levels but bleed when exposed to prolonged high relative humidity levels.
Cleaning
Paper
The first step in most cleaning treatments is to remove dust and dirt. If paper is dirty but has no other signs of deterioration, such as flaking or brittleness, it may be surface cleaned.
Surface cleaning may be achieved by using:
- a soft brush;
- a soft, high quality eraser;
- grated eraser; and
- proprietary document cleaners.
A soft brush, such as a squirrel or cosmetic brush, can remove dust. Be careful however as dust particles can be quite sharp or may smear.
If brushing is not effective, try a soft, high quality eraser, but only after the type of media has been established. For instance, charcoal or pencil drawings and pastels cannot be cleaned in this way and care must be taken to avoid smudging inks and scuffing paper.
When erasing, use even strokes, going in one direction or rotating movements, covering only small areas at a time. This will minimise the risk of slipping or crushing. Use a thin, flexible slice of eraser to reduce pressure on the document. Wear a disposable latex (rubber) glove on the hand holding the document to avoid the transfer of grease and perspiration. Alternatively, wash hands before treatment to ensure they are grease-free.
Grated eraser also may be used to remove dirt. Finely grate an art eraser or cleaner (for example, Artgum, Faber Castell) using a plastic kitchen grater. Plastic is preferred as the metal variety may rust or shed small metal particles, which could damage the paper. Spread the resultant grains over the paper and lightly rotate these with the palm of the hand or the flat of the fingers until the entire area has been covered. Then brush the residue off the paper.
An alternative is to use a commercially available, non-abrasive document cleaner. Draft Clean Powder is similar to the grated eraser discussed above and is used in the same way, but the granules are of different sizes and textures. Fine powder is mixed with coarser and firmer particles but with some extra care it can be used safely.
Document Cleaning Pads use the same ingredients as the Draft Clean Powder but are ground more finely. The powder is held in a cloth pouch and with manipulation is released onto the document. With circular motions of the pouch, dirt and dust are absorbed. Dirt is not transferred to the object even though the cloth becomes dirty during the cleaning process.
As the object is obscured by the pad or the palm of your hand during the cleaning process test this method in an inconspicuous area before using it. A potential disadvantage of these techniques is that residues of the fine powder may remain in the paper grain after cleaning.
Books
Clean books by using a dry lint-free cloth or a soft brush. The use of a low suction vacuum cleaner, such as a car cleaner or one with variable suction control, may be suitable for books in very good condition but this should be discussed with a conservator before taking action.
Brushing is the preferred method as it is easily applied and controlled. Always brush dust away from the spine of a book and away from yourself to avoid breathing in dust particles or mould spores.
Should the use of a vacuum cleaner be suitable, cover the nozzle with a piece of loose weave cloth (for example, cheesecloth, gauze) and hold it a few millimetres above the paper surface. This prevents scratching and will also stop any pieces from being accidentally sucked into the vacuum cleaner.
Due to the complex composition of paper-based materials such as books, maps and stamps, apart from removing surface dust, only attempt treatment after consultation with a conservator. The mix of leather, paper, fabric, adhesive, dyes, inks and pigments found in these objects means that any treatment must be considered very carefully.
Removing Residual Sellotape Glue
Where the plastic carrier of Sellotape is stuck to the paper, a conservator is needed to remove it safely. This carrier often becomes detached with age, leaving behind the sticky adhesive. This is undesirable as it is unsightly, attracts dirt and pages could stick together.
To remove the sticky residue rub a piece of crepe rubber (available from art and craft stores) in light circular motions over the particular area. This will gather the adhesive in a small ball, which can then be carefully lifted with tweezers.
This method can only be used on strong, sturdy papers as brittle and fragile papers are likely to be damaged during this process. The stain left by the adhesive however, will remain. Removing this stain will require a qualified conservator to apply chemical treatments. In many cases it is not possible to remove the stain.
Interleafing
Interleafing with acid-free or buffered tissue paper is a protective measure that will counteract acidity to a certain extent, especially if the documents are then stored in boxes or folders manufactured from archival materials. Interleafing also minimises abrasion between documents.
High acidity levels may be countered to some extent by placing affected papers in an alkaline or neutral environment such as that afforded by boxes or folders.
Cut buffered or unbuffered acid-free tissue paper used for interleafing to a size slightly larger than the document in question. If the documents are of varying sizes, cut the tissue to the dimensions of the largest document. This will prevent slipping and ensure there is complete coverage of the documents. The resulting documents can be stored in a folder or box that has been made to size. Do not cram too many items into one box or folder.
Certain pages of books can be interleafed with unbuffered acid-free paper, especially where transfer of images, inks or smudging may be a danger. Take care to limit interleafing to a few pages as too much added bulk will put pressure on the spine and make the pages gape.
Damp or Waterlogged Paper
If an object is damp or wet, dry it out as quickly as possible using fans or hairdryers on a cool setting. Keep papers flat and held in place as any movement could cause further damage. Hold books upright with the pages opened as evenly as possible.
An even more critical situation involves complete waterlogging, which may follow flooding of a storage area. For books, insert sheets of blotting paper, slightly larger than the book pages, every fourth or fifth page so that excess water is absorbed.
If large numbers of paper objects are involved, freeze items that cannot be treated immediately. This will minimise further damage through prolonged wetness and possible mould attack. Wrap single items in plastic and defrost and treat individually at a later date.
Mould
If mould is present on paper, quick action is necessary to prevent damage. To avoid the spread of fungal spores, isolate the object immediately in a plastic bag.
As slightly damp conditions are usually needed for mould to develop, allow the object to dry partially before further treatment is attempted. This will make it easier to remove the mould. Dry the mould-affected object in a well-ventilated area, such as a fume cupboard or outside.
After partial drying, remove visible mould with a soft brush using gentle strokes away from the person to avoid inhalation of fungal matter. Treat each page of an affected book. If the paper is fragile or flaking, or fumigation is required, consult a conservator.
Mould is difficult to treat and even low oxygen and freezing techniques may not be effective. Do not use thymol or other commercial fungicides as it can permanently damage and discolour paper. It is important to seek professional help.
After treating the object and cleaning the previously occupied storage space, ensure there is no recurrence of the conditions that allowed the mould to develop in the first place. Regular, careful cleaning and preventive conservation are the best solutions (see the chapter Mould and Insect Attack in Collections).
Framing
Framing an object can be of benefit if it is done properly. Framing protects paper objects from external hazards like dust and handling and provides a relatively stable environment. Use UV-absorbing acrylic to protect the object from damaging ultra violet light. Great care has to be taken when framing pastels, charcoal or chalk drawings and any work on paper that has flaking paints or a similar friable surface as the electrostatic nature of acrylic can cause damage. UV-absorbing acrylic does not protect against the damaging effects of white light present in daylight and artificial lights. Special precautions should be taken to hang framed works so that they are not adversely affected by such strong light (see the chapter Preventive Conservation: Agents of Decay).
Use archival quality materials for all framing. Never glue framed objects to their backings regardless of the quality of that backing. Different types of boards and papers expand and contract at different rates as the environmental conditions change. This could cause paper to tear or distort. Instead, hinge paper with suitable tapes so that the paper can move freely.
Framed objects should never touch the covering glass or acrylic as this may cause transfer of paint or print media to the glass/acrylic. A margin can be created by using a window mount or spacer inserted into the rebate of the frame.
It is best not to place framed works against external walls as these vary more in temperature and relative humidity than do internal walls. If there is no alternative, attach a spacer to the back of the frame to produce a suitable gap to increase the airflow around the framed work.
Summary
- Maintain high cleaning and hygiene standards.
- Store and display paper in appropriate environmental conditions.
- Maintain relative humidity and temperature ranges of 45 – 55 % and 15 – 25 °C respectively with maximum variations of 5 % and 4 °C within any 24 hour period.
- Keep light levels to maximum values of 50 lux with no or very low UV content (30 to a maximum of 75 µwatts/lumen).
- Do not use adhesive tapes, metal paper clips, pins or fasteners.
- Use only archival quality materials for storage and display.
- Handle objects carefully using cotton or rubber gloves.
- Never hold documents by their corners or pull books by their spines. Always fully support the object.
- Do not lift framed works by their hanging cord or the frame itself – always place hands underneath and on the side of the frame.
- Discuss treatments with a conservator prior to commencing treatment of a paper-based object.
- Always use a reputable conservation framer for mounting works on paper and ask for information about framing methods.
Bibliography
Bass, S., Paper conservation, Information Sheet, Museums Association of Australia, WA Branch.
Canadian Conservation Institute, 1986, Storing works on paper, CCI Notes, 11/2, Ottawa, Canada.
Clapp, A.F., 1987, Curatorial Care of Works of Art on Paper: Basic Procedures for Paper Preservation, Lyons and Burford, New York.
Dobrusskin, S and Banik, G., 1991, Flattening of tracing papers and selected case studies, Course Notes, ICCROM Paper Conservation Course, Austria.
Engel, P., Schirò, J., Larsen, R., Moussakova, E. and Kecskeméti, I., (Eds), 2011, New Approaches to Book and Paper Conservation‑Restoration, Wien/Horn: Verlag Berger, XXIV, 748 S.
Hamburg, D.A., 1992, Library and archival collections, in Caring for Your Collections, The National Committee to Save America’s Cultural Collections, Arthur W. Schultz (Chairman), Harry N. Abrams Inc., New York, pp. 52-63.
Holben Ellis, M., 1992, Works of art on paper, ibid, pp.40-51.
Institute of Paper Conservation, The Paper Conservator and Paper Conservation News, Secretary, Institute of Paper Conservation, PO Box 17, London, WC 1N 2PE, England.
Johnson, A.W., 1988, The Practical Guide to Book Repair and Conservation, Thames and Hudson Ltd, London.
Rickman, C., 1992, Conservation of philatelic materials, in Conference Papers Manchester 1992, Institute of Paper Conservation, G.W. Belton, Lincolnshire
Smith, M.A. and Brown, M.R., 1990, Matting and Hinging of Works of Art on Paper, 2nd Revised Edition, Consultant Press, New York.
S & M Supply Company, 1992, Glossary, Useful Hints, PO Box 4296, Kingston, ACT, 2609.
Wächter, O., 1982, Restaurierung und Erhaltung von Büchern, Archivalien und Graphiken, Herman Böhlaus Nachf. Q.M.B.H., Graz, Austria.
Zetta Florence Pty Ltd, 1995-96, It’s Our Heritage, Zetta Florence Catalogue, PO Box 109, Fitzroy, Victoria, 3064.

