Ceramics
C. Corvaia
Introduction
The term ceramic is used to describe a variety of fired clay objects. The transformation of an earthy substance by fire produces a durable material, examples of which have survived from ancient times until the present.
The basic criteria for categorising ceramics are clay composition, firing process and glazing. Clays are formed from the weathering of metamorphic and igneous rocks in the earth’s crust, by the action of hot gases, chemical and physical erosion. Primary clays are found at their site of formation and are quite pure. China clay for example, is 98 % kaolinite (hydrated aluminium silicate - Al2O3.2SiO2.2H2O). Secondary (or sedimentary) clays are deposited far from their site of origin. They have smaller particles and more impurities which result in higher plasticity and a range of colours. Examples of secondary clays include ball clays, red clays, earthenware clays, marls and fire clays.
Clay minerals have a relatively small particle size and are able to adsorb water chemically. The water acts as a lubricant between clay particles and as the water evaporates, the particles are drawn closer together until a rigid form is created. Fillers, such as sand, ground shells or grog, are added to clay bodies to control shrinkage and aid in shape retention. Fluxes, such as alkaline metal earth oxides, are added to control the fusion point of clay during firing.
The firing cycle includes an initial or biscuit firing of the clay vessel followed by glaze firing. Biscuit firings are usually within the range 900 to 1100 °C. In biscuit firing, chemically bound water is driven off at 400 to 600 °C and the clay particles are joined by sintering. At 800 °C vitrification or the fusion of fluxes and free silica begins and the ceramic attains maximum porosity. At higher firing temperatures, 1100 to 1300 °C, the ceramic undergoes shrinkage and fusion of the clay body continues until all pores are closed.
Glazes, essentially a thin layer of glass fired onto the ceramic ware, are composed of silica, metal oxide fluxes (such as sodium, potassium, calcium, magnesium and lead) and stabilisers (commonly aluminium oxide). The glaze is usually applied to the biscuit ware as a slip (ground ingredients suspended in water) and then fired when dry. Fusion of the glaze begins at 600 °C and the body and glaze of a ceramic start to integrate at 1100 °C. Glaze colourants are produced from metallic compounds and may be applied under the glaze, incorporated into the glaze slip or applied as enamels on glazed ware. Under glaze colours are more durable, whereas the lower firing temperatures of enamels (750 °C) render them more vulnerable to damage.
The major ceramic categories are earthenware, stoneware and porcelain. Earthenware bodies are derived from naturally occurring secondary clays. Low firing temperatures (600 – 1100 °C) produce a porous ware (> 15 % porosity) and a range of colours (yellow, buff, grey, red and brown). Earthenware includes terracotta (usually unglazed red ceramic), ancient and medieval wares, tin glazed earthenware (Majolica, Faience and Delft ware) and transfer printed Creamware.
Stoneware bodies are composed of modified secondary clays, fired to high temperatures of 1200 to 1300 °C to produce a vitrified, hard and durable ceramic. The porosity of stoneware is < 3 % and colours include white, buff, grey and black.
A hard-paste porcelain body is made from 50 % kaolinite, 25 % feldspar and 25 % quartz or flint. It is fired to a high temperature of 1400 °C to produce a vitreous, white, non-porous ceramic with a glassy fracture surface. Porcelain was first made in China and then developed in Europe in 1709. Soft-paste porcelain is fired to a lower temperature (1150 °C) than hard-paste porcelain and is slightly more brittle, more porous and fractures with a grainy texture. Bone china, as developed in the late 18th century in England, contains 50 % bone ash, 25 % kaolinite and 25 % Cornish stone. It is fired to 1250 °C, producing a non-porous, pure white translucent body.
Many further distinctions may be made within these groups according to the type of body, decoration, style or function of the object. It is important to assess ceramic objects before treatment, as the type of ceramic obviously affects the treatment options.
Deterioration
The most common ceramic conservation problems include:
- breakage;
- deterioration of previous repairs;
- flaking painted decoration or glaze;
- soiling or staining;
- loss and cracking; and
- damage from salt efflorescence.
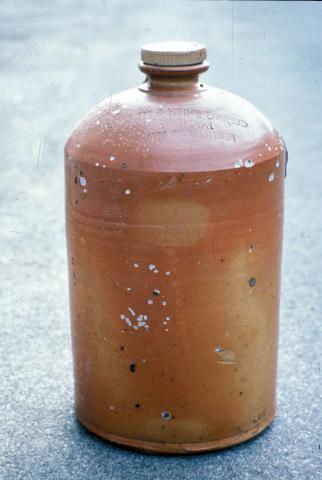
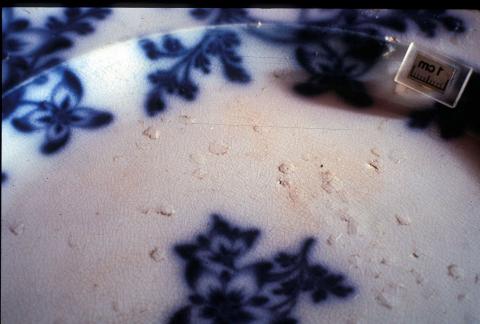
Damage from salt contamination may occur in unwashed objects recovered from buried or underwater sites. As the object dries, chloride and sulphate salts form crystals which expand and break up the ceramic. Signs of salt damage are white crystals on the surface, shallow pits on the ceramic body or missing spots of glaze (Figure 1).
Figure 1: (a) Surface damage due to salt contamination on a small ceramic jar.
(b) A ceramic plate that also has surface damage due to contamination from salt.
Preventive Conservation
Environment
Ceramics are generally less sensitive to extremes or fluctuations in environmental conditions than materials like paper, wood and ivory. As this applies only to objects in good condition however, it is wise to protect all ceramics by storing or displaying them in a stable environment, with temperatures in the range 15 - 25 °C and within a relative humidity range of 40 - 60 %. Limit temperature and relative humidity fluctuations to 4 °C and 5 % respectively within any 24 hour period.
Extremes, or sudden changes in temperature and relative humidity levels may cause susceptible ceramics and glazes to crack. Adhesives used for repairs may also be adversely affected. If an object has been contaminated by soluble salts, fluctuations in relative humidity may cause disruption to the clay fabric and glaze as the salts either crystallise or redissolve.
Avoid heat build-up from lighting sources. For display, place lighting outside showcases and if possible direct light onto ceramic objects by reflection rather than direct illumination.
Handling
Take care when handling ceramic materials as they are often fragile and easily broken. Observe the following guidelines when handling ceramics:
- avoid unnecessary handling;
- use clean, bare hands or disposable rubber gloves;
- check for any breakages, cracks or old repairs;
- remove any loose parts such as lids before moving;
- do not pick up objects by handles or protruding parts;
- carry only one object at a time. Place one hand underneath the base and use the other hand to support the side of the object; and
- if a quantity of objects need to be moved, use a tray lined with bubble wrap, a thick, clean towel, cottonwool or crumpled tissue paper and pad between each object.
Storage and Display
Protect ceramic objects against dust, harmful vapours and physical damage in storage. Achieve these aims by:
- storing ceramic objects in boxes, closed cupboards or on shelves that are not subject to vibration, jarring or shock;
- keeping objects clearly visible and accessible so that handling is minimised;
- using metal cabinets in preference to unsealed wooden cupboards or display cases. These latter units may emit organic acid vapours which are harmful to low-fired, unglazed ceramic objects;
- padding objects in boxes with bubble wrap or acid-free tissue paper;
- lining shelves with inert polyethylene foam sheet or acid-free paper and leaving enough space around each object for easy access; and
- not stacking objects. If stacking is unavoidable, as in the case of plates, separate objects with acid-free paper that has been cut to size and limit the height of the stack.
If using wooden or wood-based composites for storage and display, seal them appropriately (see the chapter Preventive Conservation: Agents of Decay).
Treatments
Examination
Before beginning any treatment, thoroughly examine the ceramic, noting:
- the condition of the ceramic body;
- the extent of previous repairs;
- any unfired decoration or blistering, weak and flaking glaze; and
- the presence of stains and residues.
Pay particular attention to any unfired decoration or weak and flaking glaze, because if these are undetected they could be damaged during treatment. Note the presence of any stains and residues as these indicate the history and use of an object and, depending on their significance, it may be appropriate to retain them. Use notes, drawings and photographs to document the condition of the ceramic before it is treated. Record all observations and pertinent investigations.
Cleaning
As cleaning removes dirt which could otherwise be embedded further during subsequent treatment stages, it is usually the first stage of a conservation treatment. Cleaning techniques which may be applied to ceramics include:
- brushing;
- vacuuming;
- wiping with damp swabs; and
- wet chemical cleaning.
Start the cleaning process by using the most gentle and least toxic materials. Always attempt dry cleaning before wet or chemical cleaning. Remove loose dirt using a brush and gentle vacuum suction. Wooden sticks will remove accretions and some of the more stubborn dirt. Do not use metal probes as they are likely to cause damage.
Do not wash objects with flaking glaze or soluble painted decoration and if extremely fragile do not brush them. Clean robust sections of vitrified glaze on such objects using damp swabs. Never fully immerse ceramics in water, as cracks in the glaze could retain water, leading to further damage.
Test any solvents to be used on an inconspicuous area and on decoration or gilding before application.
Some dirt can be removed using cotton swabs moistened in distilled or deionised water. Roll the swabs over the surface. Do not scrub them back and forth. To remove grime, use a solution containing a few drops of a concentrated, non-ionic detergent (such as Lissapol) in water (100 ml).
Alternatively, prepare and use a pure soap solution as outlined below:
- dissolve one gram (about one teaspoon) of pure soap flakes in a little hot water;
- add enough cold water to make a total of one litre of solution;
- add 100 ml of soap solution to 100 ml of water;
- apply with a cotton swab by rolling over the ceramic surface; and
- remove detergent or soap residues using cotton swabs moistened with distilled water.
This method is particularly suited to small intricate objects and porous, unglazed ceramics.
Poulticing
Poulticing is also suitable for cleaning porous, unglazed ceramics. The steps in preparing and applying a poultice are detailed below:
- tear acid-free blotting paper into small pieces;
- wet the paper with distilled water;
- mash the wet paper blend to make a pulp. A heavy-duty domestic blender is a very effective ‘masher’. Note that a large amount of water needs to be added to the paper for correct functioning of the blender (about 300 ml of wet paper to 1500 ml of water);
- drain excess water from the poultice, using either a strainer or hands, before applying;
- cover the ceramic surface with an acid-free tissue to avoid the paper pulp becoming trapped in the ceramic pores;
- apply the poultice. As it dries it absorbs dirt from the pores of the ceramic;
- cover the poultice with a polyethylene sheet if the relative humidity is low. A poultice which dries too quickly may not be effective;
- leave the poultice to dry completely and fall away; and
- several applications may be required to clean the ceramic surface satisfactorily.
Wash ceramics which are sound, glazed or less porous using a more conventional method, as outlined below:
- use a large plastic container or line a sink with towels and wash only one object at a time;
- use cold or warm water (1 L) which contains either a concentrated, non ionic detergent (1 ml or 0.25 teaspoon) or 100 ml of soap solution (see above for preparation);
- use small brushes to remove stubborn dirt;
- rinse the ceramic thoroughly with distilled water; and
- drain the ceramic on cloth or paper towelling and dry it with a soft cloth.
Stain Removal
Always test potential solvents on an inconspicuous part of the ceramic to ensure that they have no adverse effects. Try solvents such as methylated spirits, alcohol and acetone on stubborn stains. Apply these with cotton swabs. If using acetone, take care, avoid contact with skin, wear eye protection and do not inhale the vapours.
On porous, unglazed ceramic surfaces, use a paper poultice prepared with tissue paper and the chosen solvent. To slow the evaporation of the solvent, cover the poultice layer with plastic film.
Remove stains found in the bottom of old tea cups and in cracks by using oxygen-releasing detergent powders. These powders, which are often marked ‘Contains Oxygen Bleach’, contain sodium perborate, which is converted to hydrogen peroxide in water. To remove these stains:
- prepare a 2 % solution by dissolving 20 g of powder (about one tablespoon) in 1 L of water;
- leave the porcelain or other glazed ceramic in the solution for about two hours;
- check the object periodically, brushing the stained area gently at these times;
- begin the treatment in the morning and continue until the stain is removed;
- if necessary, store the ceramic in clean water overnight and place it in fresh bleaching solution the following day;
- when the stain has been removed, rinse the object thoroughly by soaking it in distilled water for two hours; and
- drain and dry the ceramic.
Although it is more expensive than the oxygen-releasing detergent powders and has a limited shelf life, hydrogen peroxide is effective in removing stubborn stains from porcelain. Always test decorative elements first to make sure they will not be affected. If there are no adverse effects then apply hydrogen peroxide as described below:
- pre-soak the porcelain in distilled water before applying the hydrogen peroxide;
- lightly roll some cotton wool and soak it in 3 % v/v hydrogen peroxide. Up to 30 % hydrogen peroxide solution may be used;
- place the swab directly over the stain, leaving it in place for two or three hours;
- check periodically, repeating the process until the stain is removed;
- if the treatment needs to continue the following day, place the porcelain in water overnight and then continue the application of hydrogen peroxide until the stain is removed;
- rinse the porcelain thoroughly by leaving it to soak for two hours in distilled water; and
- allow the porcelain to drain and dry.
As hydrogen peroxide is a very powerful oxidising agent, wear rubber gloves and eye protection when using it.
Copper and iron stains may result from clamps or dowels used in old repairs or from contamination on burial sites. Removing these stains is difficult and requires the use of stronger chemicals. Consult a conservator before attempting treatment of these types of stains.
Desalination
If a ceramic shows signs of salt damage (see Deterioration earlier) it must be desalinated. For ceramics with a friable surface, poulticing is recommended, rather than washing. Apply a fine tissue that will not ‘catch’ on the ceramic surface before the paper pulp is applied (see Poulticing above). In the case of very friable ceramics seek advice from a conservator.
Porous ceramics whose surface is not friable should be wet gradually to avoid further damage. This may be achieved by:
- placing the object in a large plastic container, adding enough tap water to cover the base of the ceramic and covering the container with a tight-fitting lid;
- check the ceramic periodically;
- water will be drawn up into the ceramic by capillary action, allowing air to escape;
- add more water, up to the ‘wet mark’ on the ceramic; and
- continue this process until the object is submerged. Desalination then proceeds.
Keep objects wet that have been recovered from damp burial (terrestrial) or underwater sites until desalination can begin. Transport them in individual, sealed polyethylene bags, with some wet sand or water to cushion them. Place the bags in rigid containers, then transfer the objects to plastic containers, buckets or tubs for treatment. Keep containers covered to avoid evaporation of the wash solution.
Desalinate ceramics recovered from marine sites by following the regime below:
- place the ceramic in a 50:50 seawater/tap water solution for two weeks;
- transfer to pure tap water and leave for four weeks;
- transfer to distilled or deionised water and wash until no more chloride salts are released. This will involve periodic changes of solution after several months in each bath; and
- if slime forms on the ceramic, indicating that bacteria are active, add a biocide to the wash solution. Consult a conservator if bacterial contamination is suspected.
The time required to complete desalination varies greatly from object to object. Ideally the chloride content of the solutions should be monitored and the solutions changed when the chloride levels in solution have stabilised. This process requires access to sophisticated equipment. A simpler approach is described below.
As a general guide, test for chloride salts each month and change the solutions if salts are present in the wash solution. To test for chloride salts, use the following procedure:
- place 2 ml of wash solution in a test tube;
- add two drops of 10 % w/v nitric acid to the wash solution;
- add two drops of silver nitrate solution to the nitric acid/wash solution. The silver nitrate solution is prepared by dissolving about 15 g of silver nitrate in 100 ml of distilled water;
- if a white precipitate forms, then chloride salts are present. Change the wash solution and continue desalination for a further month; and
- continue washing until tests show that no chlorides are present (four to five months in most cases).
Previous Restorations
Previous restoration attempts may be indicated by the presence of large metal staples, dowels, glues, resins and fills. Staples and dowels are usually left in place as removing them can cause damage. If, however, they are corroding and damaging the ceramic, treat them to stop the corrosion or remove them. Contact a conservator for advice on the most appropriate procedure.
Adhesive repairs and residues are usually apparent as they often become yellow and unsightly over the years. Some common adhesives used to repair ceramics include starch paste, animal glues, shellac, cellulose nitrate, soluble nylon, epoxies and emulsions such as PVA. Depending on the type used, old adhesives can often be redissolved. Unfortunately the solubilities of many adhesives change as they age. Soluble nylon, for instance, is probably better referred to as insoluble nylon! Comprehensive information regarding the preparation and properties of consolidants, adhesives and coatings is provided elsewhere (Horie 1987).
A conservator can provide advice regarding adhesive type and solubility. If solvents are used to soften or dissolve adhesives, always test painted surfaces to make sure they will not be affected.
To test the solubility of an old adhesive, follow these steps:
- carefully cut a small chip of adhesive with a sharp scalpel;
- place it in a covered glass container;
- soak it in water initially;
- if the adhesive does not dissolve in cold water then try warm water, alcohol (ethanol) or methylated spirits (95% ethanol and 5% methanol) and acetone (in that order);
- stronger solvents are needed to soften and/or dissolve adhesives like epoxy resins. Consult a conservator before attempting to remove these adhesive types; and
- if a chip of adhesive cannot be removed then apply the solvent to an exposed spot of adhesive and note its effect.
Take the usual precautions (rubber gloves, eye protection and non-inhalation of vapours) when using organic solvents such as acetone and alcohols.
To dismantle an old repair, try the following techniques:
- work on a padded surface, or line a container so that pieces that fall apart will not be further damaged;
- keep an accurate record of each fragment’s position in the ceramic so that subsequent reconstruction will be easier;
- paint the solvent repeatedly over the joins while very gently manipulating the fragments to test for any movement;
- when using alcohol, methylated spirits or acetone, cover the joins with cotton wool wicks soaked in solvent. Place the object in a plastic container with a tight fitting lid;
- clean excess adhesive from the edges of separated fragments while the adhesive is still soft (use a stiff brush dipped in solvent or a sharpened stick). Take care not to remove any of the clay fabric; and
- leave fragments to dry.
If it is necessary to completely immerse the join in solvent, wet the porous ceramic gradually. Avoid full immersion in acetone or alcohol if possible, due to the cost and exposure to the solvents themselves. Consult a conservator if this step is deemed necessary.
Joining
Adhesives selected for joining ceramics should be reversible and have good ageing properties. They should be able to be redissolved if necessary, should not yellow, become brittle or lose adhesion with age.
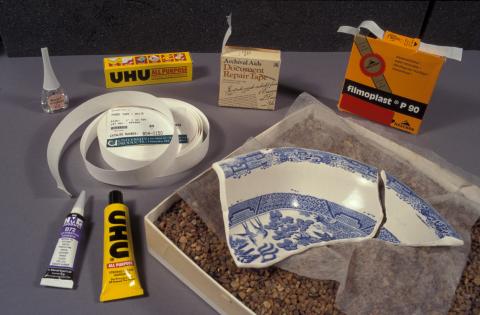
Certain acrylic and polyvinyl acetate adhesives meet the above criteria and are suitable for ceramic repairs. Paraloid B-72, an ethyl methacrylate and methyl acrylate copolymer, has been used widely (Koob 1986) and UHU All Purpose Adhesive, a polyvinyl ester, has shown good results. Both adhesives can be removed or diluted with acetone. Paraloid B-72 is available from conservation materials suppliers and UHU All Purpose Adhesive is available from art materials or stationery suppliers.
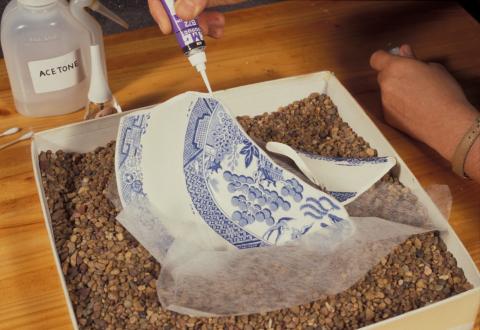
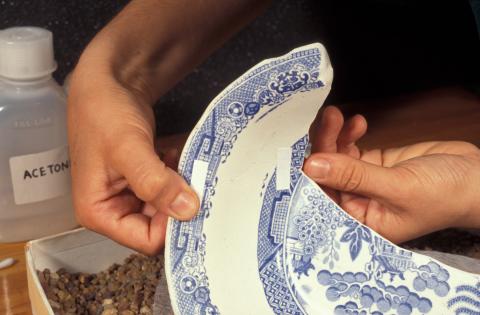
Joining fragments requires both skill and patience, as illustrated in the following procedure (see also Figure 2):
- have a practice run of the joining sequence, holding the fragments together with tape (no adhesive). Record the joining sequence to ensure that no fragments are locked out of the structure (see below for more details);
- degrease all broken edges before joining. Apply methylated spirits (or alcohol) with a small cotton swab. Take care to remove any cotton fibres that may cling to the broken edges;
- prime porous ceramic fragments with a dilute adhesive solution before joining together. Dilute the adhesive with an appropriate solvent by mixing one part adhesive to four parts solvent. Brush the dilute solution over all broken edges and allow to dry;
- to repair a broken ceramic vessel commence by joining the base fragments and proceed upwards;
- small fragments can often be joined together first to make a few large fragments which can ultimately be fitted together;
- use a sand tray to support ceramic fragments while the adhesive dries. Use only clean white sand and place a piece of soft tissue under the ceramic;
- stand the larger of the two fragments being joined in the sand - the weight of the other fragment (if correctly balanced) will tighten the join;
- select two fragments to be joined and apply adhesive along the centre of one edge;
- push the fragments together and pull apart slightly to check for an even distribution of adhesive;
- press the fragments together and manipulate to get the correct position. Running a fingernail across the join can help to check for a good fit;
- should the join need realigning, apply solvent with a brush to soften the adhesive and allow time for adjustments;
- remove excess adhesive while still wet, or semi-dry, with an appropriate solvent or if necessary with a sharp scalpel when dry. Apply a minimum amount of solvent to prevent weakening of the join; and
- apply a suitable tape across the join, on both sides of the ceramic and leave the fragments supported in a sand tray until the adhesive sets.
Work methodically so that fragments are not locked out at the end of reconstruction. A practice run of the joining sequence should ensure this. Use a tape which will not bond too strongly to the ceramic for the test run. By doing this no adhesive residue will be left behind nor will the ceramic surface be damaged when the tape is removed.
Figure 2: Repair of a ceramic dish
(a) The materials used for the repair.
(b) Application of Paraloid B-72 adhesive to the broken sides of the dish.
(c) Adhesive tape holding parts of the ceramic dish together until the adhesive sets.
Some of the self-adhesive (pressure-sensitive) tapes available from stationery or art suppliers are suitable. Archival quality paper tapes, which are self adhesive and pressure sensitive, are preferable but these are only available from conservation materials’ suppliers. They range from strong, thick paper tapes, such as Filmoplast P90 and Tyvek Tape, to finer tissue paper tapes, such as Document Repair Tape and Filmoplast P. Do not apply tape to fragile glazes, painted decoration or friable, unglazed ceramics.
Dowelling is not generally recommended as it involves removing part of the object by drilling holes. If an object is too heavy to be joined with an adhesive, display it on a support which holds fragments as if they are joined.
Gap filling is not always necessary, as there is some tolerance for loss in artefacts. If ceramic loss is visually disturbing or provides structural problems, filling may be carried out. Note that the aim should not be to make the object look new. Restrict filling and in-painting to areas of loss and do not cover original parts of the object. As filling and in-painting require considerable practice, seek advice from a conservator if you consider these treatments necessary.
Summary
- Maintain ceramics in a stable environment with temperatures in the range 15 - 25 °C, within a relative humidity range of 40 - 60 % and with maximum variations of 4 °C and 5 % respectively within any 24 hour period.
- Avoid extremes or sudden changes in temperature and relative humidity to minimise damage to glaze, ceramic or adhesives.
- Store in a stable dust-free environment. Avoid stacking.
- Handle carefully, with disposable rubber gloves or clean, bare hands.
- Carry objects one at a time, with support provided at the base and side. Use a padded tray to carry a group of objects.
- Examine and document objects thoroughly before beginning cleaning or other treatment.
- Use dry cleaning methods before wet or chemical treatments. Test water, solvents and any other chemicals which come into contact with ceramic materials, on an inconspicuous part of the object.
- Desalinate objects recovered from burial or marine sites. Do not allow objects to dry before desalination is complete.
- For repairs, choose adhesives that are reversible and have good ageing properties. Methodically plan and execute the joining of broken ceramics.
Bibliography
Buys, S. and Oakley, V., 1993, Conservation and Restoration of Ceramics, Butterworth-Heinemann, Oxford.
Craft, M., 1992, Decorative arts, in Caring for Your Collections, National Committee to Save America’s Cultural Collections, Arthur W. Schultz (Chairman), Harry N Abrams Inc., New York, pp. 96-107.
Horie, C. V., 1987, Materials for Conservation, Butterworths, London.
Koob, S., 1986, The use of Paraloid B-72 as an adhesive: its application for archaeological ceramics and other materials, Studies in Conservation, vol. 31, pp. 7-14.
Little, M., 2000, in The Winterthur Guide to Caring for Your Collection. Chapter 5: Ceramics and Glass, Landrey, G. J. (Ed.), London: University Press of New England. pp. 57–66.
Newton, C. and Logan, J., 1990 (revised 1997, 2007), Care of Ceramics and Glass - Canadian Conservation Institute (CCI) Notes 5/1, Canada.
Williams, N., 2002, Porcelain: repair and restoration, a handbook, London: The British Museum Press.

