Photographs
I. M. Godfrey and D. Gilroy
Introduction
The camera obscura described by Leonardo da Vinci in his notebooks had been used by artists for centuries as an aid to sketching landscapes. The effects of light on silver salts had also been known for some time. In the 1820s Frenchman Joseph Niépce produced images which he called heliographs using bitumen on a pewter plate. The first photograph, taken in 1826, needed an eight-hour exposure. It was not until the mid-1830s however, that the French scenic painter Louis Daguerre discovered a practical method of producing a photograph.
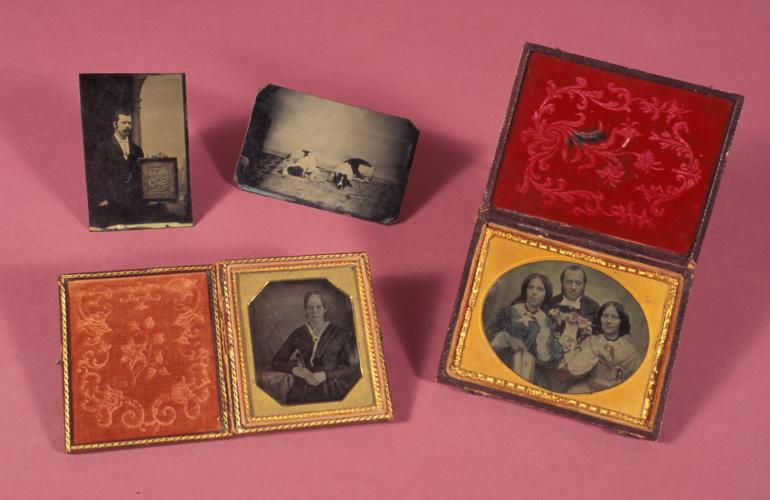
In the early 1830s Thomas Wedgewood experimented with making images using silver salts on paper and in 1835 Daguerre achieved a major breakthrough. By accident (a broken thermometer) he discovered that mercury fumes were able to develop a latent image on an exposed silver plate that had been sensitised with iodine. By 1837 he had developed a working process and in 1839 he formally announced his discovery. The images produced by this process became known as daguerreotypes (Figure 1).
Figure 1: A display of different photo techniques. Clockwise: Tintype; Daguerrotype; Ambrotype.
Daguerre’s work prompted Fox Talbot, an English gentleman scientist, to present papers on his own discoveries. In 1835, at the same time as Daguerre, he had produced negative images on silver sensitised paper which he called calotypes. On hearing of Daguerre’s discovery he sought to improve on his imperfect images. Eventually, in 1840 he was able to produce a paper negative from which a positive paper print could be made. These he called photogenic drawings. Also at this time another Frenchman, Hippolyte Bayard, was experimenting with sensitised paper prints, exhibiting them on June 24 1839, before either Daguerre’s or Talbot’s methods were announced.
The French Government offered Daguerre a lifetime pension if he would reveal the details of his discovery. This he did in August 1839. The process was offered free of charge throughout the world, except in England where patents were enforced.
The daguerreotype was far superior to the calotype in detail and was far more popular. The advantage of the calotype, allowing a number of copies to be made from one negative, was outweighed by the fact that it could not match the quality of the daguerreotype.
The major drawbacks of Daguerre’s method were the cost and its inability to produce multiple copies. The product was a direct positive, being exposed in the camera and then developed to produce a one-off positive image. If a second copy was required then a second sitting had to be arranged and the same price paid.
In 1851 the English sculptor and photographer Frederick Scott Archer started using collodion, a mixture of gun cotton (cellulose nitrate) and ether on glass photographic plates. A negative image could be produced if a glass plate was coated with collodion and sensitised with silver nitrate and potassium iodide, exposed and then developed while still wet or tacky. The resultant image was of greater sensitivity than either the daguerreotype or the calotype. When this image was backed with a black card a positive image was produced. This new photographic method was called the ambrotype and it rapidly superseded the daguerreotype and the calotype.
A cheaper offshoot of the collodion process was the tintype or ferrotype. Despite its name it was iron and not tin that was used in this process. A sheet of iron was coated with tacky collodion and exposed in the camera while still wet. It was then developed, fixed, dried and varnished. Popular from the late 1850s, it was used by travelling photographers until the 1940s.
It was the wet plate negative however, that dominated photography till the 1880s. When contact printed onto albumen paper and toned the result was a lovely warm, purple-brown image.
The development of the gelatin dry plate in 1880 and its use on paper signalled the end for the wet plate and albumen process. The gelatin negative and positive system became the basis of modern photography.
Photographic applications have become as diverse as its practitioners. There are photo-ceramics, photo-jewellery, cloth prints and prints on glass, leather, metal and ivory. There are also photo-mechanical processes, pigment prints and numerous colour processes. Despite the proliferation of photographic formats, this chapter focuses on those formats that are most commonly found in major collections and those in smaller institutions and private hands. The main photographic types normally found in collections are outlined in the section below.
Photographic Processes
Knowledge of photographic processes and their features is important in order to identify photographs. This knowledge allows those responsible for their care and preservation to:
- determine the most appropriate environmental conditions and storage requirements for particular photographs;
- differentiate between originals and copies; and
- separate cellulose nitrates and acetates from other photographic materials to minimise damage to entire collections.
Daguerreotype (1839 - 1860s)
Direct Positive
The process of producing a daguerrotype involved the following:
- a thin silver sheet was sweated onto a copper plate and then highly polished;
- after sensitising with iodine vapour the plate was exposed in the camera; and
- the latent image was then developed using mercury fumes.
Because the image was easily damaged daguerreotypes were housed behind glass with attractive brass mounts and leather-covered cases. Plastic cases, known as union cases, were introduced in 1854. These cases were made by heating and pressing a mixture of gum shellac and sawdust (or other fibrous material) into moulds, making this the first commercial example of a thermosetting plastic.
Daguerreotypes are recognised by their silver surface, sometimes being called the ‘mirror with a memory’.
Calotype (1840 - 1860s)
In its strictest sense the term calotype refers to the negative produced when a silver-sensitised sheet of paper is exposed in a camera. The positive prints produced from this negative, often called calotype prints or salted prints, lacked detail due to the paper fibres which produced a fuzzy appearance.
Salted Prints (1840 - 1860s)
Salted prints have the following features:
- good quality paper was coated with light-sensitive silver salts and printed out in sunlight to produce the image; and
- prints from glass negatives gave a sharper image than those from a paper negative.
Although the image was initially fixed using a strong salt solution, sodium thiosulphate (hypo) was used after 1841. The hypo dissolved out unexposed silver chloride producing a brighter image.
Ambrotype (1851 - 1870s)
Direct Positive
An offshoot of the wet collodion process, the ambrotype is an underexposed negative with a black backing. This backing gives it a positive appearance. Ambrotypes were packaged the same way as daguerreotypes, behind glass within a gilded, leather-embossed case.
Tintype (1852 - 1940s)
Direct Positive
Similar to the ambrotype, the tintype is in fact a sheet of japanned iron, coated with a sensitised collodion emulsion. Exposed in the camera and then immediately developed, the tintype exhibits a dull positive image with creamy highlights.
Although sometimes mounted in the same manner as ambrotypes and daguerreotypes tintypes were more commonly mounted in cards or albums. They are found in a range of sizes right down to buttonhole size. Abraham Lincoln’s presidential election campaign used his image on a tintype badge.
Wet Plate Process (1851 - 1880s)
Collodion Negative
Features of the wet plate process include the following:
- a glass sheet coated with collodion and sensitised with potassium iodide and silver nitrate was exposed in the camera while still wet;
- developed immediately after exposure the resulting negative produced fine detail;
- if allowed to dry before exposure a lot of sensitivity is lost; and
- the wet plate is identifiable by its creamy-grey appearance.
Most commonly used in conjunction with albumen paper to produce prints, it was very popular until the introduction of the gelatin dry plate in 1880. The fumes from preparing and exposing the wet plate affected photographers’ health.
Albumen Print (1850 - 1920s)
The albumen print:
- is coated with light sensitive silver salts and egg white solution;
- was normally produced by contact printing in daylight from a wet plate negative; and
- the image has yellow highlights with reddish-brown higher density areas.
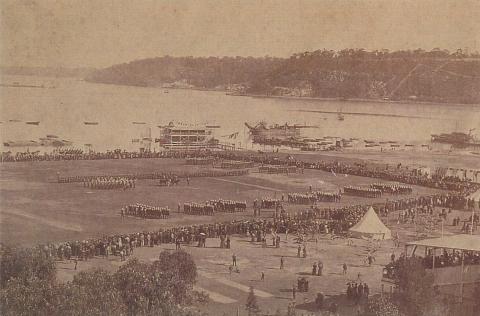
The albumen print (Figure 2) is the photograph most often found before the turn of the century. Most visiting cards are albumen prints. Although it was still used until the 1920s, the albumen process effectively went into decline after 1880.
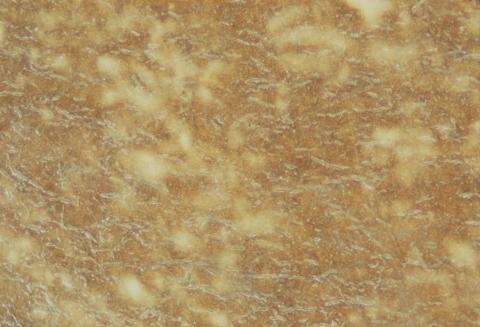
Figure 2: (a) Albumen print of the Swan River, Perth, Western Australia c 1897.
(b) Close-up of the surface showing paper fibres below the emulsion.
Gelatin Dry Plate Negative (1880 - Present)
In the 1870s Dr Leach Maddox developed the gelatin emulsion, which is the basis of modern photography. The gelatin plate needed no sensitising by the user and it came packaged ready to be exposed. This ease of use meant it quickly supplanted the wet plate method and glass plates. It was in common usage until recent times.
Gelatin Paper Prints (1880 - Present)
The advances made during the 1870s with gelatin emulsion resulted in the preparation of a gelatin bromide developing out paper. Developing out paper uses a chemical solution to produce a black and white image which is developed using artificial light in a darkroom.
It was not popular with photographers who were geared to printing out paper and the warm tones they produced. Printing out papers are contact printed using daylight and the particle size of the silver in these images is very small. This tends to scatter the light that hits them, giving the image its characteristic warm tone. Once the image density was satisfactory it was then fixed. The silver in developing out paper is larger than in printing out paper and produces an image that exhibits a neutral hue.
The introduction of a baryta layer (barium sulphate mixed with gelatin) below the gelatin layer added brilliance to the print. Gelatin printing out paper rapidly replaced both albumen and collodion printing out paper as the preferred print material. Improved sensitivity and speed in papers in the early 1900s increased demand for developing out papers and by 1920 printing out paper was rarely used.
Platinum Prints (1880 - 1920s)
Platinum prints:
- were admired for their tonal range and soft image;
- did not fade; and
- were usually steel-grey in colour but prints could be produced with a brown tone.
As platinum became increasingly expensive in the early 1900s, imitations were manufactured using silver-gelatin and also collodion. As the paper fibres of the platinum print are discernible under low magnification microscopic examination, it is easy to differentiate an original from a copy.
Collodion Prints (1880 - 1920)
Collodion prints exhibited the following characteristics:
- the same high gloss and reddish-brown tones as gelatin printing out paper;
- could be manufactured with a matt finish to imitate platinum prints. With gold and then platinum toning the image is very stable and this, coupled with its resistance to moisture, means that these prints have resisted fading extremely well; and
- are easily distinguished from platinum prints as they have a baryta layer below the emulsion. The paper fibres are not visible under microscopic examination.
Cyanotypes (1880 – 1920)
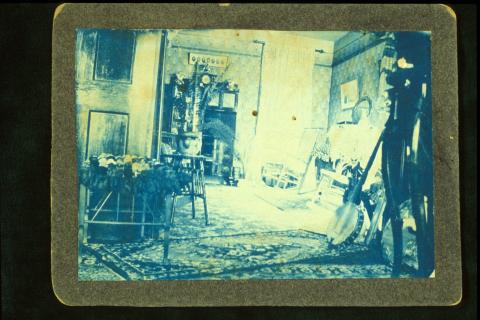
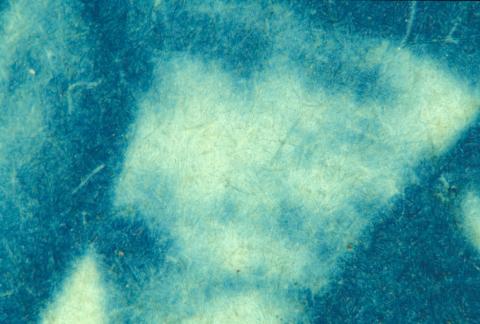
Originally developed in the 1840s this process was soon forgotten, only to reappear some 40 years later. Its bright blue appearance meant it never really gained widespread popularity and its main claim to fame was its use in the reproduction of engineers’ drawings. From this came the term ‘blueprint’ (Figure 3).
Figure 3: (a) Cyanotype c 1890.
(b) Close-up of the surface showing the image within the paper fibres.
Celluloid (Cellulose Nitrate) (1889 - 1950)
A refinement of Alexander Parkes’ 1861 invention, cellulose nitrate film was coated with a silver gelatin emulsion. Available in both sheet and roll format, eventually it was to dominate as the preferred negative material.
Using roll film in a suitably controlled camera, it was possible to expose a number of negatives rapidly. The smaller size of these negatives necessitated the use of developing out paper material, signalling the end of the glass plate and the printing out paper method of photography.
Cellulose Acetate (1930 - 1960s)
The inherent instability and flammability of cellulose nitrate resulted in the production of cellulose acetate ‘safety film’. This was in turn superseded by cellulose triacetate film (1950) which in turn was overtaken by polyester (1965).
Photomechanical Processes
Photomechanical prints include:
- collotype (1870 on);
- photogravure (1880 on); and
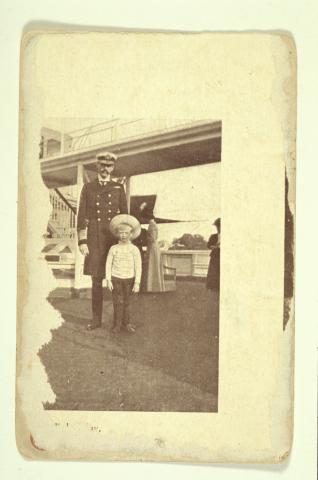
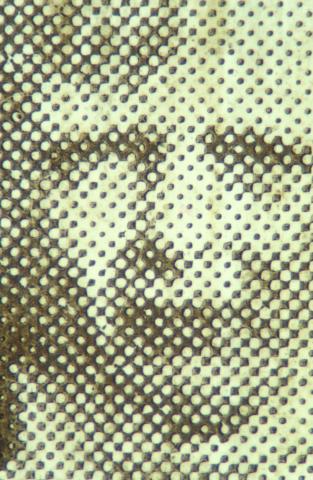
- letterpress half-tone (1885 on, Figure 4).
They are not true photographs as they have no emulsion and are printed by machine. Low magnification shows up the printed pattern.
Figure 4: (a) Postcard – letterpress half-tone.
(b) Detail of the child’s face showing the dot pattern.
Pigment Prints
Using inorganic pigments and the reaction of bichromates to render gelatin or gum arabic insoluble, these prints do not fade. Although a large range of pigments could be used, the colours chosen were normally warm chocolate browns.
Examples of pigment prints include:
- carbon print (1860 - 1930s);
- gum bichromate (1890 - 1930s); and
- woodburytype (1865 - 1890s).
The woodburytype was an early photomechanical process that used pigmented gelatin to produce the image.
Opaltypes (1880 – 1920)
Opaltypes (Figure 5) are characterised by:
- a positive image on milky white glass;
- many are hand tinted or retouched; and
- the image layer can be either carbon, silver-gelatin or platinum.
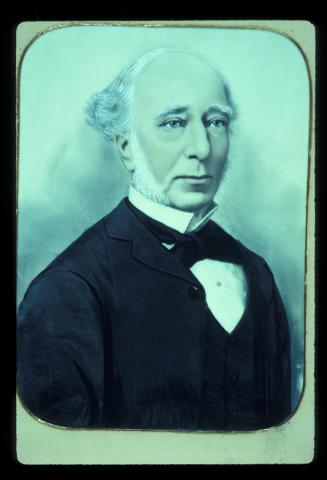
Figure 5: Opaltype – hand-tinted image on opal glass c 1890.
Lantern Slides (1851 - 1900)
Lantern slides can be identified by the following:
- the emulsion layer can be either collodion, albumen, carbon pigment or silver-gelatin;
- these were often tinted or hand painted; and
- the slide was usually formed by sandwiching two sheets of glass together to protect the image.
Stereograph (1851 - 1920)
Although there are examples of stereoscopic daguerreotypes and calotypes, the vast majority of these images are in the form of albumen prints. Silver-gelatin and collodion prints were also produced in stereographic pairs.
Photo-ceramic (Photo Enamel) (1950s - Present)
The photo-ceramic process involves:
- using pigments in a variety of ways to produce an image on porcelain or metal;
- the image is sealed by glazing; and
- the images do not fade.
Colour (1860s - Present)
Hand-colouring of images began at the inception of photography. There are many fine examples of early hand-tinted daguerreotypes, ambrotypes, prints and emulsions of all sorts. Before 1900 all colour photography involved either hand-tinting, pigment prints or photomechanical processes. In 1904 the Lumière brothers invented the autochrome process, an additive process, but it was not until 1935 that the modern era of colour photography started with the introduction of Kodachrome films.
A few of the major developments of colour processes are listed below.
- carbon print (1860s - 1930s);
- gum bichromate (1890s - 1930s);
- collotype-photomechanical (1868 - present);
- autochrome-additive process (1904 - 1940s);
- modern colour photography (1935 - present);
- instant colour process (1963 – present, Polaroid); and
- digital output photography - electrostatic, ink jet and dye sublimation prints (1985 – present)
A tabular summary and guide to the identification of the various photographic processes is provided in Appendix 7.
Structure of Photographs
Photographs are made up of:
- a support – usually glass, plastic, paper or metal;
- a binder/emulsion layer – albumen, collodion or gelatin; and
- the final image material – suspended silver, platinum, colour dyes or pigments in the emulsion/binder layer.
The composite nature of photographs complicates their care as the respective needs of the various components must be catered for. The paper support for instance will be strongly affected by fluctuations in relative humidity levels, the binder may shrink or crack if the relative humidity is too low and the dyes may be affected by inappropriate light levels (see Deterioration/Conservation next).
Deterioration/Conservation
In order to appropriately care for photographic collections, it is necessary to:
- identify and document all photographic materials in a collection;
- examine each of the photographs and assess their respective conditions; and
- determine the most appropriate environmental conditions and storage/housing for all photographs in a collection.
General Considerations
The major factors that influence the deterioration of photographic materials are (Robb 2004):
- storage or display in inappropriate environmental conditions;
- the use of poor storage enclosures or housings;
- rough or careless handling; and
- poor processing techniques in the original production of some photographs (e.g. the presence of residual processing chemicals and the use of exhausted processing chemicals).
Unless a particular photograph or photographs are of major significance it is far better to focus attention and resources on improving preventive conservation measures than on costly conservation treatments of deteriorated photographs. Aim to improve the environments to which photographs are exposed, encourage appropriate care and handling practices and use archival quality materials for storing and displaying photographs.
Significant silver deterioration will occur if photographs are not correctly processed and washed. For example, if the image is not well fixed it will eventually blacken, while if residual fixer has been left then the silver image may fade accompanied by yellowing of the image, binder and support (Robb 2004).
In addition to suffering the same problems as other paper-based materials, photographic images have other in-built problems. Some of these problems include:
- the emulsion layer is particularly attractive to insects as a food source;
- gelatin emulsions are very susceptible to mould attack caused by high humidity;
- continual changes in relative humidity may cause silver mirroring;
- images on glass are easily scratched; and
- tinted emulsions may fade due to prolonged exposure to light.
The environment to which photographic materials are exposed is critical to their longevity and preservation. The damaging effects of light are well known. Keep light exposures at 50 lux or less with minimal exposure to UV radiation.
The effects of varying relative humidity levels are manifold. For example, high relative humidity levels may soften gelatin while low relative humidity levels may cause binders to shrink and crack and overall flexibility to be reduced. Dyes deteriorate four times faster at 60 % relative humidity than at 15 % relative humidity and halving the relative humidity at which cellulose triacetate bases are stored doubles their life expectancy (Lavédrine 2003). Many ink jet prints are particularly susceptible to damage if relative humidity levels exceed 50 %.
For a mixed collection of historical photographic prints, slides and negatives, or if the collection comprises only photographs, keep the relative humidity in the range 30 – 40 % with only a 5 % daily variation. Higher levels of relative humidity can be tolerated if lower storage temperatures are maintained (Table 1, Robb 2004).
Table 1: Relationship between storage temperatures and acceptable relative humidity levels:
| Storage temperature | Acceptable relative humidity levels |
|---|---|
| 7 °C | 20 – 30 % |
| - 3 °C | 20 – 40% |
| - 10 °C | 20 – 50 % |
Temperature control is also critical as higher temperatures will accelerate degradation processes. For extended storage aimed at long-term preservation, cellulose nitrate, cellulose acetate and chromogenic dye photographs require cool (10 – 16 °C), cold (2 – 8 °C) or freezing conditions (less than 0 °C). Use vapour-proof packaging to avoid increased relative humidity levels and condensation during low temperature storage (Robb 2004).
Air pollutants will damage many photographic materials. Oxidising gases, particularly oxides of nitrogen and ozone, particulate matter and environmental fumes are particularly damaging to silver-based photographs and some ink-jet prints. Separate photographic materials from pollutant sources including industrial pollutants, untreated wood products, varnishes, paints, poor quality storage materials, chlorine-containing cleaning products, bleaches and photocopiers (Robb 2004). Strategies for ameliorating the effects of pollutants are provided elsewhere (see the chapter Preventive Conservation: Agents of Decay).
Storage Systems and Enclosures
Common sense and a knowledge of compatible archival materials goes a long way when considering storage systems for photographic materials. Some general storage considerations include the following (Robb 2004):
- strike a balance between ‘tight’ and ‘loose’ storage of photographic prints. If prints are too loose they may curl while handling damage is increased if they are too tightly packed;
- stainless steel, anodised aluminium and powder coated steel shelving or containers pose minimal risk to photographic materials;
- never use uncoated wood pulp products, glassine or PVC materials to house photographs;
- use buffered archival quality paper or board (in the form of sleeves, envelopes, folders and document boxes) to store silver, acetate and nitrate prints;
- use unbuffered archival quality paper to store chromogenic prints, cyanotypes and architectural drawings;
- use plastic enclosures (polyester, polythene, polypropylene, spun-bonded polyolefins and polystyrene) to store frequently used collections. These provide support and protection against fingerprints;
- do not use plastics that contain large amounts of plasticisers or have fillers, coatings or UV stabilisers;
- keep rubber cement, pressure sensitive tape, paper clips and elastic bands away from photographic materials; and
- if it is necessary to mark a photograph use a soft lead pencil on the reverse side of the image.
The conservation treatment of photographic images is a highly specialised subject and is fraught with potential difficulties for the amateur. Do not attempt to clean photographs other than to brush them with a clean soft brush, proceeding from the centre of the photograph towards the edges. Consultation with a conservator is recommended for almost all conservation problems.
Aspects related to the conservation of specific photographic processes are described in the sections below.
Daguerreotypes
Deterioration
Deterioration likely to affect daguerreotypes includes:
- tarnishing of the silver image;
- damage of the fragile image by poor handling when out of its frame;
- mechanical damage from the brass mount or broken glass; and
- corrosion due to high relative humidity levels.
Conservation
Exercise great care when handling these images and do not attempt to treat them. Consult a conservator for advice and note the following points:
- the silver-mercury amalgam image is formed on the surface of the plate and can be wiped off if carelessly handled. Wear gloves and handle the plate by the edges only;
- protect the case by placing it in a four-flap paper enclosure;
- physical damage such as scratching is irreparable. Make photographically restored prints from damaged images;
- store daguerreotypes in a low relative humidity environment (45 - 50%); and
- if condensation is present on the inside of the glass cover, disassemble the mount and clean the glass with alcohol. Hold the daguerreotype plate by the edges when reassembling. If inexperienced, only carry out this process in consultation with a conservator.
Although thiourea silver dips have been used to remove tarnish from daguerreotypes, this treatment is not recommended. It is extremely hazardous as surface coatings may have been applied and the image may have been hand tinted.
Unless the tarnish is so bad as to almost obscure the image, do not attempt to remove it. Seek advice from a conservator.
Ambrotypes
Deterioration
Deterioration of ambrotypes involves:
- mechanical damage to the emulsion layer by scratching; and
- breakage of glass.
Conservation
Methods of conserving ambrotypes include:
- minimising mechanical damage to the emulsion by placing a black acid-free card behind the image;
- protecting the case by placing it in a four-flap paper enclosure;
- if the image bearing glass is broken, do not attempt to glue it. Instead copy it and sandwich it between two sheets of modern glass; and
- removing dirt by using a soft brush or a moistened cotton bud. Do not use organic solvents as they may dissolve the emulsion.
Tintype
Deterioration
Factors most likely to cause deterioration of tintype plates include:
- not housing them in a case or mount so they become bent, causing the collodion emulsion layer to crack;
- high humidity which causes the iron plate to rust, resulting in further blistering of the emulsion; and
- scratching, tarnishing and dirt that will damage unmounted tintypes.
Conservation
The simplest way to conserve Tintypes is to mount them. A mount, comprising unbuffered acid-free backing board, spacer, window mount and a glass or perspex cover will protect the image.
Prints
Deterioration
All prints will suffer damage if:
- handled carelessly;
- exposed to inappropriate storage or display conditions such as high light, temperature and relative humidity levels; and
- exposed to insect attack.
Staining and foxing of prints disfigures them. Lignin in paper causes it to discolour and become brittle, while metallic impurities and localised mould growth can result in foxing. Light and high humidity will accelerate these forms of deterioration.
Silver prints are susceptible to damage from:
- sulphide formation;
- oxidation and reduction; and
- deterioration or staining from poor quality mount boards.
Sulphiding of the silver may result from impurities in the mounting material or the presence of residual processing chemicals such as the fixer (sodium thiosulphate). The result is a general fading and yellowing of the print or image.
Oxidation of silver is caused by the reaction of oxidant gases with particles of silver, converting them to highly mobile silver ions. These silver ions can migrate through the emulsion layer and if reduced back to metallic silver be redeposited in a new area. This results in fading of the image and colour changes. Sources of oxidant gases include industrial pollutants and poor quality mount boards.
The extremely small particles of silver in printing out paper are more susceptible to oxidative damage than the coarser particles present in developing out paper. In printing out paper the image tends to become more yellow and red whereas developing out paper tends to exhibit a bluish-silver mirroring effect.
Platinum prints and pigment prints do not usually fade. The main damage to these images is usually caused by the support material becoming stained or brittle. For platinum prints high temperature and relative humidity or pollution can cause image transfer with close contact mounts or covers.
Conservation
Conservation of photographic print images is enhanced by:
- careful control of temperature, relative humidity, light and pollutant levels;
- the use of unbuffered, acid-free storage containers; and
- the use of archival quality, acid-free mounting materials.
Specialist conservators and some professional photographic organisations carry out photographic restoration work. Some problems that can be tackled include:
- the removal of mounts and remounting. Many photographic prints are brittle or may suffer if exposed to aqueous treatments. Removal of mounts is extremely difficult in these cases;
- the repair of physical damage such as that caused by insect attack or tearing. Repairs can be made using infill paper fibres, retouching and then coating with gelatin or methyl cellulose as the binder; and
- restoration of silver mirroring. Silver mirroring can be tackled by applying a gelatin layer over the top of the mirrored emulsion. This masks the effect and makes for easier copying.
Conservation specialists are required for these tasks, particularly in the case of important original photographic works.
Make copies before beginning any restoration work and use retouched copies for display if the originals are badly deteriorated.
Because of the catalytic effect of the platinum in platinum prints store these print types in polyester or polypropylene sleeves to separate them from direct contact with other photographic materials.
Some of the chemical treatments that can be used to restore images include:
- intensification;
- bleaching;
- redevelopment; and
- reduction.
Glass Plate Negatives
Deterioration
The most common problems encountered include:
- scratching of the emulsion;
- breakage; and
- silver-gelatin may exhibit silver mirroring or the effects of inadequate processing.
Conservation
Store plates on edge in an enamelled metal box. Other materials that can be used for boxes are unbuffered acid-free board, heavy duty polyethylene and foam core. Fit polyethylene channel of the same width as the glass along two adjacent sides of the plate, to allow them to stand separately and to avoid crowding. This allows an airflow between the plates and prevents them sticking together. Do not stack glass plates.
Store at 30 – 40 % relative humidity to minimise glass decomposition and flaking (Robb 2004).
Cellulose Nitrate
Do not store cellulose nitrate near any other material as it is inherently unstable. In addition to giving off noxious gases as it deteriorates, cellulose nitrate has been known to ignite spontaneously. Seek specialist advice if you have a substantial collection of cellulose nitrate materials (see the chapter Modern Materials).
Modern Negatives
If stored in the correct environment modern negatives should last for hundreds of years. Careless handling is the most common cause of damage.
Colour Material
Although colour photography has been around since just after the turn of the century the initial additive process was cumbersome and did not gain widespread popularity. Colour photography gained popularity in the 1930s with the introduction of the chromogenic system, a subtractive process. In the 1960s the more stable silver dye bleach was reported but was not used for negative print material.
Digital output prints are probably the most common form of photographic imaging used by the general public. As such, ink jet, electrostatic and dye sublimation prints are likely to form the bases of many future collections. Ink jet prints are prepared when very small ink droplets are deposited on a paper or plastic support. The inks may be either organic dyes or pigments. Dye sublimation prints involve the use of a thermal transfer process to create images. Dyes are made gaseous and then condensed onto a coated paper that is specifically designed to receive the dyes. Dye sublimation prints are expensive in comparison with ink jet and electrostatic prints. Electrostatic prints are produced when heat is used to fuse a toner (containing resin and pigment) onto paper. These sort of prints are generally of lower quality than either ink jet or dye sublimation prints.
It is important to differentiate between true colour photographs and hand-tinted black and white images or pigment prints. Most pigment-based systems are quite tolerant to light exposure.
Deterioration
Colour photographs are inherently unstable. This is because the image is formed using organic dyes rather than metallic silver. Organic dyes fade in response to inappropriate light, temperature, relative humidity and pollutant levels.
Until the advent of digital photography, the most popular types of photographs were the colour negative and print system. These photographs are the least stable. This system, the chromogenic process, uses colour couplers during the processing to produce the dyes. As well as fading at uneven rates this process can exhibit yellow staining even when stored in the dark.
Colour slides are particularly susceptible to fading. Kodachrome materials fade in strong light but have excellent colour stability if stored in the dark (Robb 2004). The light fastness of inks used in digital printing has improved but there is still concern at the moisture sensitivity of ink jet inks and of their susceptibility to damage from pollutants.
A more stable system is the silver-dye-bleach system in which dyes are incorporated in the emulsion during manufacture and selectively removed during processing. This process is often used for making prints from colour slides.
While modern colour material has improved stability, images from the 1940s and 50s are often found in a severely faded or stained state. Photos from the 1960s and 1970s may also show severe deterioration, depending on their method of manufacture and their storage and display conditions. Some dye systems, especially those used in the early to mid-1990s, are very sensitive to light (Robb 2004).
Conservation
Descriptions of the full range of colour material from the 1940s to the present, is too extensive for inclusion here. Obtain advice from photographic conservators and by consulting appropriate specialist publications.
Some basic guidelines do apply however:
- restrict light levels to no more than 50 lux for displayed items and limit the duration of exposure to light sources;
- exclude sources of UV radiation if possible. Otherwise restrict levels as much as possible;
- maintain relative humidity levels in the range 30 - 40%;
- as long as relative humidity is controlled, store colour materials in a cool place (16 – 20 °C). The lower the temperature, the longer colour material will last;
- mount prints with unbuffered acid-free board behind perspex or glass. Glass is cheaper but perspex does not break as easily. Never use chipboard, hardboard, plywood and particle board to mount prints;
- avoid direct contact with glass or perspex to prevent any transfer of the image; and
- maintain a high standard of cleanliness in display and storage areas to decrease the attractiveness of these areas to insects and rodents.
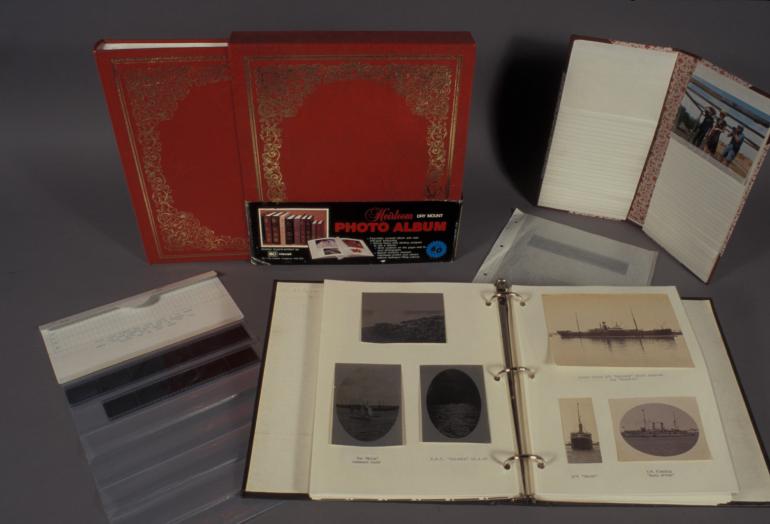
Correctly storing photographic prints, negatives and slides will increase their durability (Figure 6). Ideally each photograph should have its own enclosure to protect it against rapid changes in relative humidity, dust, insect attack, pollutants and excessive handling. Archival products are available from conservation supply companies and high quality photographic albums can be obtained from most photographic stores.
Figure 6: Examples of enclosures for photographic materials.
The following storage guidelines will increase the life of colour prints:
- never use self-adhesive or ‘magnetic’ albums for storing prints as they are harmful to the image;
- store slides in their boxes or in uncoated polypropylene or polyester sleeves;
- store negatives in uncoated polypropylene or polyester sleeves. Glassine or paper envelopes are not recommended;
- only use acid-free boxes or those manufactured from polyethylene, polypropylene or polyester and store these on enamelled metal cupboards;
- wrap large prints with unbuffered acid-free tissue and store them in an acid-free cardboard box, which should then be stored on a shelf or in a metal cabinet;
- if using paper envelopes to store prints, ensure they are unbuffered, acid and lignin-free;
- never use PVC plastics, rubber bands, paper clips and poor quality adhesives;
- do not store glass plates and cellulose nitrate material in plastic enclosures; and
- regularly inspect and clean storage areas to ensure there is no insect attack. Change tissue regularly as it will become contaminated with impurities from original mount boards;
Summary
- Treat and store most photographic collections in the manner as described for paper objects.
- Control temperature and relative humidity to 16 – 20 °C and 30 – 40 % respectively.
- Avoid direct sunlight and control light levels to 50 lux or less with as little UV radiation as possible.
- Do not use self-adhesive albums under any circumstances.
- Do not touch emulsion surfaces with bare hands.
- Support prints evenly. Do not lift by a single corner.
- Inspect regularly to avoid insect attack and to monitor the general condition of photographs.
Bibliography
Booth, L. and Weinstein, R., 1977, Collection, Use and Care of Historical Photographs, American Association for State and Local History, Nashville.
Davies, A. and Stanbury, P., 1985, The Mechanical Eye in Australia, Oxford University Press, Melbourne.
Lavédrine, B., 2003, A Guide to the Preventive Conservation of Photographic Collections, Getty Conservation Institute, Los Angeles, California.
Martin, E., 1988, Collecting & Preserving Old Photographs, Collins, London.
Pénichon, S., 2013, Twentieth-Century Color Photographs: Identification and Care, Getty Conservation Institute, Los Angeles, California.
Reilly, J., 1988, Care and Identification of 19th Century Photographic Prints, Kodak Publication No. G-25, USA.
Rempel, S., 1987, The Care of Photographs, Nick Lyons Books, USA.
Robb, A. (revised and updated by M. Roosa, 2002), 2004, Care, Handling and Storage of Photographs, International Preservation Issues Number 5, International Federation of Library Associations and Institutions Core Activity on Preservation and Conservation (IFLA-PAC), Bibliothèque nationale de France, Paris, France.
Wilhelm, H., 1993, The Permanence and Care of Colour Photographs, Preservation Publishing, Grinnell, Iowa.

