Case Studies
U. Broeze-Hoernemann, C. Corvaia, S. R. Garcia, D. Gilroy and I. M. Godfrey
The aim of this section is to demonstrate approaches to the treatment of particular objects, rather than to describe procedures themselves. Where specific procedures are referred to, readers are directed to the appropriate chapters of this book for further details.
Firearms
S. R. Garcia
Introduction
There is an increasing interest being taken in the conservation and restoration of firearms. Firearms have figured prominently in Australia’s history and are present in great numbers, particularly in the rural community. Gun laws are generally strict, even for display purposes. Contact police in your state regarding regulations which apply to the repair and handling of firearms.
Construction and Deterioration
Firearms are composite objects usually made up of steel of various grades, wood and inlays of varying material types. Take care when treating them, especially when components have corroded into a solid rusty mass. This is a common problem as the components of the mechanisms are small and intimately positioned. Dirt and unfavourable environmental conditions can ‘fuse’ these components together.
Safety
Before work of any kind is attempted on a firearm, check that it is not loaded or cocked. If there is any doubt as to its safety, seek help from an approved agency or person.
Documentation
Before treatment, take full notes, diagrams and photographs of the object’s condition.
Treatments
Cleaning
If a weapon is in a good state of repair, following the guidelines below will assist in maintaining that condition:
- wear gloves when handling the firearm to stop oils and acids from the skin etching the metal surface;
- light oiling may be all that is needed to maintain the firearm’s steel components. Use an approved light gun oil and a lint-free rag;
- if necessary strip the firearm, clean the components in an approved degreaser, dry, lightly re-oil and reassemble the firearm. Use a lint-free rag when cleaning and oiling;
- dissolve heavy grease with caustic solution;
- a touch-up ‘blueing’ solution is available if this finish is applicable. Clean the surface to remove all dirt, oils and grease prior to applying the ‘blueing’ solution; and
- clean inlays according to their material type (see relevant chapters).
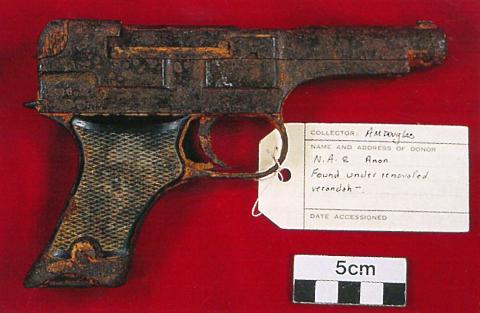
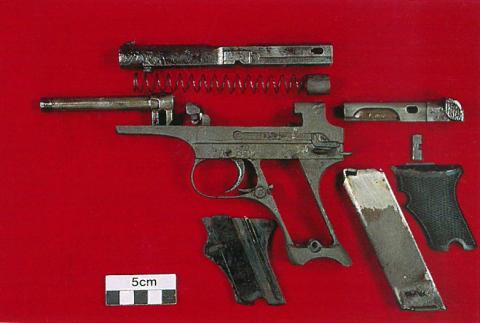
If on the other hand a firearm is in a badly corroded condition more intervention will be necessary. Such a situation is well illustrated by examining the treatment of a .32 calibre Japanese pistol (Figure 1). For this object treatment consisted of:
- stripping the firearm as far as possible;
- immersing the corroded iron components in a solution of caustic soda (20 - 50 g) in water (1 L) to remove all dirt, paint, grease and similar materials. No aluminium or wooden components were immersed;
- separating other components, using a combination of gentle heating, along with a lubricant such as CRC or WD 40 to loosen and remove nuts and screws. No heat was applied to springs;
- soaking the dismantled components (except the springs) in a solution of citric acid (20 – 50 g) in water (1 L) and gently brushing to remove rust;
- washing the components with caustic soda solution (see above) to neutralise any residual acid, then with fresh water to remove excess caustic and finally with a dewatering agent such as CRC or WD 40;
- wiping the parts dry and coating them with a solution of fish oil (20 %) in white spirit (80 %). A light gun oil is an acceptable alternative;
- washing the plastic hand grips in fresh water and physically cleaning them with a soft brush; and
- re-assembling the pistol. The mechanism could be activated following assembly.
Figure 1: Japanese pistol.
(a) Before treatment.
(b) After treatment.
Wooden Components
Clean polished or waxed stocks and handgrips with a clean soft rag or soft brush. Gun stock oils are available to refurbish wooden components if desired.
Preventive Conservation
After treatment the weapon was wrapped in acid-free tissue and stored in an enamelled metal cabinet. Check stored firearms every six to twelve months for signs of deterioration.
Fruit Tin Label
U. Broeze-Hoernemann
Condition
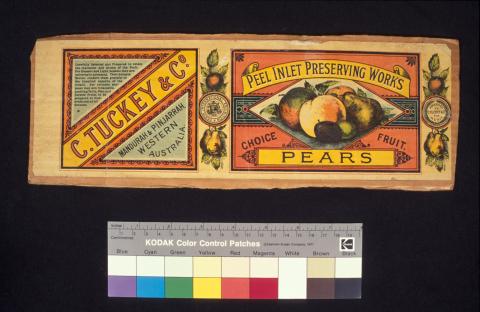
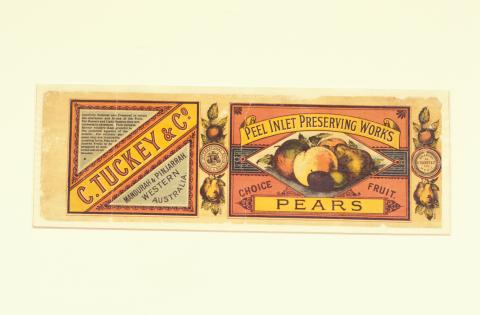
The coloured waxed paper label from the C Tuckey and Co. Peel Inlet Preserving Works was fully adhered to a backing that had been cut from a commercial cardboard box. The label had numerous tears, one of which had separated it into two pieces. There were also areas of loss, creases, surface abrasion, dirt and stains present.
Treatment Proposal
The proposed treatment of the label was drawn up as follows:
- document the label’s condition;
- surface clean the label while still adhered to the cardboard;
- remove the cardboard backing;
- de-acidify the label if necessary;
- depending on the condition of the label, strengthen it by applying a Japanese tissue backing; and
- encapsulate the label in mylar.
The cardboard backing was removed because its acidic nature would accelerate deterioration of the label. The methods used to remove backings are determined by the nature of the backing material.
The decision to reinforce the label with Japanese tissue could be made only after determining the fragility of the isolated label. Such decisions should never be taken lightly as they involve the introduction of a new component, thus changing the integrity of the object.
Encapsulation allows the label to be handled without touching the label itself while still allowing air circulation around it.
Tests Carried Out
The pH of the label was 4.6.
Stabilities of the colours and of the waxed surface were tested in water and calcium hydroxide solution. All appeared to be stable in both media.
Treatment
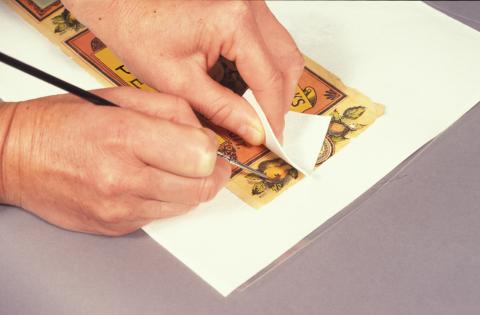
The treatment of the label is described below and in the accompanying images (Figure 2). The surface of the label was dry cleaned using a thin flexible slice of a high quality soft eraser.
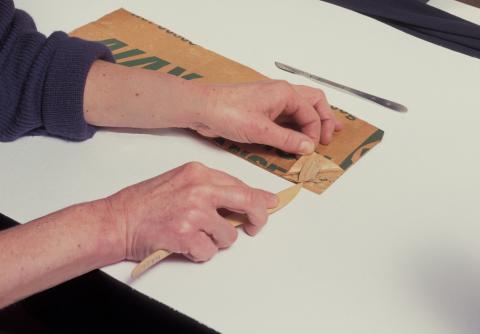
The cardboard backing was thinned initially by removing it layer by layer with a flat wooden spatula until only one thin layer remained. The remaining layer was moistened section by section with damp cotton wool until it was soft enough to be scraped off with a scalpel. This type of backing removal is not always possible. If yellow strawboard has been used as a backing, do not introduce moisture as it is likely to irreversibly stain any attached paper.
The label was washed several times in distilled water until the water remained clear, de-acidified for 30 minutes in a calcium hydroxide solution buffered to pH 9 and then air dried on a Reemay® support.
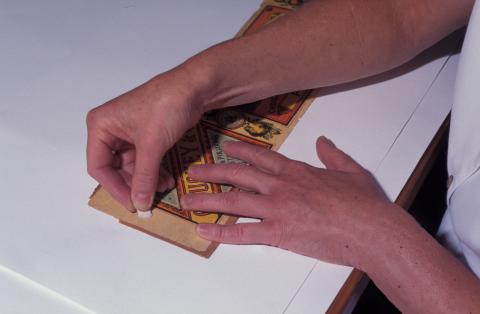
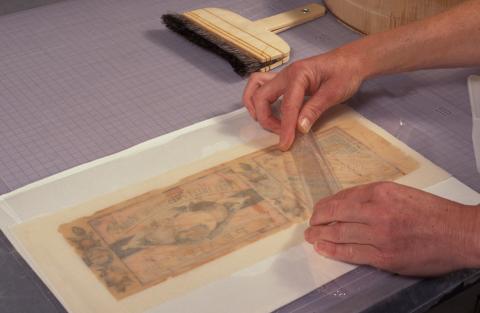
Since the object remained fragile and because of the sheer number of tears and creases, a Japanese tissue backing was applied for added stability. Kozo tissue paper was used. A piece larger than the label was pasted to the back of the label using a thin and even layer of wheat starch paste.
The reinforced label was dried between blotting paper lined with Reemay® and under a sheet of glass as weight. Blotters were changed as they became damp. Reemay® is a spun polyester which prevents adhesion of the object to the blotting paper during the drying process. After drying, the Japanese tissue was trimmed to a size slightly larger than the label.
After a paper object has been exposed to moisture, such as in the procedures described above, it is very important that it is dried thoroughly. The drying process usually takes several days but may take more than a week in some cases.
When dry the label was encapsulated in mylar. Acid-free double-sided tape was used to adhere two sides of the mylar, thereby allowing free air circulation and easy access should the label have to be removed. A strip of buffered Archive Text paper (pH 8.5) was inserted behind the label to counteract any residual acidity.
A window mount was cut from buffered 100 % rag mat board (pH 8.5) and the above described ‘parcel’ was held in place by four photo corners handmade to size from mylar and double-sided tape. This type of storage supports the object and facilitates handling and display at the same time.
Figure 2: Fruit tin label.
(a) Before treatment.
(b) Dry cleaning with sliced flexible eraser.
(c) Removal of backing using a wooden spatula.
(d) Spot testing for colour fastness using a fine brush, water and blotting paper.
(e) Application of backing.
(f) After treatment. Stored in a window mount for display, handling and storage.
Horse-drawn Vehicles
S. R. Garcia and D. Gilroy
Introduction
Horse-drawn vehicles are synonymous with Australia's history. From the Cobb & Co Coach and the ‘Sydney’ sulky to the bullock dray, horse-drawn vehicles have contributed significantly to Australia’s advancement. In the past few years hundreds of these wonderful vehicles have disappeared. Even today there are many vehicles just left to disintegrate in paddocks. With a few simple precautions, these can be saved from further deterioration.
Deterioration and Examination
The main materials used in the construction of horse-drawn vehicles are wood (one type or a mixture of woods), steel, paint and leather. All of these materials deteriorate when exposed to the elements. The normal modes and extent of deterioration of these material types is described elsewhere (see the chapters Wood, Metals and Leather).
If a vehicle is exposed outside the sun, rain and insects will soon damage spokes, felloes (wheel rims) and joints, eventually immobilising the vehicle.
Carefully examine and record the condition of a vehicle before attempting any work on it. Documentation should include:
- sketches and photographs of the vehicle and its components;
- notes on the condition of components;
- information regarding the original colours used on the vehicle. Scraping back to the original coats is usually necessary. Take paint samples if possible;
- details of any lettering, numbering or patterns present on the vehicle. Make a stencil of these; and
- any other details that may be of benefit in the conservation and restoration process.
Preventive Conservation
Conservation work may not always proceed immediately. If this is the case, move the vehicle under a shelter with the wheels and shafts supported and raised from the ground. These simple steps will prolong the vehicle’s life indefinitely. Stopping exposure to sunlight and periodic bouts of wetting and drying will minimise rot in the wood and rusting in metal components.
Make a simple stand to support the shafts and steel stands to support the axles. The latter stands are designed to raise the wheels about 6 – 12 mm above the ground.
A cover for the vehicle will help to prolong its life by protecting it from dust and the problems associated with the build-up of dirt.
Monitor the condition of the vehicle regularly. For instance, take photographs every 12 months and compare them. Take close-ups of susceptible areas.
Treatments
Conservation or Restoration
Conservation of a vehicle usually involves taking steps that will prevent any further deterioration in its condition. Restoration involves both conservation and additional work designed to restore the vehicle to something approaching its original condition.
As the current condition of a vehicle is a true reflection of its history, display in a ‘conserved only’ state is often desirable. Do not look upon complete restoration as a first option.
Wood Consolidation
If the vehicle has been exposed to the elements the wood is usually in a very poor condition. Leaving the vehicle standing on its wheels usually results in split and cracked spokes and felloes.
Unless the wood is badly deteriorated or load-bearing, use as much of the original wood as possible in any restoration. Retain all old wood, no matter how deteriorated and use as templates for the manufacture of replacement pieces. Keep these pieces in storage when not in use.
It may be necessary to split badly cracked pieces that are still robust enough to use before consolidating them. The wood can then be treated as follows:
- clean out all of the dirt and rotten wood;
- glue the sections with an appropriate wood glue and sawdust mixture and clamp them together. Do not use water-soluble glues if the vehicle is to be displayed outside;
- fill all cracks with a glue and sawdust mixture;
- sand it back to shape when the glue is dry; and
- paint the timber using a primer, an undercoat and a top coat. The top coat should match the original colour sample.
The last three steps outlined above can be used for all pieces of wood from the vehicle.
Wheel Repair
Wheels are often in a very sorry state, especially if termites have made them their home. Rebuilding wheels is a specialist craft. Seek expert guidance before disassembling and rebuilding them.
Another common problem is a build-up of rust between the inside of the tyre and the outside of the felloe. This type of problem may necessitate the removal of the tyre for treatment. If the tyre has to be removed, work upon the felloes and spokes becomes much easier. Consult a wheelwright if work of this type is necessary.
Chemical de-rusting of the tyre can be accomplished as described elsewhere (see the chapter Metals).
If the work required is of a minor nature, then splitting the felloe, cleaning as mentioned above and regluing may be all that is needed.
The case studies below demonstrate different treatments that can be applied to horse-drawn vehicles, with the particular treatments being determined by their respective conditions.
Wagon (New Norcia, Western Australia)
New Norcia is a farming community founded by Benedictine monks in the mid-19th century. Like all farming communities there was an abundance of horse-drawn vehicles, ranging from sulkies and buggies to general farm wagons. With the advent of the motor car and truck, horse-drawn vehicles fell into disuse and disrepair. They were left to rot in paddocks, lost in bushfires or broken up. Their numbers diminished alarmingly.
This was the case in New Norcia when the local historian realised that of all their horse-drawn vehicles, only one example of a four-wheeled general purpose cart remained.
Condition of the Vehicle
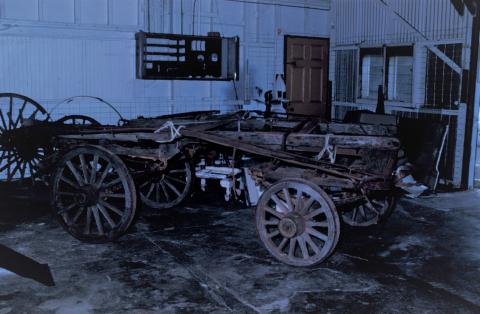
This vehicle had been on ‘display’ at the entrance to the town for many years and was in an advanced state of deterioration. The vehicle had been standing unsupported on its wheels, which had collapsed under the weight, was infested with black and white ants, had been modified and had dry and wet rot (Figure 3 a).
Initially it was felt that the vehicle was beyond redemption. As it was especially significant to the New Norcia community however, being the last of its kind and having been manufactured locally, it was decided to restore the vehicle.
Figure 3: (a) New Norcia wagon showing its pre-restoration condition.
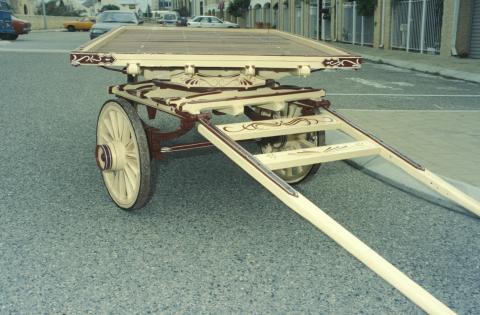
(b) The wagon after restoration.
Research
Research is a critical factor in any restoration project. Relevant information to be considered included:
- photographs;
- plans;
- paint samples;
- traces of pin-striping or signage;
- wood identification; and
- condition of the object itself.
Paint samples were taken for colour matching and tracings were made of pin-striping and signage so that patterns could be reproduced accurately. This information was needed to ensure that when restored, the object would reflect its original state.
Photographs were taken before, during and at the completion of the project. Combined with written records of treatments, repairs and details of replacements of sections and parts, photographs form an essential part of the object’s more recent history.
Treatment Regime
Once the research had been completed the following work program was carried out (Figure 3 b):
- as much of the original timber as possible was used;
- timbers that were to be replaced were used as templates and then placed in storage;
- repairs were made to timber using sawdust and epoxy resin;
- timber was reshaped, primed and undercoated;
- all steelwork was removed and treated. Note that care was taken when treating the springs;
- steelwork was coated with a solution of fish oil and white spirit to protect the steel components and give a lustrous steel-grey finish. This was painted as required;
- the vehicle was top-coated with pin-striping and signage added as per the original; and
- stands were manufactured to fit under the axles to take the weight from the wheels.
Butcher's Cart (Fremantle, Western Australia)
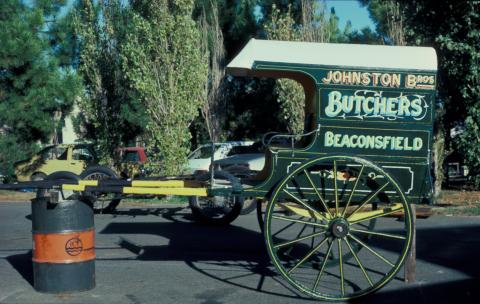
A two-wheeled butcher’s cart was originally used to deliver meats in the Fremantle area.
Condition of the Vehicle
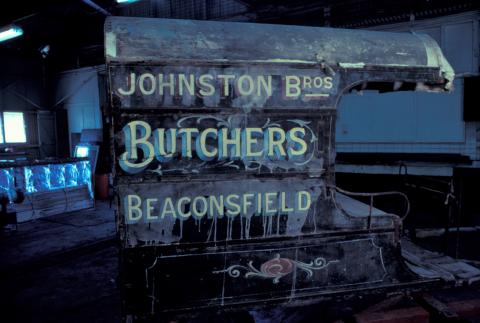
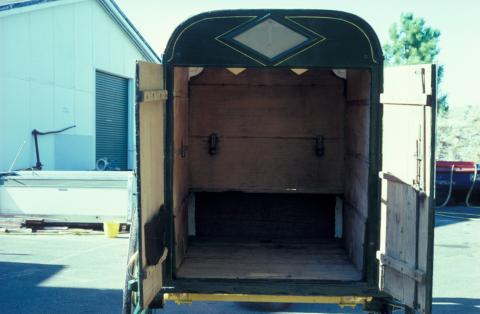
The exterior of the vehicle was ravaged by the elements with wood rot, deteriorating and flaking paint and rotting leather and waterproofing (Figure 4 a). As the interior of the vehicle held the meat, it was kept scrupulously clean and well maintained during the cart’s working life. As a result no treatment was needed for this part of the vehicle (Figure 4 b).
Research
All possible documentary and physical evidence was collected regarding the original appearance of the vehicle. In addition to the usual research and paint sampling, fabric samples were taken for identification. The sign writing was photographed, noting the colouring, type of shadowing and italics used.
Treatment Regime
The wood and steelwork were restored as described for the New Norcia vehicle. The cart was then painted to match its original colours (Figure 4 c).
Figure 4: Butcher’s Cart.
(a) Before treatment with the wheels and shafts missing.
(b) The worn interior of the cart was left in original condition.
(c) After restoration with replacement wheels and shafts.
Farm Wagon (Brookton, WA)
The four-wheeled farm wagon was built in 1903 in the Brookton area. The vehicle was housed in various sheds throughout its life and except for minor repairs carried out during its life, remains a good original example of a horse-drawn vehicle of the period.
Condition
Grease had solidified over the paint on the wheels and the wagon was covered with sand and dust. As sand and dust attract moisture, which begins the corrosion and rotting cycles, these needed to be removed.
Treatment Regime
- dust and sand were removed by careful brushing and dusting;
- minor repairs were made to cracking woodwork using an epoxy glue and sawdust mixture;
- solidified grease over the paint on the wheels was removed by careful brushing with soft brushes; and
- some minor surface rusting on the steelwork was treated.
Summary
The vehicles described above are now housed under cover, supported on stands which take the weight from the wheels. Regular monitoring and cleaning ensures there will be little need for further repairs for many years.
An important factor in the preservation of any object is the environment in which it is stored or displayed. Keep vehicles and machinery clean, dry and under cover. If objects cannot be stored indoors then this cover should be on two or three sides to prevent driving wind and rain from coming into contact with the objects.
Time Capsules
D. Gilroy and I. M. Godfrey
Introduction
The most popular notion of a time capsule is something resembling a giant vitamin pill crammed with photographs, coins and assorted memorabilia, which is either buried or placed in the foundations of a building for a period of 100 years. This method, or variations of it, were employed in Victorian times. Unfortunately the use of incompatible or unstable materials and poor packing techniques have meant that little material was recovered in good condition from time capsules of that era.
As time capsules are sealed containers, deterioration may be accelerated, particularly if unfavourable microenvironments develop in the capsule. Unfavourable conditions may arise if:
- stored materials deteriorate;
- capsules are not made from appropriate materials or are not well sealed; and
- unstable storage conditions lead to fluctuations in internal temperatures and relative humidity levels.
The lack of air exchange with the surroundings means that if for example, acidic vapours are released by an object as it ages then the rest of the interred objects will be subjected to an increasingly damaging environment. Some wood, paper and modern materials such as polyvinyl chloride behave in this fashion.
Changes in external conditions also affect the internal environment unless the storage conditions of the capsule are well controlled. A large drop in temperature, for instance, would produce an increase in relative humidity, a condition which may lead to condensation in the capsule. The growth of mould on organic objects and the corrosion of metals would be encouraged under these conditions. Conversely, if the temperature increases too much then the resultant low internal relative humidity may lead to damage such as the embrittlement of paper and wood and crazing or cracking of paint layers. Internally and externally insulating the time capsule will minimise relative humidity fluctuations.
Relative Humidity and Site Selection
The factors affecting relative humidity and strategies that may be used to control it are discussed earlier (see the chapter Preventive Conservation: Agents of Decay).
In order to ensure the long-term survival of materials placed in time capsules, pack the capsule when the ambient conditions are cool and the relative humidity is low. While these conditions are usually better for the long-term preservation of most material types there is a risk of desiccation of susceptible materials. As long as the capsule is stored in a stable environment then internal fluctuations will be small. If the capsule is packed on a day of very high relative humidity then that moist atmosphere and moisture laden materials will be sealed in the capsule - a recipe for disaster unless moisture-controlling agents are incorporated in the time capsule.
In selecting the interment site, consider:
- the temperature range associated with the site;
- the nature of the site in which the capsule is to be buried: and
- the likelihood of the site being disturbed before the time capsule is due to be opened.
The burial site may be below ground, in a wall or building or even on the ocean floor! As each site will have its own set of unique environmental parameters, the nature of the site necessarily dictates the type of construction materials that should be used for the capsule. Chemical features of the soil, depth of the water table and drainage are some of the factors which must be considered for a land site.
If the capsule is to be buried below ground then an appropriate stainless steel container is recommended, either sealed with an o-ring or with a welded lid. This type of container will minimise corrosion and leakage problems. Depending on the size of the capsule such a container could be very expensive. Alternatively if the capsule is to be placed in a crypt within a building then cheaper materials such as polyester powder-coated iron could be used.
Capsule Construction
Factors affecting the construction materials and the type of capsule include:
- length of time the capsule is to be buried;
- volume of material to be included in the capsule;
- location and nature of the burial site; and
- available funding.
For burial below ground the following materials are suitable:
- certain grades of stainless steel;
- copper and its alloys; and
- high density polyethylene (HDPE) pipe.
Materials suitable for above ground storage include:
- galvanised metal;
- polyester powder-coated iron; and
- enamelled metal.
Capsules that are either seamless or of welded construction are preferred. HDPE provides a cheaper, though less durable material for underground burial. This material may be sealed by hot-air welding, thus avoiding the use of adhesives which would be prone to breakdown in the soil. HDPE is not recommended for above ground use unless it is protected from weathering agents such as the sun and rain.
Do not use polyvinyl chloride tubing or iron materials that are not galvanised, enamelled or polyester coated as they are all prone to deterioration.
The lid on the capsule should either be welded or have an o-ring seal on the lid section and be constructed so there is an even pressure exerted on the lid. This may be achieved by having bolts evenly spaced around the lid or by using a screw-on lid. If bolts are used to secure the lid, locate them on the outside of the o-ring seal so that the seal is not compromised. An airtight seal is important if moisture, dirt and insects are to be excluded from the capsule.
Silicone sealant can only be used externally as the fumes given off as it cures could harm the contents of the capsule.
Insulate the capsule if it is to be interred above ground. The effect required is similar to a thermos flask where the box in a box principle operates with a key aim being to minimise changes in internal conditions. This may be achieved for example, by placing the capsule inside an insulated box which is then stored in the centre of an air conditioned building. If interred below ground the surrounding earth provides the insulation.
Materials for Inclusion in the Capsule
It is most important to think long and hard about just what is to be included in the time capsule. Factors to consider include:
- significance;
- interest;
- durability of materials;
- quantity and size of objects;
- compatibility of materials; and
- likely future availability of technology to replay included objects such as audio or video materials.
Think carefully about the objects to be placed in a time capsule and choose objects that most appropriately represent the present time. Avoid things that are likely to survive in other places such as in newspaper archives for instance.
Some materials are more prone to decay than others. Only include unstable objects in the capsule if they are highly significant and if they can be effectively isolated from the other objects in the capsule and treated to enhance their longevity (via oxygen exclusion for instance). The most suitable objects are those that are self-contained and self-explanatory. That is, they don’t need technology to either read, interpret or use them.
Seek the advice of a conservator regarding objects for inclusion in a time capsule so that unsuitable materials may be excluded and any materials that require treatment to increase their chances of surviving the burial period can be identified and treated prior to their inclusion in the capsule. Newspapers for example, are notoriously poor in quality and should be double packed to ensure that there is no contamination of other materials. Wrap them in alkaline-buffered paper and encapsulate in polyester to minimise contamination risks. A better alternative is to use photocopies of newspaper articles made using archival quality paper.
Where possible, use archival quality papers for included documents. As for newspapers, if original documents are printed on poor quality papers, copy them onto alkaline-buffered paper for inclusion in the capsule.
Many audio-visual materials, such as video and cassette tapes, are inherently unstable and may not last more than a few decades before suffering serious deterioration. If argon or nitrogen flushing is not possible then vacuum packing or storage of these materials in a sealed container with Ageless® oxygen scavenger is recommended. Their inclusion must also be weighed up against the likely availability of the equipment needed to replay them when the time capsule is opened. Will video technology still be available for playback?
Do not include synthetics materials such as PVC, rubber and plasticised materials. Plastics considered safe for use in time capsules include polyesters, polyethylene, polypropylene, polycarbonate and polystyrene. As it is sometimes difficult to differentiate between these synthetic materials seek professional advice before making a decision to include them in the capsule.
Photographs are popular inclusions in time capsules. Colour photographs are less stable than their black-and-white counterparts. Cibachrome processing is recommended if colour prints are to be included. Use archival standard processing techniques to increase the longevity of images that are included in the capsule. Do not stack photographs on top of each other without a sheet of polyester film between them. This will stop the photographs from sticking to each other (see the chapter Photographs for more guidelines).
If textiles are included in the capsule, make sure they have been cleaned, are free of insect and microbiological infestation and are conditioned to the humidity of the capsule. Wrap them in unbuffered, acid-free tissue.
Packing the Capsule
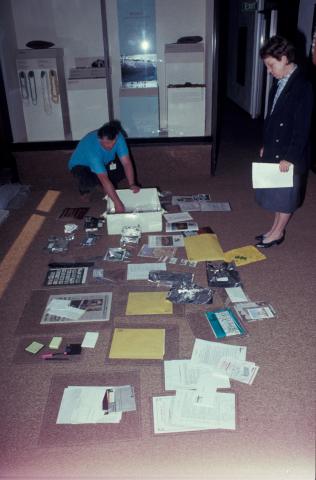
Rather than specifying a long list of ‘dos and don’ts’ regarding packing, it is better to stress the importance of common sense and care when packing the capsule. Where possible, either individually wrap all items or at least group similar materials together and wrap these as one (Figure 5). For example keep paper apart from metals. This can be done most cheaply by using either heavy-duty polyethylene bags or polyethylene containers. Heat seal the bags. Put heavy items on the bottom of the capsule.
As mentioned earlier in this section, pack the capsule when the temperature and relative humidity are at the most appropriate levels for the materials that will be included in the capsule.
Avoid folding objects, as it introduces stresses into them. If materials such as papers and textiles cannot be laid flat then roll them for storage. It is wise not to cram too many objects into the capsule.
Flushing the capsule with an inert gas such as nitrogen or argon or using oxygen scavengers such as Ageless® will help to prevent deterioration of the contents by excluding oxygen. To avoid damaging the capsule contents, use a long pipe and trickle feed system to introduce the gas. In this way the contents will not be subjected to a sudden drop in temperature and possible condensation. Argon, although more expensive than nitrogen, is preferred as it is heavier and less likely to be lost from the capsule over time. Add silica gel or zeolites to the capsule if low relative humidity conditions are required.
Note that if the capsule is flushed with an inert gas, also flush any materials that are sealed in polyethylene bags with the same gas. If this is not done deterioration due to oxidative processes will continue in the sealed bag, defeating the purpose of flushing the capsule with the gas.
Figure 5: Time capsule showing individually packed materials.
Administrative Considerations
Label objects included in the capsule and unless the object is a document or something similar which tells its own story include some information relevant to the object in question. Use archival quality paper and card for object labels, write on these with non-water soluble inks and attach the labels to the objects with stable tapes or cords or include them in sealed bags with the objects.
Lodge details concerning the location, contents and future plans for the time capsule with the appropriate authorities. This may be a local government agency, a museum, library or historical society. Provide this information to more than one organisation.
Mount Margaret Woven Basket
C. Corvaia
Introduction
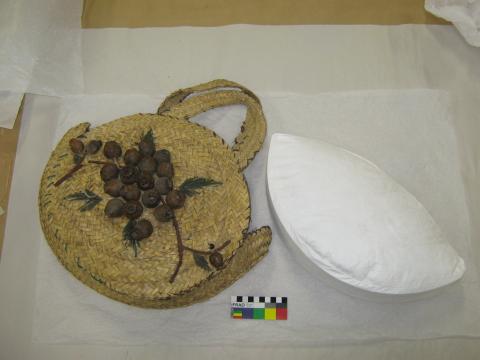
The basket was made some time before 1947 and was obtained during a visit to Melbourne by a group of Mount Margaret school children. The woven basket was donated to the Western Australian Museum by Grace and Joyce Dodge in 2010. The basket was made by stitching a plaited fibre strip. Two circles, formed in a spiral pattern, were joined at the sides and base by a wide band and two handles were added at the top.
Condition
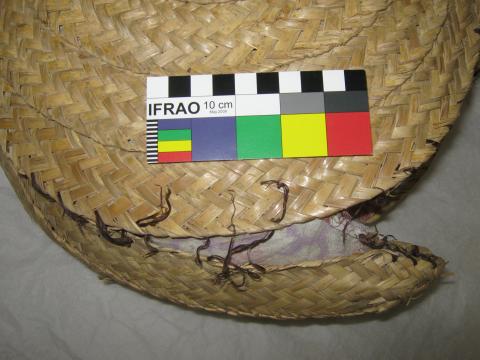
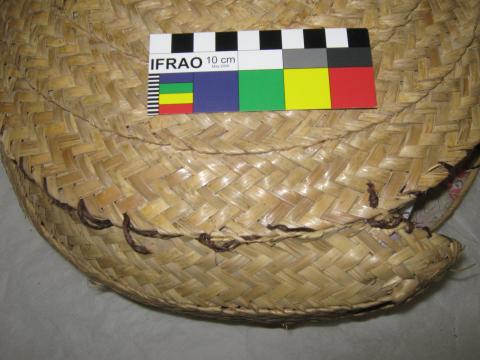
The basket had been flattened during storage and dust and dirt had accumulated on the decorated (upper) side. The other side was relatively clean with only a few brown stains visible. The decoration of eucalyptus ‘gum’ nuts had suffered some damage. Several gum nuts had abrasion losses, some sticks were broken and there were losses of the fragile green raffia stitching. The plaited fibre strips had frayed and broken edges, especially on the handles and at the top of the sides. The dark brown raffia stitching was broken and missing in areas and plastic-coated wire had been used for repairs on these joins. The textile lining of the basket was detached along the top and had stains, dirt, creases and frayed edges.
Treatment
The distortion of the shape and loss of stitching were placing stresses on the object. The accumulated dust and dirt were contributing to the deterioration of the natural fibres and continued handling caused further losses of the fragile green and dark brown raffia stitching.
Proposed treatment of the basket involved:
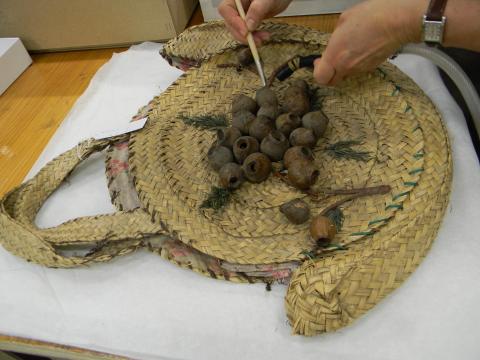
- dry cleaning of the surfaces (Figure 6);
- dehumidification and re-shaping (Figure 7);
- repair of loose and broken stitching (Figure 8);
- construction of an internal support to maintain the shape of the basket (Figure 9); and
- packing for storage (Figure 10).
In order to safely re-shape the flattened basket, the fibres needed to be humidified to increase their flexibility. Before introducing moisture to the natural fibres, the basket surfaces were cleaned using dry methods, with a brush and vacuum to remove loose dust. The basket was then placed on a supporting screen in a humidification chamber. During the first four hours of humidification the basket was constantly checked and balls of tissue paper were used as padding to progressively restore the correct shape. The following day the basket was removed from the humidification chamber and allowed to air dry. The tissue paper padding was left inside the basket while work continued. The decorated side of the basket, which still had a film of dirt, was cleaned with damp cotton buds using deionised water. Care was taken to lift the dirt out of the textured surfaces (not push it further into the weave) and to avoid the areas of fragile raffia.
Figure 6: Surface cleaning the basket.
Figure 7: Basket in the dehumidification chamber during re-shaping.
All the loose and broken stitching on the basket required stabilising to avoid further losses. The loose ends of brown raffia binding on the decoration were humidified, re-wound, secured in position to dry and then attached with methyl cellulose adhesive. Elsewhere, the brown raffia stitching had loose, brittle ends associated with losses. These were carefully manipulated into the woven plait joins and uncoloured natural raffia (a good colour match for the plaited fibre material) was used to secure the joins. The top edges of the basket at both sides had extensive loss of brown raffia stitching and the cotton lining was loose. Uncoloured raffia was used to re-stitch the lining in place, threading the blunt needle through the existing needle holes in the cotton fabric (Figure 8).
Figure 8: (a) Basket before repair of the seam between right side and back panels.
(b) Basket after repair using uncoloured raffia.
The tissue paper padding inside the basket was replaced with a more stable support which would not change over time. An internal support was constructed using Tyvek® to form a circular ‘bag’ which conformed to the inside shape of the shopping basket. Part of the perimeter was made slightly rigid with an Ethafoam™220 insert (fitted into a gusset) and Dacron™ sheeting was used for padding (Figure 9). The internal support extended to the edges of the circular sides but was not visible at the top, so that the basket could be displayed without further modifications to the support.
Figure 9: Basket and its internal support.
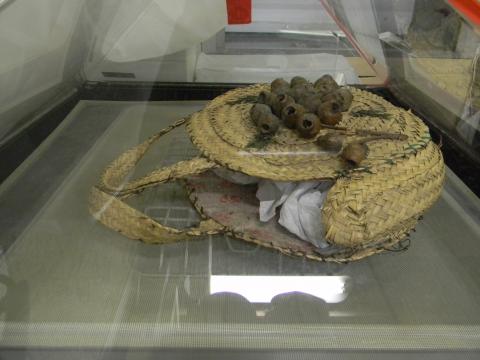
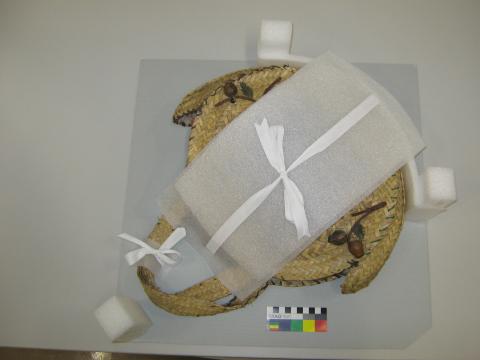
To avoid direct handling of the basket and further losses of fragile fibres, the basket was placed on an acid-free corrugated board and secured in position with Ethafoam™220, Cell-Aire® and cotton tapes. The board was fitted into a box and secured for short-term storage and travel. The shopping basket was displayed at the WA Museum of the Goldfields in Kalgoorlie in 2010.
Figure 10: Basket packed for transport.

