Handling, Packing and Storage
S. Anstey, M. Myers and I. M. Godfrey
Introduction
The aim of storage, whether in a large museum or in a private home is to ensure that objects are protected against the agents of decay - inappropriate temperature and relative humidity conditions, exposure to strong light levels, pests, dust, pollutants and poor handling. Application of many of the practices and principles outlined in other chapters should ensure that environments are appropriate for different materials in storage areas.
Objects are effectively in a state of storage whatever their location. They may be on display, a visually accessible form of storage, in boxes in a storage room or even grouped together in a time capsule. In the latter case great care must be taken with packing and control of the internal environment if deterioration processes are to be minimised (see the chapter Case Studies: Time Capsules).
Different materials have specific requirements for safe storage. Those requirements are described in specific chapters of this book. This chapter deals with more generic issues associated with the handling, packing and storage of three dimensional objects made of diverse materials and of differing sizes.
General Principles
Building Envelope
A well designed and maintained building with effective insulation is the best starting point for good storage. Environmental problems are usually associated with poorly designed and badly constructed buildings that are not well maintained. The most common problem is the entry of water into a building with resultant high humidity levels. Typical causes of water entry are:
- leaking roofs, walls or windows;
- blocked or cracked drains, gutters or downpipes;
- porous walls and/or ineffective damp courses which allow entry of ground water. This problem is most pronounced in basements, cellars and buildings affected by rising damp;
- poor positioning of gardens and garden watering systems that cause sections of the building to be frequently wet. This problem is aggravated if the building is constructed from porous materials such as sandstone or limestone; and
- poor ventilation of kitchen and bathroom areas, allowing water vapour to enter storage areas.
Other issues to do with the building envelope are:
- extremely low humidity that is associated with heating, caused either by sunlight entering through windows or poor placement of radiators and heaters;
- unsealed windows, doors, ceiling/wall joins and other areas that allow for the ingress of dirt and pollution; and
- poor housekeeping that encourages the activity of insects and vermin.
To improve the building envelope for collection storage the following should be considered:
- establish a schedule to have an annual maintenance building check and a 5 yearly building survey. Make good any repairs that are identified;
- install insulation in walls and ceilings to provide the best buffering possible from the ambient conditions, both in summer and winter. Insulation can be used to passively control the store environment;
- put draft excluders on windows and doors to reduce the ingress of dust and pollution and to minimise air exchange;
- ensure that kitchens and bathrooms are well ventilated and
- check that the garden reticulation is not impacting on the humidity within a building.
Store Room/s
When selecting a room or rooms for storage consider the following:
- internal rooms within a building offer the most buffering from the ambient conditions;
- ideally the storage room should not have services such as water or drainage in the vicinity;
- wide doors and corridors are preferable;
- pallet racking requires space for forklift access and adequate height for manoeuvring pallets;
- an anteroom is desirable for use as a holding/quarantine area;
- avoid carpets in storage areas as they harbour dust and possibly insects, are an added problem if flooding occurs and may emit organic vapours which are detrimental to some materials;
- seal floor and wall surfaces;
- cater for different types and sizes of collections by choosing the most appropriate storage furniture and ensuring that there is sufficient space in the store. Storage furniture may include drawers for smaller objects, cantilever shelving for very long objects such as spears, map drawers for the flat storage of large format paper objects and racks for rolled objects;
- it is useful to have a table (or two) in a storage area for examining objects;
- if the collection is used for research, it is useful to have a research room nearby;
- select the storage space so that the environmental conditions are the best possible with appropriate light, relative humidity, temperature, pest and pollution control (see the chapter Preventive Conservation: Agents of Decay).
- a store should not double up as a work room nor as a storage area for such things as shop stock; and
- have storage furniture designed to allow vacuum cleaning access underneath;
Holding or Quarantine Area
While private collectors are unlikely to have the luxury of a holding or quarantine area, it is strongly recommended that collecting institutions such as museums and historical societies set aside such an area. This area is used for temporary storage where objects may slowly acclimatise to their new surroundings and/or await inspection. New objects should be bagged and isolated from other objects until it is determined that there is no risk that they will introduce either insect pests or pollutants to other objects in the collection.
Condition Check
Before assimilating objects into a collection check for the presence of insects, mould, active corrosion on metals and dirt:
- if insect activity is observed (live insects or larvae, larvae cases, frass or eggs) the object has to be treated before it is assimilated into the collection (see the chapter Mould and Insect Attack in Collections);
- if fungal activity is detected then action needs to be taken to eradicate this before other objects in a collection are contaminated (see the chapter Mould and Insect Attack in Collections);
- if active corrosion is present, place the object in a drier environment and seek the advice of a conservator;
- if surface dirt is not an essential part of an object’s history then clean the object before putting it with other collection items (see the relevant chapter for cleaning details); and
- record all observations and details of any treatment applied to the object.
Acclimatisation
Acclimatisation is particularly important for objects that have been moved from one climatic zone to another. For instance, wooden objects that were stable in the higher relative humidity surroundings of the tropics will lose moisture if moved to drier regions. Slow acclimatisation is necessary to minimise drying stresses and associated damage. This may be achieved by sealing the object in clear plastic. Over time the plastic should be perforated (pin holes) to allow for slow exchange of moisture with the surroundings. The number and size of the perforations can be increased slowly as the object progressively loses moisture. Closely monitor the object to ensure that mould does not form during the acclimatisation process.
Similarly, objects from a dry climate also have to be buffered if transferred to a wetter zone. Great care must be taken when acclimatising objects as no hard-and-fast rules apply. The length of time before an object can be exposed safely to a new environment will depend on a number of factors. These include the difference in the climatic conditions of the areas involved and the condition, material type (for example, wood, leather, textile etc) and the thickness of the object. Acclimatisation periods of up to one year are not unusual.
Handling
Guidelines are given in other chapters for handling specific material types, but the importance of care and common sense cannot be over emphasised. A few general principles relating to handling and moving objects are described below.
- avoid unnecessary handling as most damage is done to objects through poor handling;
- remove jewellery, particularly on hands and wrists, as it can scratch or snag objects. Smooth wedding rings are fine;
- handle only one object at a time;
- cleanliness is very important. Wash hands thoroughly and/or wear well-fitting disposable or washable gloves that provide good tactile ability to the user. Kitchen rubber gloves are not suitable. Synthetic gloves should either be powder free or have the powder wiped from the surface before handling an object;
- choose gloves or use clean hands depending on the nature of the object to be handled. Use synthetic gloves when handling china, glass or smooth polished objects as cotton gloves are too slippery;
- assess the condition of an object before handling it. Use flat supports to carry objects that are fragile or unable to support their own weight. As a temporary measure, small bean bags can be very useful. If using small bean bags ensure that they are contained in a box so the object does not settle through the bean bags to the bottom and thus have no support;
- do not assume that handles are strong enough to support the weight of an object. Pick up objects with two hands cradling the strongest points;
- remove all loose parts such as lids and drawers to reduce the chance of breakages;
- place heavier objects on lower shelves and keep shelving at a safe height;
- assess the weight of the object to be handled. If an object is too heavy for one person, see if any components can be separated for the move or enlist the help of others;
- if appropriate use a trolley, forklift or similar device to move objects over smooth ground. Trolleys should have rubber wheels for a soft ride and swivel wheels to assist with accessing tricky places. If rough ground is to be traversed, manual lifting will cause less vibration/shock damage;
- do not drag or push objects across a surface;
- provide protection against temperature and relative humidity changes for objects being transported to an area in which different environmental conditions may be encountered (see Packing for Transportation below);
- think ahead, clear passages, open doors, remove obstacles etc; and
- be aware of and apply proper lifting techniques.
Care of Objects in the Work Area
- keep food and drink separate from the work area;
- keep the work space well organised and never compromise the safety of an object or staff;
- fragile objects should be placed on a padded surface (blotting paper, Bubble wrap™ or Cell-Aire®) which has been taped down to prevent slippage;
- prevent objects from rolling by wedging with a suitable material;
- place tissue paper or Tyvek® dust covers over objects while in the work place to reduce the accumulation of dust. Place a notice on top of the dust cover stating an object is underneath (‘Care Fragile Object Underneath’ or similar); and
- check the environmental conditions of the work area, particularly for sensitive materials.
Storage Furniture
Few institutions can afford custom made storage systems. The standard powder coated metal storage systems available commercially are ideal for museum storage and come in a range of sizes. Take time to work out and plan the requirements of a specific collection and to determine what may be required in the future. Then use this information to determine the best configuration of storage furniture for the store room(s).
Powder coated metal storage furniture is preferable to wooden furniture as it is inert. Formaldehyde in many types of wood and composite wood materials, such as chipboard and medium density board, reacts to form formic acid which is harmful to many materials. If wooden furniture is the only option, seal all surfaces with an aluminium foil laminate or a water-based polyurethane. Allow the polyurethane to off gas for four weeks before putting objects in the furniture.
The storage system required depends on the sizes of the objects to be stored and typically may comprise:
- metal cabinets of drawers (BAC™ type) for small objects;
- standard commercial type or compactus shelving for medium sized objects;
- long span shelving for medium to large objects and possible open storage;
- cantilever shelving for extra long objects such as spears;
- pallet shelving for large objects; and
- free standing floor space for very large objects.
Ideally, objects should be stored according to their classification in each of the above types of storage.
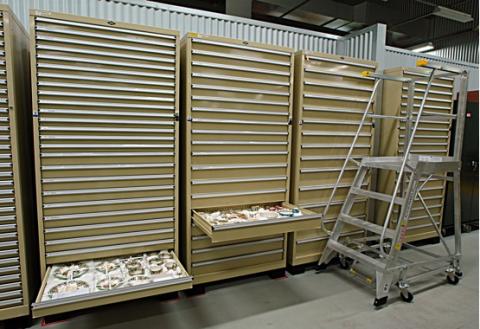
Metal Drawer Cabinets
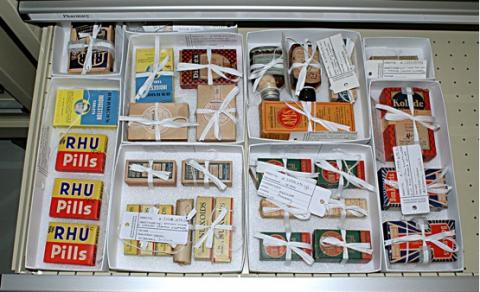
There are systems of powder coated metal drawers available that are state of the art for the storage of smaller objects (e.g. BAC™ system). If these are affordable, careful planning is needed to get the most useful configurations of drawer heights for the objects to be stored. Such drawers will usually require dividers within each drawer. Custom made modular specimen trays that configure into a drawer are very useful (Figure 1).
Figure 1: BAC™ units of drawers of different heights fitted with modular specimen boxes (image courtesy Jon Carpenter, WA Museum).
Standard Commercial Type or Compactus Shelving
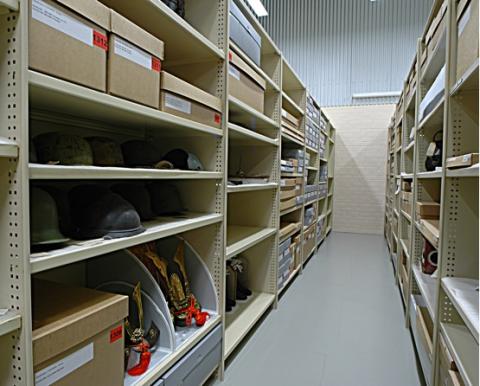
Choose the shelving type based on the objects to be stored and the best configuration for the storage space. Compactus shelving maximises space but involves movement of the shelving units which in some instances might not be desirable. If the ingress of dust is a problem use either compactus units or fit dust covers or curtains to the front of shelving. Use finely woven and washable materials such as cotton sheeting or Tyvek® for dust covers or curtains.
Medium sized objects are best stored within boxes on these shelves. Boxes can be made of cardboard, archival board or polypropylene (Figure 2). Standard boxes are available or can be custom made to configure with the shelving size.
Figure 2: Lightweight metal shelving units with objects, cardboard and polypropylene modular boxes. Note the space efficiency (image courtesy Jon Carpenter, WA Museum).
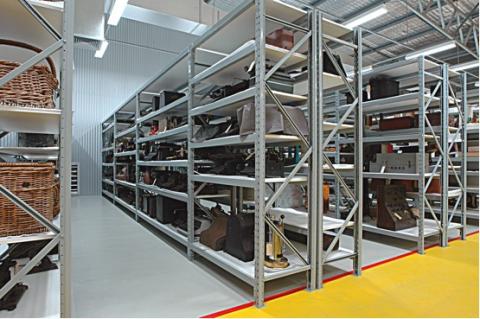
Long Span Shelving
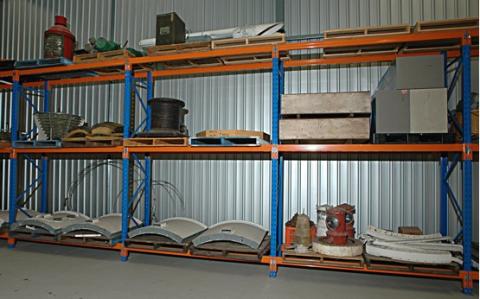
Providing there is no ingress of dust into the storage area then store medium to large objects unboxed on open shelving. Depending on the size of the store and collection to be stored these could be standard shelving as above or long span shelving as shown below (Figure 3). Line the shelves with 2 mm thick polyethylene foam sheeting such as Cell-Aire® to provide cushioning and to reduce skidding on the shelf surface.
Figure 3: Long span shelving with objects of similar height of the same classification stored on each shelf (image courtesyJon Carpenter, WA Museum).
Store objects in boxes if there is dust ingress into the storage area. Compactus shelving is not recommended for open storage due to the added risk of damage during the movement of the compactus units.
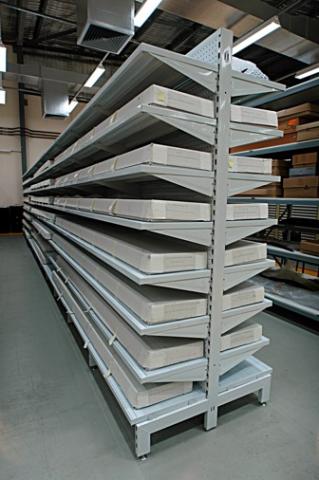
Cantilever Shelving
There are some groups of objects such as aboriginal spears that might require specialised continuous shelving such as cantilever shelving (Figure 4). This provides ease of access to the objects without the massiveness of long span shelving.
Figure 4: Cantilever shelving for the storage of long items (image courtesy Jon Carpenter, WA Museum).
Pallet Shelving
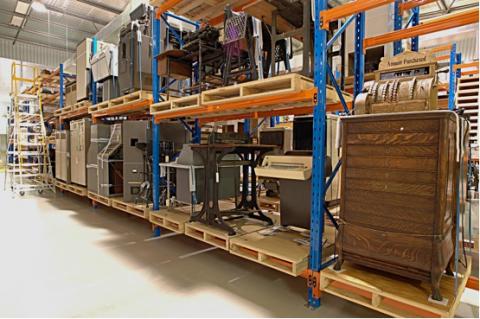
Use pallets and pallet racking for objects that are too large to store on shelves (Figure 5). Avoid the use of commercially available pallets as these are usually of poor quality and therefore unsuitable for use in collection areas. Instead custom make your own using exterior grade ply coated with water-based polyurethane. Ensure that any custom made pallets comply with industry standards regarding weight bearing loads and construction.
Figure 5: (a) Modular pallet racking with half pallets and third pallets in the middle bay. Note the space efficiency.
(b) Example of poorly stored objects on pallet racking – space inefficient storage (images courtesy Jon Carpenter, WA Museum).
Free Standing Space
Vehicles, boats, industrial machinery and other objects that are too large or too heavy to store on pallet racking will need to be stored on the floor. Ideally these objects should be slightly raised from the ground, perhaps on cradles or pallets. While this is not very space efficient it is necessary. Use dust covers.
Boxes
Storing objects in boxes is generally good practice. A box forms a further buffer to ambient conditions, restricts the movement of an object and protects it from light, insects and dust. As it encapsulates an object, a microclimate will be established within a box. It is important therefore that the box itself and any packing materials used inside it are compatible with the materials from which the object is constructed and will not cause damage to the object in the long term (see Packing for Storage below).
Recycling corrugated cardboard cartons for the storage of museum objects is not recommended and it is a definite ‘no no’ if they have previously contained food. As corrugated cardboard is made of wood pulp it is acidic and the corrugations are perfect habitats for insects. In addition the folds on the bottom of a carton provide an uneven base which may compromise object safety. Solid cardboard walled boxes can be used but not if they have contained food as any remnants will attract insects.
Storage box systems for specific sensitive types of material such as textiles, paper and photographs are described elsewhere (see the relevant chapters).
Types of Boxes
There is a range of boxes that are useful for object storage:
- Modular specimen trays – base with no lid;
- Modular brown cardboard boxes – base and separate lid;
- Modular polypropylene boxes – base and separate lid;
- Conservation suppliers’ standard boxes – base and separate or hinged lid; and
- Custom hand made boxes – diverse designs.
Modular Specimen Trays
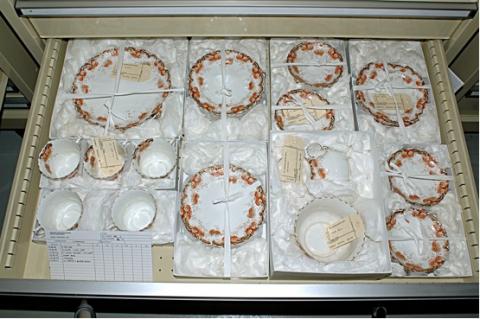
Modular specimen trays are custom made to fit the drawers of metal storage cupboards (Figure 6). These are made of non-archival card covered with archival paper. The build up of acidity in these trays is minimal because they are not lidded. Sizes are designed to configure within the drawer and could be a half, quarter, eighth or sixteenth of the drawer sizes. These trays allow objects to be secured within the drawer and therefore not suffer damage when the drawer is opened or closed, objects can be viewed without handling and can be moved by lifting the tray.
Figure 6: BAC™ drawers fitted with modular specimen trays.
(a) The china is held in place with small balls of tissue and cotton tape ties
(b) The objects are tied down to a Cell-Aire® base (images courtesy Jon Carpenter, WA Museum).
Modular Brown Cardboard Boxes
Modular brown cardboard boxes can be custom made for shelf storage (Figure 2). These are not archival and are most suitable for storing objects that are non-sensitive. However many small institutions are only able to afford this type of box. These boxes can still provide a durable and safe environment if a solid low acidic card is chosen, boxes are ventilated and when appropriate, lined with acid-free tissue or barrier paper to reduce acid migration (see Packing for Storage below).
Choose and configure the modular boxes so that the best use is made of the available space on the shelving without compromising the ability to remove box lids easily and without making the boxes too big and too heavy for easy handling. When having boxes made, check whether the manufacturer works using inside or outside dimensions and ensure that lids are about 100 to 150 mm deep. Damage can be done if it is difficult to remove a deep lid from a base.
Modular Polypropylene Boxes
Conservation suppliers will custom make modular polypropylene boxes (Figure 2). This is only cost effective if boxes are bought on a large scale as each differently sized box requires a template to be prepared, adding to the overall cost of the order. However, a carefully designed modular system can utilise all storage space on a shelf and therefore save money in the long term. As mentioned above, configure the boxes so that the best use is made of all available space without compromising either the artefacts or the ease of handling them.
Conservation Suppliers’ Standard Boxes
Conservation suppliers have standard boxes available made using archival multi-purpose board and polypropylene. It is prudent to include these standard box sizes in the equation when designing the best shelving configuration for a store.
Custom Handmade Boxes
It is most time efficient to use pre-made boxes even if fitting of additional components is required. Some objects will however, require custom hand-made boxes of archival multi-purpose board. While polypropylene flute board and Fomecore™ can be used for box making they require reinforcing along the joins. Archival multi-purpose boards are available in either single or double thicknesses, with the format and weight of the object to be stored determining which of these will be most appropriate for specific objects. There are templates available for different types of box making but some standard formulae and templates are
- base and separate lid with adhered joins;
- base and separate lid with folded construction;
- base with hinged lid with adhered joins;
- base with hinged lid and hinged front flap with adhered joins; and
- base with hinged front flap and separate lid with folded construction (Figure 7).
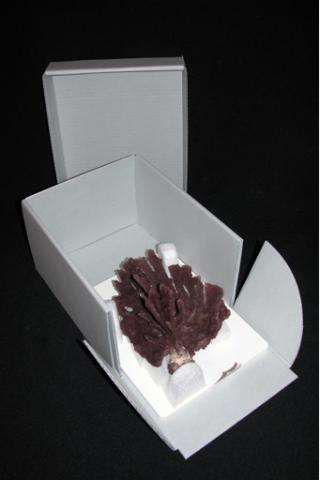
Figure 7: Custom hand-made box of archival multi-purpose corrugated board with hinged front flap and separate lid. The sponge is mounted on Cell-Aire® covered Ethafoam™ 220 supports mounted on a removable tray (image courtesy Carmela Corvaia, WA Museum).
The construction of custom hand-made boxes varies depending on the box design. There are designs where the construction is secured by folding, with tabs fitting into slots rather than using adhesives. Thinner boards such as single multi-purpose archival corrugated board are best for these types of boxes. Other constructions might require the use of hot glue, adhesives and tapes to construct the box. All have a flat piece of board as the base, unlike a carton which has four flaps folded in.
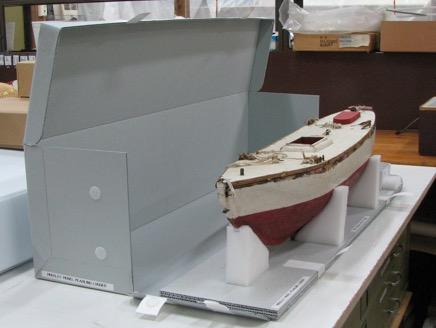
Some boxes can be cut out of one piece of board while others of larger format require stock board to be joined. Corner joins or joining stock board together can be done by neatly paring back about 40 mm of board to the outer card and adhering the overlapping card to the board. Ensure the construction technique is adequate for the weight of the object being stored. An additional base board greatly strengthens a box structure and can be used as a base on which supports can be adhered (Figure 8). Tyvek® tape can be used to make tabs for closures with Velcro self-adhesive dots if required.
Figure 8: Custom made box of archival multi-purpose corrugated board with hinged front flap and lid. The corners are adhered together. The model boat sits on a Cell-Aire® covered Ethafoam™ 220 cradle on a removable tray (image courtesy Maggie Myers, WA Museum).
Packing for Storage
General Principles
Packing techniques are as many and as varied as the objects for which they are designed and practitioners will develop techniques with experience. While the general principles outlined in this section can be extended to most objects it would be wise to consult a conservator when packing very fragile objects.
Packing Materials and Tools
While packing materials and tools are discussed below, further information is available elsewhere (see Appendix 6).
Objects of different material types have specific requirements for safe storage. These are described in other chapters that discuss particular material types. As micro-climates are established within boxes it is important that the packing materials within the box assist preservation rather than cause deterioration. The following table gives parameters for the pH and environmental preferences of some of the more common materials.
Table of Materials and Preferred Environments
| Material | pH 6 - 7 | pH 7 | pH 7 - 8 | Non-sensitive | Low oxygen, light and temperature |
|---|---|---|---|---|---|
| Aluminium | X | ||||
| Animal fibres | X | ||||
| Ceramic | X | ||||
| Copper alloys | X | ||||
| Film | X | ||||
| Glass | X | ||||
| Iron alloys | X | ||||
| Lead | X | ||||
| Leather | X | ||||
| Marble | X | ||||
| Paper | X | ||||
| Photographs | X | X | |||
| Plaster/gesso | X | ||||
| Plastics | X | ||||
| Rubber | X | ||||
| Shell | X | ||||
| Stone | X | ||||
| Wood | X | ||||
| Vegetable fibres | X | ||||
| Zinc | X |
Paper-based Packing Materials Include:
- acid-free unbuffered tissue paper;
- archival acid-free unbuffered tissue paper;
- buffered acid-free tissue paper;
- foam core board (Fomecore™);
- library board;
- multi-purpose archival corrugated board; and
- rising museum board.
Plastic-based Packing Materials Include:
- cellular polyethylene sheet (Bubble wrap™);
- polyester fabric (Parsilk or lining materials);
- polyester film (Mylar®/Melinex®);
- polyester wadding (Dacron™);
- polyethylene foam (Ethafoam™ 220);
- polyethylene foam (Ethafoam™ PE30);
- polyethylene foam backing rod;
- polyethylene foam sheet (Cell-Aire®);
- polyethylene sheet;
- polyethylene zip lock bags;
- polypropylene board or sheeting;
- polypropylene corrugated board (Coreflute®);
- polystyrene bean bags;
- spun bonded polyethylene sheet (Tyvek® sheet 1085D); and
- spun bonded polyethylene fabric (Tyvek® 1443R).
Polyvinylchloride (PVC), polystyrene and polyurethane products are generally not used in conservation because they are less stable than the above plastics and off gas detrimental acidic vapours as they break down. Despite this, polystyrene beads are used as a bean bag fillers and insulation for transport crates and water-based polyurethane paints are recommended as sealants for wooden surfaces. These products are not recommended for general use in conservation however.
Vegetable foam chips are unsuitable as a packing material for cultural heritage objects as the chips are water soluble and attract and harbour insects.
Restrainers and Tapes Include:
- cotton tape;
- double sided tape;
- paper tape;
- polyethylene self adhesive tape (Tyvek® tape);
- poly strap and poly strap buckles;
- velcro dots; and
- webbing tie downs.
Useful Tools Include:
- adhesives to secure overlapping parts of box construction;
- carpenter’s right angle or large set square to check right angles;
- cutting mat - the larger the better;
- cutting knife with replaceable blades;
- protective glove - available in different sizes from butcher suppliers;
- steel rule with a 6 mm vertical edge is the safest type to use;
- sharp scissors of different sizes;
- hot glue gun (3M Scotch-Weld™ recommended) to construct boxes, adhere support components within a box and a multitude of other uses; and
- folding tool (bone or wood, not metal) to mark boards for folds and then to establish them.
Packing Techniques
As the packing of any object involves a significant investment of time and money it is important to make the end result as good as possible. Take time to properly support an object and apply the following general principles:
- KIS – Keep it Simple;
- assess every object carefully;
- aim to be able to view each object without having to remove extraneous packaging;
- restrain objects so that they do not move in the box in any direction (see Figure 9);
- avoid having loose packing parts that will inevitably move within a container. Use hot glue to adhere cotton tape restrainers in place and machine stitch cotton tapes onto Tyvek® covers etc;
- avoid using heavy permanent markers (‘textas’) to label stock as the marks are disfiguring to the overall appearance of the packing. If necessary use a soft pencil instead;
- describe packing/unpacking procedures (including photographs if necessary) and adhere unpacking instructions to the outside of a packed object to minimise potential damage when complex procedures have been used for a particular object; and
- aim at high standards of presentation.
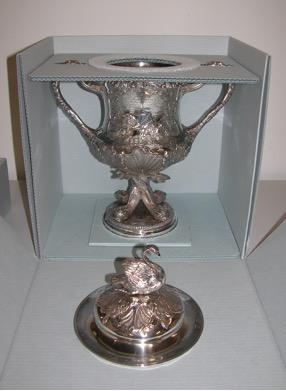
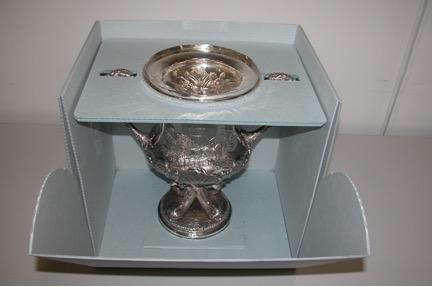
Figure 9: (a) Silver cup and lid in a custom-made box constructed from archival multi-purpose corrugated board with a hinged front flap.
(b) Board has been cut to restrict movement of the base and the handles with Cell-Aire® padding to cushion the base and lid.
Lining a Box
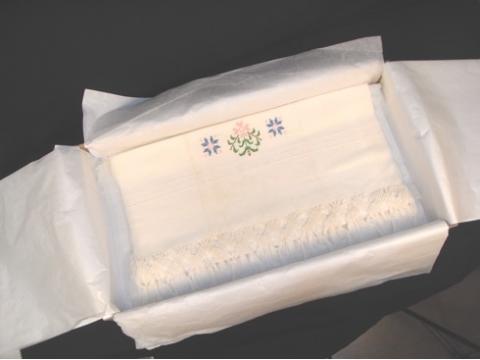
If sensitive materials require a box to be lined then it is important to line it with the correct tissue paper. Decide whether acid-free tissue or buffered tissue is the correct lining for the material being stored (see the Table of Materials and Preferred Environments above). Line the box using the tissue length ways to cover the base of the box, cover the sides and have enough to fold over the top (Figure 10). Repeat this along all sides. If necessary fold the tissue to the dimensions of the box rather than cutting the tissue as it is quicker and reduces the amount of small loose pieces of tissue that will move about in the box. Fit the tissue carefully into the corners rather than bunch them up. If the box format is large, the base may need to be covered with a full piece of tissue with the start of the lining tucked under the base tissue before covering the box sides. The tissue that will fold over at the top remains splayed out around the box perimeter until the box is packed.
Figure 10: A brown cardboard box lined with buffered acid-free tissue paper for the storage of linen and cotton objects (image courtesy Maggie Myers, WA Museum).
Ball Packing
This is a simple method of holding objects within the confines of a box with balls of tissue [see Figure 6 (a) above]. The object is well displayed and this method can be used for small to large lightweight objects. This method is not suitable for heavy objects that will not be restrained by the tissue balls. The format for the tissue paper is dependent on the size of the object to be packed. For instance the ball might be the size of an egg made from half a piece of tissue paper for a small toy being packed in a specimen tray. The area surrounding a costume however might be blocked out with larger balls each made from two or three sheets of tissue paper. The aim of the balls is to have an inner crushed structure covered with a smooth tissue finish that is closed at the bottom. These balls are suitable for blocking out objects within a box but the ball nature of them makes them unsuitable internal supports for materials like textiles. More open crushed tissue or crushed rolls of tissue are preferable for internally supporting textiles.
Base Board Packing
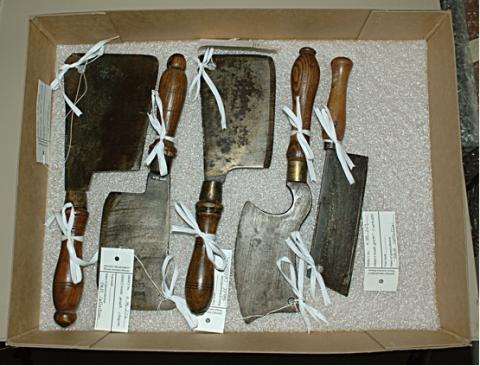
Base board packing is suitable for many small to medium-sized objects. The object is restrained and fully visible (Figure 11). Cut a base board of either single or double blue-grey corrugated multi-purpose board to fit the base of a box. Place the object on the board and mark the strongest anchor points of the object on the board. Cut slits at the anchor points and thread cotton tape down through one side and up through the other. Hold the centre point of the tape in place with a touch of hot glue on the underside. Cut strips of Cell-Aire® about 30 mm wide (the width depends of the scale of the object and the tape width) to ‘bridge’ the object. Cut a slit in each end of the Cell-Aire® bridge and thread the tape through, place the object on the base board and tie the tape in a bow over the Cell-Aire® bridge.
Figure 11: Base board packing showing strips of Cell-Aire® and tape restraints.
Cell-Aire® Lining
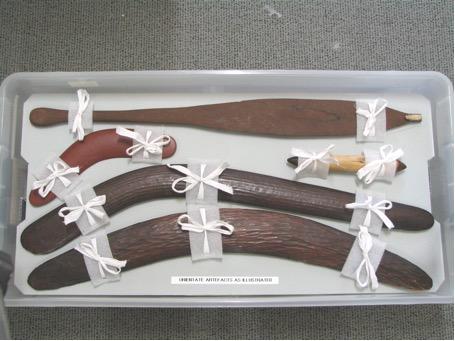
The Cell-Aire® lining method is suitable for many small objects, with the object restrained and fully visible. Line a tray or a box with 2 mm Cell-Aire®, cut using the box as the template (Figure 12). Identify the strongest part of the object and the number of anchor points that are needed. Mark the position of the anchor points on the Cell-Aire® with a soft pencil, remove the object and cut slits at each anchor point. Thread cotton tape through the slits using tape of a width that is most appropriate for the object in question - narrow for small objects, wide for larger objects. Don’t skimp on the tape and leave approximately 35 cm of tape for a bow. Use hot glue to tack the centre point of the tape to the underside of the Cell-Aire® to hold it in place. Thread the tape through the anchor point slits, then hot glue the Cell-Aire® base into the box. If needed, make Cell-Aire® bridges as described above.
Figure 12: Multiple objects tied onto a base of Cell-Aire® with room for an additional object of the same classification (image courtesy Jon Carpenter, WA Museum).
There are a multitude of variations of this method including shaping the Cell-Aire® base to support a 3D object and hot gluing Ethafoam™ supports or polyethylene backing rod bollards to support the object. The tape can pierce the box itself if additional strength is needed or preferred.
Note that Ethafoam™ 220 is very rough and should never be in direct contact with an object. Cover Ethafoam™ 220 either by hot gluing 2 mm thick Cell-Aire® over the contact surface or by covering with Parasilk or Tyvek®1443R. A variation of this method is to cut a slot around the supporting Ethafoam™ 220 and push Parasilk or Tyvek®1443R into the slot to hold it in place.
Foam Blocks
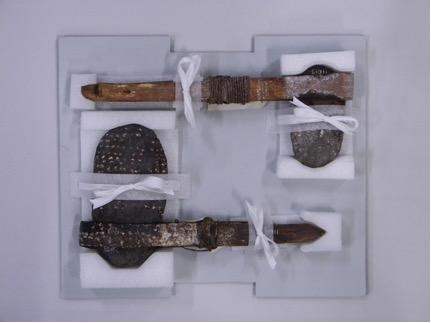
Heavier objects or objects that need to viewed without handling can be restrained with foam blocks attached either directly onto the base of a box or preferably onto a board cut to the dimensions of the base of the box (Figure 13). Identify the strategically important points of an object, taking into account the shape and the strength of all parts of the object. These might be the four corners of a square shaped object or they might be the ends of an object and a strategic depression in the object that if restrained would prevent the object from moving. Every object is unique and has to be assessed individually. Cut the Ethafoam™ 220 blocks to the appropriate size needed, shape if necessary, hot glue 2 mm thick Cell-Aire® over the contact surface and hot glue the block into place. The object can be tied with cotton tape through the board as described above or a foam block covered with Cell-Aire® can be fitted to the lid to prevent the object bouncing up.
Figure 13: Objects supported with Cell-Aire® covered Ethafoam™ 220 supports and tied down onto a multi-purpose corrugated board base (image courtesy Maggie Myers, WA Museum).
In some cases it is prudent to mark the orientation of an object on the base of the box so that it will be replaced correctly. This is very relevant when a suite of objects are boxed together. Knowing the orientation and which object goes where will save a lot of guess work at a later date!
Foam Cradle
This is a variation of the above, where the object has a sculptured shape and a cradle is needed to support it (e.g. a model boat). The object is usually mounted on a board that fits the base of the box. If light in weight the base board and mounted object can be lifted out using cotton tape handles. If the base and object are heavy however, then make the front of the box so that it can ‘flap down’ to allow the base and object to slide into place (see Figure 8 above). The box is either custom made or an adapted standard box. The object on the board can be pulled out of the box by Tyvek® tape tabs self adhered onto the base board.
Determine the number of cradle supports required and the strongest points of the object. Carve Ethafoam™ 220 blocks to shape and cover the contact surfaces with 2 mm thick Cell-Aire®, adhered with hot glue. Use hot glue to adhere the cradle supports in place on the base. As mentioned above, it may be prudent to show the orientation of the object on the base board so that it can be replaced correctly.
Objects on Pallets
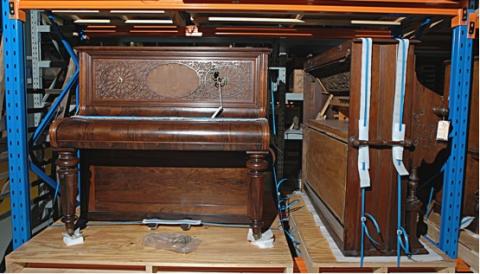
Objects stored on pallets need to be strapped onto the pallet as they will be moved by forklift and possibly stored at high levels. Hot glue Ethafoam™ 220 blocks onto the pallet to hold the corners of the object in place. Use poly strap to strap the object to the pallet (Figure 14). Use strips of Cell-Aire® to separate and cushion the object from the abrasive poly strap and Ethafoam™ 220. To stop the Cell-Aire® strips from moving, cut slits at each end of the Cell-Aire® and thread the poly strap through. Tighten the poly strap with poly strap buckles.
Figure 14: Objects strapped onto modular pallets with poly strap, Cell-Aire® protecting the edges of the object and Ethafoam™ 220 under the wheels of the piano (image courtesy Jon Carpenter, WA Museum).
Labelling
It is imperative to label a storage box with a list of its contents and describe the box’s location in an object registration system. This will allow objects to be easily retrieved when required. Each organisation will have its own methodology and practices which need to be followed. Attach a label or write on the side of the base of the box and on the lid, giving the object’s name, its registration number and if possible a photograph of the object.
Use a numbering system to identify shelving units and shelves within the units. Record the position of an object in an object registration data base or in a manual registration document. Update this information if an object is moved to a new location.
Packing for storage check list
- Has the object been packed in pH-appropriate packaging for the materials present?
- Is the object supported on its strongest points?
- Is the object restrained?
- Is the packaging simple but effective?
- Are instructions for access required?
- Is the presentation good?
- Has the box been labelled according to the institution’s protocol?
Packing for Transportation
It is prudent to assume that objects will be transported and handled without care and to pack accordingly. Request ‘air ride’ truck transport when a more cushioned conveyance is required. Document and photograph objects before packing so that any damage that occurs during transportation will be obvious. Incorporate temperature/relative humidity, shock and/or vibration data loggers in the packaging with extremely valuable objects. If an object is subsequently damaged during transit, the logger record can be used to determine the time of the impact, something that will assist in determining in whose hands the object was when the damage occurred. This will eliminate blame-shifting by identifying whether the damage occurred when it was in the hands of a courier, an airline or while being unpacked at its destination.
Factors to be considered before packing and moving an object include:
- fragility and condition - is the object strong enough to withstand transportation stresses?
- size, weight and value of the object;
- mode of transportation - is an ‘air ride’ truck needed for transport?
- type of container to be used; and
- type of packing materials.
Studies of global transport systems have shown that packed objects are most at risk when being either transported on moveable trolleys (large vibrations on uneven surfaces) or manually handled. Interestingly neither shock nor vibration was found to be significant during take-off or landing when objects were transported by air.
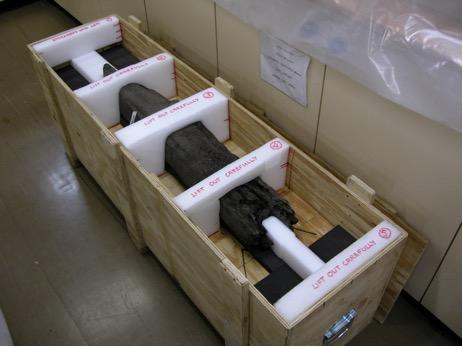
Containers may be made of either metal or wood, depending on the nature of the object to be transported. These materials provide some degree of protection against both shock and environmental changes. Commercially available aluminium transport crates can be fitted out for specific objects. Wooden crates can be custom made, ideally of exterior grade ply, coated inside with water-based polyurethane paint and allowed to off-gas for at least 4 weeks before packing (Figure 15).
Figure 15: Wooden transport crate containing a wooden anchor supported by Cell-Aire® covered Ethafoam™ 220 ‘bridges’ with clear instructions for packing and unpacking (image courtesy Maggie Myers, WA Museum).
Restraining objects is essential if damage is to be prevented from either constant or intermittent vibrations or shock such as when dropped or bumped violently. The size of the container should be such that the object and its packing fit snugly, but not too tightly, inside the container. In this way internal movement is restricted and the risk of damage is reduced.
Materials used in packing for transportation should:
- be resistant to shock;
- provide a buffer against changes in environmental conditions;
- provide a moisture barrier;
- not allow the object to settle to the bottom of the container following packing;
- be chemically inert; and
- be easily distinguishable from the packed object.
Along with the packing materials in the lists above, polystyrene board is also suitable for transportation packing. Polystyrene board is a good insulator and can be used as a liner to minimise temperature fluctuations within a crate. This is particularly relevant for air transportation where the temperature in the cargo hold can drop to -30 °C. Do not use loose polystyrene beads or other loose packing materials which are likely to allow an object to settle through the packing. Polystyrene bean bags are effective as long as they are tightly packed. Closed cell foams such as Bubblewrap™ are preferred to open cell foams like polyurethane foam for crate packing because they are better at preventing water ingress.
Objects for transportation can be wrapped in tissue and then again in Bubblewrap™ or fitted into a 3D cradle within a box so that there is no movement within the box. In the latter case, use shaped Ethafoam™ PE30 to provide object support with the object perhaps also wrapped in tissue or Parasilk, depending on the nature of its surface.
A typical crate packed with fragile objects might comprise the following layers (from the outside moving inwards):
- aluminium or wooden crate;
- lining of Marvelseal® 360 (an aluminium based nylon and polyethylene moisture barrier film), polyethylene sheeting or Mylar™ to waterproof it;
- lining of 30 mm dense polyethylene foam (Ethafoam™ PE30) or polystyrene boards;
- wrapped or boxed object supported in three dimensions;
- silica gel or Art-Sorb® can be incorporated into the packing if relative humidity fluctuations are likely; and
- Ethafoam™ PE30 or rolls of Bubble wrap™ in the spaces between the boxed object and the crate lining to stop any internal movement.
Check List for Packing for Transport:
- Has a method of transportation been decided on?
- Is environmentally controlled transport necessary?
- Have the objects been condition reported and photographed?
- Are the objects well packed with no movement within the crate?
- Have copies of documentation been included within the crate?
- Have environmental and vibration loggers been included if relevant?
- Has the outside of the crate been clearly labelled with the name of the contact person, address and the sender’s details?
- Has the consignment been insured for the transport period?
- Has the transportation itinerary been confirmed?
- Do staff need to escort the consignment to the departure point or even accompany it?
- Has all the information regarding the consignment been sent to all stakeholders?
Display
The display of objects, either as a large scale exhibition or a single showcase, is still a form of storage, albeit one that is visible and accessible to the public. In addition to the aesthetic presentation of objects in exhibitions, objects must also be protected against the usual agents of deterioration.
Objects can be exhibited on either open display or closed display within a showcase or cabinet. Open display is often the domain of larger objects while smaller objects are well suited to exhibition in a custom made showcases. Regardless of the design of the exhibition all objects will require a stable environment for the duration of their exhibition.
Open Display
Objects are often designed to be on open display as audiences respond well to fewer physical and intellectual barriers between them and objects of interest. As there is no glass to spoil the view of the object, audiences can interact with objects more closely and the gallery atmosphere often appears more relaxed and open. Open display also provides a means of displaying large objects that would otherwise never be seen by the public as the costs and means needed to construct and transport custom sized showcases are extremely high.
Some considerations for objects on open display include:
Gallery Space
- Temperature and relative humidity levels in the gallery space need to be less prone to fluctuations and may require adjustment to meet the requirements of the objects on display since they will not be buffered by a showcase;
- Exclude direct daylight from entering the gallery and use an appropriate and flexible lighting system that caters for the light and UV sensitivities of the objects on open display;
- When selecting materials from which to construct internal walls or furnishings (such as plinths), ensure that conservation grade materials are used (see the chapter Preventive Conservation: Agents of Decay);
- Choose paints for the building and internal structures (including plinths) that have minimal volatile organic components. Allow approximately 4 weeks for the paint to off gas before installing objects;
- Consider the security of the gallery space. Are there visible security guards or attendants present? and
- Consider the air filtration system and possible pollutant sources, including visitors who will be in close proximity to the objects on open display.
Display
- Objects on open display are generally more vulnerable to damage through inappropriate handling by the general public. As such, keep objects out of touching distance (generally an arm’s length or a minimum of 800 mm) by the use of either psychological barriers such as low level or sloping plinths that prevent the public from getting too close or physical barriers such as roped off areas, acrylic or glass barrier screens;
- Consider the stability of the object and if it can withstand the vibrations that may occur around it with people walking or running near it;
- Use a barrier layer such as Mylar™ under an object if it is placed directly on a painted surface to prevent the transfer of paint to the object. Foam such as high density Ethafoam™ PE30 may also be placed underneath objects to cushion their bases from hard floor surfaces;
- Consider the security of the object. What systems are in place to prevent theft? Are there pins attaching the object to the plinth or is it heavy and large enough so that it cannot be removed without someone noticing?
- Objects on open display require more regular maintenance and cleaning than objects in showcases as they are more exposed to the dust and pollution that is inside the gallery space. These objects are also more exposed to insect activity.
Closed Display - Objects in Showcases.
Showcases work quite effectively in grouping objects together and by protecting delicate, small and precious objects. Some cultural materials including certain types of rubber, plastics, wool and wood emit damaging gases that can accelerate the deterioration of other objects if they are confined in the same microenvironment within a showcase. Separate these materials and take appropriate steps to minimise the impact of pollutants generated by objects themselves (see the chapter Preventive Conservation: Agents of Decay). Showcases should have the minimum of visible structure so that there is the least possible distraction to viewing the objects. When sourcing or designing a showcase consider the following:
- type of construction materials;
- props and textiles for ‘dressing’ the case;
- glass or acrylic for panels and lids;
- stability and vibration;
- environmental control;
- pest monitoring;
- case access;
- security;
- lighting; and
- mounting and supporting objects;
Construction Materials
As microenvironments develop within display cases choose materials for their construction that are compatible with the objects that are to be displayed. Inert, inherently stable materials like glass, metals and some plastics including acrylics (like Perspex™ or Plexiglass™), polycarbonates and polyesters are all suitable. Many organic materials (resins, plastics, coatings, wood, adhesives and wool) release damaging gases including formaldehyde, acetic acid and sulphur compounds. Avoid incorporating these materials in showcases either as construction materials or as display props.
Do not use medium density fibreboard (MDF) or zero-formaldehyde MDF for display cases as they are not chemically stable. Instead use exterior grade Australian hoop pine plywood. Use either aluminium foil laminates such as Marvelseal® 360 or Moistop 622 Barrier Foil (Hook 2005) or a water-based polyurethane to seal the plywood to prevent organic pollutants from the wood and adhesives from being released into the display case environment. While the foil laminates are more expensive than polyurethane they are more effective at sealing wood. If using the water-based polyurethane, apply at least two coats of the sealant with a light sanding in between layers and allow 4 weeks for the fumes to sufficiently off-gas before enclosing objects in the space. Regardless of the sealant used, it is critical to seal all exposed surfaces, especially the edges and ends.
Display Props and Textiles
Having already established that the objects going into a display are pest free, it is most important that any props augmenting a display, particularly organic ones, are pest-free prior to being installed. Observe and treat all organic props to ensure that no pests are introduced into display cases.
Wash props like sand or stones before using them. Drying in an oven after washing will ensure that these props are also insect-free.
Wash all textiles that will be used as background display materials to remove finishes such as pest proofing and flame retardant agents. Do not use wool, silk, some rubbers and some treated leather products in display cases as they degrade to produce sulphides which will attack any metals in the cases. Test textiles for colour fastness especially if they will be in direct contact with objects (see the chapter Textiles).
Glass or Acrylic Panels and Lids
Glass and acrylic materials each have their own particular advantages and disadvantages when used in exhibition showcases. Glass provides a better seal when creating microenvironments but is heavy and expensive. Glass has a long life, can be used for larger size cases, allows for better hinge choices and with laminated glass, offers very good security for objects on display. Laminated low-iron glass is recommended as it is stronger, has a lower light absorption rate than clear glass and lower reflective properties.
Acrylics such as Perspex™ or Plexiglass™ are cheaper, lighter, do not break as easily as most glass, are easier to bond and easier to replace in an emergency. These are significant advantages if used for travelling showcases. Disadvantages of acrylic materials are their less scratch resistant surface, vulnerability to vandalism, tendency to craze with constant cleaning, limited opening techniques (acrylics and hinges don’t work very well together) and size limitations as acrylics do not work very well for large cases.
As a general guide, acrylics are recommended if short-term displays of up to 2 years are planned. If displays are planned for longer periods then glass is preferred. Do not use tempered glass in display cases as their shattering properties could lead to objects being showered with thousands of small glass fragments!
All glazing edges must be polished or fitted with edge protection. Glazing joins should be mitred and glued with an appropriate adhesive.
Stability and Vibration
Vibration and movement from external sources can cause damage to objects inside a showcase. Cases must therefore be structurally stable and secured to prevent their movement and the movement of the objects inside the cases. Ensure the stability of objects in a case and their ability to withstand vibrations that may occur around the case with people walking or running in the vicinity. Secure showcases against:
- the transmission of vibrations from surrounding floor areas to the interior of the showcases;
- any vibration associated with opening the case and while open; and
- any vibration or movement from drawers that may be part of either moveable display units or used to incorporate buffering/pollutant absorbing material in the display cases.
Well cushioned stoppers will reduce the vibration and minimise any physical damage to objects. Objects displayed in drawers need to be robust enough to withstand the movement and be supported on appropriate props that minimise possible damage.
Environmental Control
A comprehensive table of environmental requirements for cultural materials is provided elsewhere (Appendix 2). This appendix lists appropriate temperatures, relative humidity levels, maximum light and UV levels, maximum display periods per year, susceptibility to insect/mould attack and other conservation considerations. Some materials require specific environments that are free of oxygen, moisture or sulphur. Strategies for controlling environments to create favourable conditions that enhance long-term preservation are also provided elsewhere (see the chapter Preventive Conservation: Agents of Decay)
A well designed showcase can create a favourable internal microenvironment by using materials that buffer against environmental extremes and fluctuations and can also minimise problems associated with biological pests and airborne pollutants. Some methods by which these levels of control may be achieved are discussed below.
Case Seals
Seal display cases to exclude dust, minimise the ingress of pollutants and insects and form a buffer to ambient temperature and relative humidity changes. Such a sealing system should not be completely airtight or hermetically sealed however as it is necessary to allow one air exchange per day to avoid the build-up of potentially damaging fumes. Neutral-cure extruded silicon seals (either compression or adhesive gaskets) are suitable seals for display cases.
Relative Humidity Buffers
Buffering agents such as acid-free papers and fabrics can be incorporated into displays and as such will absorb moisture in a display case where fragile, humidity-sensitive materials are present. A facility drawer built inside a showcase will enable the use of silica gel in a cassette or Art-Sorb® sheets to similarly control relative humidity levels inside showcases.
Corrosion Inhibitors and Pollutant Control
A facility drawer in a showcase will also allow for the use of corrosion inhibitors (vapour phase inhibitors) where organic materials are displayed in proximity to metals that require low RH (less than 40%). Corrosion inhibitors will protect the metals on display and are usually active for 12 months. Activated carbon cloth or Microchamber™ papers and boards could also be placed in the facility drawer (or even as part of the display design) to reduce the effects of organic pollutants on susceptible objects such as lead.
Marvelseal® 360 is an aluminium based nylon and polyethylene moisture barrier film that will resist the passage of moisture and pollutants. It is an ideal barrier for the lining of wooden display cases, shelves and for lining transport crates.
All of the above methods require regular maintenance and monitoring in order to remain effective in controlling the environment within the showcase.
Pest Monitoring
A well sealed showcase will also limit insect activity inside a showcase. Do not use insect repellents or pesticides inside display cases as they create toxic microenvironments. Instead treat any insect-infested objects before placing them in cases and if necessary apply residual pesticides to skirting boards and to external parts of display cases and surrounding areas. Use sticky insect traps to monitor objects and displays, especially dioramas, which are susceptible to insect attack (see the chapter Mould and Insect Attack in Collections).
Case Access
Access is an important part of display case design. Limit the weight of doors and choose door equipment that is precision engineered for ease of use, maintenance and safe operation by one person. The doors of a display case must allow at least 60 – 90 % access to the display area without affecting the structural integrity of the case so that objects can be moved safely and maintenance carried out.
Most importantly, at no time should an object be put at risk through the opening movement of the door. In a sliding door system, the moving glass panel must slide in front of the one in the fixed position.
Security
Ensure that all showcases have locks or security screws installed to prevent the theft of valuable items. Install locks to the top and bottom rails of large standing showcases and to two sides of showcases that have four visible sides. When planning a large exhibition or permanent gallery, consider having all the showcases keyed to the same locking system to reduce the number of keys required. Ensure that there are at least two sets of keys to the showcases and that they reside somewhere that is accessible in disaster response situations.
Lighting
Museums must provide adequate lighting for viewing displays while at the same time reducing the risk of fading and damage caused by exposure to light and UV radiation. While light sources, lighting techniques and associated recommendations are described elsewhere (see the chapter Preventive Conservation: Agents of Decay), it is worthwhile emphasizing the following points:
- do not incorporate lighting systems inside display cases as the heat generated can cause a multitude of problems;
- use lights with low UV levels and high (> 90) colour rendering indices so that the true colours of objects can be observed;
- use lighting arrangements that allow for easy maintenance and control of light levels; and
- set light levels in a case to cater for the most light-sensitive object in the display.
Mounting and Supporting Objects
In order to accommodate a number of objects and to make a display more dynamic, objects need to be mounted in some way. Some objects may also require support because they are fragile, inherently weak or deteriorated, are at risk of damage when handled or require arranging or displaying in a certain way so that the interpretation of the object is clear. While it is acknowledged that compromises may be required between the conservation requirements of adequate support and the aesthetically pleasing look of a display, the safety and long-term preservation of an object must always be the number one priority.
Although preparing and supporting objects for display are specialised tasks, some methods and materials are described below.
All materials used to mount objects in a display should be inert and of archival quality. In addition to the materials described previously (see the chapter Preventive Conservation; Agents of Decay), acrylic rod, stainless steel rod covered with silicon tubing, fishing line and magnets are acceptable for use for display mounts. As specified countless times, ensure that all wooden parts including display props, plinths and similar object are suitably sealed, either using a water-based polyurethane or Marvelseal® 360 barrier foil.
Do not use Blu-tac, sticky tapes, plasticine and similar materials to mount objects for display. Over time the adhesion will fail and the oil or adhesive will migrate into porous material and leave an irreversible stain on the object. Likewise thumb tacks and nails should never be used as a mounting media in direct contact with objects as they cause permanent damage by leaving holes in objects.
Use physical barriers to avoid having objects in direct contact with display case materials like wooden or painted surfaces. This minimises the risk of damage to the object by the transfer of potentially damaging chemicals. Mylar™ (cut to shape) is a useful product to place as a barrier between an object and a display case surface. Also consider using an acrylic plinth or support to raise an object from a risky surface.
Other considerations include ensuring that:
- all shelves or plinths are strong enough to support the weight of the objects;
- there is sufficient padding at contact points with the object without compromising the object’s stability;
- the mount does not have sharp edges and is non-abrasive;
- display materials are colourfast, economical and durable; and
- display furniture is as unobtrusive as possible.
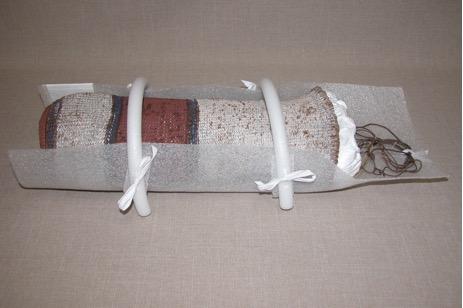
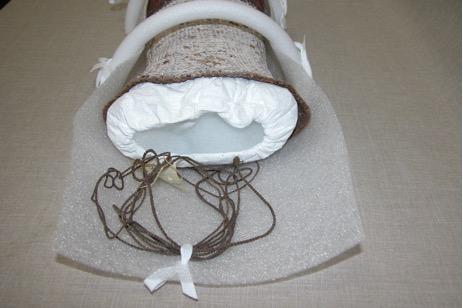
Internal supports may be required for objects that are vulnerable to collapse over time, as well as for non-rigid objects like some leather objects and textiles. Bonnets, hats and baskets for example, will usually require internal covered structures to support their shape. The support could be a shaped Dacron™ filled cushion or a shaped and covered structure such as Ethafoam™ (Figure 16). Loose wadding such as Dacron™ is unsuitable for use as a support as pressure is put on the inside of the object as opposed to the cushion cover and loose fibres may attach to the inner surface of the object.
Costumes and garments should be supported on well-fitting mannequins where appropriate (see the chapter Textiles).
Figure 16: Fragile painted basket supported internally with a Dacron™ filled Tyvek® 1443R cushion (opened to show the filling) in a Cell-Aire® cradle with polyethylene foam backing rod ‘bridges’ (image courtesy Carmela Corvaia, WA Museum).
An object may require an external support to assist in holding it in a stable position or in a position that is necessary for its proper interpretation. A canvas diving suit for example could not be displayed in a vertical position without external support as it is not capable of supporting its own weight. In such cases locate suspension points in the strongest areas of the object.
Books, if displayed open, also require support. Use custom-made stands to support the structure of the book at about 150° so that the spine is not stressed over time (see the chapter Paper and Books).
Larger textiles that are hung for display require a supportive and strong hanging system while smaller textiles might require mounting on a padded board for support (see the chapter Textiles). Hanging or suspending objects can be fraught with potential problems and the risk of damage to an object is high. Contact a conservator for advice if considering this display option.
Pre and Post Display Condition Reports
Examine and document all objects before they are displayed and again at the end of their exhibition period. Written descriptions, photographs and sketches may all form part of the condition report documentation. By doing this it will be possible to determine if objects have suffered any damage while on display. If objects have been damaged while on display take steps to rectify the situation.
Display Criteria Checklist:
- Are the materials within the display area inert?
- Have all the environmental issues been addressed within the display environment?
- Have condition reports been done?
- Are the objects adequately supported? and
- Have all props been properly quarantined?
Summary
- Insulate and maintain storage buildings so that they are able to effectively buffer changes in external ambient conditions.
- Inspect objects, object supports and props to ensure that all are pest-free prior to storing or using in a display.
- Allow objects to slowly acclimatise to new environments if they are moved from one climatic zone to another.
- Cleanliness, common sense and assessments of the conditions and strengths of objects are critical to ensure that handling damage is minimised.
- Use inert, archival quality materials and choose the most appropriate storage furniture and boxes for objects that are to be stored.
- Plan carefully so that space is utilised as fully and effectively as possible in storage areas but without over-crowding that may lead to damage.
- Maintain appropriate environments and practices that minimise the impacts of changes in temperature and relative humidity levels, high light and UV levels, pests and pollutants while objects are either in storage or on display.
- Pack objects to restrict movement and to protect against damage caused by agents of deterioration and poor handling.
- Use inert, archival materials as props and to support objects on display.
- Monitor the condition of storage environments and the condition of vulnerable objects.
Bibliography
Anstey, S, 2002, Steel shelving systems for small-to medium-sized objects, in Museum methods: a practical manual for managing small museums and galleries, (Ed.) P. Landman, Museums Australia Inc (NSW), Sydney.
Barclay, R., Bergeron A. and Dignard, C., 1998, Mount-making for Museum Objects, Second Edition, Canadian Conservation Institute, Ottawa, Canada.
Bouwmeester, W. and Murray, W., reviewed 2005, Factsheet Creating or Improving Stores, Scottish Museums Council.
Coote, K. (Ed.), 1998, Care of Collections, Conservation for Aboriginal and Torres Strait Islander Keeping Places and Cultural Centres. Australian Museum, Sydney.
Hook, E; Guidance notes; choosing a new display case, Scottish Museums Council, reviewed 2005.
Museum methods: a practical manual for managing small museums, Section 3 Preventive Conservation, 1994, 2nd edition, Museums Australia Inc, Newmarket, NSW.
reCollections, caring for collections across Australia, 1998, Heritage Collections Council, Canberra.
Rose, C. L. and de Torres, A. R. (Eds), 1992, Storage of natural history collections: Ideas and practical solutions, Society for the Preservation of Natural History Collections, Pittsburgh.
Shelley, M., 1992, The Care and handling of Art Objects: Practices in the Metropolitan Museum of Art, Revised edition, The Metropolitan Museum of Art, New York.

