Textiles
N. King Smith and M. Myers
Introduction
Although the word textile literally means ‘woven’ and a ‘woven fabric’, it has come to encompass materials produced by a variety of techniques including knotting, knitting, lace making, braiding and felting. Methods used for preserving textiles are many and varied and depend on the nature of the textile material and its chemical and physical condition.
Although the longevity of textile materials is determined largely by how well they are looked after, the survival of ancient textiles is usually attributed to good fortune rather than to the application of particular treatments or to careful management. Often fortuitous storage conditions, as a result of materials being forgotten, lost or buried, are responsible for their survival.
A qualified conservator is the best source of advice concerning the preservation of textile collections. As a first step however, it is necessary to understand the materials themselves.
Fibre Types
Until modern times all textiles were made from fibres drawn from natural sources such as protein-based animal fibres (wool and silk) and cellulose-based vegetable fibres (hemp, jute, flax and cotton). These materials have been used in textile manufacture for thousands of years, following the development of spinning and weaving technology.
In the early 19th century attempts were made to produce fibres in the laboratory. Initial attempts that involved the dissolution and reforming of natural materials had only limited success. By the early 20th century, some semi-synthetic fibres, such as casein (protein-based) and rayon (cellulose-based), had been produced commercially. Rayon is a generic term which covers a variety of fibres including cuprammonium rayon and viscose rayon. Fabrics derived from rayon are likely to be found as part of a textile collection while casein-based textiles are less likely to be encountered.
It was not until the 20th century and the development of the petrochemical industry that materials other than those from natural sources were used to produce textiles on a large scale. Examples of fully synthetic fibres developed in the 1940s include polyesters (‘terylene’, ‘dacron’), polyamides (‘nylon’) and acrylics (‘acrilan’, ‘orlon’).
To modify the properties of the individual constituents, blended fabrics have been developed. Two or more fibres are blended before they are spun into yarns. In combination or union textiles, individual yarns of one fibre type are interwoven with yarns of another type, again leading to the production of fabrics with modified properties. Polycotton is a good example where the qualities of absorption and coolness of cotton are combined with polyester for strength and non-creasing properties. The addition of acrylic fibres to other fibre types leads to an increase in the softness and warmth of the resultant fabric.
Fibre Identification
The identification of textile fibres is important because different fibre types require different conservation treatments. Optical microscopic examination and/or Fourier Transform infrared (FTIR) spectroscopic analysis of representative fibres are the most conclusive methods of identification. There are numerous texts available which describe the characteristic features that allow fibre types to be optically differentiated (Catling and Grayson 1982, The Textile Institute 1970).
Take care when selecting fibres for identification as the features of degraded fibres may differ from those of corresponding undegraded fibres. Careful sampling and examination are essential for accurate identifications. In many cases the condition of a textile can also be determined during this examination and identification stage.
Woven Textiles
This section on weave structures, finishes and dyes is summarised from Landi (1985). To make a woven textile the fibres are prepared for the rigorous treatments involved in weaving. Fibres from a bulk supply are twisted to form a continuous thread. The resultant thread can be tightly or loosely spun to produce materials of differing densities, in either ‘S’ or ‘Z’ twists. The thread is plied together to make bulkier and stronger thread. ‘S’ spun threads are ‘Z’ plied and vice versa.
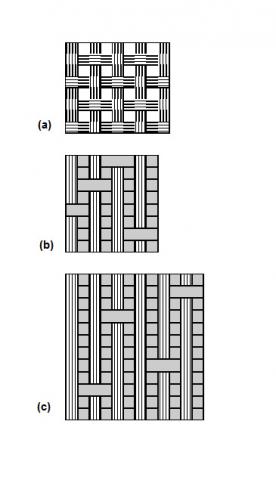
The weaving process involves the use of a loom on which threads are laid down parallel to each other and held under tension. These threads, called the warp, run the entire length of the cloth being produced. Another thread is then interlaced between the threads of the warp in set patterns, alternating between travelling right and left through the warp. This interlacing thread, the weft, effectively creates the cloth. There are many types of weave, from simple to highly complex. Three of the more common weaves are shown below (Figure 1).
Plain or tabby weave is the simplest weave with the structure consisting of a one over and a one under pattern for the warp and weft. This produces a uniform surface on the front and the back of the cloth.
Twill weave is slightly more complex, involving a one over and two (or more) under structure in which each successive pass moves along one warp, creating a diagonal pattern. Variations of this pattern include chevron, herringbone and diamond twills.
Satin weave, although similar in structure to that of twill, does not have the characteristic diagonal appearance that typifies twill. This weave is smooth on one surface and dull on the other.
Figure 1: (a) Plain or tabby weave.
(b) Twill weave – one over, three under.
(c) Satin weave.
Finishes
Woven textiles are often processed further before they are considered ready for use. Additional treatments may be aimed at improving appearance, texture, weight, flexibility or ease of care. The most commonly applied treatments include dyeing, bleaching, mercerising, weighting, moth proofing, sizing and glazing. The majority of textiles in a collection will have had some sort of finish applied to them.
As the original treatment of a textile is an inherent part of the item, it must be taken into account before any treatment is embarked upon. Otherwise, ill-considered conservation treatments may change the character of the cloth irreversibly.
Dyes
Until the 19th century dyes were derived primarily from natural sources. Two of the best known natural dyes are indigo (from the indigo plant), and Tyrian purple (from molluscs).
Although some dyes have a natural affinity to fibres, most require the assistance of a mordant. The mordant, which is usually a metal salt, is applied to the fabric before dyeing to increase the attraction between the fibre and the dye. Mordants are also used to give the dyer a greater selection of colours. Madder dye for example, gives a rust red colour when used with an alum mordant and a brown colour with an iron mordant. Mordant dyes are used on fibres or fabrics of wool, silk, nylon and cellulose.
Although natural dyes are not generally considered to be fast to light, actual colour fastness varies greatly, depending on both the fibre type and the method of application.
Deterioration
The principal agents of deterioration of textiles are:
- light;
- temperature and relative humidity;
- pollutants and chemical degradation;
- dust;
- inappropriate repairs and handling; and
- biological deterioration (insects and mould)
Substances incorporated in finishing and manufacturing processes may contribute to textile degradation. For instance, metal-based dyes and dye mordants can accelerate rotting of fibres, producing gaping holes in affected fabrics. In silks the weighting, which was introduced in the form of metal salts to increase the weight and make the silk crisper and more drapable, actively promotes the degradation of the fabric. There is little that can be done for these fabrics as deterioration will continue even under good storage conditions.
Light
All forms of light are damaging to textiles. Photochemical reactions initiated by light energy can lead to the deterioration of the principally organic textile components. The damage to a textile by visible and invisible radiation is cumulative and irreversible. Of particular importance is the ultraviolet (UV) radiation band which supplies enough energy to break the molecular bonds found in textile fibres. UV radiation is present in daylight and is also emitted by many types of artificial light. Control of visible light and UV radiation is described in an earlier chapter (see the chapter Preventive Conservation: Agents of Decay).
Closely monitor and limit the amount of light to which textiles are exposed, particularly those on display. Storing textiles in the dark is standard practice.
Isolate light sources from textiles because heat generated from light sources can accelerate deterioration. Most light sources generate heat and this can build up, especially if the light source is housed in the same closed cabinet as the textile.
Temperature and Relative Humidity
Do not expose textiles to high temperatures. Often the effects of heat damage are not immediately obvious but may be manifested by fibres becoming brittle or discolouring.
Relative humidity is a well understood agent of destruction. Fibres expand and contract in line with changes in relative humidity. Continual fluctuations of this type create stresses in fibres which may eventually lead to fragmentation of the textile. Under low relative humidity conditions fibres shrink, textiles become desiccated and lose flexibility. They are then more susceptible to damage when handled. If on the other hand the textile is exposed to high relative humidity conditions then the chemical stability of the textile will be threatened, the effects of light exposure enhanced and mould growth and insect attack encouraged.
Pollutants and Chemical Degradation
As in the case of heat damage, many of the effects of chemical reactions occurring in textiles are not immediately obvious. They often only become evident after physical damage to the fabric has already occurred. The effects of chemical degradation are irreversible.
Air pollutants such as sulphur dioxide, oxides of nitrogen and ozone all contribute to the chemical degradation of textile materials. These pollutants are more likely to cause problems in towns and industrial areas where emissions from car exhausts and factories are the greatest.
Although cellulose fibres, such as cottons and linens, can tolerate a limited degree of alkalinity, they are sensitive to acidic and strongly alkaline conditions. Both acids and strong alkalis attack the molecular structures in the fibres, causing them to become friable and the textile to weaken.
Protein fibres, such as wool and silk, can tolerate exposure to weak acidic conditions but are susceptible to attack by alkalis and strong acids. These latter substances attack the molecular structure, degrading the fibres and robbing them of tensile strength.
It is important to take these chemical reactions into account when designing treatments for textiles. For example, the type of cleaning processes applied to a fabric must be thought through carefully so that damage to the textile is avoided. For instance, do not use alkaline cleaning agents on protein-based textiles.
Dust
Dirt and dust inevitably end up embedded in textile fibres. Dust particles can cause physical damage through the abrasion of fibres, or promote degradation by acting as a nucleus for condensation, mould formation and accelerated chemical attack by adsorbed chemicals.
An indirect effect of dust and dirt build-up on textiles is the impact of resultant cleaning on these materials. All cleaning treatments are irreversible and no matter how carefully they are carried out, have the potential to weaken textiles.
Inappropriate Repairs and Handling
Much damage is done to heritage textiles by inappropriate repairs, wearing of costumes and handling textiles incorrectly. Well meaning custodians of textile collections have been known to smarten up, add to and/or replace parts of textile artefacts in their effort to care for their textiles. Minimal intervention is recommended.
The wearing of heritage costumes is considered inappropriate for many reasons. These reasons include stressing an already fragile material, the use of unsupportive under garments for the style of the costume, unnecessarily introducing pollutants, including perspiration, into the textile, possible staining from food and drink, hems trailing and possibly exposure to extreme light levels.
Inappropriate handling will transfer oils, dirt and acidity from hands to textiles and textiles can be damaged if not well supported while being moved or manipulated.
Biological Deterioration – Insects and Mould
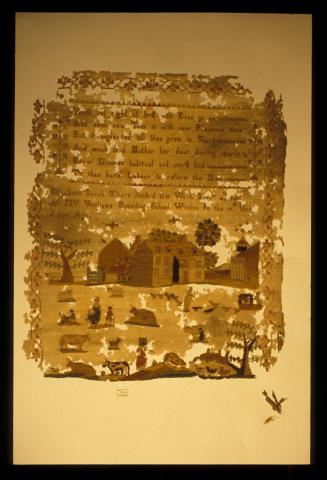
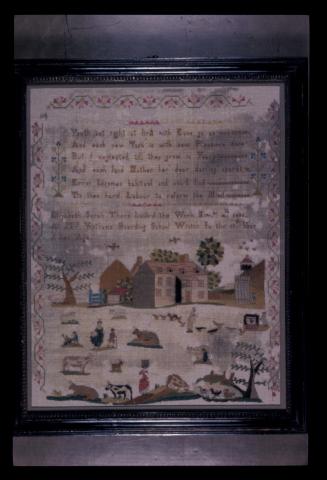
Textiles made from naturally occurring materials are most susceptible to insect attack whereas synthetic materials are rarely damaged (Figure 2). Insects cause damage in two main ways. Insect larvae destroy fibres by eating them while soiling and disfiguration occur when insect faeces and frass accumulate on textile materials.
The presence of moths flying about is only indicative of a potential problem as it is the larvae that emerge from the eggs laid by the moths that cause problems for textile collections. Micro-organisms flourish when air circulation is low and the relative humidity is 70 % or more and are capable of rapidly breaking down and drastically weakening textiles. Mould or mildew can result in stains on the textile that are often very difficult, if not impossible, to remove.
Figure 2: (a) Sampler before treatment. Damaged by insects, neglect and poor storage.
(b) Sampler after treatment – supported on a linen backing and framed.
Of the naturally occurring textiles, protein-based materials (wool, silk and fur) are most vulnerable to insect attack (especially by carpet beetles and clothes moths) whereas cotton and other cellulose-based materials are more prone to microbiological attack. Under conditions that favour mildew growth however, wool will still be attacked. Similarly cotton and other cellulose-based fibres are still at risk from attack by insects such as silverfish. Damage may also be caused to textiles by wood-boring insects that penetrate textiles that are in contact with their preferred food source.
Preventive Conservation
All textiles have a natural tendency to decay. A prime conservation objective therefore is to minimise the impact of factors which contribute to degradation processes. A further aim of textile conservators is to preserve the integrity of an artefact so that it reflects not only its basic nature but also its history of usage. In realising this aim it may be necessary to avoid treating certain artefacts, especially if the treatment is likely to result in the loss of historical information. There will be other times however when historically significant material may have to be removed if it is considered likely to contribute to the degradation of the textile if it is retained. Each case must be judged on its merits.
As some historic textiles cannot be cleaned or softened, they will remain inflexible and therefore susceptible to fibre damage upon handling. Textile conservation is heavily based on non-interventive techniques such as using correct methods to support and handle these materials and maintaining the best possible conditions in storage and display areas. In this way, degradation processes will be slowed and significant historical and technical information will be retained.
Preventive conservation strategies are aimed at ameliorating the impacts of the main agents of textile deterioration. Some of these strategies include:
- storage and display in appropriate environmental conditions;
- control of conditions to minimise mould formation and insect activity;
- the use of appropriate storage materials, methods and handling; and
- dust control and good housekeeping practices.
Environment
Optimal temperatures and relative humidity levels for storage and display areas are 15 – 25 °C and 45 – 55 % respectively with maximum variations of 4 °C and 5 % respectively in any 24 hour period. Relative humidity levels of 70 % or greater increase the risk of mould growth, insect attack and chemical degradation of textile fibres by pollutants. On the other hand, relative humidity values of 40 % or less increase the risk of desiccation and subsequent embrittlement of fibres.
Keep conditions as stable as possible. Place artefacts in boxes, cupboards, drawers, showcases and even frames to stabilise the conditions by buffering the impact of external temperature and relative humidity changes. Keeping textiles within a display case or storage box also reduces the effects of pollution. In extreme cases seals and filters might need to be installed in the building or in the secondary containers and cabinets.
Maintain light levels where textiles are displayed at a maximum of 50 lux with UV levels as low as possible, but preferably below 30 µwatts/lumen (a total UV exposure of 1500 μW/m2). Store textiles in the dark but also ensure that light levels in storage areas are sufficient so that textiles can be examined without strain when necessary.
Insects
Regularly check display and storage areas for signs of insect activity such as the presence of insects themselves, insect cases, eggs, larvae or frass. Use and regularly monitor sticky insect traps to gauge the level of insect activity. While it is the insect larvae that do the damage, the presence of adult insects is indicative of a potential problem. Since dead insects are a food source for other insects, good housekeeping is imperative. Insects found most commonly in textile collections (carpet beetles, moths and silverfish) are best controlled by thorough and regular cleaning.
Do not eat or drink in any areas where artefacts are housed as food fragments attract potential pests.
Isolate and inspect new items for signs of infestation before bringing them into storage or display areas. This can be done by enclosing the item in a polyethylene bag for two to three weeks. Inspect the bag regularly during this period for signs of larvae, insects or frass and also to ensure that there is no relative humidity build up in the sealed bag. If no evidence of insect activity is found then the object can be registered into the collection and moved into the collection storage or display areas.
If pests are found, providing the textile is not painted, the insects in textiles can be eradicated by freezing. Although details of freezing techniques are given in an earlier chapter (see the chapter Mould and Insect Attack in Collections), it is necessary to stress the importance of wrapping the textile in tissue paper before sealing it in a plastic bag prior to freezing. The sealed plastic bag prevents desiccation of the textile during freezing and the tissue protects the textile from any condensation that might result during the thawing process.
Do not apply pesticides or other chemicals to textiles as these may be damaging to the textile and the handler.
Mould
Damage caused by mould is largely irreparable. If mould is found on a textile, isolate it immediately, place it in a lower relative humidity environment and seek the advice of a conservator. Mould can be controlled by ensuring that the relative humidity of storage and display areas is kept below 70 % with good ventilation.
Appropriate Storage Materials: Methods and Handling
Use archival quality materials in storage and display systems, particularly for those materials in direct contact with textiles. Acid-free materials (pH 7) are recommended. Some acid-free materials are buffered with an alkaline buffering agent. While these buffered materials are safe for use with plant-based textiles (cotton, linen etc) they should not be used with protein-based textiles such as wool and silk.
Where possible, individually box textile items (see later sections on storage and display). As storage in a box or framing a textile create microclimates, the best archival quality preservation materials should be used in their construction. Polypropylene or acid-free boxes are highly recommended. If brown cardboard boxes are the only storage system available, for cellulose-based textiles (cotton, linen), line the box with buffered acid-free tissue or Tyvek® and wrap the textile in buffered acid-free tissue. For protein-based textiles such as wool and silk that prefer a slightly acidic environment, line brown cardboard boxes with non-buffered acid free tissue or Tyvek®. To do this, fold the tissue paper or cut the Tyvek® to fit the dimensions of the box. Fold the tissue or Tyvek® over the artefact before putting the lid in place. Controlling the relative humidity in the store to around 50 % will reduce the extent of acid migration from the cardboard to the contents.
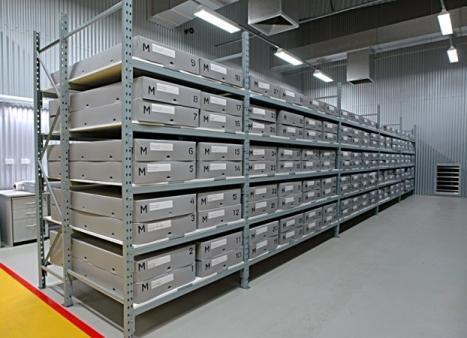
A well labelled storage system with easily accessible shelving is recommended. Powder coated metal shelving is preferred to wood or chipboard (Figure 3). If the latter are all that are available they must be well sealed with a water-based polyurethane lacquer or other appropriate sealant (see the section on Pollutants in Preventive Conservation: Agents of Decay).
Figure 3: Textile storage boxes on powder coated shelving.
Do not store textiles in plastic as many plastics generate electrostatic charges which attract dust. This can be easily transferred to a textile during unpacking. In addition, a drop in temperature inside the bag will increase the relative humidity and may contribute to enhanced chemical and/or biological degradation.
Examine the original storage and/or packaging of the textile as it may provide useful additional information about the ownership, manufacture or other details of an object’s history. Depending on the significance of this material, either store it separately from the textile or discard it.
Handle textiles with cotton or vinyl gloves to avoid the transfer of grease and acids from hands to the textile. Where gloves are impractical, such as when treating a textile, hands must be well washed. Do not wear jewellery whilst treating textiles as the fibres can get snagged and damaged. Support textiles when moving them, either in a box, on a roll or by spreading the weight evenly over the carrier.
Dust Control and Housekeeping
As dust can cause abrasion and discolouration and attracts moisture and insects, choose a room for textile storage or display that allows for good control of dust levels and which can be kept as dust-free as possible.
Regularly clean all shelves, floors, vents and windowsills. Use a vacuum cleaner with a HEPA filter for cleaning. Do not have carpets in these areas as they attract dust and insects.
Storage Systems
Store and display textiles under the environmental conditions described above.
Flat Storage
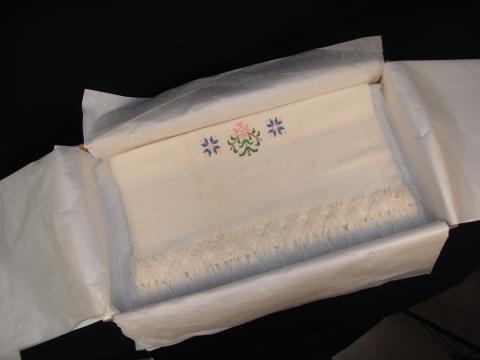
Store textiles as flat as possible with minimal folding. This provides maximum relaxation for fibres while avoiding weight-bearing stresses. If folding is unavoidable, support folds with a sausage of crumpled acid-free tissue. This minimises damage along the folds, the points at which there is most stress on the fibres. While it is generally preferable not to layer items to minimise creases and folds, small light weight two dimensional textiles can be interleaved with acid-free tissue with several placed on top of each other (Figure 4).
Figure 4: Box packed with flat textiles (two dimensional storage).
Large metal map cabinets and low profile acid-free cardboard or polypropylene boxes provide excellent storage media for flat textiles with minimum folding. In addition to allowing for easy transportation, these boxes provide light and dust protection.
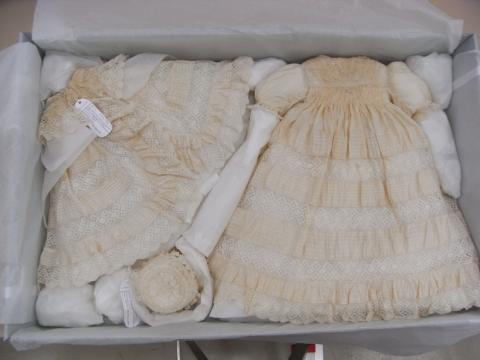
Support three dimensional artefacts with crushed acid-free tissue and lightly fill the surrounding area within the box with rounded balls of tissue. This prevents the textile slumping in the box when it is moved (Figure 5).
Figure 5: Christening gown and accessories supported with crushed acid-free tissue and blocked in with balls of tissue (three dimensional storage).
Rolled Storage
To save space, some strong (and generally larger) flat textiles may be rolled onto acid-free cardboard tubes. Note the following points if considering rolled storage:
- rolled storage is generally not appropriate for painted textiles or for those that have been treated with adhesives;
- use tubes appropriate to the size of the artefact, but the larger the diameter the better;
- the tube should be at least 60 mm wider than the textile to be rolled and up to 200 mm wider for larger artefacts;
- if large tubes are not available, the effective diameter of smaller tubes can be increased by wrapping bubble wrap around the outside;
- if there is no option but to use non acid-free cardboard tubing, isolate the textile from the tube with polyester (Mylar) or polyethylene sheeting and acid-free paper; and
- if the use of PVC tubing cannot be avoided for the long-term storage of textiles, seal the PVC with water-based polyurethane lacquer and use a barrier of polyester (Mylar) between the textile and the tube.
Roll textiles to minimise stresses on the textile and to protect it against adverse environmental conditions. To do this:
- place the textile face down and roll it along either the warp or the weft;
- while rolling, keep the textile firm, though not stretched, and interleaf it with acid-free tissue as it is being rolled;
- when rolling textiles that are either lined or have a second layer, take care to ensure that the inner layer does not become bunched or excessively creased;
- cover the rolled textile with a pre-washed white cotton/polycotton fabric or Tyvek® and tie it with cotton tape (but not too tightly);
- store rolled textiles by suspending them in a frame using a rod passed through the centre of the roll;
- do not allow rolled textiles to touch each other;
- cover the rack of rolled textiles with a pre-washed, lightweight, tightly woven fabric to give the rolled textiles protection from light and dust; and
- identify each textile by tying labels onto each tube, making sure that the labels are all at the same end.
Rolled Storage for Flags
The following system has been developed for the storage of suites of robust flags. It is not suitable for fragile flags. The system has the added advantage that a flag can be examined and re-rolled without the storage components going astray.
- cut a standard 68 mm diameter,acid-free tube, 60 mm longer than the maximum flag height;
- stick a square of double sided tape on each end to secure the roll in the Tyvek® channel;
- prepare a Tyvek® 1443R sheet the size of the flag plus the 60 mm height allowance and with allowance in the length to make a tube casing at one end and tie off at the other end (usually about 600 mm more than the width of the flag);
- machine sew the casing allowance at one end of the Tyvek® and an appropriate number of cotton tape ties at the other end. All rolls require at least two ties, but otherwise the ties should be evenly spaced about 400 mm apart;
- label the outside of the tie off end of the Tyvek® with the registration number and flag information;
- place the tube into the casing and remove the cover of the double sided tape to hold the Tyvek® in place;
- roll the flag with the fly first and hoist last, carefully flattening the flag as it is rolled;
- fold the hoist rope in at the end;
- place any metal fittings in small zip lock polyethylene bags;
- tie off (not too tight) with the cotton ties to hold the roll; and
- store rolls in a single layer. Do not stack rolls on top of each other.
Hanging Storage for Costumes
Only costumes in excellent condition should be considered for hanging storage. Use boxes to store weakened costumes or those that are heavily decorated. Pad costumes with acid-free tissue to minimise folds and creasing.
If costumes are to be hung, follow these general principles:
- pad and cover the hanger to fit the costume;
- spread the weight of the costume onto the hanger;
- make a protective cover to fit over the costume; and
- hang the costume in a tall cupboard that allows for full suspension without bunching.
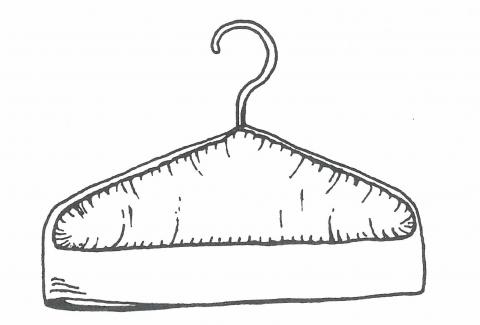
The hanger must be smaller than the costume and padded in the form of shoulders to fit the costume. Polyester wadding (e.g. Dacron) may be used to firmly fill the shape. By padding the hanger the weight of the costume is spread over a larger area, thereby reducing the load-bearing stress on the shoulders. Cover the padded hanger with pre-washed cotton fabric (Figure 6).
Figure 6: Fabric covered padded hanger.
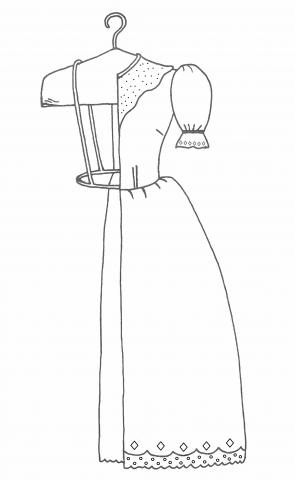
For tailored jackets, shape Ethafoam® 220 to be slightly smaller than the shoulders of the jacket and hot glue it onto both sides of a wooden coat hanger. Cover this with polyester wadding (Dacron) and pre-washed white cotton/polycotton fabric or Tyvek®. It is important that the final padded coat hanger is the correct size and shape to support the jacket shoulders. If it is not adequately supported, the weight of the costume will cause damage in the long term. When hanging costumes, spread the weight of the costume onto the hanger, but don’t have the weight only on the shoulders. For dresses sew cotton tapes to the structurally strong parts inside at the waist. Tie these tapes to the hanger to take the weight of the skirt off the bodice (Figure 7). Alternatively, and especially if the waist is weakened, sew a reinforcing cotton ‘hoop’ to the inside of the waist. Attach this to the padded hanger with cotton straps, thereby ensuring a more even weight distribution while concurrently strengthening the waist.
Figure 7: Hanging storage – padded hanger with cotton straps.
Each costume should have its own removable and washable cover. Make covers from light, tightly woven fabrics such as polyester lining or Tyvek®. Avoid fabrics such as cotton that have a tendency to cling or that have a strong frictional hold. Sew the cover so there is enough space inside for the costume to fit without restricting it. It must loosely cover the entire costume and have a closure at the bottom. Ensure the cover can be put on the costume from the side rather than over the top.
The cupboard in which costumes are hung must allow them to be fully suspended. As many dresses have trains, it will be necessary to have very tall storage cupboards. The train should not be crumpled at the bottom of the cupboard. Minimise crushing by not overfilling cupboards used for hanging textiles.
Systems for Display
Textiles are most at risk while on display. Factors influencing the display of textiles include location, environmental conditions, available space, public access and even the commercial and historic value of the materials themselves. Take all of these factors into account before deciding to display textile materials.
There are many ways to display textiles. Some examples of display techniques include:
- display on a flat surface;
- hanging;
- framing; and
- mounting on a mannequin.
Flat Surface or Passive Display
As long as the environmental conditions and the nature of the materials that contact the textile have been taken into account, two dimensional textiles may be displayed on a flat surface. It is important that any materials that come into direct contact with textiles are of archival quality. Textile support materials should be pre-washed and coloured materials tested for fastness. Display objects either completely flat or on a slight incline for easier viewing.
Hanging
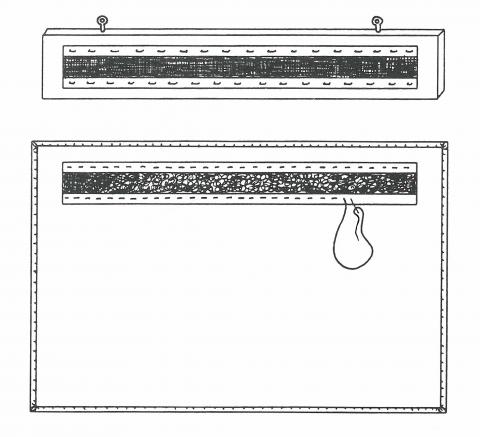
Physically strong textiles can be hung. Objects like tapestries, rugs and carpets can be suspended using a Velcro strip system (Figure 8). Sew the soft side of the Velcro to a strip of fabric which is then hand sewn across the top of the textile to be displayed. Ensure the stitch tension is strong enough to evenly support the weight of the textile. If the tension is insufficient the textile will pull and bag, damaging its structure. If the tension is too great the textile will look ‘quilted’ and will be in danger of tearing.
Use a staple gun to attach the hook side of the Velcro to a wooden batten which has been sealed with water-based polyurethane. Securely attach the wooden batten to the display wall and hang the textile by bringing the two Velcro sides together. Several pairs of hands will be needed to achieve the best result. When removing the textile from display, do not pull on the textile itself. Instead gently pry the Velcro strips apart. This will prevent damage to the textile.
Figure 8: Hanging for strong flat textiles.
Mounting and Framing
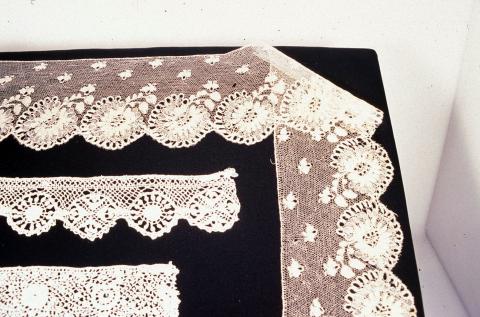
Small flat textiles are less of a display problem. They easily fit into showcases or can be framed and placed on a wall. If it is necessary to fold flat textiles, minimise creases by using rolled, clear archival materials to support the fold (Figure 9).
Figure 9: Folded lace with rolled polyethylene tube (upper right corner) to reduce creasing of the fabric.
Lightweight textiles (such as samplers and lace fragments) which are in good condition, clean and chemically stable are suitable for framing. Use archival materials for framing. The first step in framing is to attach the textile to a mount (Figure 10). Mounting involves covering a piece of board with cloth to which the textile can be sewn.
To prepare a mount:
- decide on the size of background required to mount the textile, leaving an appropriate border width and allowing a slightly wider border at the bottom of the textile;
- use archival materials like Foamcor®, Cadflute® or acid-free board such as multipurpose board for mounts;
- cut the board to the size of the textile plus the desired border;
- mark an approximately 2.5 cm wide border on the reverse side of the cut board;
- paint this border with Mowolith DM-4® or a PVA adhesive such as a hobby glue and allow it to dry;
- select a natural fibre fabric on which to attach the textile. Fine linen or cotton of a colour and texture that will enhance the textile are suitable;
- wash and press this fabric to shrink and remove any dressing. Cut the fabric to the size of the board plus 3 cms extra on each side;
- it is optional to place a piece of polyester wadding, the size of the mount board, between the board and the fabric. For heavily embroidered or beaded pieces the soft wadding helps to cushion the textile and can also give a finished look to the border. While the thickness of the polyester wadding is dependent on the size of the textile, quilters wadding is generally acceptable;
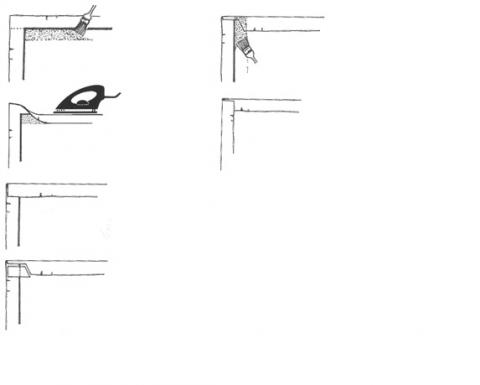
- place the fabric on a table, then the polyester wadding (if used) on top in the centre of the fabric and then the front of the mounting board on top, taking care to centre it and align the weave of the fabric with the edge of the mounting board. The rear, adhesive border side of the board should now be uppermost;
- using an iron at a wool setting, fold one side of the fabric to the back and heat seal to the adhesive with the iron. Make sure to keep the warp and weft parallel to the board;
- carefully stretch the opposite side into place, fold over and heat seal;
- cut out the corners so that when the sides are folded over, the corners are neat and not bulky;
- heat seal the third side, then carefully stretch the last side, fold over and heat seal;
- neatly fold the corners. Some extra adhesive will be needed;
Figure 10: Steps for adhering backing fabric to mount board.
Attach the textile by stitching it to the backing fabric on the mount, as outlined below:
- position the textile onto the front of the covered mount and centre it carefully. Stretch it a little, but do not over-stretch and pin it into position using fine pins;
- carefully sew the textile into place using matching colour polyester/cotton or silk thread, a fine needle (no 10 or 12) and regular running or hemming stitches depending on the type of edge to the textile;
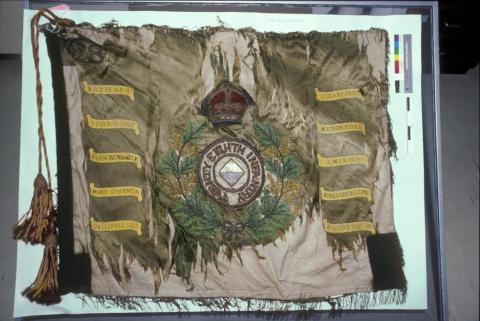
- in the case of large or heavy textiles, stay stitches across the piece are required to give it extra support (Figure 11). To minimize their impact on the textile’s appearance, these stitches should be both horizontal and vertical and follow any structures or patterns in the textile. To guide the stay stitches, mark a grid on the front with cotton thread. Use matching colour polyester/cotton or silk thread, a fine needle (no 10 or 12) and running stitch with a longer stitch underneath; and
- when Cadflute® is used, or when a mounted textile is not being framed, finish the back with a piece of fabric (same as the front) cut slightly larger than the mounting board. Turn the edges under, pin in place on the back and hand sew around.
Frame the mounted textile behind either glass or UV-absorbing perspex. Request that the framer uses conservation standard archival products and ensure there is no direct contact (10 mm minimum space) between the textile and the glass or perspex front. To reduce damage due to light exposure, do not leave mounted textiles on permanent display.
Figure 11: Colours – Kings Park Memorial, mounted onto backing support.
Three Dimensional Support - Mannequin Construction
Questions of both exposure and support must be addressed when displaying three-dimensional textiles. Use high quality, archival materials designed to suit the textile in question. If additional bulk is required to support the shape of a costume, add padded silk ‘cushions’ to the mannequin rather than loose stuffing as the latter puts added weight onto the artefact. Never use uncovered wadding as support. Over time an inadequately supported textile will be damaged as it slumps onto a mis-shaped support.
As people come in all shapes and sizes, so too do their costumes. When choosing mannequins consider the varying shapes promoted by different styles of clothing and the development of particular corseting to accentuate shapes in costumes of certain eras. Shop mannequins are rarely suitable. Although there are several museum mannequin manufacturers who provide basic figures which can be adjusted, these are quite expensive. As an alternative, mannequins can be made using Ethafoam® 220 (Larouche 1995, modified by Clayton).
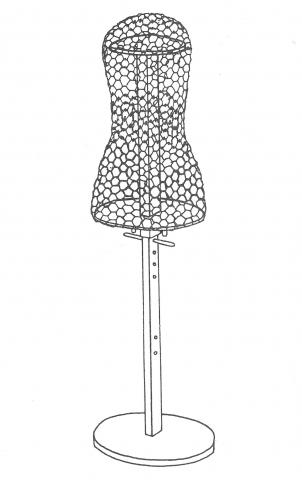
The museum-standard Ethafoam® mannequins mentioned above have replaced earlier types constructed out of wood and chicken wire and covered with Dacron and fabric (Figure 13). Descriptions of these latter mannequins are included below however as they are cost effective alternatives when funds are limited. All of the above provisos regarding accurate sizing must be followed. The features, design and contruction of a ‘chicken wire’ mannequin are as described below:
- use a simple, single-legged stand with a body which slides on the central pole. This allows the height of the displayed costume to be adjusted;
- use two ovals of plywood (the shoulders and hips) to make a basic tubular body shape, smaller than the average person, and attach galvanised or painted wire net to them;
- mount the torso onto the pole via the central holes in each piece of plywood and use the pegs to alter the height of the torso on the central pole;
- wrap polyester wadding (Dacron) around the wire and in areas where more shape is needed, such as the bust and/or hips, to build them up to fit the costume;
- compress the wire net if the costume has a very small waist;
- as arms are not usually made for the mannequin, place a small amount of crumpled tissue inside the sleeves to give them shape;
- cover the mannequin with a pre-washed, neutral-coloured, cotton-knit fabric. This material allows finer adjustment to be made by further filling with polyester wadding; and
- stitch the mannequin in some areas to refine the shape needed for each costume.
These mannequins can be reused for other costumes by carefully remeasuring and adjusting for the new costume.
Figure 12: Costume mannequin before padding.
Treatments
Cleaning
Before cleaning a textile consider the following:
- Why does the textile need to be cleaned?
- Will the textile benefit from cleaning?
- Will cleaning remove any important elements of its history?
- Is the textile strong enough to withstand the treatment?
Seek the advice of a conservator as cleaning, especially wet cleaning, may weaken some textiles. Chemical cleaning should be undertaken only by someone experienced in the cleaning of historic textiles and only an experienced conservator should attempt to clean painted textiles (such as flags and banners) and weighted silks.
Most textiles in collections have been used and washed through their useful life and come into collections in a physically worn state. For many clothing items such as cottons and linen Manchester, past treatments often included starching. Starch penetrates textiles and stiffens them when ironed. As starch is detrimental to textile fibres its removal will help in the long-term preservation of textiles. It can be gradually washed out on the occasions when wet cleaning is required. Do not re-starch an old textile.
Vacuum Cleaning
Remove loose dirt and dust from a textile before considering any other treatment. As with all treatments, carry out vacuum cleaning only when necessary, such as when preparing objects for display or storage. Very brittle or insect-damaged textiles are likely to be too fragile for vacuum cleaning. Have very fragile textiles assessed by a conservator before attempting any cleaning. Do not use beater-type vacuum cleaners and vacuum brush attachments on textiles.
Use a vacuum cleaner with adjustable suction and a soft brush. Mini attachments for vacuum cleaners are useful tools for detailed and careful cleaning. Either a variable speed motor or perforations in the hose system will allow the suction to be controlled. These controls should be at the user’s hand so that adjustments can be made immediately the need arises. A low suction car vacuum cleaner is suitable.
When using a vacuum cleaner on textile material:
- fit the end of the vacuum cleaner with a protective screen between the hose and the textile. A piece of muslin, nylon stocking or fine gauze, held in place by string or an elastic band are suitable for this purpose;
- hold the nozzle slightly above the surface of the textile while cleaning; and
- adjust the amount of suction applied to match the fragility of the textile.
As an alternative to placing a screen over the nozzle of the vacuum cleaner, place monofilament screening, such as an embroidery frame fitted with tulle, over the textile and move the vacuum cleaner over the screen. In this way, dust is drawn through the screen but neither the fabric nor its fibres are drawn into the vacuum cleaner. Bind the edges of the screen to prevent snagging on the textile.
Wet Cleaning
Do not wash textiles in water as a matter of course nor as part of an annual maintenance or cleaning program as this process can result in fabric loss, the loss of historic information and can permanently alter the look and feel of the textile. Avoid water cleaning textiles unless absolutely necessary for the survival of the textile in question. Do not wash heritage textiles in a washing machine.
In addition to considering the general points mentioned in the preamble to dry cleaning (see above), determine the colourfastness of dyes and the effects of washing on different fibre types, different weaves and on non-textile components before wet cleaning historic textiles.
Even the ‘safest’ of fabrics, such as white cottons and linens, are susceptible to damage during washing. It is not always possible to ascertain areas of weakness in an old textile and the resultant fabric loss can be significant. For example, dark coloured stains of an unknown origin may fall out during washing, leaving gaping holes in the textile. In addition certain finishing agents, incorporated in textiles to give them a particular look, may be washed out in water, irreversibly altering the appearance and characteristics of the textile.
Assessing coloured textiles is difficult as there are no foolproof tests to determine the colourfastness of the component colours. In the method described below, caution is advised as dyes may run unexpectedly, either in the wash or as the textile dries. If a soap is incorporated into the wash solution the resultant pH change (acidity level) may be enough for dyes that were previously set to become soluble and be lost.
Many textiles are made up of combinations of different fibre types, with cotton-silk and cotton-wool being common examples. Before washing consider the ‘wet properties’ of different fibre types and the reactions of individual fibre types to different pH conditions which result from using soap solutions.
Fabrics of the same fibre type but of different weave tension are also found in textile collections. Linings, for example, often have a different weave to the outer fabric. Washing in water may produce different shrinkage rates for the combinations, resulting in tensions in the textile between the differently woven fabrics. A further problem may arise if dust and dirt are trapped between the lining and the textile. Permanent staining of the outer textile has occurred when such textiles have been washed (Finch and Putnam 1985).
Bearing the above in mind, undertake washing only if the textile is likely to deteriorate due to the presence of dirt or stains (Figure 13). To ensure that this type of treatment will benefit the textile, seek the advice of a conservator before washing. Regard washing as a one-off process which is followed up by correct storage or display to avoid the need for further washing in the future.
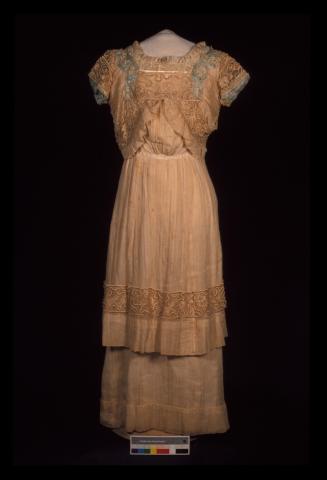
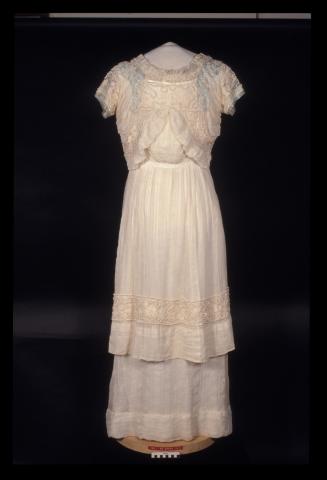
Figure 13: (a) Dress before treatment – stained, torn and discoloured.
(b) Dress after treatment – washed and repaired.
Pre-washing Checks
Surface clean textiles using a vacuum cleaner and screen (as described above) before wet cleaning. Strong white textiles, such as linens and cottons, can usually be washed by the method described below. Precautions must be taken however before washing coloured fabrics. In particular, test each colour for fastness before any form of wet cleaning. To do this:
- use an unobtrusive part of the textile for this test;
- place a square of blotting paper or folded absorbent paper tissue under the colour test point;
- dip a cotton bud into the soap solution to be used for cleaning. The cotton bud should be only slightly damp;
- hold the moistened cotton bud on the test colour for a short time under light pressure;
- check the cotton bud and the paper below for transfer of colour; and
- repeat the test on all colours present.
Do not wash the textile if any colour transfers to the cotton bud or paper below. Consult a conservator in this instance.
Other checks are also necessary, as some attachments are not stable in water. Buttons and sequins made of gelatine and casein, for example, swell and disintegrate in water. Some fabrics, such as pressed velour, glazed chintz and crepes are not suited to water cleaning and treatments should be carried out only by a qualified conservator.
Equipment for Wet Washing
To wet wash textiles, the following equipment is needed:
- a large flat tray;
- nylon fly screen or nylon curtain material, larger than the textile, to support the textile when lifting it;
- enough good quality water to cover the textile by about 20mm;
- a pure soap;
- clean, white towels to remove excess water from the textile; and
- fans and/or a cold air blowing hair drier.
The washing tray, such as a photographer's tray or bath, should be large enough to allow the textile to lay flat while immersed. Improvisation may be needed, especially if large textiles are to be washed.
Never lift unsupported wet textiles, as they are extremely fragile and the weight of the water could cause irreparable damage. Ensure that the support is lifted not the textile. Two or three people may be required to lift the support evenly when handling larger textiles.
Although distilled or deionised water is recommended for all stages of cleaning, softened tap water can be used for washing and for the first two rinses as long as distilled or deionised water is used for the final rinse. Bore water is not suitable and rainwater may contain impurities and particulate matter that could damage the fabric.
Soap Solutions
Commercial varieties of pure soaps are available. Use about five grams (about one rounded dessertspoon) of soap per 8 litres of water. In most situations where washing is deemed essential, conservators use a non-ionic, pH-neutral soap solution. Before washing, establish which type of soap solution is best for the textile in question. Do not use commercial detergents because they often contain harsh additives which are damaging to fragile textiles.
Washing
Wash, rinse and dry textiles in a clean, dust-free room, according to the following procedures:
- dissolve the soap in a small quantity of warm water. Add this to the cold or tepid water in the tray and mix thoroughly;
- place the textile on its support and gently lower it into the solution, ensuring that the textile is wet evenly;
- gently press the textile all over with the palms of the hands or with the aid of a small sponge. This creates a mild suction which helps to remove dirt;
- never rub the textile or dip it in and out of the solution;
- if the textile is relatively strong, leave it to soak for five to ten minutes, then press again; and
- note that colours can run with prolonged immersion, even after passing the colourfastness test.
Rinsing
Rinsing is necessary to remove the soap solution, prevent dirt from resettling into the textile and to remove potentially damaging materials. To rinse the textile, follow these steps:
- using the support, remove the textile from the wash solution and place it in clean water;
- repeat the pressing action with the palms of the hands or with a sponge;
- change the water again and repeat the process as often as required (usually three times) until all traces of soap and dirt have been removed; and
- use distilled or deionised water for the last rinse.
Drying
Dry textiles as gently as possible. Never use sunlight or artificial heat. When drying textiles, observe the following guidelines:
- dry textiles right side up;
- using the support, remove the textile from the last rinse water and allow it to drain for a short time before placing it on clean, dry white towels;
- cover the textile with more towels and gently press to absorb excess moisture. Gentle pressing should minimise any flattening of the weave;
- repeat the process with fresh dry towels;
- the textile can be dried on dry towels or placed onto a membrane such as a framed flyscreen which will allow a good air flow during the drying process;
- fans can be used to increase the air flow; or
- use a hairdryer on a cool and a low speed setting to accelerate the drying process. Avoid spot drying. While using a hairdryer, smooth folds or creases with the other hand. With three dimensional textiles, such as dresses, separate layers of fabric and lift the sleeves so that air can pass through.
Ironing
Drying in the above manner usually removes any need for ironing, a very harsh treatment that should only be carried out if absolutely necessary. If ironing is deemed necessary, observe the following guidelines:
- iron the textile while it is still slightly damp (not wet);
- insert a cloth between the fabric and the iron;
- support the fabric fully, as while damp, it may not be able to support its own weight;
- set the iron at its coolest possible setting. Never use steam;
- never iron folds and creases into a textile as the fibres will eventually break along these lines; and
- make small covered pads to make ironing sleeves or small spaces easier.
Starching
Do not starch historic textiles as it attracts insects and stiffens the fibres, which may lead to their eventual breakage.
Stain Removal
Do not further treat stains that remain after washing. Do not try spot cleaning or bleaching as these usually weaken the textile and may form a halo-like effect around the stain
Repairs
Minimal intervention is recommended but in some instances support stitching will prevent further deterioration of a textile. Minimal stitching should be used to stabilise a textile and it is recommended that a conservator be consulted for advice.
If stitching is undertaken, note the following:
- match the repair thread with the textile, both in colour and denier. A fine silk will require a fine silk thread whereas a woollen tapestry will require a coarser woollen thread;
- use a needle that is as fine as possible and take care to stitch between the threads as opposed to stitching through them. The type of stitch will depend on the type of stabilisation required;
- balance the stitch tension so that it is not too tight so as to damage the fibres nor too loose that it is ineffective;
- use running stitches to join two layers of fabric together, with equal lengths above and below or perhaps with minimal stitches on the surface; and
- periodically secure the running stitch with a back stitch. Use a herringbone stitch to stabilise frayed edges and couching to secure loose threads.
Summary
- Inspect textiles for mould or insect attack and treat before adding them to a collection.
- Identify the materials from which textiles are manufactured.
- Maintain temperature and relative humidity at 15 – 25 °C and 45 – 55 % respectively with maximum variations of 4 °C and 5 % respectively in any 24 hour period.
- Keep light and UV levels to 50 lux and 1500 µW/m2 (30 µwatts/lumen) respectively.
- Wear cotton or vinyl gloves when handling textiles. Remove jewellery.
- Support textiles when moving them.
- Where possible, store textiles flat, within boxes with acid-free tissue supporting any folds.
- Support 3D objects with crushed acid free tissue or custom made cushions.
- Include sufficient padding to distribute the weight in hanging storage and use dust covers.
- Do not wash or starch as a routine procedure. Consult a conservator before carrying out any treatments.
Bibliography
Catling, C. and Grayson, J., 1982, Identification of Vegetable Fibres, Chapman and Hall, London and New York.
Finch, K. and Putnam, G., 1985, The Care and Preservation of Textiles, B.T. Batsford, London.
Landi, S., 1985, The Textile Conservator’s Manual, Butterworths, London.
Larouche, D. 1995, Intersecting silhouette mannequins, Textile Conservation Newsletter, Ottawa, Spring Supplement, 1995. Modified by Clayton, S., Australian War Memorial, (https://www.awm.gov.au/).
reCollections, Caring for Collections Across Australia; Heritage Collections Council, 1998, Caring for Cultural Material 2, Canberra, Australia, pp 1 - 27.
The Textile Institute, 1970, Identification of Textile Materials, 6th Edition, Manchester.

