Systems for Display
Textiles are most at risk while on display. Factors influencing the display of textiles include location, environmental conditions, available space, public access and even the commercial and historic value of the materials themselves. Take all of these factors into account before deciding to display textile materials.
There are many ways to display textiles. Some examples of display techniques include:
- display on a flat surface;
- hanging;
- framing; and
- mounting on a mannequin.
Flat Surface or Passive Display
As long as the environmental conditions and the nature of the materials that contact the textile have been taken into account, two dimensional textiles may be displayed on a flat surface. It is important that any materials that come into direct contact with textiles are of archival quality. Textile support materials should be pre-washed and coloured materials tested for fastness. Display objects either completely flat or on a slight incline for easier viewing.
Hanging
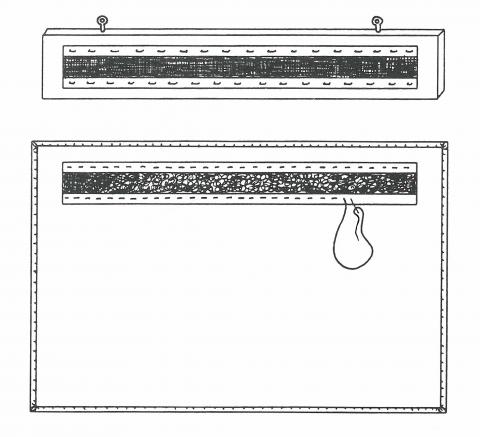
Physically strong textiles can be hung. Objects like tapestries, rugs and carpets can be suspended using a Velcro strip system (Figure 8). Sew the soft side of the Velcro to a strip of fabric which is then hand sewn across the top of the textile to be displayed. Ensure the stitch tension is strong enough to evenly support the weight of the textile. If the tension is insufficient the textile will pull and bag, damaging its structure. If the tension is too great the textile will look ‘quilted’ and will be in danger of tearing.
Use a staple gun to attach the hook side of the Velcro to a wooden batten which has been sealed with water-based polyurethane. Securely attach the wooden batten to the display wall and hang the textile by bringing the two Velcro sides together. Several pairs of hands will be needed to achieve the best result. When removing the textile from display, do not pull on the textile itself. Instead gently pry the Velcro strips apart. This will prevent damage to the textile.
Figure 8: Hanging for strong flat textiles.
Mounting and Framing
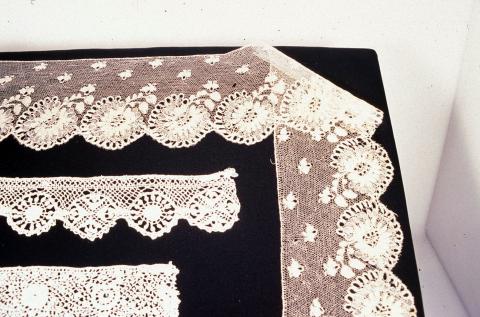
Small flat textiles are less of a display problem. They easily fit into showcases or can be framed and placed on a wall. If it is necessary to fold flat textiles, minimise creases by using rolled, clear archival materials to support the fold (Figure 9).
Figure 9: Folded lace with rolled polyethylene tube (upper right corner) to reduce creasing of the fabric.
Lightweight textiles (such as samplers and lace fragments) which are in good condition, clean and chemically stable are suitable for framing. Use archival materials for framing. The first step in framing is to attach the textile to a mount (Figure 10). Mounting involves covering a piece of board with cloth to which the textile can be sewn.
To prepare a mount:
- decide on the size of background required to mount the textile, leaving an appropriate border width and allowing a slightly wider border at the bottom of the textile;
- use archival materials like Foamcor®, Cadflute® or acid-free board such as multipurpose board for mounts;
- cut the board to the size of the textile plus the desired border;
- mark an approximately 2.5 cm wide border on the reverse side of the cut board;
- paint this border with Mowolith DM-4® or a PVA adhesive such as a hobby glue and allow it to dry;
- select a natural fibre fabric on which to attach the textile. Fine linen or cotton of a colour and texture that will enhance the textile are suitable;
- wash and press this fabric to shrink and remove any dressing. Cut the fabric to the size of the board plus 3 cms extra on each side;
- it is optional to place a piece of polyester wadding, the size of the mount board, between the board and the fabric. For heavily embroidered or beaded pieces the soft wadding helps to cushion the textile and can also give a finished look to the border. While the thickness of the polyester wadding is dependent on the size of the textile, quilters wadding is generally acceptable;
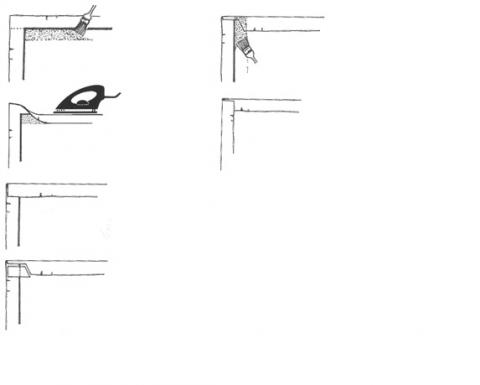
- place the fabric on a table, then the polyester wadding (if used) on top in the centre of the fabric and then the front of the mounting board on top, taking care to centre it and align the weave of the fabric with the edge of the mounting board. The rear, adhesive border side of the board should now be uppermost;
- using an iron at a wool setting, fold one side of the fabric to the back and heat seal to the adhesive with the iron. Make sure to keep the warp and weft parallel to the board;
- carefully stretch the opposite side into place, fold over and heat seal;
- cut out the corners so that when the sides are folded over, the corners are neat and not bulky;
- heat seal the third side, then carefully stretch the last side, fold over and heat seal;
- neatly fold the corners. Some extra adhesive will be needed;
Figure 10: Steps for adhering backing fabric to mount board.
Attach the textile by stitching it to the backing fabric on the mount, as outlined below:
- position the textile onto the front of the covered mount and centre it carefully. Stretch it a little, but do not over-stretch and pin it into position using fine pins;
- carefully sew the textile into place using matching colour polyester/cotton or silk thread, a fine needle (no 10 or 12) and regular running or hemming stitches depending on the type of edge to the textile;
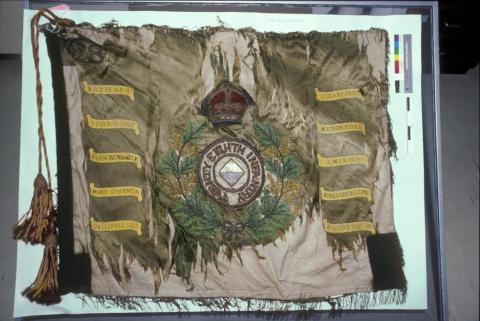
- in the case of large or heavy textiles, stay stitches across the piece are required to give it extra support (Figure 11). To minimize their impact on the textile’s appearance, these stitches should be both horizontal and vertical and follow any structures or patterns in the textile. To guide the stay stitches, mark a grid on the front with cotton thread. Use matching colour polyester/cotton or silk thread, a fine needle (no 10 or 12) and running stitch with a longer stitch underneath; and
- when Cadflute® is used, or when a mounted textile is not being framed, finish the back with a piece of fabric (same as the front) cut slightly larger than the mounting board. Turn the edges under, pin in place on the back and hand sew around.
Frame the mounted textile behind either glass or UV-absorbing perspex. Request that the framer uses conservation standard archival products and ensure there is no direct contact (10 mm minimum space) between the textile and the glass or perspex front. To reduce damage due to light exposure, do not leave mounted textiles on permanent display.
Figure 11: Colours – Kings Park Memorial, mounted onto backing support.
Three Dimensional Support - Mannequin Construction
Questions of both exposure and support must be addressed when displaying three-dimensional textiles. Use high quality, archival materials designed to suit the textile in question. If additional bulk is required to support the shape of a costume, add padded silk ‘cushions’ to the mannequin rather than loose stuffing as the latter puts added weight onto the artefact. Never use uncovered wadding as support. Over time an inadequately supported textile will be damaged as it slumps onto a mis-shaped support.
As people come in all shapes and sizes, so too do their costumes. When choosing mannequins consider the varying shapes promoted by different styles of clothing and the development of particular corseting to accentuate shapes in costumes of certain eras. Shop mannequins are rarely suitable. Although there are several museum mannequin manufacturers who provide basic figures which can be adjusted, these are quite expensive. As an alternative, mannequins can be made using Ethafoam® 220 (Larouche 1995, modified by Clayton).
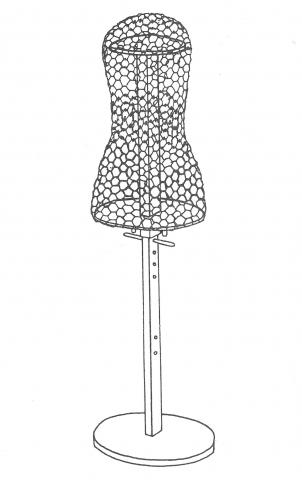
The museum-standard Ethafoam® mannequins mentioned above have replaced earlier types constructed out of wood and chicken wire and covered with Dacron and fabric (Figure 13). Descriptions of these latter mannequins are included below however as they are cost effective alternatives when funds are limited. All of the above provisos regarding accurate sizing must be followed. The features, design and contruction of a ‘chicken wire’ mannequin are as described below:
- use a simple, single-legged stand with a body which slides on the central pole. This allows the height of the displayed costume to be adjusted;
- use two ovals of plywood (the shoulders and hips) to make a basic tubular body shape, smaller than the average person, and attach galvanised or painted wire net to them;
- mount the torso onto the pole via the central holes in each piece of plywood and use the pegs to alter the height of the torso on the central pole;
- wrap polyester wadding (Dacron) around the wire and in areas where more shape is needed, such as the bust and/or hips, to build them up to fit the costume;
- compress the wire net if the costume has a very small waist;
- as arms are not usually made for the mannequin, place a small amount of crumpled tissue inside the sleeves to give them shape;
- cover the mannequin with a pre-washed, neutral-coloured, cotton-knit fabric. This material allows finer adjustment to be made by further filling with polyester wadding; and
- stitch the mannequin in some areas to refine the shape needed for each costume.
These mannequins can be reused for other costumes by carefully remeasuring and adjusting for the new costume.
Figure 12: Costume mannequin before padding.

