Conservation and Care of Collections (2017)
Presented is a digitised edition of Conservation and Care of Collections.
The original text was compiled by the WA Museum's Department of Materials Conservation in 1998, edited by Ian Godfrey and David Gilroy.
This updated version provides an in-depth range of information for both institutions and individuals caring for collections.
Foreword
The aim of compiling the original version (1998) of Conservation and Care of Collections was to provide a basis for an holistic approach to the care and conservation of movable cultural material held in small museums, National Trust houses, historical societies and private collections.
As such the layout and content was designed with these client groups in mind and it was not intended to be the definitive conservation manual. The publication was concerned specifically with the objects and images found in the targeted collections and did not attempt to comment on or categorise heritage sites or buildings.
This revised edition builds on the first, with revised content and updated information, particularly with respect to recommendations regarding environmental parameters best suited for particular material types.
Over the nearly 20 years since the original publication there have been considerable advances made in the materials conservation area, most notably in the scientific analysis of materials and the application of sophisticated treatment techniques.
The application of high-powered analytical techniques and conservation practices including combined gas chromatography/mass spectrometry, nuclear magnetic resonance spectroscopy, the synchrotron, laser scanning and associated technologies, 3-D printing and nanotechnologies has pushed conservation to incredible levels and will continue to do so into the future.
Unfortunately many of these recent advances in the profession are expensive to access and require highly sophisticated equipment and expertise, limiting their use to larger institutions. Thus many new techniques cannot be applied by general collectors and small institutions. For this reason, the focus of this revised edition has remained on practices and techniques that are simpler and more generally accessible. Information has been presented on a range of levels suitable to both institutions and individuals.
The chapter layouts are designed to provide a breadth of information for collectors. For example, a brief historical background is included in the introduction to each material type. Such information, used in conjunction with details concerning agents of decay, possible treatments and correct storage and display conditions, should ensure that appropriate conservation management strategies are adopted.
There is a deliberate concentration on material types as opposed to types of objects. In this way we hope to broaden the understanding of approaches to conservation rather than merely deal with object-specific treatments. An example of this approach can be seen in the chapter on wood where the understanding of the nature of material is primary and the treatment of furniture as a specific object is secondary.
Although the emphasis of this book is on preventive conservation, hands-on treatments will be necessary for some materials. For this reason specific treatment regimes are described. Extreme caution should be exercised in applying these treatments however and professional assistance is recommended in most cases.
The Western Australian Museum's Department of Materials Conservation has had a commitment to an outreach program since its inception. This publication is an extension of the program, and in conjunction with continued cooperation between conservation professionals and collectors in all areas, should provide a sound basis for the care of our widely scattered cultural heritage.
The editors wish to thank all of the contributors and pay respect to current and former employees whose work helped establish the reputation of this department. Special thanks must go to the former departmental registrar Lucy Burrow for her help in preparing this publication, particularly the graphics.
Publication Notes
2017 revised edition editor - Ian Godfrey.
1998 original edition editors - David Gilroy and Ian Godfrey.
This publication was created by the Western Australian Museum's Department of Materials Conservation.
Preventive Conservation: Agents of Decay
D. Gilroy and I. M. Godfrey
Introduction
The simplest and most inexpensive way to look after an object or collection is to prevent it suffering deterioration in the first place. Whether an object is in a home or in a museum, the same causes of deterioration apply. A metal artefact in a garden shed will suffer more damage than it would if stored in a box inside a house. Similarly a painting on display in a home or gallery may deteriorate more if placed into a less favourable museum storage environment. There is no point in spending time and materials to treat an object if it is returned to the same conditions which led to the original deterioration.
Information presented in this section concentrates on the environmental factors which cause deterioration in materials. Different climatic zones have their own distinct problems. High humidity in the tropics and salt-laden air in coastal regions are typical examples which should receive extra consideration. Other obvious dangers to collections include fire, flooding and theft. Although these factors must be considered by those responsible for a collection they are not covered in detail in this book.
It is important to know from what materials an object is made and their susceptibility to the various causes of decay. This information is useful in determining where and how it should be stored or displayed.
Thorough preventive conservation practices should be established and regular inspections are essential if the best conditions for a collection are to be maintained. It is important, for example, not to take food or drink into display or storage areas. Spillages have the potential to not only damage objects but also to attract potentially damaging pests. Apart from the obvious health issues, smoking is not recommended in these areas because of the risk of damage from either fire or smoke.
Another important issue is the level of access to artefacts. Materials used daily for educational purposes should be copies or non-essential artefacts because constant handling will cause deterioration through either breakage or general wear and tear.
To reduce the risk of cross contamination in storage and display areas, any new material coming into a collection should be isolated initially, inspected and if necessary, cleaned. Treatment of pests should be arranged if infestations are found.
The most significant environmental factors which contribute to the degradation of objects are listed below:
- light;
- temperature;
- relative humidity (RH);
- pollutants; and
- biological pests.
Many of these factors are interrelated and cannot be considered separately. Bright sunlight for example will cause photochemical damage to light-sensitive material, increased temperature and decreased relative humidity.
Each of these agents of deterioration will be discussed in turn in the following sections with guidelines given regarding the types of conditions that will enhance the longevity of materials. As most collections are made up of an assortment of objects and material types no one set of conditions will be suitable for all objects. Where a choice has to be made, conditions should be tailored to minimise damage to the most sensitive of the objects.
Light
Principles
Light is an energy form capable of damaging materials such as organic fibres (textiles and paper), watercolour paintings, dyed materials, coloured leather, botanical specimens and colour photographs.
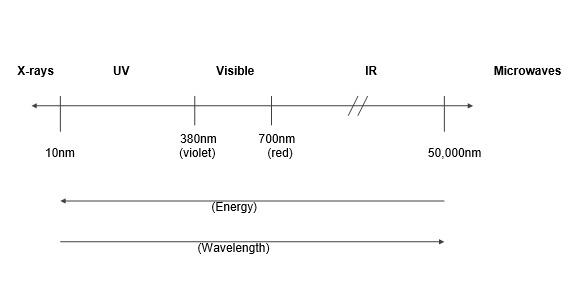
The human eye can detect only those wavelengths of light that make up the visible spectrum (rainbow colours). Unseen components of light such as ultraviolet (UV) and infra-red (IR) light can also severely affect particular material types (Figure 1).
Figure 1: Light region of the electromagnetic spectrum.
Ultraviolet (UV) Radiation
(10-380 nm)
As wavelengths below 300 nanometres (nm) do not penetrate the earth's atmosphere and glass cuts out UV radiation with wavelengths of less than 320 nm, the UV band of concern is 320-380 nm. This shortwave, invisible UV radiation is highly energetic and is most likely to cause photochemical deterioration. There is a high proportion of UV radiation in daylight and a significant amount is emitted by fluorescent tubes.
Visible Light
(380-760 nm)
Visible light affects an object in two important ways - it can lead to its deterioration and it can affect the way an observer perceives an object.
Deterioration is caused not only by high energy light at the blue end of the spectrum but also by heat produced by lower energy red light. Exposure to brighter, more intense light increases the rate at which light-induced damage occurs.
If colour-corrected light is not used for viewing, a colour shift may occur that human eyes cannot perceive. Examples of this include the apparent change in colour when red meat is removed from specially lit butchers’ displays (metamerism) into the ordinary light of their stores and the yellow tinge imparted to objects by a dimmed incandescent globe. Fluorescent tubes on the other hand, are an excellent source of accurate colour-rendering light. Unfortunately this same light is capable of causing significant photochemical damage to susceptible objects.
Infra-red (IR) Radiation
(760 nm upwards)
IR radiation can cause objects to heat up and accelerate chemical deterioration processes. It is also capable of producing changes in relative humidity levels. Under conditions of reduced relative humidity objects can become brittle, while increased relative humidity will increase corrosion of metals. Such changes in relative humidity correspond to the IR source being turned on and off respectively.
Light Measurement
The human eye responds well to green-yellow light but less so to the blue and red ends of the spectrum. Both UV and IR radiation are invisible to the human eye. Light meters and cameras have been designed to measure visible light in the same way that the eye perceives it.
The brightness or intensity of light is measured in units called lumens. One lumen every square metre is equivalent to one lux. When measuring light intensity the meter must face the direction of the light source. To determine the intensity of light impacting on an object, place the meter directly in front of the object, as close to the surface as possible and parallel to the object’s surface.
UV radiation may be measured either as a proportion of visible light, with units of microwatts per lumen (µW/lumen) or more usefully as a direct measure of actual UV exposure, with units of microwatts per square metre (µW/m2).
IR radiation is not usually measured, with its effect most easily detected by monitoring associated temperature changes.
Advances in technology have led to the development of light and UV monitoring devices that can take either one-off, instantaneous measurements or, by the use of meters with data logging capabilities, can monitor these parameters over extended periods. Data logging instruments allow monitoring of light variations that occur during the day and as the angle of the sun alters from season to season. Use of these instruments to determine light exposure profiles aids in the long-term management of light sensitive objects.
While specialist equipment is available to monitor light and UV levels, the brightness of visible light can also be measured easily using any camera that has a built-in light meter (see Appendix 1).
If, as is often the case, light and UV monitors are not readily available, it is important to be aware of the approximate light and UV radiation levels generated by various light sources. Note that the actual levels of exposure are dependent on the distance between the light source and the exposed object, with increasing distance resulting in reduced light and UV levels.
| Examples of illumination (visible light) levels: | Lux |
|---|---|
| Daylight, fluorescent lights in an office or laboratory | 600-1500 |
| Daylight coming in through a window | 35,000 |
| Direct sunlight | up to 136,000 |
| Examples of UV from various sources: | µW/lumen |
|---|---|
| Fluorescent lights (low UV) | 33 |
| Fluorescent lights (general) | 80-250 |
| Tungsten globe | 60-80 |
| Direct sun | 400 |
| Light overcast sky | 800 |
| Blue sky | 1600 |
If the light intensity (lux) and the UV radiation levels (µW/lumen) are known then the actual UV exposure (µW/m2) can be calculated by multiplying these two values together. For example, a fluorescent tube with a light intensity of 800 lux and a UV output of 100 µW/lumen would be exposing an object to UV levels corresponding to 80,000 µW/m2 (= 800 lumens/m2 x 100 µW/lumen).
Another important aspect of light measurement relates to the measurement of colours in objects. Although this requires the use of specialised equipment (Chroma Meters or colorimeters), it provides an accurate way of quantifying changes that may occur in coloured objects, paintings and prints. In this process, measurements taken at strategic points are repeated after a period of light exposure. Any changes in colour will be detected and can be related to the environmental conditions to which the object was exposed. Chroma Meters range in price and quality and it is possible to use one instrument to measure chromaticity, colour difference, correlated colour temperature and the luminance of light sources.
Light-induced Deterioration
Light has many effects, the most noticeable of which are colour changes induced in objects. For instance the bleaching of ivory, the fading of pigments, dyes and inks and the discolouration of wood, varnishes and lacquers are all due to light exposure (Figure 2).
Different materials react to light in different ways. Some materials fade while others darken. Some types of wood yellow, others bleach and some turn grey when exposed to light. A more subtle effect can be observed in colour photographs or water colours where there may be a colour shift when one of the more light-sensitive dyes is affected by light.
In addition to inducing colour changes in objects, exposure to light is also responsible for weakening fibres in textiles and paper.
Light has the potential to damage organic materials whether they are in pure form or make up part of a composite object. Natural organic materials such as wood, fibres and biological specimens are all vulnerable, as are modern polymeric materials (plastics) and even metal objects which contain an organic component such as paint, lacquer or an inlay. The inlaid ivory handle of a hand gun for instance, would be susceptible to light damage.
For composite objects the most sensitive component must be considered when planning for display and/or storage. The relative sensitivities of different materials may be gauged by comparing the recommended maximum lighting levels for these materials (see below). Expose the most sensitive objects to lower light levels to minimise photochemical damage.
Reciprocity Rule
The same amount of damage will be produced by strong light in a short time as will be done by a weaker light over a longer period. For example, 500 lux exposure for 10 hours will cause an equivalent amount of deterioration to 50 lux exposure for 100 hours.
Monitoring Deterioration
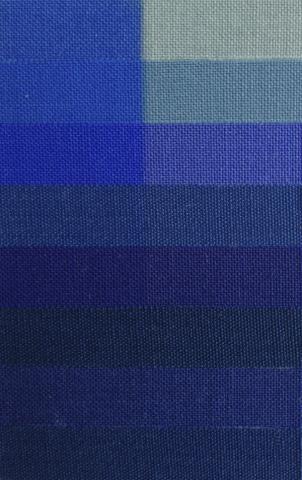
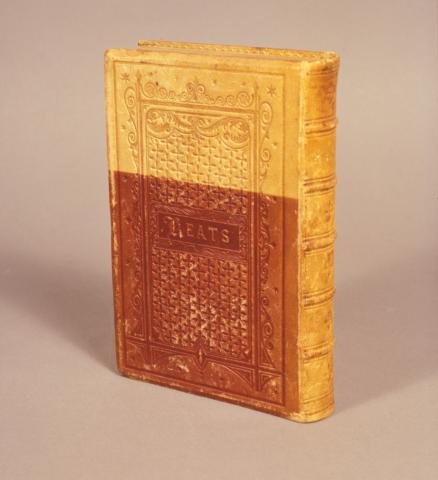
The impacts of lighting conditions can be monitored on site using light dosimeters such as blue wool scales or the recently developed LightCheck®. A blue wool scale is a small card comprising a series of dyes of differing light fastness (Figure 2). Half of the card is covered and it is then placed in the area in which lighting impacts are to be determined. After a fixed exposure period, the blue wool scale is removed and the cover removed from the card. A comparison can then be made between the exposed and unexposed dyes and a clear indication gained as to the likely damage that will occur to light sensitive objects exposed at the test site.
Figure 2: A blue wool test strip where the left side of the strip was covered while the right side was exposed to full sun for 30 days (Copyright Catharine Ellis).
An alternative system, LightCheck®, can be used in a similar fashion. A LightCheck® strip is placed next to an object on display and regularly inspected. The extent of light damage is determined by comparison with a colour scale that can then be related to an equivalent exposure level. LightCheck® strips are available in two formats, one for shorter duration and testing in areas holding very light sensitive objects and the other for areas in which less sensitive objects are exposed. The LightCheck® strips are considered to be more sensitive to light exposure than the blue wool scales.
Recommended Maximum Light and UV Levels
These values are set so that objects can be viewed while minimising the risk of photochemical damage. Note that the UV levels recommended below correspond to 30 µW/lumen for highly sensitive objects and 75 µW/lumen for sensitive and insensitive objects.
Highly Sensitive Objects - 50 lux and 1500 µW/m2
Textiles, costumes, watercolours, tapestries, prints and drawings, manuscripts, miniatures, distemper in frescoes, wallpapers, gouache, dyed leather, most natural exhibits, botanical specimens, fur and feathers.
Sensitive Objects - 200 lux and 15,000 µW/m2
Oil, tempera and acrylic paintings, undyed leather, horn, bone, ivory, most wood, oriental lacquer and other painted or coloured objects.
Light Insensitive Objects - 300 lux and 22,500 µW/m2
Stone, metal, glass, ceramic, jewellery, enamel and wooden objects that have largely been used outdoors or have otherwise lost their natural colouring.
Recommended Overall Exposure Levels
When developing a lighting strategy it is essential to consider overall exposure levels and not just maximum light and UV levels. Overall exposure levels can be determined by multiplying the actual light exposure levels by the number of hours for which objects are exposed. For example, an object exposed to an average 50 lux for 8 hours a day, 300 days of the year would have an overall exposure of 50 x 8 x 300 lux hours (= 120,000 lux hours or 120 klux hours). For highly light sensitive objects, Thomson (1986) proposes overall exposures of 200 klux hours, for sensitive objects 650 klux hours and no overall limit for light insensitive objects. For these latter objects overall light levels will be largely determined by the environmental requirements of nearby objects.
Determining overall exposure levels is not easy however and may require extensive data logging. If daylight impinges on display spaces, consultation with local meteorological offices or educational institutions may be necessary to determine daylight availability. Daylight availability varies with the changing seasons due to the duration of available light and the angle of the sun.
Controlling Light Levels
Of all the agents that contribute to the deterioration of cultural materials, light is probably the easiest to control. The problem is achieving the right balance between minimising photochemical damage by limiting light levels and still maintaining appropriate colour rendering of objects and allowing objects to be viewed without reducing surface details. Loss of object detail can be a significant problem for older visitors to museums.
Light levels may be controlled by using some or all of the following strategies:
- exclude all daylight;
- place the most light-sensitive objects furthest from light sources;
- use low UV light sources;
- use UV filters over light sources or in display cabinets;
- alternate sensitive materials between display and low-light storage;
- use partitions to create ‘shaded’ areas;
- use copies for display; and
- use automatic light switching.
Ideally, all daylight should be excluded from storage and display areas. This has three beneficial effects. It reduces overall light levels significantly, it allows the intensity of interior light and the amount of UV exposure to be controlled and also gives greater opportunities for creative lighting effects to be introduced.
Light control may be achieved by using appropriate artificial lighting sources such as low UV fluorescent lights and arrangements such as reflected rather than direct lighting. Whatever the light sources and arrangements, the end result must be conditions that meet the required specifications for the illuminated objects and allow the objects to be viewed satisfactorily.
Options to eliminate daylight include the use of blinds, shutters, curtains and even paint. While UV-absorbing films and tints can also play a part in reducing overall light and UV levels, the former methods are preferred. It is obvious when curtains, blinds and shutters have deteriorated to the point that they are no longer effective in reducing light intensities and need to be replaced, but it is often more difficult to determine when UV absorbing films are no longer performing to their original specifications. Neutral density films can also be applied to windows. These will reduce the overall light transmission and, as long as they are applied to all windows in a particular space, will create the impression that the windows are all clear.
As the intensity of light is reduced with distance from a light source, place the most light-sensitive objects furthest from it.
The same result may be achieved by bouncing light off a reflecting surface to create a diffuse effect. The intensity of the light is reduced because the path length of the light from the source to the object is increased, some of the incident light is absorbed and some is scattered by the reflecting surface. Depending on the nature of the reflecting surface, this is an excellent way of not only reducing light intensity but also of reducing UV levels in the reflected light and creating interesting lighting effects. When daylight is reflected from white walls, usually containing titanium dioxide pigments, approximately 80 % of the UV radiation is absorbed during each reflection.
Options to reduce the impact of UV radiation on objects include the use of low UV fluorescent tubes, installation of UV absorbing covers or sleeves over light sources and the use of UV absorbing perspex or UV absorbing films in display case construction. The use of a diffuser over a fluorescent tube for instance, will usually reduce the UV radiation to acceptable values. This is because most diffusers have UV absorbing chemicals in them to prevent their deterioration when in use.
Light exposure can also be reduced by adopting appropriate management strategies. Material that is particularly light sensitive may be alternated between display and storage. To cut light exposure by half in an historic house for example, only open half of the rooms for six months of the year and the other half for the following six months. Similarly, if a diary or register is displayed open, then rotate the exposed pages.
Another alternative is to use lights that are activated when someone enters the collection area room and which remain on for a limited period (automatic light switching).
Note that the importance of an object as well as its sensitivity to light damage must be considered carefully before remedial measures are taken. Occasionally, maximum light levels are insufficient to show artefact details adequately. This problem may arise when general light levels in the vicinity are too high, making the artefact at say 50 or 200 lux, relatively dark. Decreasing general light levels in the vicinity of the artefact will assist in overcoming this problem.
If the light on an artefact must be increased above recommended levels then reduce the display time proportionately. For example if the recommended light level is 50 lux and the actual level is 200 lux then put the object on display for only three months per year and keep it in dark storage for the other nine months.
If appropriate light levels cannot be established then make copies of particularly sensitive or significant photographs, prints and similar objects. The copy may then be put on display and the original safely stored.
Artificial Light Sources
There are many factors to be taken into account when considering the use of artificial light sources. These include:
- the light source itself;
- how the light gets from the source to the object; and
- maintenance and control systems.
When choosing a light source, factors to be considered include the ability of the source to render colours accurately, its colour temperature and its UV output. The standard measure for colour rendering is the colour rendering index (CRI) with daylight being given a CRI of 100. At present, tungsten halogen lights, with a CRI of 99 and some (not all) fluorescent lights with CRIs in the 90s are the first choices for museum lighting systems.
Note that light sources should not be in enclosed spaces with objects. Heat generated by the ballast of fluorescent lights, by tungsten lights themselves or by the motors of fibre optic systems can build up to damaging levels.
Light emitting diode (LED) technology is developing rapidly and it is envisaged that these light sources will become much more widely used in museum displays and in general spaces. LEDs can be combined to give a full colour spectrum, are UV free, use less energy than traditional halogen sources and because of their greater longevity, reduce on-going maintenance and costs.
While a colour temperature of 3000 K has been recommended for museum light sources, the human visual system responds to illumination in a discriminatory fashion. It has been demonstrated for instance, that the colour temperature of light sources preferred by observers varies according to the dominant colours in the object being viewed. Because of this it is strongly recommended that the same type of light source be used in areas that can be viewed simultaneously.
The most usual way of getting light from the source to the object is via a reflector, with most light sources sitting within a reflector in a light fitting. The type of reflector will affect the shape of the beam and will also control any stray light. Reflectors should be cleaned regularly.
Consult lighting specialists if more sophisticated delivery systems, including those using diffusing or ribbed glass lenses and fibre optics are considered for lighting displays. Glass fibre optic systems have some particular advantages in museum lighting, allowing the distribution of light from one lamp over a greater area, the placement of the lamp at a distance from the lit object and a natural reduction in the UV content of the light along the way. They are not a cure-all however, simply another tool to be considered.
Lighting systems should be designed so that maintenance and control are facilitated with fittings suitable for extended use and for easy lamp changes. Centralised controls and dimming facilities can allow for better overall control over light levels and the transition between differently lit areas. It is worth noting however, that strong dimming of tungsten halogen lights reduces their CRI.
As there are a wide variety of light sources available and lighting technology is continually developing, consultation with manufacturers and suppliers is recommended so that the latest and most appropriate information can be obtained.
Relative Humidity and Temperature
These deterioration factors are considered together because of their close inter-relationship.
Principles
The relative humidity (RH) of the air is an indication of how much water vapour is in the air at a particular temperature compared with how much water vapour the air could actually hold at that temperature. It is expressed as a percentage and can be defined as follows:
| RH = | amount of water in a given amount of air | x | 100 |
| max. amount of water the air can hold at that temperature | 1 |
Air at 100 % relative humidity holds the maximum amount of water possible at that particular temperature and is said to be saturated. Saturated air at 10 °C holds about 10 grams per cubic metre (g/m3) of moisture; at 20 °C about 17 g/m3 and at 30 °C more than 30 g/m3. Put simply, the relative humidity is a measure of the percentage saturation of the air. Therefore air at 50% relative humidity, regardless of temperature, is holding half of its total possible water capacity.
In essence, cold air cannot hold as much water vapour as warm air. In a closed environment such as a display case, there will be a fixed amount of water vapour, referred to as the absolute humidity. If the temperature inside the case falls then the relative humidity will rise. If the temperature rises the relative humidity will fall. Such changes in relative humidity could be caused by many factors including direct sunlight, spotlights and air-conditioning failures.
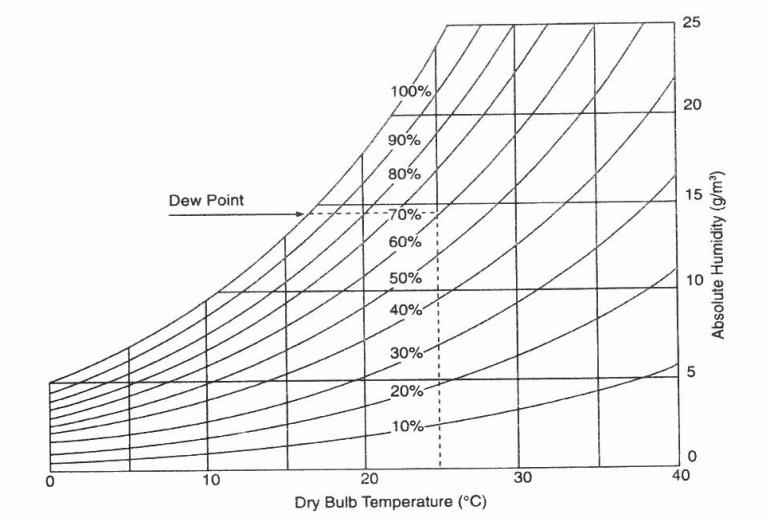
Figure 3: Hygrometric chart (adapted from Thomson 1986).
The hygrometric chart above (Figure 3) illustrates that a relative humidity of 60 % in a well-sealed display case kept at 25 °C will rise to about 80 % relative humidity if the temperature falls to 20 °C. Dew point will be reached if the temperature falls to about 16 °C. Condensation will then occur.
Deterioration Effects
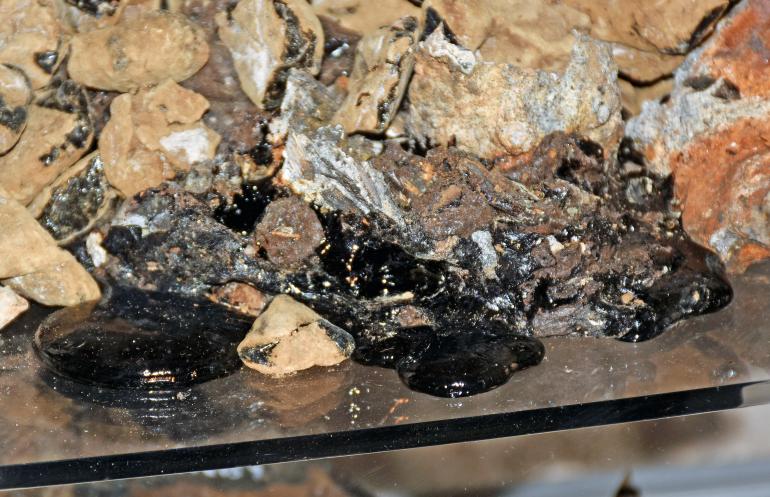
Damage caused by either changes in temperature and relative humidity or by exposure to inappropriate levels of these agents may be either chemical, physical or biological in nature (Figure 4). The main impacts of temperature, unless they are extreme enough to freeze or melt objects, are on relative humidity and the rate of chemical deterioration of objects. A 10 °C rise in temperature for example, approximately doubles the rate at which chemical reactions proceed.
Figure 4: Tar creep induced by warm gallery temperatures.
After light, relative humidity is the most significant factor to be considered in the environmental control of collections. Constant relative humidity above 70 % can cause mould growth and increase corrosion whereas relative humidity levels below 40 % may cause sensitive materials such as paper, parchment and textiles to become brittle.
It is important not only to control relative humidity levels but also to minimise fluctuations. Large and rapid changes in relative humidity caused by sudden temperature variations can have significant effects on materials. A sudden drop in temperature in a display case for example, may result in the dew point being reached. The subsequent condensation will accelerate metal corrosion and encourage biological attack on susceptible organic materials.
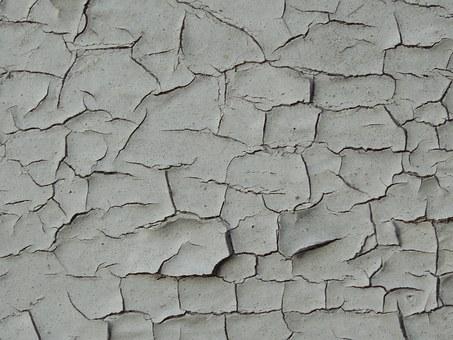
Organic materials such as paper, wood, textiles, bone and ivory expand and contract as they absorb and release water in response to changes in relative humidity levels. Rapid fluctuations can lead to cracking and warping of these materials and also cause bonded materials to separate. Paint for instance, may craze or peel from wooden surfaces (Figure 5) and paper glued to a backing board may buckle.
Figure 5: Paint damage due to differential expansion of the underlying wood and the paint layers.
Temperature and Relative Humidity Guidelines
While temperatures in museum display spaces are often designed for visitor comfort rather than for object preservation, conditions in storage areas are usually more carefully defined and controlled (see recommendations for particular material types in other chapters).
For many years the recommended ideal temperature and relative humidity conditions for museum collections were specified as 20 °C and 50 % respectively. These conditions, that were experientially based rather than scientifically determined, are difficult to maintain unless expensive air conditioning systems are used and may not be possible or even desirable in certain areas. In the tropics for instance, where the average yearly relative humidity is about 65 %, it may be better to have this as the optimum level (combined with air circulation) whereas in an arid region it may be better to aim for a relative humidity range of 40 - 50 %. This not only saves on energy costs but also means that material which is conditioned to the ambient relative humidity will not be damaged by change. The following temperature and relative humidity ranges were recommended, on a daily basis for particular climatic zones (Heritage Collections Council 2002):
- hot, humid climates, 22 – 28 °C, 55 – 70 %
- hot dry climates, 22 – 28 °C, 40 – 60 %
- temperate climates, 18 - 24 °C, 45 – 65 %
Storage and/or display of objects in appropriate environments contribute significantly to their longevity. The key is to determine just what the most appropriate environments are for the objects under consideration. Most of the uncertainty with the specification of relative humidity conditions is associated with organic and mixed media materials whereas the conditions for inorganic materials like metals and ceramics are generally more clearly defined.
Since the early 1990s, many scientific studies have been devoted to determining the most appropriate environmental conditions for the storage and display of objects. Early work by Michalski (1993) and Erhardt and Mecklenburg (1994) suggested that although certain material types benefit from storage in strictly controlled conditions, most mixed materials in sound order only need be maintained in environments within a relative humidity range of 40 - 70 %. A relative humidity fluctuation of ± 5% was suggested for sensitive objects (Michalski 1993).
Continued study in this area further refined relative humidity guidelines, with relative humidity variations within the range 30 – 60 % then considered mechanically safe for general collections (Erhardt et al, 2007). More stable conditions must be maintained however for certain degraded objects (veneers and inlays etc) and where possible, lower relative humidity conditions should be maintained for most metal objects. In 2014 following much debate, the Australian Institute for the Conservation of Cultural Materials (AICCM) recommended the following conditions as ‘interim’ guidelines for general collection materials:
- Temperatures to be maintained within the range 15 – 25 °C, with a maximum variation of ± 4 °C in any 24 hour period.
- Relative humidity levels to be maintained within the range 45 – 55 % with a maximum variation of ± 5 % in any 24 hour period.
In addition, the AICCM also recommended that relative humidity control be managed carefully to ensure that where conditions vary seasonally, the relative humidity for collections be maintained within the range of 40 – 60 %.
These more relaxed guidelines were determined after considering the possible impact these changes may have on the preservation of general collections, the need to make collection care more sustainable (especially in light of climate change) and to reduce the carbon footprint and high costs associated with the maintenance of tighter collection conditions. This latter point is significant as previous guidelines were difficult to maintain in most situations without the use of expensive, high energy air-conditioning systems. Similar guidelines to those of the AICCM were also recommended by the American Institute for Conservation (AIC) and endorsed by the International Institute for Conservation of Historic and Artistic Works (IIC) and the International Council of Museums Conservation Committee (ICOM-CC). In fact these latter groups recommended that the ‘interim’ guidelines recommended by the AICCM and the AIC should not be considered as interim but as guidelines per se. Further, the IIC and ICOM-CC groups also recommended that collection care should be achievable for local climates and that consideration should be given to more use of passive methods for environmental control, to the use of simpler technologies, air circulation and lower energy systems.
Conservation management of environmental parameters has also changed somewhat, tending to move away from the specification of strict guidelines (apart from those for particular material types such as acetate films, weeping glass etc) to the adoption of a risk analysis approach. Risk analysis requires an examination of the relationship between the environment and the objects in that particular environment. If the objects are stable within their usual environment then there is little point in altering those conditions. Thus instead of blindly following the strict temperature and relative humidity guidelines specified by many of the larger cultural institutions, anecdotal evidence suggests that it may be better to try to maintain the local conditions to which objects have become acclimatised. This is, of course on the proviso that an appropriate investigation has revealed that these conditions have not caused damage to sensitive objects.
In conjunction with determining the most appropriate relative humidity set point, it is most important to attempt to reduce diurnal and seasonal fluctuations. It is well known that the smaller the fluctuations, the lower the risk of physical damage to susceptible objects. Depending on the chosen relative humidity set point, say 55 %, a variation in daily relative humidity of 5 % from that value would be considered safe for hygroscopic collections, a variation of 10 % would pose a low risk to most organic materials while variations of greater than 20 % would constitute a significantly increased risk to those types of collections.
For most materials, as long as the conditions return to a value close to the original, extreme short-term fluctuations may not be a problem as there is not enough time for objects to respond. Very thin objects however, are much more susceptible to damage from short-term fluctuations than larger more massive objects. These latter objects can take up or lose more moisture without physical impacts becoming evident than can smaller moisture sensitive objects.
Note that for objects containing more than one material type, the relative humidity level of the storage environment should reflect the recommended conditions for the most sensitive component.
Measurement
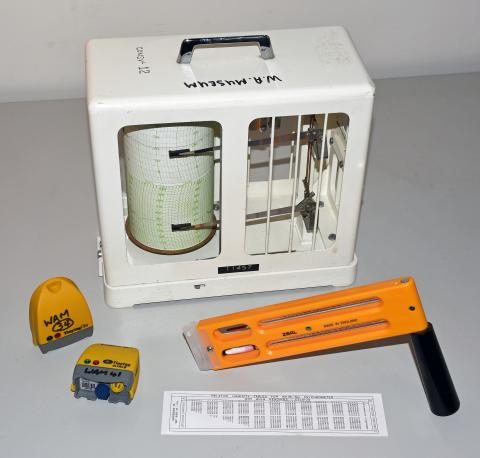
Relative humidity may be measured by using any of the following devices (Figure 6):
- sling psychrometer;
- thermohygrograph;
- hair hygrometers;
- calibrated electronic devices which provide a digital readout of temperature and RH; and
- data loggers linked to relative humidity sensors
Figure 6: Temperature and relative humidity data loggers (front left), sling psychrometer (front right) and thermohygrograph (rear middle).
One of the simplest instruments for measuring relative humidity is the sling psychrometer. This device is also known simply as the ‘sling’ or as a whirling hygrometer. It consists of two matched thermometers mounted side-by-side, one of which has a fabric sleeve covering it. The end of this sleeve is inserted into a reservoir which is filled with distilled water. The fabric-covered thermometer is known as the wet bulb, the other the dry bulb. When the thermometers are swung around, the water in the sleeve of the wet bulb evaporates, making it cooler than the dry bulb. The amount of evaporation and subsequent cooling depends on the amount of moisture present in the air - the drier the air the greater the level of cooling and vice versa. The difference in the temperatures of the thermometers therefore indicates how dry or humid the air is - the greater the difference the lower the ambient relative humidity, the smaller the difference the higher the relative humidity. A standard hygrometric chart, which displays a series of wet and dry bulb temperature differences and corresponding dry bulb temperatures, is then used to give an accurate measure of the relative humidity.
The sling is used to calibrate many other types of hygrometers. Coupled with a thermohygrograph (seven-day or one-month) an accurate day-to-day or hour-to-hour record of temperature and humidity can be obtained all year round. An advantage of a thermohygrograph is that the recent temperature and relative humidity history of the space being monitored is immediately visible on its chart.
Electronic instruments are also available which record changes in temperature and relative humidity. These devices vary greatly in price and can be obtained from electronic shops or conservation suppliers. These instruments have certain advantages. For example, they may be placed relatively unobtrusively in display cases or in small storage areas in which a thermohygrograph either would not be appropriate or would not fit.
Other relative humidity sensors linked to data loggers can be programmed to record temperature and relative humidity conditions at regular intervals over periods of many months. These sensors are very small and by operating continuously over the different seasons allow useful long-term profiles to be established of storage and display conditions.
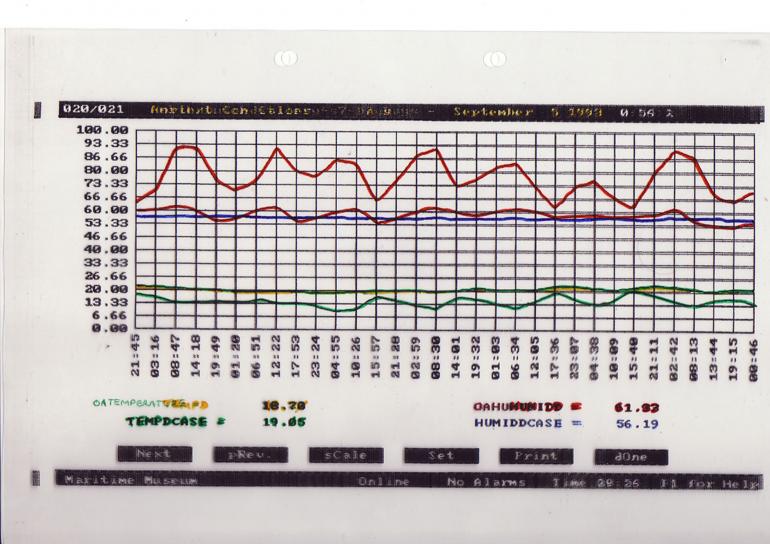
Monitoring relative humidity is important to determine both the actual levels and the fluctuation rates. This information may be used to see how well a building buffers the external ambient conditions and also to see how well a display case further buffers the gallery environment (Figure 7). If the temperature is steady then the relative humidity within a well-sealed display case will remain constant.
Controlling Relative Humidity and Temperature
Relative humidity and temperature control strategies include the use of:
- the buffering effects of buildings and storage media;
- moisture-absorbing desiccants (silica gel and zeolites);
- natural moisture-absorbing materials such as wood, paper and textiles;
- refrigerant dehumidifiers;
- air conditioning systems; and
- thorough and well-planned building maintenance.
We strongly recommend the use of passive methods for temperature and relative humidity control as these are often more sustainable and cost-effective. Appropriate design of buildings and storage media, the use of insulating materials and good management practices are critical components of passive environmental control. These methods are much preferred to more costly and often less reliable air conditioning systems.
Fluctuations in temperature and relative humidity are caused by daily and seasonal fluctuations in the local weather. Even without air conditioning, the insulating effect of a building ensures temperature and relative humidity variations inside a building are generally smaller than those outside. The conditions in the innermost rooms will be the most stable, outer rooms and lofts the most variable and basements the most vulnerable to the development of high relative humidity levels. Thermal insulation of a building will assist in maintaining more stable conditions. The provision of shading (north side of a building in the southern hemisphere) and the use of reflective building surfaces will also assist in reducing the impacts of exterior conditions on interior environments.
Cupboards, boxes and display cases are secondary insulating barriers which provide an additional buffer, helping to stabilise conditions even more (Figure 7). It is interesting to note that the books in a library provide a significant amount of the buffering of the internal library environment.
Figure 7: Temperature and relative humidity readings showing the differences between external conditions, those in an exhibition gallery and in a display case. The uppermost readings highlight the strong buffering of relative humidity inside a display case.
Depending on the internal and external climatic conditions, careful ventilation of a building can also be used to adjust the internal relative humidity. Accurate measurement of the respective relative humidity levels (interior and exterior) is essential for this strategy to be successful.
The climate within an individual showcase or cabinet can be controlled if material particularly sensitive to high relative humidity levels is to be stored or displayed. If the relative humidity is too high (above 65 %) then it may be necessary to use a desiccant within the display case to absorb excess water vapour. Orange self-indicating silica gel can be used for this purpose. Do not use the blue self-indicating silica gel as the cobalt chloride colouring is considered to be carcinogenic. It is important that any silica gel used in display cases is conditioned to the desired relative humidity level prior to being placed in the storage or display space. This process is best left in the hands of conservators as there is a risk of too much moisture being absorbed, resulting in desiccation of vulnerable objects.
Commercial conservation materials such as Art Sorb are also available. They are very useful in helping to control relative humidity levels in display cases and similarly sized containers. Art Sorb is a silica-based material, pre-conditioned to relative humidity levels of either 40, 50 or 60 %. Art Sorb is available in pellet, sheet or cassette form, depending on the nature of the space in which it is to be used. Sheets are generally only available buffered to 50 %.
Zeolite pellets may be of use in climatic areas in which the endemic relative humidity is naturally high (Australian Library and Information Association 1989). A Japanese researcher has developed a treated natural zeolite pellet capable of absorbing and releasing large amounts of water vapour. The pellets have been combined with Japanese paper with the resultant material being produced as a sheet or a paper-covered honeycomb board filled with pellets. Incorporating these materials in storage and display cabinets will minimise relative humidity fluctuations.
Zeolites have the added advantage of being able to absorb odours and as such, have been manufactured and sold commercially in packet or bag form for use in the home. They have been used to lower the relative humidity and absorb odours in refrigerators. If contemplating the use of these products always check their effect in the space in which they are to be used. This is important so that the risk of desiccation, or even inadequate dehumidification, is minimised.
An alternative way of controlling relative humidity levels is to incorporate other materials that absorb moisture, such as treated wood, paper and textiles in the cabinet or display case with the moisture-sensitive artefacts. These water-absorbing materials reduce relative humidity fluctuations by taking up or releasing moisture as conditions change. In this way the artefact is subjected to smaller relative humidity variations. Materials used in this way must be compatible with the moisture-sensitive object. It would not be appropriate for instance, to store a lead object in an oak box or to use alkaline-buffered acid-free tissue paper with leather objects.
In Japan this type of approach is used to deal with the naturally high humidity experienced in that country. Objects are stored in wooden chests in wooden buildings to take advantage of the natural moisture-absorbing and releasing properties of wood. In this way the box contents are buffered against both the naturally high relative humidity and against any changes in external conditions. The relative humidity range inside a Karabitsu (lacquered Japanese cedar chest) for instance, ranged from 60 – 65 % compared to the ambient conditions of 42 – 80 % (Kikkawa and Sano 2008). This approach would not be suitable for all material types however, especially those sensitive to the acidic vapours given off by wood. With the right choice of wood (hoop pine for example) and wrapping of artefacts in acid-free tissue, this approach may allow some of the problems associated with endemically high relative humidity conditions to be overcome without the need for more costly and active intervention.
Alternatively, if passive methods such as those outlined above are not sufficient, this problem may be tackled by lowering the relative humidity of the storage or display area itself. This can be achieved by employing a thermostatically controlled refrigerant dehumidifier to remove excess moisture. As mould formation is encouraged by conditions of high relative humidity, warm temperatures and stagnant air, it may be necessary to employ a combination of dehumidification, air circulation and temperature control. The use of fans within a room will assist in preventing the establishment of ‘dead’ spots in which localised high relative humidity microenvironments may otherwise be established.
Refrigerated air coolers can remove moisture from a building or room by condensing it outside. Water collected by this process is pure enough for use in the sling psychrometer.
Air conditioning systems should not be regarded as the first step in stabilising environmental conditions. While they are very good at maintaining appropriate temperatures, their impact on relative humidity control is highly variable, with higher fluctuations often being recorded following the installation of air conditioning systems. This is particularly the case when air conditioning operates intermittently. If the aim of air conditioning is to maintain objects in the best possible conditions then the system should run for 24 hours a day. If the air conditioning is turned off overnight the environment inside the building will tend towards external values. In winter a lowering of temperature in a well-sealed building will result in an increase in relative humidity. When the air conditioning plant is turned on in the morning there will be a rapid increase in temperature accompanied by a rapid decrease in relative humidity. These rapid changes in relative humidity should be avoided. It is obviously better to use passive controls to minimise fluctuations in environmental conditions.
Air conditioning systems which incorporate humidity control are available but these tend to be very expensive to set up, run and maintain.
It is important to prevent the development of extreme conditions of temperature and relative humidity. Usually such extremes are localised and often only affect a few objects. For example, localised heating and consequent low relative humidity may be caused by direct sunlight falling on an object, by having spotlights positioned too close or by having radiators or heaters adjacent to an object. It is also important to position sensitive objects away from the incoming air stream of air conditioning systems. This allows the incoming air to mix and equilibrate with the bulk of the air in the room before reaching a sensitive object, thereby minimising the impact of relative humidity fluctuations.
A common cause of high humidity is leakage of rainwater through the roof or walls. It is wise not to place objects or shelving against external walls as damp and localised extremes of both temperature and relative humidity are likely. Common sense and adequate building maintenance will minimise such problems.
Biological Pests
Although a chapter in this book is devoted entirely to biological pests a few of the major points are discussed briefly in this section.
Biological pests include moulds, bacteria, insects and other small animals such as mice, rats and birds. All of these organisms are capable of causing severe damage to objects in a collection.
Problems can be minimised by adopting appropriate housekeeping practices and ensuring that the building in which objects are housed is well maintained. Some of the practical ways in which this can be achieved include:
- keeping storage and display areas clean;
- regularly inspecting objects in the collection;
- ensuring that new objects are not infested or contaminated before they are added to a collection;
- blocking access to ceiling spaces by nesting birds, possums and other animals;
- controlling populations of mice, rats and insects by the use of screens, traps and the careful application of residual pesticides;
- keeping food sources away from objects; and
- controlling the environmental conditions so that mould growth and insect populations are not encouraged (keep the relative humidity below 65 %).
Note that trapping rodents is preferable to poisoning them. Trapping allows the rodent’s body to be disposed of appropriately, while poisoning means the body usually ends up as a source of food for some other pest.
Pollutants
Much of the information contained in this section is summarised from lecture notes (2006) and a publication by Jean Tétreault (2003).
Pollutants are compounds, either natural or man-made, that have damaging effects on cultural materials. They may emanate from:
- the materials associated with a collection, including storage and display containers and construction materials;
- the objects in the collection themselves; and
- the surrounding air.
Depending on the type of pollutant and the susceptibility of material types, pollutants have a variety of detrimental effects on objects including increased corrosion of metals and degradation of organic materials. Acetic and formic acids from wood products actively corrode lead and produce efflorescence on calcareous materials such as sea shells, corals and calcium-rich fossils. Ammonia gas produced from alkaline-type silicone sealants, concrete and cleaning products, induces blemishes on ebonite, efflorescence on cellulose nitrate and discolouration of photographic prints and artists’ colourants.
Some pollution-sensitive materials and the airborne pollutants that affect them most seriously are listed below (after Tétreault 2006).
| Sensitive Material | Most Harmful Pollutant |
|---|---|
| Lead | acetic acid |
| Silver | hydrogen sulphide |
| Polyurethane magnetic tapes | water vapour, particles |
| Cellulose acetate | water vapour, acetic acid |
| Cellulose nitrate | water vapour, nitrogen oxides |
| Natural rubber | ozone |
| Colourants (alizarin crimson, basic fuchsin curcumin etc) | nitrogen and sulphur dioxides, ozone |
| Photographic gelatin, colour photo prints | water vapour |
Storage and Display Materials
The most common sources of pollutants in storage areas are the materials used to store and/or display objects. To gain the greatest buffering effect against external environmental changes, it is desirable for objects to be stored in well-sealed containers. This is problematic however, unless the materials used in these containers are stable, of archival quality and neither they nor the object to be placed in the container emit harmful pollutants. Otherwise pollutant levels will build up to damaging levels in the container. Materials which are known to release harmful vapours at room temperature (modified after Padfield et al 1982) include:
- wood (particularly hardwood and composite boards);
- protein-based glues (except photographic gelatin);
- cellulose nitrate and cellulose acetate;
- highly plasticised polyvinyl chloride;
- polyvinyl alcohol;
- RTV silicones;
- polyurethane;
- rubbers containing sulphur vulcanising agents;
- wool and felt;
- some dyes which contain labile sulphur; and
- concrete
Materials which are considered to be ‘safe’ (modified after Padfield et al 1982) include:
- metals;
- ceramics and glass;
- inorganic pigments;
- polyethylene and polypropylene;
- acrylic paints and varnishes;
- polycarbonates;
- polystyrene and modified polystyrene such as high impact polystyrene and acrylonitrile/butadiene/styrene (ABS);
- polyesters and fibres including polymethyl methacrylate (Perspex, plexiglass), polyethylene terephthalate; and
- unbleached and undyed cotton and linen.
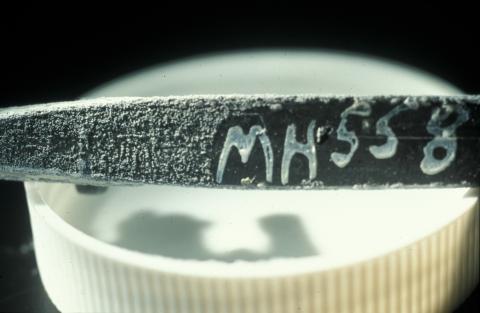
Materials such as chipboard, wood, certain polymers and paints can contribute to the deterioration of objects in a collection. Oak and cedar for example give off high amounts of acetic acid, promoting the corrosion of nearby metal objects, with lead objects particularly susceptible (Figure 8). It has been demonstrated that carbonyl pollutants such as acetic acid from wood are more prevalent in internal museum environments than in the external air with concentrations increasing in the following order:
Galleries < storage areas < display cases < storage cabinets
Data of this sort provides clear evidence of the use of inappropriate materials and the build-up of pollutants in more confined spaces.
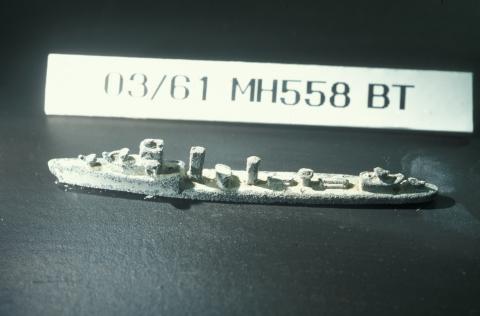
Figure 8: A lead painted model battleship showing corrosion induced by acetic acid vapours given off by wood used in display case construction.
Objects in direct contact with certain polymer storage files may become contaminated as plasticisers migrate from these polymers. Artefacts stored in highly plasticised polyvinyl chloride are particularly at risk owing to the migration of plasticisers and the possible release of corrosive hydrogen chloride from this polymer. Staining is likely for objects in contact with acidic papers and some paints and adhesives while malleable materials like plasticine and blu tack will transfer sulphur and oils respectively to any objects with which they come into contact.
The placement of objects in freshly painted wooden cupboards or rooms is also not recommended as the solvent fumes from the drying paint may affect the organic components of some objects (glues, resins, plastics, lacquers and the like). It is recommended that a newly painted, internal surface be allowed to cure for at least four weeks before use (see Appropriate Materials later in this section for additional recommendations). Use paints that contain low levels of volatile organic components.
Artefacts
The objects themselves may prove to be pollutant sources as they degrade. Cellulose nitrate movie films for example, not only release acidic oxidising gases but also pose a fire risk as they deteriorate. These materials must be stored in their own well-ventilated and preferably fire-proof area.
This in-built, intrinsic form of pollution is often much harder to deal with than either airborne pollutants or pollutants that migrate from materials in contact. It is most important therefore to understand the nature of the materials from which collection objects are made so that precautions can be taken for those with a pre-disposition to deterioration.
Airborne Pollutants
Airborne pollutants including dust, oxides of nitrogen and sulphur, hydrogen sulphide, peroxides, ozone, cooking fumes and airborne salt may arise from vehicle emissions, industrial activity or decaying organic matter.
Dust can be made up of a variety of materials including fine dirt, salt particles, oily mists, textile fibres and wood and metal powders. The precise nature of the dust and the objects on which it settles will determine its effect. Dust can promote both chemical and biological attack on objects. It is particularly damaging for magnetic media such as polyurethane sound and visual recording tapes. Dust causes damage to objects by:
- physical abrasion and discolouration;
- attracting moisture; and
- attracting biological pests such as insects, mould and bacteria.
The deposition of small particles on objects often initiates deterioration processes. Metal corrosion often starts after particles are deposited on a surface, oily residues can absorb potentially damaging pollutants and many deposited salts are hygroscopic. Finer particles are generally more damaging than coarser particles. Finely divided dust is harder to clean, particularly from fragile or complex porous surfaces and increases the risk of damage to an object during cleaning. Note that unsealed concrete is a source of alkaline dust.
A further issue is the perception that dirty objects create. If objects on display are coated with dust it gives visitors the impression that the collections are not being well cared for.
The amount and type of dust can be monitored quite simply by using standardised ‘sticky’ surfaces such as double-sided tape stuck to a glass microscope slide. After exposure these dust traps should be covered with a microscope cover slip to stop further dust accumulation prior to optical microscopic examination. Classification of particles (e.g. salt, soil, clothing fibres, soot etc) and estimations of quantities will allow remedial action to be taken to reduce further dust deposition.
Note that for some objects, water vapour and oxygen in the air must also be considered to be pollutants as they can cause material deterioration in susceptible artefacts.
Preventive Measures
The significance of any air pollution problem will be determined largely by the particular collection environment and its location, be it in an industrial, tropical, coastal or desert site. Each particular environment will have its own set of problems. Pollutants may be transported by moving air or by direct contact between objects which allows the transfer of damaging materials from one object to another.
Although reducing pollutant levels is not easy, preventive measures will help to reduce damage to objects. Preventive action may involve combinations of the following:
- good housekeeping;
- exclusion of pollutants;
- sealing of exposed surfaces such as concrete and timber walls and floors;
- the use of archival quality storage and display materials;
- incorporation of absorbent materials in storage containers;
- appropriate use of ventilation and air exchange;
- reducing chemical reactions by reducing relative humidity, temperature, light and oxygen; and
- using filtered air conditioning.
The Building and Storage Enclosures
As with buffering against changes in relative humidity, the first line of defence against externally generated pollutants is the building itself. As a rough rule of thumb and, as long as there are no significant indoor pollution sources, if the pollutant level outside is 100, it will be approximately 10 inside a room and 1 inside a box (Tétreault, 2003).
A simple air-tight enclosure, containing no noxious substances, is therefore the simplest way of isolating an object from damaging pollutants. Valuable objects that deteriorate in the presence of oxygen can be sealed in an air-tight container filled with an inert gas like argon. Note that the argon should be refilled on a regular basis. If an object is to be stored in an airtight container it is critical that neither the object nor the container are potential sources of damaging emissions and that relative humidity fluctuations are controlled within the container. It would be most unwise for instance, to store cellulose acetate and cellulose nitrate objects or acidic paper in well-sealed enclosures.
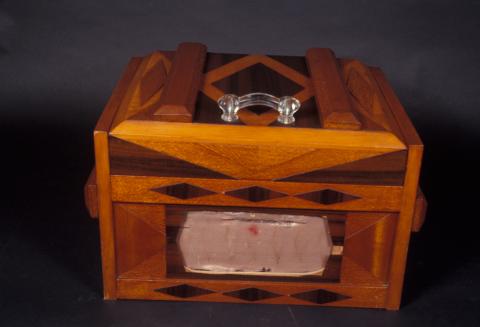
If objects are stored in boxes, it is a good idea to make a mylar ‘window’ in the box so that the object can be viewed without having to open it. As monitoring of an object’s condition is an important part of its on-going preservation, the presence of ‘windows’ in stacked boxes is invaluable, as are regular inspections of objects.
When considering the use of airtight enclosures take relative humidity and pest control factors into account.
Appropriate Materials
Boxes and supporting materials for objects should usually be made of archival quality materials. This may not be necessary for all objects however. If acidic newspapers are to be stored in cardboard boxes for example, the use of acid-free boxes will be much more costly and of little long-term benefit with respect to minimising acid development in the paper. Slightly acidic cardboard boxes could be used as long as the storage environment has a stable relative humidity (approximately 50 %) and the boxes are not exposed to direct wetness. See other chapters in this book and consult a conservator if in doubt about the type of materials that are best suited for storage enclosures for particular material types.
Use enamelled, galvanised or powder coated metal, stainless steel, acrylic or glass cabinets and shelves in preference to wood or chipboard for storage and display, particularly for enclosed spaces.
Wood and wood products should be avoided for storage containers, cupboards and display cabinets, especially for acid-sensitive objects. Some timbers, plywood and composite board products may be used however, depending on the type of wood, the presence and type of surface coatings, the type of resin/glue used in manufacture and/or the presence and type of laminating surfaces. Some examples of wood products suitable for storage and display systems include (after Tétreault 2006):
- plywood with phenol formaldehyde impregnated paper overlays (high density overlaid);
- plywood with ABS plastic laminates;
- plywood with phenolic laminates (e.g. Arborie, Formica);
- exterior grade plywood; and
- particle board without urea formaldehyde resins.
If laminated wood products are used for storage systems it is critical that all surfaces are completely sealed, particularly the ends and edges. As a general principle exterior grade products emit less damaging pollutants and are of better quality than similar products designed for interior use.
It is strongly recommended that if there is no alternative other than to use products such as plywood, chipboard or medium density fibreboard then all surfaces should be either laminated (as described above), coated with plastic or aluminium barrier foils or primed and painted with at least 2 top coats. Although this latter method will minimise emissions, pollutants released by the wood products will eventually diffuse through the paint or varnish layers. Oxidative paints, including oil-based polyurethane, alkyds and epoxy esters (epoxy in one can) should not be used to paint wooden surfaces into which artefacts are to be placed. Other paints, including two-pack epoxies and water-based polyurethanes are acceptable, subject to appropriate drying periods before use. Varnishes and water-based paints are not as effective as polyurethane lacquers as a coating barrier. If coated wood products are used for open shelving then four days drying time is sufficient. In enclosed spaces however, four weeks drying time is essential.
Ventilation, Sorbents and Filters
If it is not possible to avoid pollutants either by using archival quality storage materials or airtight enclosures then alternative strategies must be adopted. These may include the use of appropriate ventilation, sorbents or filters.
Sorbents effectively ‘soak up’ pollutants from the environment. They are generally very good at mitigating the impacts of externally generated pollutants and will therefore protect objects in well-sealed containers. They are not as good at protecting objects against high levels of internally generated pollutants (such as off-gassing from wood) as the sorbent will quickly become saturated. Ventilation may be a better option in the latter case.
Sorbent materials include activated carbon, activated charcoal cloth, zeolites, silica gel, activated alumina and specifically impregnated composites. Each of these materials has specific absorption characteristics and none of them will control all possible pollutants. Activated charcoal cloth for instance, is very good at absorbing acetic acid vapours but has minimal effect on hydrogen sulphide or nitrogen oxides. Some sorbents and the pollutants that they are most effective against are summarised below (after Tétreault 2003).
| Sorbent | Most effective against |
|---|---|
| Activated carbon | acetic acid, ozone, sulphur dioxide |
| Activated charcoal cloth | acetic acid, ozone |
| Activated alumina (with potassium permanganate) | acetic acid, hydrogen sulphide, ozone, sulphur dioxide |
| Molecular sieves (zeolite) | water vapour |
| Silica gel | water vapour |
| Zinc oxide | hydrogen sulphide |
A variety of sorbents are available that incorporate different impregnating materials. These composite sorbents have the ability therefore to control more potential pollutants. For example, in addition to having good sorption properties for acetic acid, ozone and sulphur dioxide, activated carbon containing potassium carbonate is also good at absorbing hydrogen sulphide and nitrogen dioxide.
A sorbent may be incorporated as a layer or liner in storage and display areas or even as a wrapping material around a sensitive object (as long as the object does not have to be visible). Although expensive, activated charcoal cloth can last up to ten years, depending on the level of pollution. Commercially available Microchamber™ papers and boards incorporate zeolites and activate charcoal and are capable of providing protection against both acidic and oxidising pollutants such as ozone, oxides of nitrogen and sulphur dioxide. These products afford much greater protection to artefacts than alkaline buffered boards and papers.
An often overlooked factor in controlling pollutant effects is the importance of relative humidity control, both to reduce its impact on susceptible materials (for which it must be considered to be a pollutant) and also to lower the rates of other pollutant-induced chemical reactions. Metals which are more prone to corrosion at elevated relative humidity levels benefit from storage or display in low relative humidity environments. Implement strategies as outlined in the earlier Relative Humidity and Temperature section of this chapter for those objects that can tolerate lower relative humidity conditions.
The effects of people and their clothing should also be considered when reviewing pollution sources. Bio-effluents (colloquially the fart), off-gassing, particularly from wet clothing and the loss of skin and cloth fibres can contribute to deterioration in susceptible objects in poorly ventilated spaces. Having a separate area for visitors to leave coats and limiting the number of visitors will reduce potential pollutants and increase visitor comfort.
Dust Control
Clean areas regularly and maintain buildings to minimise dust problems. Practical steps that can be taken to reduce dust in collections include the following:
- clean storage and display areas with a good quality vacuum cleaner (HEPA filter recommended) rather than a broom. This reduces the amount of dust that may be spread and/or resuspended during cleaning;
- use a damp cloth rather than a feather duster for exposed surfaces;
- use dust covers, closed containers and/or covered shelving to protect artefacts from dust contamination; and
- maintain building surroundings to minimise dust generation.
For objects in storage, protective wrapping with materials such as washed cotton or linen and/or acid-free tissue will provide protection against dust and some pollutants.
For museums, keeping a one metre gap between visitors and objects will result in approximately 90 % of human-generated dust (cloth fibres, human dander etc) being deposited before it reaches the objects. This is because larger dust particles drop closer to their source. Finer particles remain suspended in the air for longer periods and can be transported further by air circulation in a building.
Air Conditioning
Larger institutions, museums and art galleries often rely on heating, ventilation and air conditioning (HVAC) systems to maintain internal conditions that are both comfortable for visitors and appropriate for preservation of objects on display. In addition to providing basic temperature and relative humidity control HVAC systems can also improve air quality by filtering out particles and gaseous pollutants. As there are many different HVAC systems, filters, components and designs, consultation with specialist engineers is essential in order to match a system to a particular environment, building and its contents.
Sophisticated HVAC systems are expensive to set up, operate and maintain. Less costly alternatives, while not as effective, include the use of using portable filtration units in rooms and the careful placement of objects to reduce exposure to pollutants (away from open windows etc). Increased ventilation may help to dilute internally generated pollutants while restricted ventilation will help to exclude externally produced pollutants. The strategy to be used must be determined by a careful examination of the situation in question.
While the majority of this section has concentrated on the effects and alleviation of airborne pollutants, the impact of pollutants that migrate via direct contact must also be taken into account. Avoid direct contact between objects and coatings for instance. Archival lining materials such as acid-free paper or board, polyethylene, polypropylene, polyethylene terephthalate and mylar can be used to separate objects from shelving or other materials from which contaminants may migrate. Such separation may even be as simple as sealing in a polyethylene bag.
Monitoring of collections is an important part of on-going collection care. While it is desirable to be able to monitor pollutant levels in storage and display areas, this requires specialised equipment and is often costly to undertake. In reality, what often happens is that the objects themselves become the deterioration monitors - when an object deteriorates, the nature of its deterioration gives an indication of the likely cause, providing a guide to appropriate follow-up remedial action. The key is to regularly inspect objects in collections to ensure that preventive action can be taken as soon as possible.
Summary
- Know the material types and the agents of decay that are most likely to cause damage in a collection so that appropriate steps can be taken to minimise deterioration and damage.
- Exclude direct sunlight from storage and display areas.
- Maintain light, temperature and relative humidity levels in storage and display areas that are best suited to minimise the deterioration of the most sensitive objects in those areas.
- Use archival quality materials to store and display artefacts.
- Where possible apply passive, low technology techniques to buffer changes in relative humidity and temperature rather than rely on expensive mechanical systems.
- Isolate artefacts that are prone to deterioration from more stable artefacts.
- Focus on improving storage and display conditions than applying treatments to deteriorated or damaged artefacts.
- Ensure that house-keeping standards are high and that buildings are well maintained so that the effects of biological pests are reduced and internal environmental conditions are as good as they can be.
- Regularly monitor the condition of stored artefacts.
Bibliography
Artcare, The Care of Art and Artefacts in New Zealand, 1998, Auckland Art Gallery Toi o Tāmaki, Auckland, New Zealand.
Australian Library and Information Association, 1989, Fumigation, Conservation of Library Materials, Newsletter No. 5, p. 3.
Bachmann, K., (Ed.), 1992, Conservation Concerns: A Guide for Collectors and Curators, Smithsonian Institute Press, Washington.
Caple, C., (Ed.), 2011, Preventive Conservation in Museums, Routledge, London and New York.
Grattan, D. and Michalski, S., 2009, Environmental guidelines for museums – temperature and relative humidity (RH), www.cci-icc.gc.ca/crc/articles/enviro/controls-niveaux-eng.aspx
Erhardt, D. and Mecklenburg, M., 1994, Relative humidity re-examined, in Preventive Conservation: Practice, Theory and Research, Preprints of the Contributions to the Ottawa Congress, September, 1994, IIC, pp. 32-38.
Erhardt, D., Tumosa, C.S. and Mecklenburg, M.F., 2007, Applying science to the question of museum climate, in Padfield, T. and Borchersen, K. (Eds), Museum Microclimates. Contributions to the conference in Copenhagen, 19-23 November, 2007, The National Museum of Denmark, pp 11-18 (www.microclimates.natmus.dk).
Guidelines for Environmental Control in Cultural Institutions, 2002, Heritage Collections Council, Canberra, ACT, Australia.
Kikkawa, Y. and Sano, C., 2008, Preservation of Historic Paper in Japan, in Conservation and Access. Contributions to the London Congress, 15 – 19 September, 2008, The International Institute for Conservation of Historic and Artistic Works, p 266.
Michalski, S., 1993, Relative humidity: a discussion of correct/incorrect values, in Preprints, ICOM Committee for Conservation 10th Triennial Meeting, Washington DC, pp. 624-629.
Museums Australia Inc. (NSW), 1994, Museum Methods: A Practical Manual for Managing Small Museums, Museums Australia Inc. (NSW).
Padfield, T and Borchersen, K., (Eds), 2007, Museum Microclimates: Contributions to the Copenhagen conference, 19-23 November 2007, National Museum of Denmark, www.microclimates.natmus.dk
Padfield, T., Erhardt, D. and Hopwood, W.R., 1982, Trouble in store, in N.S. Brommelle and G. Thomson (Eds), Science and Technology in the Service of Conservation, Preprints of the Contributions to the Washington Congress, 3-9 September, 1982, IIC, London, pp. 24-27.
Powerhouse Museum, 1994, Caring for Heritage Objects, Powerhouse Museum Research Series No. 3, Sydney.
Tétreault, J., 2003, Airborne Pollutants in Museums. Galleries and Archives: Risk Assessment, Control Strategies, and Preservation Management, Canadian Conservation Institute, Ottawa, Canada.
Tétreault, J., 2006, Display and Storage Products Used in Museums, Lecture Notes, Canadian Conservation Institute, Ottawa, Canada.
Thomson, G., 1986, The Museum Environment, 2nd Edition, Butterworths, London.
Mould and Insect Attack in Collections
I. M. Godfrey and N. King Smith
Introduction
Although mould and insect attack are treated separately in this section it is most important that pest control is dealt with in a coordinated fashion. Pest management should be a routine part of the operations associated with a collection not just a series of responses to crises.
Strang (1993) recommends conducting a survey to assess the existing situation before any attempt is made to implement a pest management regime. This survey should consider the following factors:
- the building and its location;
- portable fittings and hardware; and
- procedures and people.
These factors should be examined to determine their impact on pests. Is the building well sealed? Do storage and display cabinets restrict the entry of pests? Do staff eat and keep foodstuffs well away from collection areas? Are fresh plants or flowers allowed into the building? These are just some of the questions that should be considered in the initial survey.
Having assessed the existing situation, design and implement pest management activities that will minimise the risks posed to collections by pests (Strang 1993, Strang and Kigawa 2009). These activities should be based on ‘five stages of control’:
- avoid;
- block;
- detect;
- respond; and
- recover.
This approach to pest control, often called ‘integrated pest management’, involves:
- preventive measures;
- monitoring of collection areas;
- treatment of artefacts;
- treatment of infestations; and
- review and assessment of procedures.
The key points are summarised below with more details provided later in the chapter.
Preventive Measures
Key pest preventive measures include:
- excluding pests by using screens and sealing cracks and access points;
- ensuring that additions to a collection are not infested by quarantining and monitoring objects before adding them to the collection;
- isolating susceptible objects in pest-proof bags or containers;
- good housekeeping and maintenance in and around the building including removing rubbish, keeping plants away from the building and reducing or removing sources of moisture and food;
- positioning external lights so that they either draw insects away from building openings or at the very least don’t attract insects into the building;
- control of relative humidity, temperature and air circulation to prevent mould formation;
- not allowing food, drink or plant material (fresh or dried) in collection areas;
- thoroughly cleaning all areas associated with a collection (vacuuming with a HEPA filter is recommended). This includes storage areas, display areas, tea rooms, offices and the area immediately outside the collection; and
- applying appropriate pesticides to the external perimeters of buildings and on internal skirting boards (see Appendix 3) .
Monitoring Collection Areas
Collection areas should be monitored by:
- regularly inspecting for dead or live insects, insect frass, cocoons, silk webbings, holes in objects, musty smells, changes in the appearance of objects and any other signs of pest activity;
- using commercially available sticky traps to identify insect activity; and
- using termite baits to monitor activity around a building.
Treatment of Artefacts
Ways to treat artefacts to prevent or control pest infestations include:
- bagging and removing any affected artefacts from the storage and display areas; and
- freezing or fumigating artefacts, using inert gases, low oxygen or chemical techniques.
Treatment of Infestations
If an area of the collection is infested by pests, then:
- after isolating the affected artefacts, thoroughly clean the area (vacuuming with a HEPA filter is recommended); and
- apply pesticides if pest activity continues.
Review and Assessment of Procedures
Management of pest infestations should be assessed against existing procedures to determine their effectiveness. Take the following steps after a pest outbreak:
- document the outbreak. Record details concerning the artefacts affected, the extent of damage incurred, when the infestation occurred and the nature of the infestation (for example, type of insect attack);
- determine the circumstances that led to the infestation; and
- decide what action can be taken to prevent similar problems in the future.
Note that the cycle does not end with the treatment of an object. In fact it begins again. There is no point in eradicating pests if reinfestation is likely to occur. Follow treatment with remedial action and careful monitoring to reduce the chances of pests returning.
If in any doubt, consult a conservator who will be able to provide you with the latest information on control and treatment techniques.
Mould
Most people have seen mould growths on old bread, cheese, jam, damp wood and leather. This mould growth, usually appearing as a fine fluffy mass is referred to as the ‘fungal colony’. Mould growth is favoured under warm, dark and moist conditions when air circulation is limited. The presence of dirt, particularly organic detritus also increases the risk of mould growth.
The appearance of the colony changes when conditions are favourable to mould growth, usually when the relative humidity is high. The older parts take on a different colour and fruiting structures appear. These fruiting structures, which contain the individual reproductive bodies called spores, are usually only visible with a microscope. The fruiting structures stand up above the mass of the colony so that the spores may be discharged into the atmosphere and carried by air currents to suitable growth surfaces.
Under such conditions spores absorb water, enlarge rapidly and branch repeatedly, forming a new colony. When the colony is established and large enough, fruiting structures appear, spores are produced and the cycle is repeated.
As long as the environment is suitable mould will form on organic materials (dead plant and animal matter). Provided there is sufficient moisture available, either in the object itself or in the environment, fungi will feed on leather, cotton, wool, bone, paper, wood, bark, fur and rawhide (Figure 1). Fungi are also capable of growing on metal and stone surfaces, particularly those with a coat of dust or organic debris. Some species even grow on creosote-treated wood while others can incorporate poisonous, chlorine-containing compounds into their diets.
Figure 1: Mould growing on feathers that had been exposed to high relative humidity conditions (copyright Ellen Carrlee, Alaska State Museum).
Examples of undesirable effects of fungal infestation include the complete destruction of wooden and paper materials, staining of textile and paper-based objects and attack on photographic gelatin.
Some fungi can tolerate temperatures as low as minus 10 °C while others can survive in temperatures as high as 110 °C. Fungi are affected more by relative humidity levels than by temperature. A few species can survive below 60 % relative humidity but the majority require a relative humidity of at least 70 % to survive and reproduce. Fungal bodies normally die if the relative humidity drops below 60 %. The spores released at such adverse times will lie dormant however until suitable conditions for growth are available again.
Preventing Mould Growth
Preventing contamination by fungal spores within any building is practically impossible as spores are everywhere in the air and will be present on all surfaces. It is possible however, to control conditions so that it is very difficult for spores to germinate. This can be done by controlling the relative humidity and air circulation. Methods used to control relative humidity are described elsewhere (see the chapter Preventive Conservation: Agents of Decay).
If the relative humidity is maintained at a sufficiently low level spores cannot germinate. A relative humidity range of 40 to 65 % is considered safe. Too low a value (below 40 %), while stopping mould formation, can damage susceptible materials such as paper, leather and silk.
As mould growth is encouraged under stagnant conditions, it is also important to maintain adequate ventilation in storage and display areas. The use of something as simple as a fan will help to stop the build up of high relative humidity microclimates in susceptible areas such as against exterior walls and in basements.
Although elimination of the sources of fungal spores is not possible, surface contamination of indoor objects can be reduced by:
- sealing windows and doors and using central air-conditioning;
- storing objects in dustproof containers;
- covering objects that have been temporarily removed from containers; and
- vacuum cleaning objects carefully prior to storage or display.
It is more efficient to control collection conditions and prevent mould growth rather than have to treat objects contaminated by active colonies.
Material on Display
Provided the temperature does not vary greatly individual display cases can act as a buffer zone within a collection, helping to maintain relative humidity at a reasonably constant level. High relative humidity periods may occur sporadically (average relative humidity below 65 % but with occasional spells above this level) or endemically (average relative humidity above 65 %). Different methods are needed to control display case humidity under these conditions.
Sporadically High Relative Humidity
The strategy adopted to deal with occasional periods of high relative humidity will be largely determined by the nature of the storage or display equipment and the condition of objects in the collection. High relative humidity can usually be controlled by using a well-sealed display case or cabinet as a buffer against the ambient conditions. If this is not successful it may be necessary to use a dehydrating agent, such as self-indicating silica gel, to absorb the excess moisture. A change in colour from orange-yellow to either dark green, pale yellow or colourless (the colour change is determined by the type of silica gel used) indicates that the silica gel is saturated with moisture and needs to be changed. Note that the formerly recommended blue self-indicating silica gel is now classified as a toxic substance and should not be used. Other alternatives for controlling relative humidity levels are described elsewhere (see the chapter Preventive Conservation: Agents of Decay).
A disadvantage of using silica gel is the large quantity required to achieve and maintain a reduced relative humidity environment. For transporting objects or for short periods of high relative humidity, one kilogram of silica gel is needed for each cubic metre of space. If the problem is endemic then 20 kg/m3 is necessary (Thomson 1986).
Endemically High Relative Humidity
The options for controlling prolonged periods of high relative humidity are to use silica gel (20 kg/m3) in a well-sealed display case or to improve the ventilation so that mould growth is not possible. Although the use of air curtains and fans greatly improve conditions in tropical regions these may have to be combined with the use of silica gel or other desiccants if mould growth continues to be a problem.
Treatment of Mould
Mould is indicated by the presence of a ‘musty’ smell, stains and ‘fluffy’ or powdery growths on susceptible materials. Mould’s presence can be confirmed by either microscopic examination of the colony and/or culturing of the fungus under controlled conditions.
Initial steps in the treatment of mould (Guild and MacDonald 2004) include:
- protection of people;
- isolation of artefacts;
- deactivation of the mould by either air-drying or freezing; and
- cleaning of artefacts.
The first step in the treatment of mould is to protect all people in the vicinity of the outbreak from exposure to fungal spores. Moulds can cause health problems, especially for anyone with pre-existing respiratory ailments. Some moulds are toxins while others are primarily allergens. If the presence of mould is suspected it is important to take appropriate precautions when handling contaminated objects. Wear disposable gloves, a high quality mask or respirator, safety glasses and protective outer clothing (washable or disposable overalls).
Isolate mould-affected artefacts to prevent dispersal of spores. Seal small objects in polyethylene bags or boxes and wrap larger objects in plastic sheeting. If the objects are still damp or wet, minimise the time that objects are sealed in plastic so that further mould growth is not encouraged.
Mould must be deactivated before it is removed from an object. If living mould is physically removed from artefacts there is a danger of spreading spores to other objects, not to mention the associated health risks of such a practice.
Whereas chemical treatments such as paradichlorobenzene and thymol have often been recommended for mould treatment, avoid their use as they are harmful to both people and many materials in the collection. It is preferable to focus on deactivating the active mould using non-chemical methods (see below), cleaning up any affected storage areas and taking steps to eliminate the cause of the outbreak (water leak, air conditioning failure etc).
It is most important to do something about the conditions that led to the development of mould in the first place such as implementing passive environmental controls, effective housekeeping techniques and improved building maintenance. It is important to examine the area from which the object came, to treat this if necessary (see ‘Treatment of previous storage and display areas’ below) and to take steps to ensure that the risk of future outbreaks is minimised.
There are a variety of methods for treating mould-affected objects, including freezing, air drying between 30 and 40 °C and exposure to either ultraviolet radiation, sunlight or gamma radiation. As some of these methods can be damaging to objects, consult a conservator if you are unsure about possible treatment effects. Additional details of two of these methods are presented below.
Air Drying Treatment
Drying a mould-affected object will deactivate growing mould, minimise further mould growth and will also allow the object to be vacuum cleaned to remove fungal hyphae and spores from the surface.
If the object is still damp it should be supported, preferably on an absorbent, clean surface such as blotting paper and spread out as much as possible. If the object will not be damaged by elevated temperatures, raising the temperature to between 30 and 40 °C will deactivate growing mould. If this is not possible then dry the object using natural ventilation, fans or dehumidifiers. Fans used to increase the air circulation should not be aimed directly at the object to reduce the risk of damage to the object and the spread of spores.
Once the object is dry it may be cleaned by careful vacuuming using a HEPA-filtered vacuum cleaner. See the Textiles chapter for details on appropriate vacuum cleaning techniques.
Freezing Treatment
Freezing artefacts is a further example of a non-chemical approach to mould treatment. Freezing has the potential to kill germinating spores and associated hyphae (fine fibrous strands), but may not be effective against dry spores (Florian 1994). Slow freezing to minus 20 °C and slow thawing enhance the effect of freezing on mould and spores (Florian 1997). Controlling environmental storage conditions following freezing treatment is critical to avoid activating dormant spores.
Whereas previously there were many objects for which freezing was considered unsafe (Berkouwer 1994), it is now considered safe to freeze most materials, including composite organic/inorganic items (Carlee 2003, Strang 2008). The low moisture contents of most museum objects, the inclusion of adsorbent, buffering materials with the object to be frozen and sealing in polyethylene bags all help to prevent damage to susceptible objects. Some objects that should not be frozen however include the following:
- desiccated or seriously degraded objects;
- some objects which contain a variety of materials, especially layers; and
- objects that have a high natural water content.
Such objects may not be able to withstand the fluctuations in relative humidity due to temperature changes and subsequent dimensional changes. Examples of such materials include:
- oil or acrylic paintings on canvas or panels, painted textiles and painted wood;
- glass plate negatives, glass colour transparencies, lantern slides and mounted glass slides, daguerreotypes, ambrotypes and tintypes;
- plant specimens or other objects that have high water contents (> 26 %); and
- computer, magnetic and grooved audio media such as tapes, disks, cassettes, discs and cylinders.
Many textiles and wooden artefacts, most paper-based objects including modern photographic prints, acetate film, books, herbarium specimens and artefacts made from materials of plant origin (leaves, seeds etc), leather artefacts, natural history specimens and objects made from materials of animal origin (feathers, fur, horn, bone etc) may be frozen to eradicate mould and insects.
If mould attack has occurred already, then the affected object, its storage area and any materials in contact with the object should be treated following the steps described below (Dodd 1991):
- isolate all affected material to stop further contamination;
- treat affected materials and storage areas;
- determine the cause of the mould outbreak; and
- rectify any problems which may have contributed to mould formation.
Isolation and Preparation for Freezing
The steps involved in the isolation of mould-affected objects are summarised below:
- place affected objects in plastic bags and remove them from the collection;
- if the mould outbreak is due to wetting of an object then allow it to dry out partly (see above), acclimatise to a relative humidity of 50 - 60 % and then wrap it in clean tissue paper, clean white cotton or linen;
- place the object in a polyethylene bag and remove most of the air from the bag. Carry out this procedure in a well-ventilated area and wear appropriate personal protection to reduce the risk of inhaling fungal spores; and
- seal the bag with tape or by heat sealing.
Treatment of Affected Materials
To ensure treatment of mould-affected materials is effective and that the risk to the artefacts is minimised, follow these steps:
- either wrap the objects in absorbent material like clean white cotton or linen or clean tissue paper or add these materials as packing in the bag to provide additional protection against relative humidity changes during freezing;
- seal the objects in polyethylene bags and place them in a freezer for at least four days at minus 20 °C or below ;
- allow objects to thaw slowly (in a refrigerator) before removing them from the refrigerator. Allow them to warm to ambient conditions before unsealing; and
- use a HEPA-filtered vacuum cleaner in a well-ventilated area to remove dead hyphae and spores from objects. Correct vacuum cleaning techniques are described elsewhere (see the chapter Textiles).
Vacuum clean objects in a fume cupboard or similar containment enclosure. If a suitable enclosure is not available then clean the objects outdoors in a dry, well ventilated area away from air-conditioning intakes and other people.
Unless access to industrial freezers is possible, there are limitations on the size of objects that can be treated in this fashion.
Treatment of Previous Storage and Display Areas
If possible, dry storage and display equipment at elevated temperatures. Spores cannot survive three to four hours of temperatures greater than 36 °C. While this is desirable, it may not be possible for large storage racks or indeed may damage the equipment. If the climatic conditions are warm enough, seal contaminated shelving units in black plastic and evacuate as much air as possible. Place the sealed shelving in the sun for the required period. As long as the plastic is well sealed the shelving will not be desiccated as there will be insufficient exchange of moisture from the shelving to the surrounding air.
Unless the storage equipment is likely to be damaged by contact with alcohol, swab the equipment with a 70 % alcohol/water solution as a further precaution against re-contamination. Methylated spirits can be used to make up the alcohol solution. Carry out this treatment in a well-ventilated area. Alternatively use a 0.5 % solution of sodium hypochlorite (household bleach) to wash the equipment. If bleach solution is used, wet the surfaces for 15 to 20 minutes with disinfecting solution to ensure that complete disinfection occurs (Guild and MacDonald 2004). There are also commercially available products containing ethanol, water and ortho-phenylphenol that are suitable for use on non-painted surfaces.
Determining the Cause of the Outbreak
All possible causes of mould growths should be examined and maintenance organised if a leaking roof, overflowing gutter or similar building problem contributed to increased relative humidity levels in the collection area. Implement relative humidity control strategies if the mould outbreak was the result of adverse weather conditions (see the chapter Preventive Conservation: Agents of Decay).
Chemical Fumigation
For some mould-affected objects, non-chemical techniques may be neither effective nor appropriate. In such cases it may be necessary to consider chemical fumigation. If there is no alternative to chemical treatment, consult a conservator to obtain the most recent information on chemical techniques and their effects on specific material types. This is important because many chemical treatments are damaging to objects and great care is needed. It is preferable to avoid chemical intervention if possible.
Use commercial pest control agencies to deal with heavy infestations of either fungi or insects. Again, consult a conservator prior to such intervention to minimise risks to artefacts.
Safety Equipment
When removing dead fungal matter, wear suitable safety gear such as a high quality dust mask or respirator, disposable gloves, protective outer clothing and glasses or goggles. Wear protective gloves and goggles when handling methylated spirits and other potentially dangerous chemicals.
Insect Attack
The most common insects encountered in museums or private collections include the:
- case bearing clothes moth;
- webbing clothes moth;
- hide beetle;
- carpet beetle;
- cigarette beetle;
- drugstore beetle;
- furniture beetle (wood borer);
- silverfish;
- cockroach; and
- termite.
Details of the life cycles and identification of some of these pests are provided elsewhere (Appendix 4). The insects mentioned above can contaminate, damage or even completely destroy artefacts contained in ethnographic, natural science, archaeological and historic collections. Unless the attack has been in progress for considerable time, most of the damage is detectable only by close inspection.
Depending on the species, insects will feed on organic materials composed of either proteins or cellulose. Objects made up of materials such as wool, fur, leather, paper, wood, feathers, hair and plant specimens are particularly susceptible to attack (Figure 2). Occasionally some insects will attack non-food materials during certain stages of their life cycle and may even burrow or tunnel through artefact materials to get to a food source.
Figure 2: The remains of a collection of butterflies after an insect attack. Only the outlines remain.
The procedures involved in a coordinated approach to minimising the risk and dealing with insect attack are detailed below.
Preventive Measures
The first step in the control of biological pests is the adoption of preventive measures to minimise infestations. Although no building will ever be insect-proof, steps can be taken to reduce potential problems. Non-chemical strategies to minimise insect problems have been reviewed by Pearson (1993). Some recommended strategies include:
- thoroughly inspecting objects to be incorporated into a collection. If necessary, quarantine objects by storing them in polyethylene bags and checking for any signs of activity over a two month period. If in doubt, assume that pests are present;
- keeping garden and household rubbish away from buildings and disposing of it as soon as possible;
- positioning external lights so that they either draw insects away from building openings or at the very least don’t attract insects into the building. Mercury vapour lights are attractive to insects but sodium lighting is less so;
- ensuring food and food preparation areas are away from collection and display areas, food containers are sealed and spills and scraps are cleaned up promptly;
- using clean white paper as a liner on the bottom of storage drawers or shelves so that it is easier to see if there is any insect activity (insect bodies, frass etc);
- keeping doors and windows closed. Fit screens and draft excluders to doors, windows, vents and drains;
- regularly inspecting buildings to highlight and fix any problems such as leaking pipes, drains etc;
- sealing spaces around pipes and ducts with caulking compounds (both interior and exterior). Repair cracks and other possible entry points;
- cleaning drains and gutters regularly;
- thorough housekeeping (regular vacuum cleaning rather than just dusting) is essential as dirt and debris provide food and shelter for pests and create damaging microenvironments; and
- using storage units and display cases as secondary barriers to insect intrusion. These should be well sealed (gaskets) to prevent insect entry to collected objects. Polyethylene and polyester bags can also be used.
It is also important to note that unfortunately it is often the people working with collections who transport insect pests into their collections. Insects may be hidden in the corrugations of cardboard boxes, in work bags and satchels and even in books brought into collection areas. Be vigilant!
Low temperature storage will assist in the control of insect pests. Breeding cycles are interrupted and insect development are reduced below 5 °C, while temperatures between 5 and 10 °C effectively prevent large increases in insect numbers (Pinniger 1989).
Chemical treatments are a useful adjunct to the range of preventive measures described above but should never be seen as the main focus of pest management activities. Applying chemicals to the exterior of a building, skirting boards and display surfaces that are particularly susceptible to insect attack (dioramas for instance) will assist in minimising damage to collections.
In choosing a particular insecticide find a balance between the effects of the chemical on insects and its impact on the environment (e.g. residual nature and toxicity), the artefacts in the collection and the people who may come into contact with it. A summary of commonly used pesticides, their characteristics and known effects on materials is provided elsewhere (Appendix 3).
If correctly applied, pyrethrins, organophosphorous and carbamate-based pesticides can be used on buildings and internal structures with minimum risk to artefacts housed there. Very few adverse reactions have been observed from using pyrethrins near artefacts. Pyrethrins may be either natural or synthetic, persistent or non-persistent. They generally have a low toxicity towards humans and are characterised by their ability to rapidly knock down insects. Synthetic pyrethrins (permethrin for example) have been prepared to overcome the lack of persistence of the naturally occurring compounds. The increased persistence of permethrin however, is accompanied by an increased toxicity to humans. Other synthetic pyrethrins such as bioresmethrin and phenothrin are less toxic than natural pyrethrins and consequently are suitable for space treatments.
Note that spray treatments of rooms and galleries is not an effective way of controlling insect pests. Most pests will be sufficiently hidden in cracks and crevices and inside the covers of books for example so as to be unaffected by aerosol spraying. It is almost a Darwinian way of improving the gene pool of insects by killing the most vulnerable and leaving the damaging ones to continue to breed! This approach, while often making those responsible for collections feel that they are really doing something to care for their valuable objects, is therefore not recommended. Targeted use of residual insecticides on skirting boards and other surfaces is far more effective.
Organophosphorous insecticides, which include chlorpyrifos, dichlorvos, diazinon and malathion are usually highly toxic. They have a moderate residual activity and among other effects on materials, most compounds stain red carpets.
Carbamates, like the organophosphorous insecticides, have a moderate residual activity and effective knockdown ability. They are found often in commercially available household products. Carbamate-based insecticides include carbaryl, bendiocarb and propoxur.
Desiccant dusts, usually made up of diatomaceous earth or silica, are non-poisonous and are extremely effective for use under cupboards, in cracks and in other secluded areas. They remain active for long periods and can be obtained with pyrethrin additives which enhance their knockdown capability.
Monitoring Collection Areas
Inspect collection areas regularly and carefully. Observe objects in the collection, storage and display units and secluded areas (cracks, crevices, under furniture) in which either insects or signs of activity may be present. Use a torch to inspect secluded places. Systematic inspections will substantially reduce the risk of major infestations. As well as inspecting general collection areas, priority should be given to the careful inspection of highly susceptible objects (fauna, furs etc). Indications of potential problems include:
- sightings of insects (adult, pupal or larval forms);
- frass (wood dust and faecal debris), remnants of cocoons, webs, skins, and the like; and
- exit holes in wood, damage to materials in the collection.
Sticky (blunder) traps are commercially available and are an excellent early warning system that provide evidence of the presence and the type of insects in a collection long before they are noticed by visual inspections (Figure 3). Traps are available for both crawling and flying insects. Follow the guidelines below for the most effective use of these traps:
- place traps along the edges of walls, near doors, in corners, under furniture and away from strong lighting;
- use one trap in every corner and every 30 to 50 square metres in small areas or every 100 to 200 square metres in large areas like warehouses;
- keep records of the dates, positions of placement, person responsible and insects detected. Label each trap with a unique number so the findings remain well defined;
- inspect traps regularly (weekly at first and then monthly); and
- replace traps after 3 – 6 months or when they are either full of insects, have become dirty or have lost their stickiness.
Figure 3: A baited sticky trap.
Use insect traps and visual inspections of the collections and collection areas in a complementary fashion - the visual sighting of larval casts should be followed up by placing sticky traps in that area and the capture of insects by a sticky trap should be followed by a careful inspection of the collection area and of vulnerable objects.
If it appears that insects are active the next steps are to determine the nature and extent of the infestation. Any material that would aid in the identification of pests should be collected - frass and obviously insects (at any stage of their life cycle) are diagnostic. Place live insects, especially larval forms, in a glass jar containing methylated spirits so their shape and size will be maintained until they can be examined by experts.
If a potential insect outbreak is indicated then it is possible to use sticky traps that incorporate specific pheromones (insect sex attractants) to get an indication of the extent of the likely problem. These traps are effectively ‘baited’ with pheremones that will attract specific insects to them, thus giving an idea of the local population of that particular species. Follow manufacturer’s guidelines to ensure that traps are placed in the most appropriate locations. Do not use pheromone sticky traps in the first instance as they are likely to attract insects into your collection areas. Pheremone traps should be inspected weekly.
To determine if an infestation is new or old, objects (textiles for example) should be isolated and sealed in polyethylene bags or, in the case of wooden objects in particular, placed on a contrasting background. Regular inspections in the following months will allow new frass or other signs of activity to be noted. When placing objects in polyethylene bags, take care to ensure that unfavourable microenvironments do not form within the bag. Monitor the condition of the object as well as looking for signs of insect pests.
At this stage two concurrent activities take place. Treat artefacts that have been infested by insects and determine the extent and source of the infestation. Eradication of the infestation follows. The latter activity may involve treatment of the object, the storage and display area, the building itself or a combination of these. Each of these aspects of pest management will be dealt with in turn.
Treatment of Artefacts
There has been a very strong move away from the use of chemicals to treat insect infestations with much research being directed towards the development of techniques based on the use of either freezing, low oxygen or heated environments. If correctly applied, these approaches have the potential to treat infestations without any risk of damage to artefacts. Despite this trend, there is still a place in an overall management program for chemical treatments whether they are used in treatments of infested objects or purely in a prophylactic mode.
While heating to 55 °C is a very effective means for rapidly killing insects, this method is not described here. Those interested are referred to Strang and Kigawa (2009) for more details.
Of the non-chemical treatments, freezing is recommended because of the quick treatment times, relatively low cost, ease of preparation for the objects, low monitoring requirements and its inert, non-toxic nature.
Freezing Techniques
Freezing techniques may be used for most organic materials but are not suitable for all artefact types. Details of materials for which freezing is not appropriate are outlined in the earlier section on Treatment of Mould.
To ensure treatment of insect-affected objects is effective and that the risk to the artefacts is minimised, wrap the objects in clean absorbent tissue, cotton or linen, remove as much air from the bag as possible, seal the objects in polyethylene bags and place them in a freezer according to one of the following regimes:
- for two weeks at – 20 to – 30 °C;
- for 5 days at - 30 C or below; or
- for seven days at -18 °C to – 20 °C, followed by thawing (still sealed in polyethylene) at room temperature for 2-3 days followed by a further seven days at -18 °C to - 20 °C.
Pack objects in the freezer so that the drop in temperature is as rapid as possible for all objects and allow objects to thaw slowly and warm to ambient conditions before unsealing them. Keeping the objects in their bags will prevent condensation forming on objects as they warm to ambient conditions (allow about 24 hours for this).
The double freezing method (Berkouwer 1994) mentioned above is convenient because the temperature range -18 °C to - 20 °C is that at which most household chest freezers operate. The object is thawed between freezing cycles to allow any eggs to hatch that were not killed during the initial freezing period. The hatched larvae will then be killed during the second cycle.
Freezing is the cheapest, easiest and most convenient form of insect treatment. Check with a conservator if there is doubt about the suitability of an artefact for this type of treatment.
Low Oxygen Atmospheres
Killing insects using oxygen-depleted atmospheres is a useful, non-contaminating alternative for objects that cannot be treated by freezing. Low oxygen atmospheres can be produced by flushing a storage system with either nitrogen or argon or by using an oxygen scavenger to remove oxygen from a closed system.
Note that pigments such as litharge, cinnabar and sienna are not suitable for low oxygen treatments because of colour changes that result from the anoxic environment. Prussian blue and ultramarine experience temporary colour changes but these reverse when the materials are re-exposed to oxygen.
Although the use of carbon dioxide as a fumigant is not a strict application of the use of low oxygen atmospheres, it will be considered later in this section as the principles for its use are similar to those for low oxygen applications and it is an easy and very effective technique for pest eradication.
There have been numerous studies carried out to determine optimum treatment times for particular insect pests but at this time no hard-and-fast rules have been developed as there are many factors to consider. Some general principles do apply however. Shorter treatment times will be effective if higher temperatures, lower relative humidity levels and lower oxygen concentrations are used and if argon is used instead of nitrogen. To be most effective against insect pests the oxygen concentration must be kept in the range 0.1 – 0.3 %. A typical treatment would take approximately 4 weeks if the temperature is 25 °C.
The method of lowering the oxygen concentration will be determined by the size of the object to be treated and by the availability and cost of appropriate equipment and expertise.
Methods which may be used to treat infested objects include:
- flushing a bag with an inert gas (e.g. nitrogen, argon) until the oxygen concentration is less than 0.1 % and then adjusting the gas flow to maintain the low oxygen level;
- flushing a bag as described above and sealing it after an appropriate amount of an oxygen scavenger has been added; and
- adding a calculated number of satchels of oxygen scavenger to a bag and sealing it.
These three methods have been described in detail elsewhere (Daniel et al 1993) with additional information on the properties and use of the oxygen scavenger, Ageless® provided by other sources (Grattan and Gilberg 1994, Brandon and Hanlon 2003). Alternative commercial oxygen scavengers include Atco™, FreshPax™ and RP-System™. While Ageless®, Atco™ and FreshPax™ are iron oxide-based, the RP-System™ is based on unsaturated organic compounds that absorb corrosive gases as well as oxygen. The iron oxide-based products increase the relative humidity environment inside the treatment bag. For prolonged treatment, it would be prudent to include conditioned silica gel or Artsorb in the sealed bag to maintain an appropriate relative humidity. While limited information is available about the RP-System™ scavenger, it is claimed to have a neutral effect on relative humidity levels. More details about these products are available elsewhere (Maekawa and Elert 2003).
In the text below, while Ageless® will continue to be referred to, it is important to note that this is not to be taken as a recommendation for this particular product, but merely as a convenient way of referring to low oxygen scavengers in general.
In all cases the bags into which the artefacts are placed must have a very low gas permeability. Suitable bags for use with oxygen scavengers are laminates based on a number of different polymers including polychlorotrifluoroethylene, polyvinylidene chloride, polyethylene terephthalate and copolymers of ethylenevinyl acetate and ethylenevinyl alcohol. These products are sold under a variety of commercial names. Consult a conservator or conservation supply company to find the name of an appropriate product that is locally available.
The first two oxygen-depletion methods, which are best suited for the treatment of large objects, should be left in the hands of professionals. Specialised equipment is needed and careful control must be exercised over the relative humidity of the gas used to flush the system to avoid desiccation of sensitive objects.
The third method is well suited to the treatment of small objects, in particular those with a volume of less than about 100 litres. The oxygen scavenger Ageless® Z-2000, which is capable of absorbing 2000 millilitres of oxygen from 10 litres of air is recommended for museum objects. An indicator, Ageless-Eye® must be placed in the treatment bag. The indicator is pink when the oxygen level is less than 0.5 % and blue if it is above that level. Note that there are different types of oxygen indicators available, designed to cater for different temperatures and relative humidity levels. These indicators should be stored in the dark and protected from strong light when in use to reduce fading under strong light conditions. Of the available indicators, Ageless-Eye® K is recommended for typical anoxic treatments. Fresh indicators should be used with each treatment.
Steps involved in the treatment of small objects include:
- buy or make bags using a heat sealer and appropriate barrier film (see above). The latter option is recommended as bags can be tailored to particular objects. Unfortunately both bags and barrier film are quite expensive;
- calculate the approximate volume of oxygen in the bag, using the dimensions of the bag, the approximate volume of the object and the concentration of oxygen (O2) in the air.
Volume O2 = (bag volume minus object volume) x 0.2
- place the objects, the oxygen indicator and enough packets of Ageless® Z-2000 in the prepared bag, using about 25 % more Ageless® than calculated. As the Ageless® packets become hot when the scavenger reacts with oxygen they must not come into direct contact with the objects;
- place conditioned silica gel or a similar desiccant in the bag if the bag is not going to be flushed with nitrogen or argon before sealing;
- build an internal protective frame of cardboard for very fragile objects to prevent crushing;
- seal the bag. Heat sealing is necessary to ensure air-tight seals. If possible, flush the bag with nitrogen or argon before sealing as this will extend the life of the Ageless® scavenger significantly and will also counter the increased relative humidity that is produced in the bag by the oxygen scavenger;
- store the bags at 25 °C for about four weeks. If the objects are left at room temperatures of approximately 20 – 22 °C treatments should continue for at least three months; and
- following treatment remove the objects from the bags, discard the Ageless® packets, inspect and carefully vacuum the objects. The bags may be reused.
It is important to maintain the temperature at or slightly above 25 °C to ensure that all insects are killed.
While the above method appears quite straight forward, practice is required to ensure that the correct technique, pressure and temperature are used to seal the bags effectively. If unsure, make a second seal line as insurance against failure of the first. If attempting to seal large sheets of film, use tape or clips to hold the sheets in place before heat sealing. This will minimise wrinkling and leakage.
Carbon dioxide is more effective and generally cheaper than either nitrogen, argon or oxygen scavengers but requires specialised equipment to operate and monitor. Although some have reported concern about the slight possibility of interaction between carbon dioxide, moisture and objects to produce potentially damaging carbonic acids and/or carbonates, this is extremely unlikely and fumigation with carbon dioxide is considered to be safe for all material types.
The usual procedure is to evacuate most of the air from a vapour-proof bag that encloses the object and then to fill it with carbon dioxide. Alternatively the air inside the bag can be displaced by the carbon dioxide that is heavier than air. By using an inlet and outlet system with openings on the upper surface of the bag or enclosure, the lighter nitrogen and oxygen will be forced out by the incoming, denser carbon dioxide.
Maintain carbon dioxide concentrations above 60 % for the treatment to be effective. A special monitor must be used to measure carbon dioxide levels in the bag and to ensure that the gas, particularly if used in large volumes, does not leak into the surroundings. It is also prudent to monitor the relative humidity of the bag environment during treatment. Typically objects need to be exposed to carbon dioxide for 4 weeks at 25 °C. Treatment times can be reduced if higher temperatures are used.
As exposure to carbon dioxide can be damaging to human health, it would be wise to check with local authorities before using this technique for treating large objects.
Chemical Treatments
Factors to be considered when choosing chemical insecticides include:
- toxicity to the insect;
- toxicity to people;
- effects on objects;
- environmental effects; and
- cost.
The area of chemical control of insects is highly specialised. Insecticides act in a variety of ways, as stomach poisons, by interrupting developmental stages or by contact. They may be applied in many different forms, as dusts, emulsions, oil concentrates, gases and impregnated resin strips. The active ingredients of pesticides also vary.
Insect growth regulators are persistent chemicals which may be used in storage and display areas. They do not rapidly knock down insects, rather they act by upsetting the balance of hormones needed to control growth and development of insects. In this way breeding cycles are interrupted and control is exerted over developing insect populations.
While there is merit in the application of residual pesticides to a building and its internal structures, direct application of pesticides to artefacts is strongly discouraged. As many chemicals react with artefact materials, carefully choose insecticides for use near collections. Information about particular chemical treatments is provided elsewhere (Appendix 3).
Review and Assessment of Procedures
It is important not just to ‘clean up’ after a pest problem. Assess the situation so that similar problems do not occur in the future. Prepare an action plan outlining the steps to be taken to minimise future risks. Re-examine all factors which affect pest management to identify and take remedial action against any deficiencies in the control mechanisms.
Bibliography
Berkouwer, M., 1994, Freezing to eradicate insect pests in textiles at Brodsworth Hall, The Conservator, No. 18, pp. 15-22.
Brandon, J. and Hanlon, G., 2003, A low tech method for insect eradication using AgelessTM, American Institute for Conservation, 2003 Wooden Artifacts Group Postprints, Arlington, Virginia, (http://aic.stanford.edu/sg/wag/2003/brandon_hanlon_03.pdf)
Carrlee, E., (2003), Does low temperature pest management cause damage? Literature review and observational study of ethnographic objects, Journal of the American Institute for Conservation, vol. 42, pp. 141-166.
Daniel, V., Maekawa, S., Preusser, F.D. and Hanlon, G., 1993, Nitrogen fumigation: a viable alternative, Preprints, ICOM Committee for Conservation 10th Triennial Meeting, Washington DC, pp. 863-867.
Dodd, W., 1991, Freezing as part of an integrated pest management system: Review after seven years maintaining a textile collection, AICCM National Newsletter, pp. 12-13.
Florian, M.-L. E., 1986, ‘The freezing process – effects on insects and artefact materials’, Leather Conservation News Volume 3 (Number 1), Materials Conservation Laboratory of Texas Memorial Museum, Austin, Texas, pp 1-17.
Florian, M.-L. E., 1994, Conidial fungi (mould, mildew) biology: A basis for logical prevention, eradication and treatment for museum and archival collections, Leather Conservation News, vol. 10, pp. 1-29.
Florian, M.-L, 1997, Heritage eaters, insects and fungi in heritage collections, James and James, London, pp 129-130.
Grattan, D.W. and Gilberg, M., 1994, Ageless oxygen absorber: chemical and physical properties, Studies in Conservation, vol. 39, pp. 210-214.
Guild, S. and MacDonald, M., 2004, Mould prevention and collection recovery: Guidelines for heritage collections, CCI Technical Bulletin No. 26, Canadian Conservation Institute, Ottawa, Canada.
Maekawa, S and Elert, K., (2003), The use of oxygen-free environments in the control of museum pests, Getty Publications, Los Angeles, California, pp. 157.
Pearson, C., 1993, Building out pests, AICCM Bulletin, vol. 19, pp. 41-55.
Pinniger, D., 1989, Insect Pests in Museums, Institute of Archaeology Publications, London.
Strang, T., 1993, Museum Pest Management, Student Course Notes, Copyright 1992, Canadian Conservation Institute, Ottawa, Canada.
Strang, T., 1997, “Controlling Insect Pests with Low Temperature” Canadian Conservation Institute Note 3/3, 1997, updated 2008 (http://www.cci-icc.gc.ca/crc/notes/pdf-documents/3-3_e.aspx).
Strang, T. and Kigawa, R., 2009, Combatting pests of cultural property, CCI Technical Bulletin No. 29, Canadian Conservation Institute, Ottawa, Canada.
Thomson, G., 1986, The Museum Environment, 2nd Edition, Butterworths, London.
Handling, Packing and Storage
S. Anstey, M. Myers and I. M. Godfrey
Introduction
The aim of storage, whether in a large museum or in a private home is to ensure that objects are protected against the agents of decay - inappropriate temperature and relative humidity conditions, exposure to strong light levels, pests, dust, pollutants and poor handling. Application of many of the practices and principles outlined in other chapters should ensure that environments are appropriate for different materials in storage areas.
Objects are effectively in a state of storage whatever their location. They may be on display, a visually accessible form of storage, in boxes in a storage room or even grouped together in a time capsule. In the latter case great care must be taken with packing and control of the internal environment if deterioration processes are to be minimised (see the chapter Case Studies: Time Capsules).
Different materials have specific requirements for safe storage. Those requirements are described in specific chapters of this book. This chapter deals with more generic issues associated with the handling, packing and storage of three dimensional objects made of diverse materials and of differing sizes.
General Principles
Building Envelope
A well designed and maintained building with effective insulation is the best starting point for good storage. Environmental problems are usually associated with poorly designed and badly constructed buildings that are not well maintained. The most common problem is the entry of water into a building with resultant high humidity levels. Typical causes of water entry are:
- leaking roofs, walls or windows;
- blocked or cracked drains, gutters or downpipes;
- porous walls and/or ineffective damp courses which allow entry of ground water. This problem is most pronounced in basements, cellars and buildings affected by rising damp;
- poor positioning of gardens and garden watering systems that cause sections of the building to be frequently wet. This problem is aggravated if the building is constructed from porous materials such as sandstone or limestone; and
- poor ventilation of kitchen and bathroom areas, allowing water vapour to enter storage areas.
Other issues to do with the building envelope are:
- extremely low humidity that is associated with heating, caused either by sunlight entering through windows or poor placement of radiators and heaters;
- unsealed windows, doors, ceiling/wall joins and other areas that allow for the ingress of dirt and pollution; and
- poor housekeeping that encourages the activity of insects and vermin.
To improve the building envelope for collection storage the following should be considered:
- establish a schedule to have an annual maintenance building check and a 5 yearly building survey. Make good any repairs that are identified;
- install insulation in walls and ceilings to provide the best buffering possible from the ambient conditions, both in summer and winter. Insulation can be used to passively control the store environment;
- put draft excluders on windows and doors to reduce the ingress of dust and pollution and to minimise air exchange;
- ensure that kitchens and bathrooms are well ventilated and
- check that the garden reticulation is not impacting on the humidity within a building.
Store Room/s
When selecting a room or rooms for storage consider the following:
- internal rooms within a building offer the most buffering from the ambient conditions;
- ideally the storage room should not have services such as water or drainage in the vicinity;
- wide doors and corridors are preferable;
- pallet racking requires space for forklift access and adequate height for manoeuvring pallets;
- an anteroom is desirable for use as a holding/quarantine area;
- avoid carpets in storage areas as they harbour dust and possibly insects, are an added problem if flooding occurs and may emit organic vapours which are detrimental to some materials;
- seal floor and wall surfaces;
- cater for different types and sizes of collections by choosing the most appropriate storage furniture and ensuring that there is sufficient space in the store. Storage furniture may include drawers for smaller objects, cantilever shelving for very long objects such as spears, map drawers for the flat storage of large format paper objects and racks for rolled objects;
- it is useful to have a table (or two) in a storage area for examining objects;
- if the collection is used for research, it is useful to have a research room nearby;
- select the storage space so that the environmental conditions are the best possible with appropriate light, relative humidity, temperature, pest and pollution control (see the chapter Preventive Conservation: Agents of Decay).
- a store should not double up as a work room nor as a storage area for such things as shop stock; and
- have storage furniture designed to allow vacuum cleaning access underneath;
Holding or Quarantine Area
While private collectors are unlikely to have the luxury of a holding or quarantine area, it is strongly recommended that collecting institutions such as museums and historical societies set aside such an area. This area is used for temporary storage where objects may slowly acclimatise to their new surroundings and/or await inspection. New objects should be bagged and isolated from other objects until it is determined that there is no risk that they will introduce either insect pests or pollutants to other objects in the collection.
Condition Check
Before assimilating objects into a collection check for the presence of insects, mould, active corrosion on metals and dirt:
- if insect activity is observed (live insects or larvae, larvae cases, frass or eggs) the object has to be treated before it is assimilated into the collection (see the chapter Mould and Insect Attack in Collections);
- if fungal activity is detected then action needs to be taken to eradicate this before other objects in a collection are contaminated (see the chapter Mould and Insect Attack in Collections);
- if active corrosion is present, place the object in a drier environment and seek the advice of a conservator;
- if surface dirt is not an essential part of an object’s history then clean the object before putting it with other collection items (see the relevant chapter for cleaning details); and
- record all observations and details of any treatment applied to the object.
Acclimatisation
Acclimatisation is particularly important for objects that have been moved from one climatic zone to another. For instance, wooden objects that were stable in the higher relative humidity surroundings of the tropics will lose moisture if moved to drier regions. Slow acclimatisation is necessary to minimise drying stresses and associated damage. This may be achieved by sealing the object in clear plastic. Over time the plastic should be perforated (pin holes) to allow for slow exchange of moisture with the surroundings. The number and size of the perforations can be increased slowly as the object progressively loses moisture. Closely monitor the object to ensure that mould does not form during the acclimatisation process.
Similarly, objects from a dry climate also have to be buffered if transferred to a wetter zone. Great care must be taken when acclimatising objects as no hard-and-fast rules apply. The length of time before an object can be exposed safely to a new environment will depend on a number of factors. These include the difference in the climatic conditions of the areas involved and the condition, material type (for example, wood, leather, textile etc) and the thickness of the object. Acclimatisation periods of up to one year are not unusual.
Handling
Guidelines are given in other chapters for handling specific material types, but the importance of care and common sense cannot be over emphasised. A few general principles relating to handling and moving objects are described below.
- avoid unnecessary handling as most damage is done to objects through poor handling;
- remove jewellery, particularly on hands and wrists, as it can scratch or snag objects. Smooth wedding rings are fine;
- handle only one object at a time;
- cleanliness is very important. Wash hands thoroughly and/or wear well-fitting disposable or washable gloves that provide good tactile ability to the user. Kitchen rubber gloves are not suitable. Synthetic gloves should either be powder free or have the powder wiped from the surface before handling an object;
- choose gloves or use clean hands depending on the nature of the object to be handled. Use synthetic gloves when handling china, glass or smooth polished objects as cotton gloves are too slippery;
- assess the condition of an object before handling it. Use flat supports to carry objects that are fragile or unable to support their own weight. As a temporary measure, small bean bags can be very useful. If using small bean bags ensure that they are contained in a box so the object does not settle through the bean bags to the bottom and thus have no support;
- do not assume that handles are strong enough to support the weight of an object. Pick up objects with two hands cradling the strongest points;
- remove all loose parts such as lids and drawers to reduce the chance of breakages;
- place heavier objects on lower shelves and keep shelving at a safe height;
- assess the weight of the object to be handled. If an object is too heavy for one person, see if any components can be separated for the move or enlist the help of others;
- if appropriate use a trolley, forklift or similar device to move objects over smooth ground. Trolleys should have rubber wheels for a soft ride and swivel wheels to assist with accessing tricky places. If rough ground is to be traversed, manual lifting will cause less vibration/shock damage;
- do not drag or push objects across a surface;
- provide protection against temperature and relative humidity changes for objects being transported to an area in which different environmental conditions may be encountered (see Packing for Transportation below);
- think ahead, clear passages, open doors, remove obstacles etc; and
- be aware of and apply proper lifting techniques.
Care of Objects in the Work Area
- keep food and drink separate from the work area;
- keep the work space well organised and never compromise the safety of an object or staff;
- fragile objects should be placed on a padded surface (blotting paper, Bubble wrap™ or Cell-Aire®) which has been taped down to prevent slippage;
- prevent objects from rolling by wedging with a suitable material;
- place tissue paper or Tyvek® dust covers over objects while in the work place to reduce the accumulation of dust. Place a notice on top of the dust cover stating an object is underneath (‘Care Fragile Object Underneath’ or similar); and
- check the environmental conditions of the work area, particularly for sensitive materials.
Storage Furniture
Few institutions can afford custom made storage systems. The standard powder coated metal storage systems available commercially are ideal for museum storage and come in a range of sizes. Take time to work out and plan the requirements of a specific collection and to determine what may be required in the future. Then use this information to determine the best configuration of storage furniture for the store room(s).
Powder coated metal storage furniture is preferable to wooden furniture as it is inert. Formaldehyde in many types of wood and composite wood materials, such as chipboard and medium density board, reacts to form formic acid which is harmful to many materials. If wooden furniture is the only option, seal all surfaces with an aluminium foil laminate or a water-based polyurethane. Allow the polyurethane to off gas for four weeks before putting objects in the furniture.
The storage system required depends on the sizes of the objects to be stored and typically may comprise:
- metal cabinets of drawers (BAC™ type) for small objects;
- standard commercial type or compactus shelving for medium sized objects;
- long span shelving for medium to large objects and possible open storage;
- cantilever shelving for extra long objects such as spears;
- pallet shelving for large objects; and
- free standing floor space for very large objects.
Ideally, objects should be stored according to their classification in each of the above types of storage.
Metal Drawer Cabinets
There are systems of powder coated metal drawers available that are state of the art for the storage of smaller objects (e.g. BAC™ system). If these are affordable, careful planning is needed to get the most useful configurations of drawer heights for the objects to be stored. Such drawers will usually require dividers within each drawer. Custom made modular specimen trays that configure into a drawer are very useful (Figure 1).
Figure 1: BAC™ units of drawers of different heights fitted with modular specimen boxes (image courtesy Jon Carpenter, WA Museum).
Standard Commercial Type or Compactus Shelving
Choose the shelving type based on the objects to be stored and the best configuration for the storage space. Compactus shelving maximises space but involves movement of the shelving units which in some instances might not be desirable. If the ingress of dust is a problem use either compactus units or fit dust covers or curtains to the front of shelving. Use finely woven and washable materials such as cotton sheeting or Tyvek® for dust covers or curtains.
Medium sized objects are best stored within boxes on these shelves. Boxes can be made of cardboard, archival board or polypropylene (Figure 2). Standard boxes are available or can be custom made to configure with the shelving size.
Figure 2: Lightweight metal shelving units with objects, cardboard and polypropylene modular boxes. Note the space efficiency (image courtesy Jon Carpenter, WA Museum).
Long Span Shelving
Providing there is no ingress of dust into the storage area then store medium to large objects unboxed on open shelving. Depending on the size of the store and collection to be stored these could be standard shelving as above or long span shelving as shown below (Figure 3). Line the shelves with 2 mm thick polyethylene foam sheeting such as Cell-Aire® to provide cushioning and to reduce skidding on the shelf surface.
Figure 3: Long span shelving with objects of similar height of the same classification stored on each shelf (image courtesyJon Carpenter, WA Museum).
Store objects in boxes if there is dust ingress into the storage area. Compactus shelving is not recommended for open storage due to the added risk of damage during the movement of the compactus units.
Cantilever Shelving
There are some groups of objects such as aboriginal spears that might require specialised continuous shelving such as cantilever shelving (Figure 4). This provides ease of access to the objects without the massiveness of long span shelving.
Figure 4: Cantilever shelving for the storage of long items (image courtesy Jon Carpenter, WA Museum).
Pallet Shelving
Use pallets and pallet racking for objects that are too large to store on shelves (Figure 5). Avoid the use of commercially available pallets as these are usually of poor quality and therefore unsuitable for use in collection areas. Instead custom make your own using exterior grade ply coated with water-based polyurethane. Ensure that any custom made pallets comply with industry standards regarding weight bearing loads and construction.
Figure 5: (a) Modular pallet racking with half pallets and third pallets in the middle bay. Note the space efficiency.
(b) Example of poorly stored objects on pallet racking – space inefficient storage (images courtesy Jon Carpenter, WA Museum).
Free Standing Space
Vehicles, boats, industrial machinery and other objects that are too large or too heavy to store on pallet racking will need to be stored on the floor. Ideally these objects should be slightly raised from the ground, perhaps on cradles or pallets. While this is not very space efficient it is necessary. Use dust covers.
Boxes
Storing objects in boxes is generally good practice. A box forms a further buffer to ambient conditions, restricts the movement of an object and protects it from light, insects and dust. As it encapsulates an object, a microclimate will be established within a box. It is important therefore that the box itself and any packing materials used inside it are compatible with the materials from which the object is constructed and will not cause damage to the object in the long term (see Packing for Storage below).
Recycling corrugated cardboard cartons for the storage of museum objects is not recommended and it is a definite ‘no no’ if they have previously contained food. As corrugated cardboard is made of wood pulp it is acidic and the corrugations are perfect habitats for insects. In addition the folds on the bottom of a carton provide an uneven base which may compromise object safety. Solid cardboard walled boxes can be used but not if they have contained food as any remnants will attract insects.
Storage box systems for specific sensitive types of material such as textiles, paper and photographs are described elsewhere (see the relevant chapters).
Types of Boxes
There is a range of boxes that are useful for object storage:
- Modular specimen trays – base with no lid;
- Modular brown cardboard boxes – base and separate lid;
- Modular polypropylene boxes – base and separate lid;
- Conservation suppliers’ standard boxes – base and separate or hinged lid; and
- Custom hand made boxes – diverse designs.
Modular Specimen Trays
Modular specimen trays are custom made to fit the drawers of metal storage cupboards (Figure 6). These are made of non-archival card covered with archival paper. The build up of acidity in these trays is minimal because they are not lidded. Sizes are designed to configure within the drawer and could be a half, quarter, eighth or sixteenth of the drawer sizes. These trays allow objects to be secured within the drawer and therefore not suffer damage when the drawer is opened or closed, objects can be viewed without handling and can be moved by lifting the tray.
Figure 6: BAC™ drawers fitted with modular specimen trays.
(a) The china is held in place with small balls of tissue and cotton tape ties
(b) The objects are tied down to a Cell-Aire® base (images courtesy Jon Carpenter, WA Museum).
Modular Brown Cardboard Boxes
Modular brown cardboard boxes can be custom made for shelf storage (Figure 2). These are not archival and are most suitable for storing objects that are non-sensitive. However many small institutions are only able to afford this type of box. These boxes can still provide a durable and safe environment if a solid low acidic card is chosen, boxes are ventilated and when appropriate, lined with acid-free tissue or barrier paper to reduce acid migration (see Packing for Storage below).
Choose and configure the modular boxes so that the best use is made of the available space on the shelving without compromising the ability to remove box lids easily and without making the boxes too big and too heavy for easy handling. When having boxes made, check whether the manufacturer works using inside or outside dimensions and ensure that lids are about 100 to 150 mm deep. Damage can be done if it is difficult to remove a deep lid from a base.
Modular Polypropylene Boxes
Conservation suppliers will custom make modular polypropylene boxes (Figure 2). This is only cost effective if boxes are bought on a large scale as each differently sized box requires a template to be prepared, adding to the overall cost of the order. However, a carefully designed modular system can utilise all storage space on a shelf and therefore save money in the long term. As mentioned above, configure the boxes so that the best use is made of all available space without compromising either the artefacts or the ease of handling them.
Conservation Suppliers’ Standard Boxes
Conservation suppliers have standard boxes available made using archival multi-purpose board and polypropylene. It is prudent to include these standard box sizes in the equation when designing the best shelving configuration for a store.
Custom Handmade Boxes
It is most time efficient to use pre-made boxes even if fitting of additional components is required. Some objects will however, require custom hand-made boxes of archival multi-purpose board. While polypropylene flute board and Fomecore™ can be used for box making they require reinforcing along the joins. Archival multi-purpose boards are available in either single or double thicknesses, with the format and weight of the object to be stored determining which of these will be most appropriate for specific objects. There are templates available for different types of box making but some standard formulae and templates are
- base and separate lid with adhered joins;
- base and separate lid with folded construction;
- base with hinged lid with adhered joins;
- base with hinged lid and hinged front flap with adhered joins; and
- base with hinged front flap and separate lid with folded construction (Figure 7).
Figure 7: Custom hand-made box of archival multi-purpose corrugated board with hinged front flap and separate lid. The sponge is mounted on Cell-Aire® covered Ethafoam™ 220 supports mounted on a removable tray (image courtesy Carmela Corvaia, WA Museum).
The construction of custom hand-made boxes varies depending on the box design. There are designs where the construction is secured by folding, with tabs fitting into slots rather than using adhesives. Thinner boards such as single multi-purpose archival corrugated board are best for these types of boxes. Other constructions might require the use of hot glue, adhesives and tapes to construct the box. All have a flat piece of board as the base, unlike a carton which has four flaps folded in.
Some boxes can be cut out of one piece of board while others of larger format require stock board to be joined. Corner joins or joining stock board together can be done by neatly paring back about 40 mm of board to the outer card and adhering the overlapping card to the board. Ensure the construction technique is adequate for the weight of the object being stored. An additional base board greatly strengthens a box structure and can be used as a base on which supports can be adhered (Figure 8). Tyvek® tape can be used to make tabs for closures with Velcro self-adhesive dots if required.
Figure 8: Custom made box of archival multi-purpose corrugated board with hinged front flap and lid. The corners are adhered together. The model boat sits on a Cell-Aire® covered Ethafoam™ 220 cradle on a removable tray (image courtesy Maggie Myers, WA Museum).
Packing for Storage
General Principles
Packing techniques are as many and as varied as the objects for which they are designed and practitioners will develop techniques with experience. While the general principles outlined in this section can be extended to most objects it would be wise to consult a conservator when packing very fragile objects.
Packing Materials and Tools
While packing materials and tools are discussed below, further information is available elsewhere (see Appendix 6).
Objects of different material types have specific requirements for safe storage. These are described in other chapters that discuss particular material types. As micro-climates are established within boxes it is important that the packing materials within the box assist preservation rather than cause deterioration. The following table gives parameters for the pH and environmental preferences of some of the more common materials.
Table of Materials and Preferred Environments
| Material | pH 6 - 7 | pH 7 | pH 7 - 8 | Non-sensitive | Low oxygen, light and temperature |
|---|---|---|---|---|---|
| Aluminium | X | ||||
| Animal fibres | X | ||||
| Ceramic | X | ||||
| Copper alloys | X | ||||
| Film | X | ||||
| Glass | X | ||||
| Iron alloys | X | ||||
| Lead | X | ||||
| Leather | X | ||||
| Marble | X | ||||
| Paper | X | ||||
| Photographs | X | X | |||
| Plaster/gesso | X | ||||
| Plastics | X | ||||
| Rubber | X | ||||
| Shell | X | ||||
| Stone | X | ||||
| Wood | X | ||||
| Vegetable fibres | X | ||||
| Zinc | X |
Paper-based Packing Materials Include:
- acid-free unbuffered tissue paper;
- archival acid-free unbuffered tissue paper;
- buffered acid-free tissue paper;
- foam core board (Fomecore™);
- library board;
- multi-purpose archival corrugated board; and
- rising museum board.
Plastic-based Packing Materials Include:
- cellular polyethylene sheet (Bubble wrap™);
- polyester fabric (Parsilk or lining materials);
- polyester film (Mylar®/Melinex®);
- polyester wadding (Dacron™);
- polyethylene foam (Ethafoam™ 220);
- polyethylene foam (Ethafoam™ PE30);
- polyethylene foam backing rod;
- polyethylene foam sheet (Cell-Aire®);
- polyethylene sheet;
- polyethylene zip lock bags;
- polypropylene board or sheeting;
- polypropylene corrugated board (Coreflute®);
- polystyrene bean bags;
- spun bonded polyethylene sheet (Tyvek® sheet 1085D); and
- spun bonded polyethylene fabric (Tyvek® 1443R).
Polyvinylchloride (PVC), polystyrene and polyurethane products are generally not used in conservation because they are less stable than the above plastics and off gas detrimental acidic vapours as they break down. Despite this, polystyrene beads are used as a bean bag fillers and insulation for transport crates and water-based polyurethane paints are recommended as sealants for wooden surfaces. These products are not recommended for general use in conservation however.
Vegetable foam chips are unsuitable as a packing material for cultural heritage objects as the chips are water soluble and attract and harbour insects.
Restrainers and Tapes Include:
- cotton tape;
- double sided tape;
- paper tape;
- polyethylene self adhesive tape (Tyvek® tape);
- poly strap and poly strap buckles;
- velcro dots; and
- webbing tie downs.
Useful Tools Include:
- adhesives to secure overlapping parts of box construction;
- carpenter’s right angle or large set square to check right angles;
- cutting mat - the larger the better;
- cutting knife with replaceable blades;
- protective glove - available in different sizes from butcher suppliers;
- steel rule with a 6 mm vertical edge is the safest type to use;
- sharp scissors of different sizes;
- hot glue gun (3M Scotch-Weld™ recommended) to construct boxes, adhere support components within a box and a multitude of other uses; and
- folding tool (bone or wood, not metal) to mark boards for folds and then to establish them.
Packing Techniques
As the packing of any object involves a significant investment of time and money it is important to make the end result as good as possible. Take time to properly support an object and apply the following general principles:
- KIS – Keep it Simple;
- assess every object carefully;
- aim to be able to view each object without having to remove extraneous packaging;
- restrain objects so that they do not move in the box in any direction (see Figure 9);
- avoid having loose packing parts that will inevitably move within a container. Use hot glue to adhere cotton tape restrainers in place and machine stitch cotton tapes onto Tyvek® covers etc;
- avoid using heavy permanent markers (‘textas’) to label stock as the marks are disfiguring to the overall appearance of the packing. If necessary use a soft pencil instead;
- describe packing/unpacking procedures (including photographs if necessary) and adhere unpacking instructions to the outside of a packed object to minimise potential damage when complex procedures have been used for a particular object; and
- aim at high standards of presentation.
Figure 9: (a) Silver cup and lid in a custom-made box constructed from archival multi-purpose corrugated board with a hinged front flap.
(b) Board has been cut to restrict movement of the base and the handles with Cell-Aire® padding to cushion the base and lid.
Lining a Box
If sensitive materials require a box to be lined then it is important to line it with the correct tissue paper. Decide whether acid-free tissue or buffered tissue is the correct lining for the material being stored (see the Table of Materials and Preferred Environments above). Line the box using the tissue length ways to cover the base of the box, cover the sides and have enough to fold over the top (Figure 10). Repeat this along all sides. If necessary fold the tissue to the dimensions of the box rather than cutting the tissue as it is quicker and reduces the amount of small loose pieces of tissue that will move about in the box. Fit the tissue carefully into the corners rather than bunch them up. If the box format is large, the base may need to be covered with a full piece of tissue with the start of the lining tucked under the base tissue before covering the box sides. The tissue that will fold over at the top remains splayed out around the box perimeter until the box is packed.
Figure 10: A brown cardboard box lined with buffered acid-free tissue paper for the storage of linen and cotton objects (image courtesy Maggie Myers, WA Museum).
Ball Packing
This is a simple method of holding objects within the confines of a box with balls of tissue [see Figure 6 (a) above]. The object is well displayed and this method can be used for small to large lightweight objects. This method is not suitable for heavy objects that will not be restrained by the tissue balls. The format for the tissue paper is dependent on the size of the object to be packed. For instance the ball might be the size of an egg made from half a piece of tissue paper for a small toy being packed in a specimen tray. The area surrounding a costume however might be blocked out with larger balls each made from two or three sheets of tissue paper. The aim of the balls is to have an inner crushed structure covered with a smooth tissue finish that is closed at the bottom. These balls are suitable for blocking out objects within a box but the ball nature of them makes them unsuitable internal supports for materials like textiles. More open crushed tissue or crushed rolls of tissue are preferable for internally supporting textiles.
Base Board Packing
Base board packing is suitable for many small to medium-sized objects. The object is restrained and fully visible (Figure 11). Cut a base board of either single or double blue-grey corrugated multi-purpose board to fit the base of a box. Place the object on the board and mark the strongest anchor points of the object on the board. Cut slits at the anchor points and thread cotton tape down through one side and up through the other. Hold the centre point of the tape in place with a touch of hot glue on the underside. Cut strips of Cell-Aire® about 30 mm wide (the width depends of the scale of the object and the tape width) to ‘bridge’ the object. Cut a slit in each end of the Cell-Aire® bridge and thread the tape through, place the object on the base board and tie the tape in a bow over the Cell-Aire® bridge.
Figure 11: Base board packing showing strips of Cell-Aire® and tape restraints.
Cell-Aire® Lining
The Cell-Aire® lining method is suitable for many small objects, with the object restrained and fully visible. Line a tray or a box with 2 mm Cell-Aire®, cut using the box as the template (Figure 12). Identify the strongest part of the object and the number of anchor points that are needed. Mark the position of the anchor points on the Cell-Aire® with a soft pencil, remove the object and cut slits at each anchor point. Thread cotton tape through the slits using tape of a width that is most appropriate for the object in question - narrow for small objects, wide for larger objects. Don’t skimp on the tape and leave approximately 35 cm of tape for a bow. Use hot glue to tack the centre point of the tape to the underside of the Cell-Aire® to hold it in place. Thread the tape through the anchor point slits, then hot glue the Cell-Aire® base into the box. If needed, make Cell-Aire® bridges as described above.
Figure 12: Multiple objects tied onto a base of Cell-Aire® with room for an additional object of the same classification (image courtesy Jon Carpenter, WA Museum).
There are a multitude of variations of this method including shaping the Cell-Aire® base to support a 3D object and hot gluing Ethafoam™ supports or polyethylene backing rod bollards to support the object. The tape can pierce the box itself if additional strength is needed or preferred.
Note that Ethafoam™ 220 is very rough and should never be in direct contact with an object. Cover Ethafoam™ 220 either by hot gluing 2 mm thick Cell-Aire® over the contact surface or by covering with Parasilk or Tyvek®1443R. A variation of this method is to cut a slot around the supporting Ethafoam™ 220 and push Parasilk or Tyvek®1443R into the slot to hold it in place.
Foam Blocks
Heavier objects or objects that need to viewed without handling can be restrained with foam blocks attached either directly onto the base of a box or preferably onto a board cut to the dimensions of the base of the box (Figure 13). Identify the strategically important points of an object, taking into account the shape and the strength of all parts of the object. These might be the four corners of a square shaped object or they might be the ends of an object and a strategic depression in the object that if restrained would prevent the object from moving. Every object is unique and has to be assessed individually. Cut the Ethafoam™ 220 blocks to the appropriate size needed, shape if necessary, hot glue 2 mm thick Cell-Aire® over the contact surface and hot glue the block into place. The object can be tied with cotton tape through the board as described above or a foam block covered with Cell-Aire® can be fitted to the lid to prevent the object bouncing up.
Figure 13: Objects supported with Cell-Aire® covered Ethafoam™ 220 supports and tied down onto a multi-purpose corrugated board base (image courtesy Maggie Myers, WA Museum).
In some cases it is prudent to mark the orientation of an object on the base of the box so that it will be replaced correctly. This is very relevant when a suite of objects are boxed together. Knowing the orientation and which object goes where will save a lot of guess work at a later date!
Foam Cradle
This is a variation of the above, where the object has a sculptured shape and a cradle is needed to support it (e.g. a model boat). The object is usually mounted on a board that fits the base of the box. If light in weight the base board and mounted object can be lifted out using cotton tape handles. If the base and object are heavy however, then make the front of the box so that it can ‘flap down’ to allow the base and object to slide into place (see Figure 8 above). The box is either custom made or an adapted standard box. The object on the board can be pulled out of the box by Tyvek® tape tabs self adhered onto the base board.
Determine the number of cradle supports required and the strongest points of the object. Carve Ethafoam™ 220 blocks to shape and cover the contact surfaces with 2 mm thick Cell-Aire®, adhered with hot glue. Use hot glue to adhere the cradle supports in place on the base. As mentioned above, it may be prudent to show the orientation of the object on the base board so that it can be replaced correctly.
Objects on Pallets
Objects stored on pallets need to be strapped onto the pallet as they will be moved by forklift and possibly stored at high levels. Hot glue Ethafoam™ 220 blocks onto the pallet to hold the corners of the object in place. Use poly strap to strap the object to the pallet (Figure 14). Use strips of Cell-Aire® to separate and cushion the object from the abrasive poly strap and Ethafoam™ 220. To stop the Cell-Aire® strips from moving, cut slits at each end of the Cell-Aire® and thread the poly strap through. Tighten the poly strap with poly strap buckles.
Figure 14: Objects strapped onto modular pallets with poly strap, Cell-Aire® protecting the edges of the object and Ethafoam™ 220 under the wheels of the piano (image courtesy Jon Carpenter, WA Museum).
Labelling
It is imperative to label a storage box with a list of its contents and describe the box’s location in an object registration system. This will allow objects to be easily retrieved when required. Each organisation will have its own methodology and practices which need to be followed. Attach a label or write on the side of the base of the box and on the lid, giving the object’s name, its registration number and if possible a photograph of the object.
Use a numbering system to identify shelving units and shelves within the units. Record the position of an object in an object registration data base or in a manual registration document. Update this information if an object is moved to a new location.
Packing for storage check list
- Has the object been packed in pH-appropriate packaging for the materials present?
- Is the object supported on its strongest points?
- Is the object restrained?
- Is the packaging simple but effective?
- Are instructions for access required?
- Is the presentation good?
- Has the box been labelled according to the institution’s protocol?
Packing for Transportation
It is prudent to assume that objects will be transported and handled without care and to pack accordingly. Request ‘air ride’ truck transport when a more cushioned conveyance is required. Document and photograph objects before packing so that any damage that occurs during transportation will be obvious. Incorporate temperature/relative humidity, shock and/or vibration data loggers in the packaging with extremely valuable objects. If an object is subsequently damaged during transit, the logger record can be used to determine the time of the impact, something that will assist in determining in whose hands the object was when the damage occurred. This will eliminate blame-shifting by identifying whether the damage occurred when it was in the hands of a courier, an airline or while being unpacked at its destination.
Factors to be considered before packing and moving an object include:
- fragility and condition - is the object strong enough to withstand transportation stresses?
- size, weight and value of the object;
- mode of transportation - is an ‘air ride’ truck needed for transport?
- type of container to be used; and
- type of packing materials.
Studies of global transport systems have shown that packed objects are most at risk when being either transported on moveable trolleys (large vibrations on uneven surfaces) or manually handled. Interestingly neither shock nor vibration was found to be significant during take-off or landing when objects were transported by air.
Containers may be made of either metal or wood, depending on the nature of the object to be transported. These materials provide some degree of protection against both shock and environmental changes. Commercially available aluminium transport crates can be fitted out for specific objects. Wooden crates can be custom made, ideally of exterior grade ply, coated inside with water-based polyurethane paint and allowed to off-gas for at least 4 weeks before packing (Figure 15).
Figure 15: Wooden transport crate containing a wooden anchor supported by Cell-Aire® covered Ethafoam™ 220 ‘bridges’ with clear instructions for packing and unpacking (image courtesy Maggie Myers, WA Museum).
Restraining objects is essential if damage is to be prevented from either constant or intermittent vibrations or shock such as when dropped or bumped violently. The size of the container should be such that the object and its packing fit snugly, but not too tightly, inside the container. In this way internal movement is restricted and the risk of damage is reduced.
Materials used in packing for transportation should:
- be resistant to shock;
- provide a buffer against changes in environmental conditions;
- provide a moisture barrier;
- not allow the object to settle to the bottom of the container following packing;
- be chemically inert; and
- be easily distinguishable from the packed object.
Along with the packing materials in the lists above, polystyrene board is also suitable for transportation packing. Polystyrene board is a good insulator and can be used as a liner to minimise temperature fluctuations within a crate. This is particularly relevant for air transportation where the temperature in the cargo hold can drop to -30 °C. Do not use loose polystyrene beads or other loose packing materials which are likely to allow an object to settle through the packing. Polystyrene bean bags are effective as long as they are tightly packed. Closed cell foams such as Bubblewrap™ are preferred to open cell foams like polyurethane foam for crate packing because they are better at preventing water ingress.
Objects for transportation can be wrapped in tissue and then again in Bubblewrap™ or fitted into a 3D cradle within a box so that there is no movement within the box. In the latter case, use shaped Ethafoam™ PE30 to provide object support with the object perhaps also wrapped in tissue or Parasilk, depending on the nature of its surface.
A typical crate packed with fragile objects might comprise the following layers (from the outside moving inwards):
- aluminium or wooden crate;
- lining of Marvelseal® 360 (an aluminium based nylon and polyethylene moisture barrier film), polyethylene sheeting or Mylar™ to waterproof it;
- lining of 30 mm dense polyethylene foam (Ethafoam™ PE30) or polystyrene boards;
- wrapped or boxed object supported in three dimensions;
- silica gel or Art-Sorb® can be incorporated into the packing if relative humidity fluctuations are likely; and
- Ethafoam™ PE30 or rolls of Bubble wrap™ in the spaces between the boxed object and the crate lining to stop any internal movement.
Check List for Packing for Transport:
- Has a method of transportation been decided on?
- Is environmentally controlled transport necessary?
- Have the objects been condition reported and photographed?
- Are the objects well packed with no movement within the crate?
- Have copies of documentation been included within the crate?
- Have environmental and vibration loggers been included if relevant?
- Has the outside of the crate been clearly labelled with the name of the contact person, address and the sender’s details?
- Has the consignment been insured for the transport period?
- Has the transportation itinerary been confirmed?
- Do staff need to escort the consignment to the departure point or even accompany it?
- Has all the information regarding the consignment been sent to all stakeholders?
Display
The display of objects, either as a large scale exhibition or a single showcase, is still a form of storage, albeit one that is visible and accessible to the public. In addition to the aesthetic presentation of objects in exhibitions, objects must also be protected against the usual agents of deterioration.
Objects can be exhibited on either open display or closed display within a showcase or cabinet. Open display is often the domain of larger objects while smaller objects are well suited to exhibition in a custom made showcases. Regardless of the design of the exhibition all objects will require a stable environment for the duration of their exhibition.
Open Display
Objects are often designed to be on open display as audiences respond well to fewer physical and intellectual barriers between them and objects of interest. As there is no glass to spoil the view of the object, audiences can interact with objects more closely and the gallery atmosphere often appears more relaxed and open. Open display also provides a means of displaying large objects that would otherwise never be seen by the public as the costs and means needed to construct and transport custom sized showcases are extremely high.
Some considerations for objects on open display include:
Gallery Space
- Temperature and relative humidity levels in the gallery space need to be less prone to fluctuations and may require adjustment to meet the requirements of the objects on display since they will not be buffered by a showcase;
- Exclude direct daylight from entering the gallery and use an appropriate and flexible lighting system that caters for the light and UV sensitivities of the objects on open display;
- When selecting materials from which to construct internal walls or furnishings (such as plinths), ensure that conservation grade materials are used (see the chapter Preventive Conservation: Agents of Decay);
- Choose paints for the building and internal structures (including plinths) that have minimal volatile organic components. Allow approximately 4 weeks for the paint to off gas before installing objects;
- Consider the security of the gallery space. Are there visible security guards or attendants present? and
- Consider the air filtration system and possible pollutant sources, including visitors who will be in close proximity to the objects on open display.
Display
- Objects on open display are generally more vulnerable to damage through inappropriate handling by the general public. As such, keep objects out of touching distance (generally an arm’s length or a minimum of 800 mm) by the use of either psychological barriers such as low level or sloping plinths that prevent the public from getting too close or physical barriers such as roped off areas, acrylic or glass barrier screens;
- Consider the stability of the object and if it can withstand the vibrations that may occur around it with people walking or running near it;
- Use a barrier layer such as Mylar™ under an object if it is placed directly on a painted surface to prevent the transfer of paint to the object. Foam such as high density Ethafoam™ PE30 may also be placed underneath objects to cushion their bases from hard floor surfaces;
- Consider the security of the object. What systems are in place to prevent theft? Are there pins attaching the object to the plinth or is it heavy and large enough so that it cannot be removed without someone noticing?
- Objects on open display require more regular maintenance and cleaning than objects in showcases as they are more exposed to the dust and pollution that is inside the gallery space. These objects are also more exposed to insect activity.
Closed Display - Objects in Showcases.
Showcases work quite effectively in grouping objects together and by protecting delicate, small and precious objects. Some cultural materials including certain types of rubber, plastics, wool and wood emit damaging gases that can accelerate the deterioration of other objects if they are confined in the same microenvironment within a showcase. Separate these materials and take appropriate steps to minimise the impact of pollutants generated by objects themselves (see the chapter Preventive Conservation: Agents of Decay). Showcases should have the minimum of visible structure so that there is the least possible distraction to viewing the objects. When sourcing or designing a showcase consider the following:
- type of construction materials;
- props and textiles for ‘dressing’ the case;
- glass or acrylic for panels and lids;
- stability and vibration;
- environmental control;
- pest monitoring;
- case access;
- security;
- lighting; and
- mounting and supporting objects;
Construction Materials
As microenvironments develop within display cases choose materials for their construction that are compatible with the objects that are to be displayed. Inert, inherently stable materials like glass, metals and some plastics including acrylics (like Perspex™ or Plexiglass™), polycarbonates and polyesters are all suitable. Many organic materials (resins, plastics, coatings, wood, adhesives and wool) release damaging gases including formaldehyde, acetic acid and sulphur compounds. Avoid incorporating these materials in showcases either as construction materials or as display props.
Do not use medium density fibreboard (MDF) or zero-formaldehyde MDF for display cases as they are not chemically stable. Instead use exterior grade Australian hoop pine plywood. Use either aluminium foil laminates such as Marvelseal® 360 or Moistop 622 Barrier Foil (Hook 2005) or a water-based polyurethane to seal the plywood to prevent organic pollutants from the wood and adhesives from being released into the display case environment. While the foil laminates are more expensive than polyurethane they are more effective at sealing wood. If using the water-based polyurethane, apply at least two coats of the sealant with a light sanding in between layers and allow 4 weeks for the fumes to sufficiently off-gas before enclosing objects in the space. Regardless of the sealant used, it is critical to seal all exposed surfaces, especially the edges and ends.
Display Props and Textiles
Having already established that the objects going into a display are pest free, it is most important that any props augmenting a display, particularly organic ones, are pest-free prior to being installed. Observe and treat all organic props to ensure that no pests are introduced into display cases.
Wash props like sand or stones before using them. Drying in an oven after washing will ensure that these props are also insect-free.
Wash all textiles that will be used as background display materials to remove finishes such as pest proofing and flame retardant agents. Do not use wool, silk, some rubbers and some treated leather products in display cases as they degrade to produce sulphides which will attack any metals in the cases. Test textiles for colour fastness especially if they will be in direct contact with objects (see the chapter Textiles).
Glass or Acrylic Panels and Lids
Glass and acrylic materials each have their own particular advantages and disadvantages when used in exhibition showcases. Glass provides a better seal when creating microenvironments but is heavy and expensive. Glass has a long life, can be used for larger size cases, allows for better hinge choices and with laminated glass, offers very good security for objects on display. Laminated low-iron glass is recommended as it is stronger, has a lower light absorption rate than clear glass and lower reflective properties.
Acrylics such as Perspex™ or Plexiglass™ are cheaper, lighter, do not break as easily as most glass, are easier to bond and easier to replace in an emergency. These are significant advantages if used for travelling showcases. Disadvantages of acrylic materials are their less scratch resistant surface, vulnerability to vandalism, tendency to craze with constant cleaning, limited opening techniques (acrylics and hinges don’t work very well together) and size limitations as acrylics do not work very well for large cases.
As a general guide, acrylics are recommended if short-term displays of up to 2 years are planned. If displays are planned for longer periods then glass is preferred. Do not use tempered glass in display cases as their shattering properties could lead to objects being showered with thousands of small glass fragments!
All glazing edges must be polished or fitted with edge protection. Glazing joins should be mitred and glued with an appropriate adhesive.
Stability and Vibration
Vibration and movement from external sources can cause damage to objects inside a showcase. Cases must therefore be structurally stable and secured to prevent their movement and the movement of the objects inside the cases. Ensure the stability of objects in a case and their ability to withstand vibrations that may occur around the case with people walking or running in the vicinity. Secure showcases against:
- the transmission of vibrations from surrounding floor areas to the interior of the showcases;
- any vibration associated with opening the case and while open; and
- any vibration or movement from drawers that may be part of either moveable display units or used to incorporate buffering/pollutant absorbing material in the display cases.
Well cushioned stoppers will reduce the vibration and minimise any physical damage to objects. Objects displayed in drawers need to be robust enough to withstand the movement and be supported on appropriate props that minimise possible damage.
Environmental Control
A comprehensive table of environmental requirements for cultural materials is provided elsewhere (Appendix 2). This appendix lists appropriate temperatures, relative humidity levels, maximum light and UV levels, maximum display periods per year, susceptibility to insect/mould attack and other conservation considerations. Some materials require specific environments that are free of oxygen, moisture or sulphur. Strategies for controlling environments to create favourable conditions that enhance long-term preservation are also provided elsewhere (see the chapter Preventive Conservation: Agents of Decay)
A well designed showcase can create a favourable internal microenvironment by using materials that buffer against environmental extremes and fluctuations and can also minimise problems associated with biological pests and airborne pollutants. Some methods by which these levels of control may be achieved are discussed below.
Case Seals
Seal display cases to exclude dust, minimise the ingress of pollutants and insects and form a buffer to ambient temperature and relative humidity changes. Such a sealing system should not be completely airtight or hermetically sealed however as it is necessary to allow one air exchange per day to avoid the build-up of potentially damaging fumes. Neutral-cure extruded silicon seals (either compression or adhesive gaskets) are suitable seals for display cases.
Relative Humidity Buffers
Buffering agents such as acid-free papers and fabrics can be incorporated into displays and as such will absorb moisture in a display case where fragile, humidity-sensitive materials are present. A facility drawer built inside a showcase will enable the use of silica gel in a cassette or Art-Sorb® sheets to similarly control relative humidity levels inside showcases.
Corrosion Inhibitors and Pollutant Control
A facility drawer in a showcase will also allow for the use of corrosion inhibitors (vapour phase inhibitors) where organic materials are displayed in proximity to metals that require low RH (less than 40%). Corrosion inhibitors will protect the metals on display and are usually active for 12 months. Activated carbon cloth or Microchamber™ papers and boards could also be placed in the facility drawer (or even as part of the display design) to reduce the effects of organic pollutants on susceptible objects such as lead.
Marvelseal® 360 is an aluminium based nylon and polyethylene moisture barrier film that will resist the passage of moisture and pollutants. It is an ideal barrier for the lining of wooden display cases, shelves and for lining transport crates.
All of the above methods require regular maintenance and monitoring in order to remain effective in controlling the environment within the showcase.
Pest Monitoring
A well sealed showcase will also limit insect activity inside a showcase. Do not use insect repellents or pesticides inside display cases as they create toxic microenvironments. Instead treat any insect-infested objects before placing them in cases and if necessary apply residual pesticides to skirting boards and to external parts of display cases and surrounding areas. Use sticky insect traps to monitor objects and displays, especially dioramas, which are susceptible to insect attack (see the chapter Mould and Insect Attack in Collections).
Case Access
Access is an important part of display case design. Limit the weight of doors and choose door equipment that is precision engineered for ease of use, maintenance and safe operation by one person. The doors of a display case must allow at least 60 – 90 % access to the display area without affecting the structural integrity of the case so that objects can be moved safely and maintenance carried out.
Most importantly, at no time should an object be put at risk through the opening movement of the door. In a sliding door system, the moving glass panel must slide in front of the one in the fixed position.
Security
Ensure that all showcases have locks or security screws installed to prevent the theft of valuable items. Install locks to the top and bottom rails of large standing showcases and to two sides of showcases that have four visible sides. When planning a large exhibition or permanent gallery, consider having all the showcases keyed to the same locking system to reduce the number of keys required. Ensure that there are at least two sets of keys to the showcases and that they reside somewhere that is accessible in disaster response situations.
Lighting
Museums must provide adequate lighting for viewing displays while at the same time reducing the risk of fading and damage caused by exposure to light and UV radiation. While light sources, lighting techniques and associated recommendations are described elsewhere (see the chapter Preventive Conservation: Agents of Decay), it is worthwhile emphasizing the following points:
- do not incorporate lighting systems inside display cases as the heat generated can cause a multitude of problems;
- use lights with low UV levels and high (> 90) colour rendering indices so that the true colours of objects can be observed;
- use lighting arrangements that allow for easy maintenance and control of light levels; and
- set light levels in a case to cater for the most light-sensitive object in the display.
Mounting and Supporting Objects
In order to accommodate a number of objects and to make a display more dynamic, objects need to be mounted in some way. Some objects may also require support because they are fragile, inherently weak or deteriorated, are at risk of damage when handled or require arranging or displaying in a certain way so that the interpretation of the object is clear. While it is acknowledged that compromises may be required between the conservation requirements of adequate support and the aesthetically pleasing look of a display, the safety and long-term preservation of an object must always be the number one priority.
Although preparing and supporting objects for display are specialised tasks, some methods and materials are described below.
All materials used to mount objects in a display should be inert and of archival quality. In addition to the materials described previously (see the chapter Preventive Conservation; Agents of Decay), acrylic rod, stainless steel rod covered with silicon tubing, fishing line and magnets are acceptable for use for display mounts. As specified countless times, ensure that all wooden parts including display props, plinths and similar object are suitably sealed, either using a water-based polyurethane or Marvelseal® 360 barrier foil.
Do not use Blu-tac, sticky tapes, plasticine and similar materials to mount objects for display. Over time the adhesion will fail and the oil or adhesive will migrate into porous material and leave an irreversible stain on the object. Likewise thumb tacks and nails should never be used as a mounting media in direct contact with objects as they cause permanent damage by leaving holes in objects.
Use physical barriers to avoid having objects in direct contact with display case materials like wooden or painted surfaces. This minimises the risk of damage to the object by the transfer of potentially damaging chemicals. Mylar™ (cut to shape) is a useful product to place as a barrier between an object and a display case surface. Also consider using an acrylic plinth or support to raise an object from a risky surface.
Other considerations include ensuring that:
- all shelves or plinths are strong enough to support the weight of the objects;
- there is sufficient padding at contact points with the object without compromising the object’s stability;
- the mount does not have sharp edges and is non-abrasive;
- display materials are colourfast, economical and durable; and
- display furniture is as unobtrusive as possible.
Internal supports may be required for objects that are vulnerable to collapse over time, as well as for non-rigid objects like some leather objects and textiles. Bonnets, hats and baskets for example, will usually require internal covered structures to support their shape. The support could be a shaped Dacron™ filled cushion or a shaped and covered structure such as Ethafoam™ (Figure 16). Loose wadding such as Dacron™ is unsuitable for use as a support as pressure is put on the inside of the object as opposed to the cushion cover and loose fibres may attach to the inner surface of the object.
Costumes and garments should be supported on well-fitting mannequins where appropriate (see the chapter Textiles).
Figure 16: Fragile painted basket supported internally with a Dacron™ filled Tyvek® 1443R cushion (opened to show the filling) in a Cell-Aire® cradle with polyethylene foam backing rod ‘bridges’ (image courtesy Carmela Corvaia, WA Museum).
An object may require an external support to assist in holding it in a stable position or in a position that is necessary for its proper interpretation. A canvas diving suit for example could not be displayed in a vertical position without external support as it is not capable of supporting its own weight. In such cases locate suspension points in the strongest areas of the object.
Books, if displayed open, also require support. Use custom-made stands to support the structure of the book at about 150° so that the spine is not stressed over time (see the chapter Paper and Books).
Larger textiles that are hung for display require a supportive and strong hanging system while smaller textiles might require mounting on a padded board for support (see the chapter Textiles). Hanging or suspending objects can be fraught with potential problems and the risk of damage to an object is high. Contact a conservator for advice if considering this display option.
Pre and Post Display Condition Reports
Examine and document all objects before they are displayed and again at the end of their exhibition period. Written descriptions, photographs and sketches may all form part of the condition report documentation. By doing this it will be possible to determine if objects have suffered any damage while on display. If objects have been damaged while on display take steps to rectify the situation.
Display Criteria Checklist:
- Are the materials within the display area inert?
- Have all the environmental issues been addressed within the display environment?
- Have condition reports been done?
- Are the objects adequately supported? and
- Have all props been properly quarantined?
Summary
- Insulate and maintain storage buildings so that they are able to effectively buffer changes in external ambient conditions.
- Inspect objects, object supports and props to ensure that all are pest-free prior to storing or using in a display.
- Allow objects to slowly acclimatise to new environments if they are moved from one climatic zone to another.
- Cleanliness, common sense and assessments of the conditions and strengths of objects are critical to ensure that handling damage is minimised.
- Use inert, archival quality materials and choose the most appropriate storage furniture and boxes for objects that are to be stored.
- Plan carefully so that space is utilised as fully and effectively as possible in storage areas but without over-crowding that may lead to damage.
- Maintain appropriate environments and practices that minimise the impacts of changes in temperature and relative humidity levels, high light and UV levels, pests and pollutants while objects are either in storage or on display.
- Pack objects to restrict movement and to protect against damage caused by agents of deterioration and poor handling.
- Use inert, archival materials as props and to support objects on display.
- Monitor the condition of storage environments and the condition of vulnerable objects.
Bibliography
Anstey, S, 2002, Steel shelving systems for small-to medium-sized objects, in Museum methods: a practical manual for managing small museums and galleries, (Ed.) P. Landman, Museums Australia Inc (NSW), Sydney.
Barclay, R., Bergeron A. and Dignard, C., 1998, Mount-making for Museum Objects, Second Edition, Canadian Conservation Institute, Ottawa, Canada.
Bouwmeester, W. and Murray, W., reviewed 2005, Factsheet Creating or Improving Stores, Scottish Museums Council.
Coote, K. (Ed.), 1998, Care of Collections, Conservation for Aboriginal and Torres Strait Islander Keeping Places and Cultural Centres. Australian Museum, Sydney.
Hook, E; Guidance notes; choosing a new display case, Scottish Museums Council, reviewed 2005.
Museum methods: a practical manual for managing small museums, Section 3 Preventive Conservation, 1994, 2nd edition, Museums Australia Inc, Newmarket, NSW.
reCollections, caring for collections across Australia, 1998, Heritage Collections Council, Canberra.
Rose, C. L. and de Torres, A. R. (Eds), 1992, Storage of natural history collections: Ideas and practical solutions, Society for the Preservation of Natural History Collections, Pittsburgh.
Shelley, M., 1992, The Care and handling of Art Objects: Practices in the Metropolitan Museum of Art, Revised edition, The Metropolitan Museum of Art, New York.
General Points on Artefact Treatments
D. Gilroy and I. M. Godfrey
Objects from the past have been described as having the character of both historic documents and of aesthetic entities (Caple 2000). Objects are sources of important information but also provide aesthetic experiences for those, such as museum visitors, who interact with them. Before beginning any treatment of an artefact therefore, consider these four factors:
- the history of the artefact;
- the materials present;
- how the artefact is constructed; and
- the condition of the artefact.
Knowledge of an artefact’s history is important to prevent the removal of material that may provide information about its past. A treatment as simple as surface cleaning could conceivably remove traces of DNA or fingerprints that provide information about an object’s past. Before attempting to remove a stain from a textile, for example, assess the nature and significance of the stain. Does the stain pose a risk to the textile itself? Does it provide information about past usage of the textile? Is the stain associated with a significant part of the textile’s history?
Often a balance needs to be struck between the need to preserve the object and the information contained either within or on it and either cleaning or restoration work that is designed to enhance the aesthetic qualities of the same object. In these instances it is important to have a discussion with all stakeholders to ensure that the best possible decision is made.
If some form of treatment is necessary, examine the artefact thoroughly to determine the material type, mode of construction and its condition. If there is any doubt about either the type of treatment to apply or the possible effect of a particular treatment, consult a conservator. It is also very important to be aware of any potential risks posed by chemicals used to treat objects. Consult references and material safety data sheets to fully familiarise yourself with the chemicals and precautions needed in their application.
Do not treat objects unless they are likely to continue to deteriorate if not treated. Keep conservation treatments to the minimum necessary for stabilisation of the object.
The methods described in the following chapters are for artefacts constructed of one material type that are reasonably sound. Composite objects, made up of different materials, are often difficult to treat. In some cases the components can be separated and treated individually. If this path is taken, exercise great care as reassembly may be difficult following treatment.
If an object is fragile, badly deteriorated or very valuable, seek advice from a conservator before attempting any treatment.
If possible, try treatments on scrap or spare pieces of material to gain experience and to observe the effect of the treatment on the material itself. If no extra material is available, attempt the proposed treatment on an inconspicuous part of the object itself. Only apply treatment to the whole object after this has been done.
Note that if an object needs conservation treatment its environment should be examined as carefully as the object itself. There is no point in treating an object and then returning it to the environment that may have contributed to its deterioration in the first place.
Conservation or Restoration?
The aims of conservation have been expressed as a balance between the oft competing aims of revelation, investigation and preservation (Caple 2000). Thus, while it may be more important to enhance the aesthetic quality of an oil painting by cleaning the surface (revelation), such an action may remove evidence of the paintings past. Analysis and investigation of an object is necessary in order to gain historic information and also to enable informed treatment and preservation decisions to be made.
With every object to be treated, make a decision as to the extent of the conservation treatment needed to investigate, document, preserve and/or enhance its aesthetic qualities. The intended use of an object, its condition, composition and possibly even the availability of conservation resources may all affect the final treatment proposal. Conservation may be either preventive or interventive, with interventive treatment being the minimum needed to stabilise the object and to prevent it suffering further damage. Restoration involves conservation treatment plus the repair or replacement of missing or damaged sections and is a process that aims to give the object an appearance that more closely resembles its form and colour from an earlier, significant stage in its life.
Restoration, although often carried out to enhance the aesthetic value of objects, is really only necessary when the replacement of missing parts will help stabilise and protect the object from further damage.
With all restoration work it is essential to know exactly how the original object was constructed. This may involve much research as the key to ethical restoration is the quality of the evidence that is available. Useful evidence may arise from:
- the symmetry of an object;
- the presence of patterns or lines of continuation;
- old photographs; and
- scientific examinations of the object, which may reveal old paint fragments, paint layers and the like.
Do not carry out any restoration unless there is definitive evidence of what should be reinstated or replaced. Any restoration work should use techniques and materials that affect the object least. Ideally the materials incorporated into a restored object should also be detectable, though not necessarily conspicuous and be able to be removed should further work be needed in the future. In theory, nothing original should be taken away, but in practice (and often for the greater good) material from the centre of an object is sometimes removed to make way for dowels or other jointing methods that do not distort the surface.
Restoration techniques are beyond the scope of this book and are dealt with only briefly.
Documentation
Whenever an object is treated it is essential to keep a detailed, permanent record of the treatment. This record should include details of the:
- condition of the object before the work was done;
- treatment carried out; and
- condition of the object following treatment.
The aim of the record is to provide as much information as possible about the object. Include photographs, drawings and written descriptions of the object where relevant. In many cases a sketch and written description will provide more information than a photograph.
Also add to the record any known history of the object, dimensions, the size of cracks (if any), missing parts, colours, component materials, treatment chemicals and procedures.
Basic Chemical Information
Many of the treatments described in this book involve the use of chemicals. Take the following precautions when mixing and handling these substances, especially acids:
- always wear rubber gloves and protective glasses;
- work in a well-ventilated area; and
- when mixing and diluting chemicals, always add the measured quantity of the chemical to the water, never the reverse. This is especially important with acids and alkalis.
Preparing Solutions
Chemicals come in both solid and liquid forms. Citric acid, for example, is a solid whereas concentrated hydrochloric acid is a liquid. When solids are involved in a formulation the composition is usually expressed in parts by weight of solid, whereas liquid formulations are often expressed in parts by volume. For example, a solution of involving solid citric acid may be expressed as 5 g per litre of water whereas a solution involving liquid polyethylene glycol 400 may be expressed as 200 ml per litre of water.
For most of the formulations mentioned in this book kitchen scales are accurate enough for weighing purposes and any convenient volume measure can be used.
A solution made up of a solid in water may be specified as weight of solid per weight of water (w/w) or, more usually, as the weight of solid per volume of water (w/v). The two are almost equivalent as 1000 millilitres of water weighs about 1000 grams. Examples are given below.
citric acid (10%, w/w) = a solution in which 10g of citric acid is dissolved in 100g of water
citric acid (10%, w/v) = a solution in which 10g of citric acid is dissolved in 100ml of water
Solution Strengths
Acids and alkalis - Concentrated acids and alkalis in liquid form are sold by specific gravity (SG) as they are not necessarily 100% strength.
Specific gravities of some commonly used solutions are listed below:
| Sulfuric acid | 1.84 |
| Nitric acid | 1.42 |
| Hydrochloric acid | 1.18 |
| Ammonia | 0.88 |
The convention adopted in preparing some dilute solutions is to assume that the commercial chemical is 100% and to dilute it accordingly. For example:
10% sulfuric acid = 100ml of sulfuric acid (SG 1.84) dissolved in 900ml of distilled water
50% ammonia solution = equal volumes of ammonia (SG 0.88) and distilled water are mixed
There are exceptions however as concentrated hydrochloric acid (SG 1.18) is only a 32 % solution in water. It is most important therefore to read the labels associated with all chemicals so that solution concentrations are calculated correctly and any precautions associated with their use are also taken into account.
The strength of a hydrogen peroxide solution is indicated by the number of volumes of oxygen gas produced by the decomposition of one volume of solution. It is available commercially as follows:
100 volumes = about 30% hydrogen peroxide
20 volumes = about 6% hydrogen peroxide
10 volumes = about 3% hydrogen peroxide
These solutions are supplied in amber coloured bottles. Store them in a cool place, protected from light (a refrigerator is ideal).
Mixing Chemicals
Mix chemicals thoroughly in glass, stainless steel or enamel-coated containers. Do not use concrete water troughs, aluminium, copper or brass containers as the chemicals may damage them. Do not use polyethylene bowls as these may distort with the heat generated during mixing of certain chemicals. Sodium hydroxide for example, produces a lot of heat when it dissolves in water.
Once the chemicals are mixed and cold, store them in glass or polyethylene containers. The majority of treatment solutions can be re-used a number of times. Discard the solutions when they are no longer effective and prepare fresh ones.
Disposal of Chemicals
Local authorities restrict discharge of chemicals directly into a sewage system. Obtain copies of local by-laws and follow the regulations regarding chemical disposal.
Acid-alkali Scale
All chemicals may be classified as being either acidic, neutral or alkaline. The pH value of a chemical gives an indication of its acidic or alkaline nature.
pH values range from 0 to 14. A neutral solution has a pH of 7 whereas an acidic solution has a pH less than 7. The more acidic a material the lower is its pH value. Alkaline solutions have pH values greater than 7. The more alkaline a solution is, the higher its pH value.
The pH value of a solution may be determined in a number of ways. These range from the use of sophisticated equipment to impregnated papers that give characteristic colours in acidic or alkaline solutions. In the latter case, the colour of the paper after it has been dipped in the solution is compared with standard colour charts to determine approximate pH values. Colours range from red (acidic) through pale orange (neutral) to dark blue (alkaline).
Vinegar (acetic acid) and lemon juice (citric and tartaric acid) have low pH values and turn the paper red, whereas household soap and cleaning fluids usually have high pH values (alkaline) and turn the paper blue. Tap, distilled or rainwater should have a neutral pH value close to 7.
Usually pH measurements are used to determine whether all the chemicals have been removed by rinsing following the treatment of an object. Moisten pH paper with distilled water and place it on the clean object. Any traces of acid or alkali from the cleaning solution will show up as blue or red respectively. Repeat washing until the pH paper does not change colour.
Bibliography
Caple, C., (2000), Conservation Skills: Judgement, Method and Decision Making, Routledge, London and New York, pp 256.
Leather
I. M. Godfrey
Introduction
The skin of any animal can be used to make leather. The physical characteristics of leather and its susceptibility to deterioration depend on the skin type and the processing treatment applied to it. Long before genuine tanning processes were employed to prepare leather, raw hides and skins were subjected to a variety of procedures designed both to preserve and alter their properties. Examples of these procedures include working oil, grease and even brain substance into raw skins, softening hides by chewing (Eskimo) and exposing skins to smoke (Waterer 1972).
Animal skin products have been used for domestic purposes from ancient times until the present. These materials were used over 4,500 years ago in the early civilisations of Egypt, Assyria and Babylonia (Reed 1972). About 3,500 years ago the Egyptians were making leather from the hides and skins of ox, calf, sheep, goat, lion, panther, gazelle, cheetah, antelope, leopard, camel and hippopotamus. Depending on the requirements of the final product, dehairing baths, alum tawing, vegetable and oil tannage, colouring and dyeing were all used. Leather products of this period included document rolls, sandals, aprons, shields, saddles, boats, balls and thongs for bindings (Reed 1972).
Of major archaeological and historic interest are leathers derived from the more common animals, such as those made from the hides of cows, sheep, goats, pigs and horses. Leathers can be differentiated by the characteristic hair follicle patterns on their grain surfaces. Preparation of leather from the skins of marine animals and reptiles is a more recent development.
Processing Hides and Skins
Skin products include rawhide, parchment, semi-tanned leather and fully tanned leather. The nature of skin and its conversion into leather are described extremely well by Waterer (1972). The following summarises much of Waterer’s descriptions.
Skin is a complex structure made up of hair, a protein-containing layer of collagen fibre bundles, sweat glands, fat and blood vessels (Figure 1). The proteinaceous layer is a three-dimensional weave of collagen fibre bundles, large and loosely woven in the corium but fine and tightly packed in the protective, outer grain layer. Collagen molecules are made up of amino acids, linked by polypeptide bonds to form chains that combine in a helical fashion.
Figure 1: A cross-section of leather hide.
The processing of skins or hides may involve some or all of the following techniques:
- isolation of the corium (collagen layers);
- curing (dehydration by sun drying, dry or wet salting and pickling);
- tanning (vegetable, mineral or oil processing);
- dressing; and
- finishing.
During processing both the epidermal and the fatty layers of the skin are removed. Tanning processes are then used to stabilise the collagen fibre tissue. Details of some of these processes are outlined below.
Rawhide is the untanned skin of an animal which has had all of the flesh removed before drying. It is not leather, having not been exposed to any tanning processes. It is usually a very rigid, tough material, used where these properties are essential. Despite its inherent toughness, rawhide is in many ways the least durable of the skin products because of its susceptibility to deterioration and its moisture sensitivity. Some of its uses include the manufacture of suitcases, hammer heads, drum coverings, thonging and lashings.
Parchment is prepared by removing the flesh from the skin and drying the skin under tension by stretching it on a frame. It is usually light coloured, opaque and smooth and takes ink and colours well. Modern parchments are considered inferior in their properties to medieval or ancient parchments because of the different processing methods and materials employed (Reed 1972).
Semi-tanned leather (‘buckskin’ or ‘buff’ leather) is produced by stretching the skin and rubbing an oil and fat emulsion (sometimes from the brain of the animal) into it. The skin is manipulated until it is dry, soft and flexible. It is often smoked after this. When ‘new’, semi-tanned leather is soft, suede-like, extremely flexible and is considered to be quite durable. This oil ‘tanned’ leather is now most commonly encountered in the form of ‘chamois’ or ‘wash’ leather. In earlier times it was used for clothing, pouches, gloves, saddle seats, military uniforms and military equipment.
Fully tanned leather is the end product of the tanning and finishing of cured skins. Either vegetable or mineral tanning processes are used to raise the shrinkage temperature of leather, to prevent bacterial decay and in the case of chrome tanning, to impart water resistance to the leather. These processes involve complex chemical reactions between the tanning agents and the helical collagen molecules.
Vegetable tanning uses the tannins, found in the bark, wood, leaves and fruits of particular plants, to stabilise the collagen fibres. Before finishing the leather ranges in colour from pale to reddish brown, depending on the tanning agents used.
Mineral tanning refers to the use of metal salts to tan the leather. Salts that have been used include aluminium, chromium, zirconium and iron. Originally a solution of alum and salt (‘tawing’) was used to produce a white leather, which could then be dyed. Leather produced by tawing is not ‘true leather’ as the original raw skin can be regenerated by immersing it in warm water. Zirconium salts have been used to produce a washable white leather.
In the 1880s chrome salts were used to produce leathers which were hard-wearing, stable and water resistant. Chrome-tanned leather has a characteristic bluish colour that can be seen in the middle of a cross-section of the skin. Chrome-tanned leathers, which now make up about 90 % of the world’s leather production, cannot be embossed because of their resilience and open texture, making them unsuitable for bookbinding and other similar kinds of work.
Dressing leather involves incorporating materials such as fats and oils into it in order to lubricate the leather fibres and prevent sticking when dried. The amount and type of fat incorporated into leather and the mechanical treatment of skins are used at this stage to produce the desired properties. Sole leather, usually vegetable tanned for example, is rolled and only lightly oiled to produce a hard, slightly pliable material, whereas harness leather has a mixture of oil and tallow worked into it to induce strength, flexibility and water resistance.
Finishing processes tend to affect the appearance of the leather, with little impact on other properties (Figure 2). Traditional finishing processes include staining, dyeing, graining, plating, boarding, enamelling (to produce ‘patent’ leather) and abrading (to produce a suede or velvet finish).
Figure 2: Indian knife and scabbard that shows embossing, dyeing, and the corrosion of studs.
Today leathers are classified according to either the type of animal from which they were derived or the type of treatment to which they have been subjected. Smaller animals such as goats and sheep or the young of larger animals usually produce fine leathers.
Technically the term ‘leather’ only refers to skin products that have been fully tanned (vegetable or mineral tannages). The term will be used in this strict sense (unless specified otherwise) for the rest of this chapter.
Deterioration
As mentioned in the introduction, leather is composed of tanned collagen, moisture, oils and fat. The amino acids that link to form collagen molecules give leather its slightly acidic nature, with a pH range between 3 and 6. The water and fat contents in leather should range between 12 - 20 % and 2 - 10 % respectively. Within these limits equilibrium and leather condition is maintained; outside them, deterioration accelerates. If there is too much fat in the leather for instance, water is repelled, resulting in the leather eventually becoming hard, brittle and inflexible. Once this occurs, it is often difficult to return the leather to its original condition.
Leather is affected adversely by a range of environmental and biological agents, careless handling and poor storage and display techniques. Chemical changes may take place in the tanning agents and other materials used in the manufacturing processes as well as in the collagen molecules. A comprehensive review of leather deterioration mechanisms is provided elsewhere (Kite and Thomson 2006). Some of these deterioration agents and processes include:
- attack by moulds, bacteria, rats, termites and many kinds of insects. A combination of excessive lubrication with oils and fats and high relative humidity (above 70 %) provides the right conditions for mould to develop on leather;
- drying out and the development of hard, brittle and cracked leather due to excessive lubrication and/or, low relative humidity (below 40 %) and/or moderate heat and relative humidity fluctuations;
- corrosion of metals in contact with fatty materials incorporated in leather dressings. For example, a turquoise, waxy substance often forms on copper fastenings attached to leather (Figure 3);
- attack on collagen molecules is catalysed by metal ions, copper (II), iron and cobalt ions in particular, and may lead to the breakdown of leather. These metals may have been incorporated in the leather from water and other materials used in tanning, from dyes, by direct contact with metals as a result of manufacturing processes or contact with metals in archaeological deposits;
- the effects of light, which include attack on the polymeric collagen components themselves, fading of dyes incorporated in leather (Figure 4) and interaction with atmospheric compounds to form harmful substances such as sulphur trioxide. Skin products that still have hair attached are susceptible to both insect attack and light-induced damage that may result in substantial hair loss;
- physical damage by too frequent or too vigorous cleaning, rough handling or storage of leather objects in conditions under which stresses and strains are induced in the object;
- the development of ‘red rot’ in vegetable tanned leather objects. Certain items of harness, military equipment, book bindings and upholstery are susceptible to this type of decay that is caused by atmospheric pollutants; and
- chemical and mechanical damage caused by dust. The sharp edges of minute dust and dirt particles are abrasive and can cause fibre damage if removed by methods other than suction. Dust also acts as a nucleation centre, attracting fungal spores and acting as a centre for condensation and subsequent chemical attack.
Figure 3: Corrosion of copper alloy studs due to excess fat in the leather. Turquoise waxy material is evidence of copper corrosion.
Figure 4: Leather bound book of Keats’ poems showing fading due to light exposure.
Preventive Conservation
Environment
Display and store items made from leather, hide and skin in a clean, well-ventilated environment maintained at a maximum temperature of 25 °C with a relative humidity in the 45 - 65 % range, with daily fluctuations limited to 4 °C and 5 % respectively.
Very dry conditions (less than 40 % relative humidity) will cause loss of moisture and embrittlement while high humidity (greater than 70 % relative humidity) encourages mould growth. Parchment is very sensitive to relative humidity fluctuations and changes dimensions as it absorbs and releases moisture into its surroundings.
Protecting skin products in a storage or display cabinet will help to stabilise environmental fluctuations while also providing protection against dust and insect attack.
As all light has the potential to damage leather, keep light levels to a minimum, particularly for dyed leather (see below for recommended levels). Avoid exposing any leather to bright spotlights or direct sunlight as both of these can cause discolouration, desiccation and embrittlement.
| Best light values for leather objects | ||
|---|---|---|
| Material | Total white light (lux) | Maximum UV (µWatts/m2) |
| Dyed leather | 50 | 1,500 |
| Undyed leather | 200 | 15,000 |
More information on aspects of preventive conservation is provided elsewhere (Raphael 1993, Kite and Thomson 2006).
Storage and Display
To maintain leather in good condition a high standard of cleanliness is needed. Vacuum and remove dust from storage areas regularly to minimise the likelihood of microbiological, insect or rodent attack.
Protect leather objects from dust (cupboards, unbleached calico or tyvek dust covers, acid-free boxes or acid-free tissue) and inspect them frequently, preferably every six months, to ensure mould or insect infestations are noted at an early stage. Use only unbuffered acid-free materials with leather because buffered acid-free materials are alkaline and are therefore potentially damaging to the slightly acidic leather.
Support leather objects in their desired shape when in storage and on display so that they do not need reshaping as they age and harden. Avoid sharp folds or creases in leather unless it is the original shape of the object. Fill rounded items with unbuffered, acid-free tissue paper. Supports of other shapes can be made from chemically stable polyethylene or polypropylene foams. To avoid stressing them, store large or long leather pieces horizontally.
If three-dimensional objects are unable to support their own weight, support them internally. The form of the support will depend on the shape of the object and the weight of leather to be supported. Fit leather clothing or large objects such as saddles on made-to-measure dummy mounts. Chemically stable materials, such as the above-mentioned foams, linen, dacron and most metals, may be used in the manufacture of these supports.
Use painted metal storage cupboards and furniture to reduce the risk of acidic vapours from wood products coming into contact with skin materials. If wooden furniture is used then seal and line it with impermeable coatings (for example, clear, water-based polyurethane) or laminates (see the chapter Preventive Conservation: Agents of Decay).
Standard conservation-quality mounting and framing is usually adequate to protect art or documents on parchment.
Treatments
If leather objects are stored and displayed in good conditions, the need for potentially damaging treatments can be reduced or avoided. Do not attempt treatments that involve the use of detergents, stain removers and similar chemicals before consulting a conservator to obtain the most up to date advice. Any treatment should be the least interventive possible.
Cleaning Leather
Cleaning has the potential to damage leather and should not be considered an automatic option for leather objects. There are some situations, however, when cleaning is recommended. These include:
- objects that have been acquired recently. Before their addition to the collection such objects should be inspected and cleaned if necessary. Inspect the objects to reduce the risk of contaminating the rest of the collection; and
- objects on display or in storage that are at risk due to damaging surface contaminants.
Before cleaning any leather a number of factors should be considered. These include:
- the type of leather;
- the type of surface;
- the nature of any contaminants; and
- what is to be cleaned.
The last point needs to be considered carefully as dirt or other accretions accumulated during an object’s historical usage must be viewed in a different light to that which has been deposited during its period in storage. If an object is in a fragile condition it may be better not to clean it to avoid further damage. Instead, try to protect the object against further soiling.
Surface deposits that may need to be removed by cleaning include:
- inorganic dirt, dust and salts;
- organic residues such as fatty or gummy spews; and
- mould.
To distinguish mould, spews and crystalline salts examine the leather surface under a microscope. The crystalline nature of salts would be clearly evident and the presence of fungal hyphae (fine fibrous strands) should allow these contaminants to be identified. Gummy spews are formed by the breakdown of oils and fish oils in particular. These resinous-looking substances are usually smelly and unpleasant to touch and handle. Fatty spews are greasy deposits that appear on the leather surface and are sometimes mistaken for mould. They form when solid fats, or their breakdown products, migrate to the surface. Lubricants used to soften leather are often the source of these fatty materials.
Cleaning Techniques
If cleaning is necessary then the following mechanical and wet cleaning approaches may be considered:
- vacuum cleaning;
- brushing with a soft brush;
- compressed air;
- granular erasers;
- scraping with a wooden spatula;
- petroleum-based solvents such as white spirit and hexane; and
- water-based cleaning - including the use of pure water, alcohol and water solutions, and emulsion cleaners.
Never wet the leather surface during cleaning as this increases the likelihood of the leather hardening when it dries. An additional risk associated with water-based cleaners is darkening of the leather surface. Avoid water-based cleaning methods unless the leather surface is relatively impervious to water.
Vacuum cleaning, with the nozzle just above the leather surface, is probably the safest cleaning method. It is particularly suited to cleaning dusty leather in good condition. Place a gauze screen on the end of the nozzle when cleaning. Check this periodically to make sure that pieces of the surface are not being removed.
Brushing with a soft squirrel hair or camel hair brush may also be used to remove surface dust. Note that even using a soft-bristled brush may not prevent damage to fragile objects as dust is abrasive and pieces may be dislodged.
A gentle stream of compressed air may be appropriate for some objects. To prevent re-deposition of dust, carry out this procedure either in the open air or in a fume cupboard. As with brushing, there is a danger of dislodging fragile pieces.
Approved granular erasers, such as Artgum 211 or Faber Castell and sponges of the Wishab type, may be used to remove more stubborn dirt, but only on surfaces in good condition. Erasers should not contain sulphur or chlorine compounds. Their use is outlined below:
- use a household grater to finely grate an eraser. A plastic grater is preferred as the metal variety may rust or shed small metal particles;
- spread the grains over the leather and lightly rotate them with the palm of the hand or the flat of the fingers until the entire area has been covered; and
- remove the eraser crumbs with a vacuum cleaner. This is extremely important as the residues may affect the texture, colour, pH and ‘wettability’ of the leather. In addition, as the crumbs age they harden and may cause physical damage to the leather.
Scraping, using a soft wooden spatula, may be used to remove thick surface deposits such as those occasionally formed by fatty spews. Only use this method to remove the bulk of the deposit and take particular care not to damage the leather surface. Solvents may be used to remove the residues left after scraping (see below).
Use a sponge, moistened slightly with water, to remove water-soluble dirt from leather objects that are in good condition and whose surface is protected by a water-resistant coating (wax, resin or similar). Identify the nature of the coating before carrying out this type of cleaning.
Use petroleum-based solvents such as white spirit or hexane, applied either as a poultice or with a sponge, to remove thin films of fatty or gummy spews. Test the solvents on an inconspicuous area of the object to ensure that surface finishes are not affected.
Use alcohol or alcohol/water solutions (50/50 mix) to remove surface salts. A low water content is desirable to minimise potential damage to the leather. Test the solution before use to ensure it has no detrimental effect on the leather surface.
An emulsion cleaner, whose ingredients and method of use are described below, is based on a formulation described in Fogle (1985). It has been used successfully to remove stubborn inorganic and organic dirt. As this formulation contains some water, test it before using it on a large scale.
| Non-ionic detergent (for example, Teric N9, Arkopal N090) | 20 ml |
| Carboxymethyl cellulose (CMC) | 2 g |
| Distilled water | 1 L |
| X-4 solvent (hexane) | 2 L |
Prepare the cleaner in the following manner:
- vigorously mix the detergent, CMC and distilled water for several minutes;
- leave the mixture to stand overnight. This gives the CMC time to swell; and
- add 150 ml of this solution to 1000 ml of X-4 solvent and shake vigorously until a creamy emulsion is formed.
The cleaning solution keeps indefinitely but should be shaken before use. Before using the cleaner, test it on an inconspicuous area of the object to be cleaned to ensure it has no significant effect on either surface coatings or on the leather itself. Rub the cleaner onto the surface with a clean cloth, rotating the cloth as it becomes soiled. If the object is very small or delicate, use cotton buds (or similar) to apply the cleaner.
Anecdotal evidence suggests that although saddle soap appears to have little detrimental effect on leather objects still in use, museum objects cleaned with this soap often seem to be in worse condition than untreated objects. Of major concern is the alkaline nature of the saddle soaps and the effect they and similar products can have on the leather (which is naturally acidic). Its use is not recommended for objects in storage or on display.
Biological Infestation - Mould and Insects
Avoid using chemical reagents to treat biological infestations as there is the risk of damage or contamination of treated objects. Methyl bromide, a commonly used fumigant, is particularly damaging to leather and should not be used. Non-toxic methods of treatment are available, with freezing and oxygen depletion approaches described earlier (see the chapter, Mould and Insect Attack in Collections). To be sure that the safest method is being employed to treat an object, contact a conservator before any treatment.
Mould
Aim to prevent mould growth by ensuring there is effective air circulation in storage areas, that relative humidity is kept below 70 % and over-lubrication is avoided.
Insects
Insects, including carpet beetles, spider beetles and cockroaches, will attack leather. Damage also may occur as a result of other insect types burrowing through leather in search of suitable foods such as the animal glue used in leather bindings or the wooden supports of upholstered furniture.
Preventing insect attack is preferable to treatment. Steps to minimise the risk of insect attack have been outlined earlier (see the chapter Mould and Insect Attack in Collections).
Lubrication and Dressing of Leather
Lubrication is probably not necessary for most objects in a collection as this process is often accompanied by unwanted side-effects such as increasing acidity, discoloration, the formation of surface spews and damage to surface finishes. Dressings should therefore never be applied as a routine treatment. Take the following points into account before applying any lubricants to leather:
- for leather in storage, the main purpose of oils used in dressings is to prevent the leather from hardening if the relative humidity levels fluctuate widely. Environmental control of conditions is preferred to the application of dressings;
- the application of too much oil causes leather to repel moisture, a process that eventually produces a hard and brittle leather;
- too much applied oil stains the surroundings and attracts dust and insects;
- excess lubricant encourages mould formation;
- some dressings darken leather and lead to increased stickiness;
- dressings do not provide protection against acidic pollutants;
- if reshaping alone is required then often humidification alone will suffice (see below);
- dressings should not be used to ‘feed’ leather or to improve their appearance. If an improved appearance is desired and the object originally had a polished surface, apply a wax polish;
- never apply lubricants to objects containing untanned or semi-tanned materials or to either surface of painted or gilt leather; and
- lubrication of the leather covers of books is not recommended as the materials incorporated in the dressings make gluing repairs more difficult. There is also a tendency for these materials to migrate into the paper.
Note that as leathers age their ability to absorb fats and oils is reduced. The amount of fat and oil needed in archaeological and historic leathers (3 - 5 %) is less than in their modern counterparts (10 - 12 %). Pumping more lubricants into aged leather will only cause more problems.
To summarise, lubrication of leather is only necessary if:
- flexibility needs to be restored to an object;
- the storage or display environment fluctuates greatly, usually leading to an extremely dry or cracked object (due to shrinkage); and
- humidification alone is insufficient to induce enough flexibility for reshaping.
As most objects in collections rarely need to be flexible and hopefully will be stored in their desired shape and in relatively stable conditions, there should be little need for lubrication.
If flexibility must be restored to hardened leather, or the object is to be reshaped, re-humidify or ‘condition’ the leather before lubrication. Various procedures have been described that raise the humidity without wetting the leather (Calnan 1984, Kite and Thomson 2006). Two of these procedures are:
- covering flat leather with a layer of soft cotton fabric or spun-bonded polyester fabric like Reemay and then covering the cotton or polyester with either damp sawdust or damp blotting paper (overnight); or
- placing the leather in a humidity chamber.
Of these options, use of a humidity chamber is the preferred method (see ‘Humidification’ below for further details).
The lubricants, fats or oils, can then be added to leather using either a water-based emulsion or an organic solvent as the transport medium. Vegetable oils are not used as frequently as fats because in the long term they are more prone to oxidation, a process accompanied by yellowing and hardening of the oil and subsequent loss of lubricating properties. Always test lubricants on an inconspicuous area before large-scale use and apply them to the grain surface (to minimise the risk of tide marks forming on this surface).
Applying oils in emulsion (water-based) form increases the likelihood of oils remaining evenly distributed throughout the interior of the leather. An emulsion is the best vehicle for carrying the lubricant if tests show that:
- water does not discolour the surface; and
- the surface is permeable to water.
An emulsion formulation and method of application, as recommended in Fogle (1985), are described below:
| lanolin | 2 g |
| neats-foot oil | 10 g |
| non-ionic-detergent (Teric N9, Arkopal N090) | 6 g |
| distilled water | 100 ml |
The emulsion is prepared by:
- warming together (at about 60 °C) the lanolin and the neats-foot oil until they melt;
- cooling the mixture to 20 °C and then adding the detergent. Stir the mixture thoroughly and rapidly;
- slowly adding the distilled water (in small amounts) while stirring continuously; and
- observing the mixture for 10 minutes in a glass cylinder to see if it separates or remains as a stable homogeneous liquid.
This mixture contains no preservatives and is best used soon after being prepared. Refrigeration will extend its life for a few months. Paint the emulsion on the leather using a soft-bristled brush. If more than one coat is needed to achieve the desired flexibility, allow the leather to dry before applying the next coat.
Use an organic solvent-based dressing if the leather is:
- fragile;
- darkened by water; or
- impermeable to an emulsion due to the presence of a wax or other coating.
As for the emulsion, a formulation and method of application of a solvent-based dressing are described in Fogle (1985).
| lanolin | 2 g |
| neats-foot oil | 8 g |
| Shellsol T (aromatics-free White Spirit) | 100 ml |
Prepare the dressing by dissolving the lanolin and neats-foot oil in the Shellsol T. Apply the dressing by painting the solution on the leather using a soft-bristled brush. Allow the leather to dry between coats if more than one coat is needed to induce the desired amount of flexibility.
Some commercial neats-foot oil products contain significant quantities of impurities, triglycerides in particular. Solid triglycerides will settle out on the surface of leather after dressing to form fatty spews. To remove these from neats-foot oil, refrigerate it and discard the solid upper layer. If possible purchase ‘cold tested’ neats-foot oil which has already had the triglycerides removed.
If there is a surface finish that is impermeable to solvents it will resist penetration of oils and fats into the leather. In this situation it is better to rub an oil emulsion into the flesh side to encourage penetration. Care must be taken however to avoid tide marks on the grain surface.
A preparation such as British Museum Leather Dressing may be used to restore surface oil content if:
- dryness is only a surface condition; and
- the leather is very thin (for example, book covers, car seats).
This dressing, which should be applied sparingly, may be used with leather which incorporates metals. The beeswax in the composition leaves behind a thin film which will take a polish. A formulation is given below:
| lanolin | 200 g |
| cedar oil | 30 ml |
| beeswax | 15 g |
| X-4 solvent (or hexane) | 330 ml |
Prepare and apply the dressing as follows:
- mix the lanolin, cedar oil and beeswax together and melt by careful heating;
- rapidly pour the molten mixture into the cold X-4 solvent and allow it to cool with stirring;
- apply the dressing sparingly and rub it well into the leather with clean swabs; and
- polish the leather with a soft cloth two days after applying the wax.
Note that a careful assessment should be made before any treatment is applied to the leather of a book cover. In most cases it is preferable to store books under the best possible conditions (see the chapter, Paper and Books).
For more information on the lubrication and dressing of leather refer to publications by Calnan (1984), Fogle (1985), Tuck (1983) and Kite and Thomson (2006).
Humidification
Humidification can be used to condition and reshape leather.
A simple humidity chamber can be prepared using polyethylene sheeting and tape. Place the object to be humidified in the polyethylene ‘tent’ then increase the relative humidity using either an ultrasonic humidifier, a bowl filled with wet cotton wool or a jar containing water (50 %) and alcohol (50 %, methylated spirits or ethanol). Seal the tent with tape. The alcohol inhibits the formation of mould in the high relative humidity environment created inside the tent. Monitor the set-up to prevent condensation formation.
Usually conditioning is carried out overnight whereas the time for reshaping varies considerably between objects. The time taken for softening to occur depends primarily on the leather thickness and the presence or otherwise of surface coatings.
As the leather softens it is able to be reshaped slowly. Remove the object from the chamber periodically and progressively ease it into the required shape. Usually it is necessary to use padding during this process to maintain the gradually changing shape. Non-buffered, acid-free tissue or polyethylene foam are suitable padding materials.
Treatment of Attached Metal Fittings
Iron and copper alloys are commonly found as components of leather objects. Fats present in leather enhance the corrosion of these materials. A turquoise-blue, waxy material which forms on copper fittings is usually the most visible sign of corrosion.
Due to the intimate contact between the metals and the leather, immersion in chemical baths is usually not an option for the removal of disfiguring corrosion products. Careful application of physical methods is recommended. In some instances treatment chemicals may be applied using bentonite paste (see the chapter, Metals).
Copper corrosion products may be treated in the following way:
- use a soft wooden spatula to remove the bulk of corrosion products;
- use cotton buds soaked in leather cleaner (see earlier) to remove any residues; and
- coat the fittings with either microcrystalline wax or renaissance wax to minimise further corrosion. A corrosion inhibitor, benzotriazole (5 %), may be incorporated in the wax if additional protection is required.
Gentle, carefully applied abrasive methods are best to remove surface rust. Apply microcrystalline wax to the cleaned surfaces to protect against further corrosion.
Repair
The repair of tears and splits, infilling and consolidation of leather are highly specialised tasks. Advice from a conservator is strongly recommended.
Use a backing material to support any damaged areas. Materials that have been used include leather and woven and non-woven fabrics such as linen, Reemay and Cerex. Synthetic fabrics often are preferred for reinforcing fragile leather due to their dimensional stability, light weight and strength. Internally plasticised polyvinyl acetate (PVA), ethylene vinyl acetate (EVA) emulsions or acrylic emulsions are suitable for bonding backing material to the flesh side (where accessible) of the damaged object.
Solvent-based adhesives are safest to use on moisture-sensitive materials made from rawhide and buckskin.
As well as case studies, examples of materials and techniques used for repairs, infilling and consolidation are provided elsewhere (Calnan, 1991, Kite and Thomson 2006).
Summary
- If possible, identify the leather or types of leather used.
- Check for mould or insect attack and treat before adding leather objects to other collection items.
- Maintain the temperature at 25 °C or below and the relative humidity in the range 45 - 65 % with daily fluctuations limited to 4 °C and 5 % respectively.
- Control light levels to below 50 Lux and 1500 µW/m2 (30 µW/Lumen) for dyed leather and below 200 lux and 15,000 µW/m2 (75 µW/Lumen) for undyed leather.
- Do not fold or crease flat leather objects.
- Support shaped objects with inert foam material such as polyethylene, polypropylene or dacron.
- Store in acid-free boxes or use textile covers. These protect from dust and act as a buffer against changes in relative humidity.
- Consult a conservator if specific treatments are necessary.
Bibliography
Calnan, C., 1984, The conservation of social history and industrial leather, in Taken Into Care: The Conservation of Social and Industrial History Items, Proceedings of the Joint UKIC/AMSSEE meeting, United Kingdom Institute of Conservation, London.
Calnan, C., (Ed.), 1991, Conservation of Leather in Transport Collections, papers given at a UKIC conference, Restoration ‘91, United Kingdom Institute of Conservation, London.
Dignard, C. and Mason, J., last modified: 2016-12-09, Caring for leather, skin and fur, Government of Canada, http://canada.pch.gc.ca/eng/1468243997245
Fogle, S., (Ed.), 1985, Recent Advances in Leather Conservation, The Foundation of the American Institute for Conservation of Historic and Artistic Works, Washington D.C.
Kite, M. and Thomson, R., 2006, Conservation of Leather and Related Materials, Elsevier, Oxford.
Raphael, T.J., 1993, The care of leather and skin products: a curatorial guide, Leather Conservation News, vol. 9, pp. 1-15.
Reed, R., 1972, Ancient Skins, Parchments and Leathers, Seminar Press, London and New York.
Tuck, D.H., 1983, Oils and Lubricants Used on Leather, The Leather Conservation Centre, Northampton.
Waterer, J.W., 1972, A Guide to the Conservation and Restoration of Objects Made Wholly or in Part of Leather, G. Bell & Sons, London.
Textiles
N. King Smith and M. Myers
Introduction
Although the word textile literally means ‘woven’ and a ‘woven fabric’, it has come to encompass materials produced by a variety of techniques including knotting, knitting, lace making, braiding and felting. Methods used for preserving textiles are many and varied and depend on the nature of the textile material and its chemical and physical condition.
Although the longevity of textile materials is determined largely by how well they are looked after, the survival of ancient textiles is usually attributed to good fortune rather than to the application of particular treatments or to careful management. Often fortuitous storage conditions, as a result of materials being forgotten, lost or buried, are responsible for their survival.
A qualified conservator is the best source of advice concerning the preservation of textile collections. As a first step however, it is necessary to understand the materials themselves.
Fibre Types
Until modern times all textiles were made from fibres drawn from natural sources such as protein-based animal fibres (wool and silk) and cellulose-based vegetable fibres (hemp, jute, flax and cotton). These materials have been used in textile manufacture for thousands of years, following the development of spinning and weaving technology.
In the early 19th century attempts were made to produce fibres in the laboratory. Initial attempts that involved the dissolution and reforming of natural materials had only limited success. By the early 20th century, some semi-synthetic fibres, such as casein (protein-based) and rayon (cellulose-based), had been produced commercially. Rayon is a generic term which covers a variety of fibres including cuprammonium rayon and viscose rayon. Fabrics derived from rayon are likely to be found as part of a textile collection while casein-based textiles are less likely to be encountered.
It was not until the 20th century and the development of the petrochemical industry that materials other than those from natural sources were used to produce textiles on a large scale. Examples of fully synthetic fibres developed in the 1940s include polyesters (‘terylene’, ‘dacron’), polyamides (‘nylon’) and acrylics (‘acrilan’, ‘orlon’).
To modify the properties of the individual constituents, blended fabrics have been developed. Two or more fibres are blended before they are spun into yarns. In combination or union textiles, individual yarns of one fibre type are interwoven with yarns of another type, again leading to the production of fabrics with modified properties. Polycotton is a good example where the qualities of absorption and coolness of cotton are combined with polyester for strength and non-creasing properties. The addition of acrylic fibres to other fibre types leads to an increase in the softness and warmth of the resultant fabric.
Fibre Identification
The identification of textile fibres is important because different fibre types require different conservation treatments. Optical microscopic examination and/or Fourier Transform infrared (FTIR) spectroscopic analysis of representative fibres are the most conclusive methods of identification. There are numerous texts available which describe the characteristic features that allow fibre types to be optically differentiated (Catling and Grayson 1982, The Textile Institute 1970).
Take care when selecting fibres for identification as the features of degraded fibres may differ from those of corresponding undegraded fibres. Careful sampling and examination are essential for accurate identifications. In many cases the condition of a textile can also be determined during this examination and identification stage.
Woven Textiles
This section on weave structures, finishes and dyes is summarised from Landi (1985). To make a woven textile the fibres are prepared for the rigorous treatments involved in weaving. Fibres from a bulk supply are twisted to form a continuous thread. The resultant thread can be tightly or loosely spun to produce materials of differing densities, in either ‘S’ or ‘Z’ twists. The thread is plied together to make bulkier and stronger thread. ‘S’ spun threads are ‘Z’ plied and vice versa.
The weaving process involves the use of a loom on which threads are laid down parallel to each other and held under tension. These threads, called the warp, run the entire length of the cloth being produced. Another thread is then interlaced between the threads of the warp in set patterns, alternating between travelling right and left through the warp. This interlacing thread, the weft, effectively creates the cloth. There are many types of weave, from simple to highly complex. Three of the more common weaves are shown below (Figure 1).
Plain or tabby weave is the simplest weave with the structure consisting of a one over and a one under pattern for the warp and weft. This produces a uniform surface on the front and the back of the cloth.
Twill weave is slightly more complex, involving a one over and two (or more) under structure in which each successive pass moves along one warp, creating a diagonal pattern. Variations of this pattern include chevron, herringbone and diamond twills.
Satin weave, although similar in structure to that of twill, does not have the characteristic diagonal appearance that typifies twill. This weave is smooth on one surface and dull on the other.
Figure 1: (a) Plain or tabby weave.
(b) Twill weave – one over, three under.
(c) Satin weave.
Finishes
Woven textiles are often processed further before they are considered ready for use. Additional treatments may be aimed at improving appearance, texture, weight, flexibility or ease of care. The most commonly applied treatments include dyeing, bleaching, mercerising, weighting, moth proofing, sizing and glazing. The majority of textiles in a collection will have had some sort of finish applied to them.
As the original treatment of a textile is an inherent part of the item, it must be taken into account before any treatment is embarked upon. Otherwise, ill-considered conservation treatments may change the character of the cloth irreversibly.
Dyes
Until the 19th century dyes were derived primarily from natural sources. Two of the best known natural dyes are indigo (from the indigo plant), and Tyrian purple (from molluscs).
Although some dyes have a natural affinity to fibres, most require the assistance of a mordant. The mordant, which is usually a metal salt, is applied to the fabric before dyeing to increase the attraction between the fibre and the dye. Mordants are also used to give the dyer a greater selection of colours. Madder dye for example, gives a rust red colour when used with an alum mordant and a brown colour with an iron mordant. Mordant dyes are used on fibres or fabrics of wool, silk, nylon and cellulose.
Although natural dyes are not generally considered to be fast to light, actual colour fastness varies greatly, depending on both the fibre type and the method of application.
Deterioration
The principal agents of deterioration of textiles are:
- light;
- temperature and relative humidity;
- pollutants and chemical degradation;
- dust;
- inappropriate repairs and handling; and
- biological deterioration (insects and mould)
Substances incorporated in finishing and manufacturing processes may contribute to textile degradation. For instance, metal-based dyes and dye mordants can accelerate rotting of fibres, producing gaping holes in affected fabrics. In silks the weighting, which was introduced in the form of metal salts to increase the weight and make the silk crisper and more drapable, actively promotes the degradation of the fabric. There is little that can be done for these fabrics as deterioration will continue even under good storage conditions.
Light
All forms of light are damaging to textiles. Photochemical reactions initiated by light energy can lead to the deterioration of the principally organic textile components. The damage to a textile by visible and invisible radiation is cumulative and irreversible. Of particular importance is the ultraviolet (UV) radiation band which supplies enough energy to break the molecular bonds found in textile fibres. UV radiation is present in daylight and is also emitted by many types of artificial light. Control of visible light and UV radiation is described in an earlier chapter (see the chapter Preventive Conservation: Agents of Decay).
Closely monitor and limit the amount of light to which textiles are exposed, particularly those on display. Storing textiles in the dark is standard practice.
Isolate light sources from textiles because heat generated from light sources can accelerate deterioration. Most light sources generate heat and this can build up, especially if the light source is housed in the same closed cabinet as the textile.
Temperature and Relative Humidity
Do not expose textiles to high temperatures. Often the effects of heat damage are not immediately obvious but may be manifested by fibres becoming brittle or discolouring.
Relative humidity is a well understood agent of destruction. Fibres expand and contract in line with changes in relative humidity. Continual fluctuations of this type create stresses in fibres which may eventually lead to fragmentation of the textile. Under low relative humidity conditions fibres shrink, textiles become desiccated and lose flexibility. They are then more susceptible to damage when handled. If on the other hand the textile is exposed to high relative humidity conditions then the chemical stability of the textile will be threatened, the effects of light exposure enhanced and mould growth and insect attack encouraged.
Pollutants and Chemical Degradation
As in the case of heat damage, many of the effects of chemical reactions occurring in textiles are not immediately obvious. They often only become evident after physical damage to the fabric has already occurred. The effects of chemical degradation are irreversible.
Air pollutants such as sulphur dioxide, oxides of nitrogen and ozone all contribute to the chemical degradation of textile materials. These pollutants are more likely to cause problems in towns and industrial areas where emissions from car exhausts and factories are the greatest.
Although cellulose fibres, such as cottons and linens, can tolerate a limited degree of alkalinity, they are sensitive to acidic and strongly alkaline conditions. Both acids and strong alkalis attack the molecular structures in the fibres, causing them to become friable and the textile to weaken.
Protein fibres, such as wool and silk, can tolerate exposure to weak acidic conditions but are susceptible to attack by alkalis and strong acids. These latter substances attack the molecular structure, degrading the fibres and robbing them of tensile strength.
It is important to take these chemical reactions into account when designing treatments for textiles. For example, the type of cleaning processes applied to a fabric must be thought through carefully so that damage to the textile is avoided. For instance, do not use alkaline cleaning agents on protein-based textiles.
Dust
Dirt and dust inevitably end up embedded in textile fibres. Dust particles can cause physical damage through the abrasion of fibres, or promote degradation by acting as a nucleus for condensation, mould formation and accelerated chemical attack by adsorbed chemicals.
An indirect effect of dust and dirt build-up on textiles is the impact of resultant cleaning on these materials. All cleaning treatments are irreversible and no matter how carefully they are carried out, have the potential to weaken textiles.
Inappropriate Repairs and Handling
Much damage is done to heritage textiles by inappropriate repairs, wearing of costumes and handling textiles incorrectly. Well meaning custodians of textile collections have been known to smarten up, add to and/or replace parts of textile artefacts in their effort to care for their textiles. Minimal intervention is recommended.
The wearing of heritage costumes is considered inappropriate for many reasons. These reasons include stressing an already fragile material, the use of unsupportive under garments for the style of the costume, unnecessarily introducing pollutants, including perspiration, into the textile, possible staining from food and drink, hems trailing and possibly exposure to extreme light levels.
Inappropriate handling will transfer oils, dirt and acidity from hands to textiles and textiles can be damaged if not well supported while being moved or manipulated.
Biological Deterioration – Insects and Mould
Textiles made from naturally occurring materials are most susceptible to insect attack whereas synthetic materials are rarely damaged (Figure 2). Insects cause damage in two main ways. Insect larvae destroy fibres by eating them while soiling and disfiguration occur when insect faeces and frass accumulate on textile materials.
The presence of moths flying about is only indicative of a potential problem as it is the larvae that emerge from the eggs laid by the moths that cause problems for textile collections. Micro-organisms flourish when air circulation is low and the relative humidity is 70 % or more and are capable of rapidly breaking down and drastically weakening textiles. Mould or mildew can result in stains on the textile that are often very difficult, if not impossible, to remove.
Figure 2: (a) Sampler before treatment. Damaged by insects, neglect and poor storage.
(b) Sampler after treatment – supported on a linen backing and framed.
Of the naturally occurring textiles, protein-based materials (wool, silk and fur) are most vulnerable to insect attack (especially by carpet beetles and clothes moths) whereas cotton and other cellulose-based materials are more prone to microbiological attack. Under conditions that favour mildew growth however, wool will still be attacked. Similarly cotton and other cellulose-based fibres are still at risk from attack by insects such as silverfish. Damage may also be caused to textiles by wood-boring insects that penetrate textiles that are in contact with their preferred food source.
Preventive Conservation
All textiles have a natural tendency to decay. A prime conservation objective therefore is to minimise the impact of factors which contribute to degradation processes. A further aim of textile conservators is to preserve the integrity of an artefact so that it reflects not only its basic nature but also its history of usage. In realising this aim it may be necessary to avoid treating certain artefacts, especially if the treatment is likely to result in the loss of historical information. There will be other times however when historically significant material may have to be removed if it is considered likely to contribute to the degradation of the textile if it is retained. Each case must be judged on its merits.
As some historic textiles cannot be cleaned or softened, they will remain inflexible and therefore susceptible to fibre damage upon handling. Textile conservation is heavily based on non-interventive techniques such as using correct methods to support and handle these materials and maintaining the best possible conditions in storage and display areas. In this way, degradation processes will be slowed and significant historical and technical information will be retained.
Preventive conservation strategies are aimed at ameliorating the impacts of the main agents of textile deterioration. Some of these strategies include:
- storage and display in appropriate environmental conditions;
- control of conditions to minimise mould formation and insect activity;
- the use of appropriate storage materials, methods and handling; and
- dust control and good housekeeping practices.
Environment
Optimal temperatures and relative humidity levels for storage and display areas are 15 – 25 °C and 45 – 55 % respectively with maximum variations of 4 °C and 5 % respectively in any 24 hour period. Relative humidity levels of 70 % or greater increase the risk of mould growth, insect attack and chemical degradation of textile fibres by pollutants. On the other hand, relative humidity values of 40 % or less increase the risk of desiccation and subsequent embrittlement of fibres.
Keep conditions as stable as possible. Place artefacts in boxes, cupboards, drawers, showcases and even frames to stabilise the conditions by buffering the impact of external temperature and relative humidity changes. Keeping textiles within a display case or storage box also reduces the effects of pollution. In extreme cases seals and filters might need to be installed in the building or in the secondary containers and cabinets.
Maintain light levels where textiles are displayed at a maximum of 50 lux with UV levels as low as possible, but preferably below 30 µwatts/lumen (a total UV exposure of 1500 μW/m2). Store textiles in the dark but also ensure that light levels in storage areas are sufficient so that textiles can be examined without strain when necessary.
Insects
Regularly check display and storage areas for signs of insect activity such as the presence of insects themselves, insect cases, eggs, larvae or frass. Use and regularly monitor sticky insect traps to gauge the level of insect activity. While it is the insect larvae that do the damage, the presence of adult insects is indicative of a potential problem. Since dead insects are a food source for other insects, good housekeeping is imperative. Insects found most commonly in textile collections (carpet beetles, moths and silverfish) are best controlled by thorough and regular cleaning.
Do not eat or drink in any areas where artefacts are housed as food fragments attract potential pests.
Isolate and inspect new items for signs of infestation before bringing them into storage or display areas. This can be done by enclosing the item in a polyethylene bag for two to three weeks. Inspect the bag regularly during this period for signs of larvae, insects or frass and also to ensure that there is no relative humidity build up in the sealed bag. If no evidence of insect activity is found then the object can be registered into the collection and moved into the collection storage or display areas.
If pests are found, providing the textile is not painted, the insects in textiles can be eradicated by freezing. Although details of freezing techniques are given in an earlier chapter (see the chapter Mould and Insect Attack in Collections), it is necessary to stress the importance of wrapping the textile in tissue paper before sealing it in a plastic bag prior to freezing. The sealed plastic bag prevents desiccation of the textile during freezing and the tissue protects the textile from any condensation that might result during the thawing process.
Do not apply pesticides or other chemicals to textiles as these may be damaging to the textile and the handler.
Mould
Damage caused by mould is largely irreparable. If mould is found on a textile, isolate it immediately, place it in a lower relative humidity environment and seek the advice of a conservator. Mould can be controlled by ensuring that the relative humidity of storage and display areas is kept below 70 % with good ventilation.
Appropriate Storage Materials: Methods and Handling
Use archival quality materials in storage and display systems, particularly for those materials in direct contact with textiles. Acid-free materials (pH 7) are recommended. Some acid-free materials are buffered with an alkaline buffering agent. While these buffered materials are safe for use with plant-based textiles (cotton, linen etc) they should not be used with protein-based textiles such as wool and silk.
Where possible, individually box textile items (see later sections on storage and display). As storage in a box or framing a textile create microclimates, the best archival quality preservation materials should be used in their construction. Polypropylene or acid-free boxes are highly recommended. If brown cardboard boxes are the only storage system available, for cellulose-based textiles (cotton, linen), line the box with buffered acid-free tissue or Tyvek® and wrap the textile in buffered acid-free tissue. For protein-based textiles such as wool and silk that prefer a slightly acidic environment, line brown cardboard boxes with non-buffered acid free tissue or Tyvek®. To do this, fold the tissue paper or cut the Tyvek® to fit the dimensions of the box. Fold the tissue or Tyvek® over the artefact before putting the lid in place. Controlling the relative humidity in the store to around 50 % will reduce the extent of acid migration from the cardboard to the contents.
A well labelled storage system with easily accessible shelving is recommended. Powder coated metal shelving is preferred to wood or chipboard (Figure 3). If the latter are all that are available they must be well sealed with a water-based polyurethane lacquer or other appropriate sealant (see the section on Pollutants in Preventive Conservation: Agents of Decay).
Figure 3: Textile storage boxes on powder coated shelving.
Do not store textiles in plastic as many plastics generate electrostatic charges which attract dust. This can be easily transferred to a textile during unpacking. In addition, a drop in temperature inside the bag will increase the relative humidity and may contribute to enhanced chemical and/or biological degradation.
Examine the original storage and/or packaging of the textile as it may provide useful additional information about the ownership, manufacture or other details of an object’s history. Depending on the significance of this material, either store it separately from the textile or discard it.
Handle textiles with cotton or vinyl gloves to avoid the transfer of grease and acids from hands to the textile. Where gloves are impractical, such as when treating a textile, hands must be well washed. Do not wear jewellery whilst treating textiles as the fibres can get snagged and damaged. Support textiles when moving them, either in a box, on a roll or by spreading the weight evenly over the carrier.
Dust Control and Housekeeping
As dust can cause abrasion and discolouration and attracts moisture and insects, choose a room for textile storage or display that allows for good control of dust levels and which can be kept as dust-free as possible.
Regularly clean all shelves, floors, vents and windowsills. Use a vacuum cleaner with a HEPA filter for cleaning. Do not have carpets in these areas as they attract dust and insects.
Storage Systems
Store and display textiles under the environmental conditions described above.
Flat Storage
Store textiles as flat as possible with minimal folding. This provides maximum relaxation for fibres while avoiding weight-bearing stresses. If folding is unavoidable, support folds with a sausage of crumpled acid-free tissue. This minimises damage along the folds, the points at which there is most stress on the fibres. While it is generally preferable not to layer items to minimise creases and folds, small light weight two dimensional textiles can be interleaved with acid-free tissue with several placed on top of each other (Figure 4).
Figure 4: Box packed with flat textiles (two dimensional storage).
Large metal map cabinets and low profile acid-free cardboard or polypropylene boxes provide excellent storage media for flat textiles with minimum folding. In addition to allowing for easy transportation, these boxes provide light and dust protection.
Support three dimensional artefacts with crushed acid-free tissue and lightly fill the surrounding area within the box with rounded balls of tissue. This prevents the textile slumping in the box when it is moved (Figure 5).
Figure 5: Christening gown and accessories supported with crushed acid-free tissue and blocked in with balls of tissue (three dimensional storage).
Rolled Storage
To save space, some strong (and generally larger) flat textiles may be rolled onto acid-free cardboard tubes. Note the following points if considering rolled storage:
- rolled storage is generally not appropriate for painted textiles or for those that have been treated with adhesives;
- use tubes appropriate to the size of the artefact, but the larger the diameter the better;
- the tube should be at least 60 mm wider than the textile to be rolled and up to 200 mm wider for larger artefacts;
- if large tubes are not available, the effective diameter of smaller tubes can be increased by wrapping bubble wrap around the outside;
- if there is no option but to use non acid-free cardboard tubing, isolate the textile from the tube with polyester (Mylar) or polyethylene sheeting and acid-free paper; and
- if the use of PVC tubing cannot be avoided for the long-term storage of textiles, seal the PVC with water-based polyurethane lacquer and use a barrier of polyester (Mylar) between the textile and the tube.
Roll textiles to minimise stresses on the textile and to protect it against adverse environmental conditions. To do this:
- place the textile face down and roll it along either the warp or the weft;
- while rolling, keep the textile firm, though not stretched, and interleaf it with acid-free tissue as it is being rolled;
- when rolling textiles that are either lined or have a second layer, take care to ensure that the inner layer does not become bunched or excessively creased;
- cover the rolled textile with a pre-washed white cotton/polycotton fabric or Tyvek® and tie it with cotton tape (but not too tightly);
- store rolled textiles by suspending them in a frame using a rod passed through the centre of the roll;
- do not allow rolled textiles to touch each other;
- cover the rack of rolled textiles with a pre-washed, lightweight, tightly woven fabric to give the rolled textiles protection from light and dust; and
- identify each textile by tying labels onto each tube, making sure that the labels are all at the same end.
Rolled Storage for Flags
The following system has been developed for the storage of suites of robust flags. It is not suitable for fragile flags. The system has the added advantage that a flag can be examined and re-rolled without the storage components going astray.
- cut a standard 68 mm diameter,acid-free tube, 60 mm longer than the maximum flag height;
- stick a square of double sided tape on each end to secure the roll in the Tyvek® channel;
- prepare a Tyvek® 1443R sheet the size of the flag plus the 60 mm height allowance and with allowance in the length to make a tube casing at one end and tie off at the other end (usually about 600 mm more than the width of the flag);
- machine sew the casing allowance at one end of the Tyvek® and an appropriate number of cotton tape ties at the other end. All rolls require at least two ties, but otherwise the ties should be evenly spaced about 400 mm apart;
- label the outside of the tie off end of the Tyvek® with the registration number and flag information;
- place the tube into the casing and remove the cover of the double sided tape to hold the Tyvek® in place;
- roll the flag with the fly first and hoist last, carefully flattening the flag as it is rolled;
- fold the hoist rope in at the end;
- place any metal fittings in small zip lock polyethylene bags;
- tie off (not too tight) with the cotton ties to hold the roll; and
- store rolls in a single layer. Do not stack rolls on top of each other.
Hanging Storage for Costumes
Only costumes in excellent condition should be considered for hanging storage. Use boxes to store weakened costumes or those that are heavily decorated. Pad costumes with acid-free tissue to minimise folds and creasing.
If costumes are to be hung, follow these general principles:
- pad and cover the hanger to fit the costume;
- spread the weight of the costume onto the hanger;
- make a protective cover to fit over the costume; and
- hang the costume in a tall cupboard that allows for full suspension without bunching.
The hanger must be smaller than the costume and padded in the form of shoulders to fit the costume. Polyester wadding (e.g. Dacron) may be used to firmly fill the shape. By padding the hanger the weight of the costume is spread over a larger area, thereby reducing the load-bearing stress on the shoulders. Cover the padded hanger with pre-washed cotton fabric (Figure 6).
Figure 6: Fabric covered padded hanger.
For tailored jackets, shape Ethafoam® 220 to be slightly smaller than the shoulders of the jacket and hot glue it onto both sides of a wooden coat hanger. Cover this with polyester wadding (Dacron) and pre-washed white cotton/polycotton fabric or Tyvek®. It is important that the final padded coat hanger is the correct size and shape to support the jacket shoulders. If it is not adequately supported, the weight of the costume will cause damage in the long term. When hanging costumes, spread the weight of the costume onto the hanger, but don’t have the weight only on the shoulders. For dresses sew cotton tapes to the structurally strong parts inside at the waist. Tie these tapes to the hanger to take the weight of the skirt off the bodice (Figure 7). Alternatively, and especially if the waist is weakened, sew a reinforcing cotton ‘hoop’ to the inside of the waist. Attach this to the padded hanger with cotton straps, thereby ensuring a more even weight distribution while concurrently strengthening the waist.
Figure 7: Hanging storage – padded hanger with cotton straps.
Each costume should have its own removable and washable cover. Make covers from light, tightly woven fabrics such as polyester lining or Tyvek®. Avoid fabrics such as cotton that have a tendency to cling or that have a strong frictional hold. Sew the cover so there is enough space inside for the costume to fit without restricting it. It must loosely cover the entire costume and have a closure at the bottom. Ensure the cover can be put on the costume from the side rather than over the top.
The cupboard in which costumes are hung must allow them to be fully suspended. As many dresses have trains, it will be necessary to have very tall storage cupboards. The train should not be crumpled at the bottom of the cupboard. Minimise crushing by not overfilling cupboards used for hanging textiles.
Systems for Display
Textiles are most at risk while on display. Factors influencing the display of textiles include location, environmental conditions, available space, public access and even the commercial and historic value of the materials themselves. Take all of these factors into account before deciding to display textile materials.
There are many ways to display textiles. Some examples of display techniques include:
- display on a flat surface;
- hanging;
- framing; and
- mounting on a mannequin.
Flat Surface or Passive Display
As long as the environmental conditions and the nature of the materials that contact the textile have been taken into account, two dimensional textiles may be displayed on a flat surface. It is important that any materials that come into direct contact with textiles are of archival quality. Textile support materials should be pre-washed and coloured materials tested for fastness. Display objects either completely flat or on a slight incline for easier viewing.
Hanging
Physically strong textiles can be hung. Objects like tapestries, rugs and carpets can be suspended using a Velcro strip system (Figure 8). Sew the soft side of the Velcro to a strip of fabric which is then hand sewn across the top of the textile to be displayed. Ensure the stitch tension is strong enough to evenly support the weight of the textile. If the tension is insufficient the textile will pull and bag, damaging its structure. If the tension is too great the textile will look ‘quilted’ and will be in danger of tearing.
Use a staple gun to attach the hook side of the Velcro to a wooden batten which has been sealed with water-based polyurethane. Securely attach the wooden batten to the display wall and hang the textile by bringing the two Velcro sides together. Several pairs of hands will be needed to achieve the best result. When removing the textile from display, do not pull on the textile itself. Instead gently pry the Velcro strips apart. This will prevent damage to the textile.
Figure 8: Hanging for strong flat textiles.
Mounting and Framing
Small flat textiles are less of a display problem. They easily fit into showcases or can be framed and placed on a wall. If it is necessary to fold flat textiles, minimise creases by using rolled, clear archival materials to support the fold (Figure 9).
Figure 9: Folded lace with rolled polyethylene tube (upper right corner) to reduce creasing of the fabric.
Lightweight textiles (such as samplers and lace fragments) which are in good condition, clean and chemically stable are suitable for framing. Use archival materials for framing. The first step in framing is to attach the textile to a mount (Figure 10). Mounting involves covering a piece of board with cloth to which the textile can be sewn.
To prepare a mount:
- decide on the size of background required to mount the textile, leaving an appropriate border width and allowing a slightly wider border at the bottom of the textile;
- use archival materials like Foamcor®, Cadflute® or acid-free board such as multipurpose board for mounts;
- cut the board to the size of the textile plus the desired border;
- mark an approximately 2.5 cm wide border on the reverse side of the cut board;
- paint this border with Mowolith DM-4® or a PVA adhesive such as a hobby glue and allow it to dry;
- select a natural fibre fabric on which to attach the textile. Fine linen or cotton of a colour and texture that will enhance the textile are suitable;
- wash and press this fabric to shrink and remove any dressing. Cut the fabric to the size of the board plus 3 cms extra on each side;
- it is optional to place a piece of polyester wadding, the size of the mount board, between the board and the fabric. For heavily embroidered or beaded pieces the soft wadding helps to cushion the textile and can also give a finished look to the border. While the thickness of the polyester wadding is dependent on the size of the textile, quilters wadding is generally acceptable;
- place the fabric on a table, then the polyester wadding (if used) on top in the centre of the fabric and then the front of the mounting board on top, taking care to centre it and align the weave of the fabric with the edge of the mounting board. The rear, adhesive border side of the board should now be uppermost;
- using an iron at a wool setting, fold one side of the fabric to the back and heat seal to the adhesive with the iron. Make sure to keep the warp and weft parallel to the board;
- carefully stretch the opposite side into place, fold over and heat seal;
- cut out the corners so that when the sides are folded over, the corners are neat and not bulky;
- heat seal the third side, then carefully stretch the last side, fold over and heat seal;
- neatly fold the corners. Some extra adhesive will be needed;
Figure 10: Steps for adhering backing fabric to mount board.
Attach the textile by stitching it to the backing fabric on the mount, as outlined below:
- position the textile onto the front of the covered mount and centre it carefully. Stretch it a little, but do not over-stretch and pin it into position using fine pins;
- carefully sew the textile into place using matching colour polyester/cotton or silk thread, a fine needle (no 10 or 12) and regular running or hemming stitches depending on the type of edge to the textile;
- in the case of large or heavy textiles, stay stitches across the piece are required to give it extra support (Figure 11). To minimize their impact on the textile’s appearance, these stitches should be both horizontal and vertical and follow any structures or patterns in the textile. To guide the stay stitches, mark a grid on the front with cotton thread. Use matching colour polyester/cotton or silk thread, a fine needle (no 10 or 12) and running stitch with a longer stitch underneath; and
- when Cadflute® is used, or when a mounted textile is not being framed, finish the back with a piece of fabric (same as the front) cut slightly larger than the mounting board. Turn the edges under, pin in place on the back and hand sew around.
Frame the mounted textile behind either glass or UV-absorbing perspex. Request that the framer uses conservation standard archival products and ensure there is no direct contact (10 mm minimum space) between the textile and the glass or perspex front. To reduce damage due to light exposure, do not leave mounted textiles on permanent display.
Figure 11: Colours – Kings Park Memorial, mounted onto backing support.
Three Dimensional Support - Mannequin Construction
Questions of both exposure and support must be addressed when displaying three-dimensional textiles. Use high quality, archival materials designed to suit the textile in question. If additional bulk is required to support the shape of a costume, add padded silk ‘cushions’ to the mannequin rather than loose stuffing as the latter puts added weight onto the artefact. Never use uncovered wadding as support. Over time an inadequately supported textile will be damaged as it slumps onto a mis-shaped support.
As people come in all shapes and sizes, so too do their costumes. When choosing mannequins consider the varying shapes promoted by different styles of clothing and the development of particular corseting to accentuate shapes in costumes of certain eras. Shop mannequins are rarely suitable. Although there are several museum mannequin manufacturers who provide basic figures which can be adjusted, these are quite expensive. As an alternative, mannequins can be made using Ethafoam® 220 (Larouche 1995, modified by Clayton).
The museum-standard Ethafoam® mannequins mentioned above have replaced earlier types constructed out of wood and chicken wire and covered with Dacron and fabric (Figure 13). Descriptions of these latter mannequins are included below however as they are cost effective alternatives when funds are limited. All of the above provisos regarding accurate sizing must be followed. The features, design and contruction of a ‘chicken wire’ mannequin are as described below:
- use a simple, single-legged stand with a body which slides on the central pole. This allows the height of the displayed costume to be adjusted;
- use two ovals of plywood (the shoulders and hips) to make a basic tubular body shape, smaller than the average person, and attach galvanised or painted wire net to them;
- mount the torso onto the pole via the central holes in each piece of plywood and use the pegs to alter the height of the torso on the central pole;
- wrap polyester wadding (Dacron) around the wire and in areas where more shape is needed, such as the bust and/or hips, to build them up to fit the costume;
- compress the wire net if the costume has a very small waist;
- as arms are not usually made for the mannequin, place a small amount of crumpled tissue inside the sleeves to give them shape;
- cover the mannequin with a pre-washed, neutral-coloured, cotton-knit fabric. This material allows finer adjustment to be made by further filling with polyester wadding; and
- stitch the mannequin in some areas to refine the shape needed for each costume.
These mannequins can be reused for other costumes by carefully remeasuring and adjusting for the new costume.
Figure 12: Costume mannequin before padding.
Treatments
Cleaning
Before cleaning a textile consider the following:
- Why does the textile need to be cleaned?
- Will the textile benefit from cleaning?
- Will cleaning remove any important elements of its history?
- Is the textile strong enough to withstand the treatment?
Seek the advice of a conservator as cleaning, especially wet cleaning, may weaken some textiles. Chemical cleaning should be undertaken only by someone experienced in the cleaning of historic textiles and only an experienced conservator should attempt to clean painted textiles (such as flags and banners) and weighted silks.
Most textiles in collections have been used and washed through their useful life and come into collections in a physically worn state. For many clothing items such as cottons and linen Manchester, past treatments often included starching. Starch penetrates textiles and stiffens them when ironed. As starch is detrimental to textile fibres its removal will help in the long-term preservation of textiles. It can be gradually washed out on the occasions when wet cleaning is required. Do not re-starch an old textile.
Vacuum Cleaning
Remove loose dirt and dust from a textile before considering any other treatment. As with all treatments, carry out vacuum cleaning only when necessary, such as when preparing objects for display or storage. Very brittle or insect-damaged textiles are likely to be too fragile for vacuum cleaning. Have very fragile textiles assessed by a conservator before attempting any cleaning. Do not use beater-type vacuum cleaners and vacuum brush attachments on textiles.
Use a vacuum cleaner with adjustable suction and a soft brush. Mini attachments for vacuum cleaners are useful tools for detailed and careful cleaning. Either a variable speed motor or perforations in the hose system will allow the suction to be controlled. These controls should be at the user’s hand so that adjustments can be made immediately the need arises. A low suction car vacuum cleaner is suitable.
When using a vacuum cleaner on textile material:
- fit the end of the vacuum cleaner with a protective screen between the hose and the textile. A piece of muslin, nylon stocking or fine gauze, held in place by string or an elastic band are suitable for this purpose;
- hold the nozzle slightly above the surface of the textile while cleaning; and
- adjust the amount of suction applied to match the fragility of the textile.
As an alternative to placing a screen over the nozzle of the vacuum cleaner, place monofilament screening, such as an embroidery frame fitted with tulle, over the textile and move the vacuum cleaner over the screen. In this way, dust is drawn through the screen but neither the fabric nor its fibres are drawn into the vacuum cleaner. Bind the edges of the screen to prevent snagging on the textile.
Wet Cleaning
Do not wash textiles in water as a matter of course nor as part of an annual maintenance or cleaning program as this process can result in fabric loss, the loss of historic information and can permanently alter the look and feel of the textile. Avoid water cleaning textiles unless absolutely necessary for the survival of the textile in question. Do not wash heritage textiles in a washing machine.
In addition to considering the general points mentioned in the preamble to dry cleaning (see above), determine the colourfastness of dyes and the effects of washing on different fibre types, different weaves and on non-textile components before wet cleaning historic textiles.
Even the ‘safest’ of fabrics, such as white cottons and linens, are susceptible to damage during washing. It is not always possible to ascertain areas of weakness in an old textile and the resultant fabric loss can be significant. For example, dark coloured stains of an unknown origin may fall out during washing, leaving gaping holes in the textile. In addition certain finishing agents, incorporated in textiles to give them a particular look, may be washed out in water, irreversibly altering the appearance and characteristics of the textile.
Assessing coloured textiles is difficult as there are no foolproof tests to determine the colourfastness of the component colours. In the method described below, caution is advised as dyes may run unexpectedly, either in the wash or as the textile dries. If a soap is incorporated into the wash solution the resultant pH change (acidity level) may be enough for dyes that were previously set to become soluble and be lost.
Many textiles are made up of combinations of different fibre types, with cotton-silk and cotton-wool being common examples. Before washing consider the ‘wet properties’ of different fibre types and the reactions of individual fibre types to different pH conditions which result from using soap solutions.
Fabrics of the same fibre type but of different weave tension are also found in textile collections. Linings, for example, often have a different weave to the outer fabric. Washing in water may produce different shrinkage rates for the combinations, resulting in tensions in the textile between the differently woven fabrics. A further problem may arise if dust and dirt are trapped between the lining and the textile. Permanent staining of the outer textile has occurred when such textiles have been washed (Finch and Putnam 1985).
Bearing the above in mind, undertake washing only if the textile is likely to deteriorate due to the presence of dirt or stains (Figure 13). To ensure that this type of treatment will benefit the textile, seek the advice of a conservator before washing. Regard washing as a one-off process which is followed up by correct storage or display to avoid the need for further washing in the future.
Figure 13: (a) Dress before treatment – stained, torn and discoloured.
(b) Dress after treatment – washed and repaired.
Pre-washing Checks
Surface clean textiles using a vacuum cleaner and screen (as described above) before wet cleaning. Strong white textiles, such as linens and cottons, can usually be washed by the method described below. Precautions must be taken however before washing coloured fabrics. In particular, test each colour for fastness before any form of wet cleaning. To do this:
- use an unobtrusive part of the textile for this test;
- place a square of blotting paper or folded absorbent paper tissue under the colour test point;
- dip a cotton bud into the soap solution to be used for cleaning. The cotton bud should be only slightly damp;
- hold the moistened cotton bud on the test colour for a short time under light pressure;
- check the cotton bud and the paper below for transfer of colour; and
- repeat the test on all colours present.
Do not wash the textile if any colour transfers to the cotton bud or paper below. Consult a conservator in this instance.
Other checks are also necessary, as some attachments are not stable in water. Buttons and sequins made of gelatine and casein, for example, swell and disintegrate in water. Some fabrics, such as pressed velour, glazed chintz and crepes are not suited to water cleaning and treatments should be carried out only by a qualified conservator.
Equipment for Wet Washing
To wet wash textiles, the following equipment is needed:
- a large flat tray;
- nylon fly screen or nylon curtain material, larger than the textile, to support the textile when lifting it;
- enough good quality water to cover the textile by about 20mm;
- a pure soap;
- clean, white towels to remove excess water from the textile; and
- fans and/or a cold air blowing hair drier.
The washing tray, such as a photographer's tray or bath, should be large enough to allow the textile to lay flat while immersed. Improvisation may be needed, especially if large textiles are to be washed.
Never lift unsupported wet textiles, as they are extremely fragile and the weight of the water could cause irreparable damage. Ensure that the support is lifted not the textile. Two or three people may be required to lift the support evenly when handling larger textiles.
Although distilled or deionised water is recommended for all stages of cleaning, softened tap water can be used for washing and for the first two rinses as long as distilled or deionised water is used for the final rinse. Bore water is not suitable and rainwater may contain impurities and particulate matter that could damage the fabric.
Soap Solutions
Commercial varieties of pure soaps are available. Use about five grams (about one rounded dessertspoon) of soap per 8 litres of water. In most situations where washing is deemed essential, conservators use a non-ionic, pH-neutral soap solution. Before washing, establish which type of soap solution is best for the textile in question. Do not use commercial detergents because they often contain harsh additives which are damaging to fragile textiles.
Washing
Wash, rinse and dry textiles in a clean, dust-free room, according to the following procedures:
- dissolve the soap in a small quantity of warm water. Add this to the cold or tepid water in the tray and mix thoroughly;
- place the textile on its support and gently lower it into the solution, ensuring that the textile is wet evenly;
- gently press the textile all over with the palms of the hands or with the aid of a small sponge. This creates a mild suction which helps to remove dirt;
- never rub the textile or dip it in and out of the solution;
- if the textile is relatively strong, leave it to soak for five to ten minutes, then press again; and
- note that colours can run with prolonged immersion, even after passing the colourfastness test.
Rinsing
Rinsing is necessary to remove the soap solution, prevent dirt from resettling into the textile and to remove potentially damaging materials. To rinse the textile, follow these steps:
- using the support, remove the textile from the wash solution and place it in clean water;
- repeat the pressing action with the palms of the hands or with a sponge;
- change the water again and repeat the process as often as required (usually three times) until all traces of soap and dirt have been removed; and
- use distilled or deionised water for the last rinse.
Drying
Dry textiles as gently as possible. Never use sunlight or artificial heat. When drying textiles, observe the following guidelines:
- dry textiles right side up;
- using the support, remove the textile from the last rinse water and allow it to drain for a short time before placing it on clean, dry white towels;
- cover the textile with more towels and gently press to absorb excess moisture. Gentle pressing should minimise any flattening of the weave;
- repeat the process with fresh dry towels;
- the textile can be dried on dry towels or placed onto a membrane such as a framed flyscreen which will allow a good air flow during the drying process;
- fans can be used to increase the air flow; or
- use a hairdryer on a cool and a low speed setting to accelerate the drying process. Avoid spot drying. While using a hairdryer, smooth folds or creases with the other hand. With three dimensional textiles, such as dresses, separate layers of fabric and lift the sleeves so that air can pass through.
Ironing
Drying in the above manner usually removes any need for ironing, a very harsh treatment that should only be carried out if absolutely necessary. If ironing is deemed necessary, observe the following guidelines:
- iron the textile while it is still slightly damp (not wet);
- insert a cloth between the fabric and the iron;
- support the fabric fully, as while damp, it may not be able to support its own weight;
- set the iron at its coolest possible setting. Never use steam;
- never iron folds and creases into a textile as the fibres will eventually break along these lines; and
- make small covered pads to make ironing sleeves or small spaces easier.
Starching
Do not starch historic textiles as it attracts insects and stiffens the fibres, which may lead to their eventual breakage.
Stain Removal
Do not further treat stains that remain after washing. Do not try spot cleaning or bleaching as these usually weaken the textile and may form a halo-like effect around the stain
Repairs
Minimal intervention is recommended but in some instances support stitching will prevent further deterioration of a textile. Minimal stitching should be used to stabilise a textile and it is recommended that a conservator be consulted for advice.
If stitching is undertaken, note the following:
- match the repair thread with the textile, both in colour and denier. A fine silk will require a fine silk thread whereas a woollen tapestry will require a coarser woollen thread;
- use a needle that is as fine as possible and take care to stitch between the threads as opposed to stitching through them. The type of stitch will depend on the type of stabilisation required;
- balance the stitch tension so that it is not too tight so as to damage the fibres nor too loose that it is ineffective;
- use running stitches to join two layers of fabric together, with equal lengths above and below or perhaps with minimal stitches on the surface; and
- periodically secure the running stitch with a back stitch. Use a herringbone stitch to stabilise frayed edges and couching to secure loose threads.
Summary
- Inspect textiles for mould or insect attack and treat before adding them to a collection.
- Identify the materials from which textiles are manufactured.
- Maintain temperature and relative humidity at 15 – 25 °C and 45 – 55 % respectively with maximum variations of 4 °C and 5 % respectively in any 24 hour period.
- Keep light and UV levels to 50 lux and 1500 µW/m2 (30 µwatts/lumen) respectively.
- Wear cotton or vinyl gloves when handling textiles. Remove jewellery.
- Support textiles when moving them.
- Where possible, store textiles flat, within boxes with acid-free tissue supporting any folds.
- Support 3D objects with crushed acid free tissue or custom made cushions.
- Include sufficient padding to distribute the weight in hanging storage and use dust covers.
- Do not wash or starch as a routine procedure. Consult a conservator before carrying out any treatments.
Bibliography
Catling, C. and Grayson, J., 1982, Identification of Vegetable Fibres, Chapman and Hall, London and New York.
Finch, K. and Putnam, G., 1985, The Care and Preservation of Textiles, B.T. Batsford, London.
Landi, S., 1985, The Textile Conservator’s Manual, Butterworths, London.
Larouche, D. 1995, Intersecting silhouette mannequins, Textile Conservation Newsletter, Ottawa, Spring Supplement, 1995. Modified by Clayton, S., Australian War Memorial, (https://www.awm.gov.au/).
reCollections, Caring for Collections Across Australia; Heritage Collections Council, 1998, Caring for Cultural Material 2, Canberra, Australia, pp 1 - 27.
The Textile Institute, 1970, Identification of Textile Materials, 6th Edition, Manchester.
Ivory, Bone and Related Materials
I. M. Godfrey
Introduction
The use of bone and ivory dates back to prehistoric times. Early people, hunting animals for food and clothing, would use as much of the beast as possible with the teeth (ivory) and bones used for arrowheads, handles and other implements. Over time this usage extended to weaponry, musical instruments, religious pieces, personal artefacts, decorative items, artistic pieces and items for games (Figure 1).
Figure 1: Examples of scrimshaw on sperm whale teeth.
When people speak of ivory, it is generally assumed that the material is from the large incisor teeth or tusks of either the African or Indian elephant. The teeth of numerous other animals including the hippopotamus, sperm whale, narwhal, walrus, wart hog and wild boar have also been used for some of the purposes mentioned above. Fossil ivories of the mastodon and the mammoth have been carved. An expert is able to distinguish between ivory types by examining differences in grain, colour, texture and hardness. Due to physical and chemical changes that occur in burial environments however, the identification of archaeological ivory can be very difficult, if not impossible, depending on the ivory type and the size and shape of the object.
As the structure of bone is more open than that of ivory, it is more easily stained and coloured. Bone can be difficult to differentiate from ivory when worked and polished with oils and waxes. Horn, baleen and tortoise shell are all skin-based materials that have been used for similar purposes to bone and ivory (Figure 2). The Tagua nut, derived from certain palm trees native to South America, Micronesia and Africa, also resembles ivory, stains easily and can be carved in the same way as authentic ivory. It is white with a marbled appearance and has been used for buttons, jewellery and artistic carvings.
Figure 2: Close-up of box made from tortoise shell overlaid onto bone.
In 1862 at the Great International Exhibitions in London, Alexander Parkes exhibited a material called ‘Parkesine’, a modified cellulose nitrate plastic. This material was substituted for ivory in billiard balls and laid the foundations for the plastics industry. Known as French ivory and, along with other materials such as mixtures of ivory and bone dust mixed with chalk, gelatin, gutta-percha and plaster of Paris, cellulose nitrate formed the basis of an extensive industry in synthetic substitutes for natural materials.
Today pigmented polyester resins are used to imitate these earlier works of art. Normally a silicone mould is made of the original and then pigmented resin is poured in. Once set, the surface can be treated with paint or dye to highlight any surface details. The opaque nature and uniform colour of these copies are usually sufficient to identify them.
Nature and Composition
Bone-like materials (ivory, bone and antler) are made up of both organic and inorganic components. The major organic component is the fibrous protein collagen. This makes up about 25 - 30 % of these natural substances with most of the balance being made up of inorganic calcium phosphate containing small amounts of magnesium and carbonate. Even when dry these mineralised tissues contain up to 10 % water. Skin derivatives such as horn, baleen and tortoise shell have the sulphur-containing protein keratin as the main constituent.
Vegetable, or palm ivory is composed of almost pure cellulose, the fundamental constituent of the cell walls of plants while synthetic ivory substitutes can be prepared from a variety of different materials (see above).
Identification
Although it is often difficult to differentiate between bone, ivory, horn and synthetic substitutes, an examination of the morphological, surface and structural features or of the chemical composition of a material usually allows a positive identification to be made. A high quality hand lens and examination of photographs or photomicrographs which highlight structural features makes it easier to identify these materials (Penniman 1952). Antler and bone, although difficult to distinguish from each other in a worked piece, can be distinguished from ivory with a hand lens. This is because the ivory contains none of the microscopic pores that, in life, contained the blood vessels that fed the growing bone or antler.
Morphological features such as the shape and size of the materials in their unworked state, together with elements such as the marrow cavity in long bones and the pulp cavity in tusks may aid the identification process.
Ivory is basically another form of bone called dentine. Despite their different structures bone and ivory have similar chemical compositions. Thus, unless some material is available for destructive analysis, chemical tests cannot usually distinguish between bone and ivory.
Features which may identify elephant ivory include:
- the pattern of intersecting arcs, usually referred to as ‘engine turning’ or Schreger lines, which are found on the cross-sectional (transverse) surface. These are quite clearly visible on African elephant ivory (Figure 3) but are slightly more difficult to observe on Indian elephant ivory;
- the presence of slightly wavy or braided continuous lines on the longitudinal surfaces;
- the presence of ‘cloudy’ areas, which are sometimes wavy, on longitudinal surfaces. These ‘clouds’ appear as areas which are whiter and more opaque than the material between them.
A further characteristic of all ivories is their fluorescence with a bluish light when irradiated with long wave ultra-violet (UV) light. Depending on the ivory type, this fluorescence varies from bluish-white to a deep violet blue (Penniman 1952). The difference in fluorescence from old ivories also may be useful in distinguishing old from new surfaces, as an aged patina fluoresces in mottled yellow tones while newer ivories and restorations usually appear deep blue-purple. Synthetic materials often exhibit a brilliant fluorescence, quite different from the natural substances.
Figure 3: Elephant ivory showing intersecting arcs (Schreger lines) which help to identify this material.
Identifying features of bone include the following:
- generally lighter in weight than a similar sized piece of ivory;
- the presence of a porous cavity often visible on the back surface of an artefact;
- the presence of small pits that held the blood vessels and short longitudinal striations. These often appear as very small dots and darkened lines on the longitudinal surfaces, features which are enhanced by dirt which collects in them.
Microscopic examination, including the use of polarised light, or an examination of materials under UV light may allow materials such as horn, baleen, tortoise shell and vegetable ivory to be identified. Vegetable ivory is characterised by the presence of very fine, slightly darker concentric lines on the transverse surface and by numerous star-shaped pits throughout the tissue.
Vegetable ivory and man-made alternatives to the natural bone-like materials can be differentiated easily by spectroscopic or chemical methods. Infra-red (IR) spectroscopy in particular, allows for rapid and usually unambiguous identification of polymeric substances (ivory copies). This type of analysis must be carried out by an expert. Although IR analyses are usually destructive, only a small amount of material (less than one milligram) is required for testing. Careful analysis of IR spectra can also provide valuable information about the degree of degradation of bone and ivory, providing valuable information about changes in the amounts and compositions of the organic and inorganic components (Godfrey et al 2002).
A very simple, though destructive, method of determining whether a material is composed of a synthetic substance is the ‘hot needle’ test. Many of the polymeric materials used as substitutes for bone and ivory will melt when heated. A hot needle applied to an inconspicuous part of an object should give a quick, though not reliable estimate, of the composition of the object in question. Because of the destructive nature of this test, however, it is not recommended.
For full descriptions of the methods available to differentiate ivory, bone and related materials refer to Penniman (1952), Thornton (1981), Krzyszkowska (1990), Locke (2013) and Mann (2013).
Deterioration
Bone and ivory have directional properties (are anisotropic) and are therefore susceptible to warping and cracking on exposure to moisture and heat (Figure 4). This is especially so for thin artefacts where even moisture from the hands may be damaging. Warping and cracking are essentially irreversible. Bone and ivory are also prone to chemical attack and staining.
Deterioration processes which affect bone and ivory include:
- warping and cracking due to changes in relative humidity and temperature. Ivory is particularly sensitive to changes in relative humidity;
- chemical and bacterial degradation of the protein component of bone and ivory. This is enhanced by prolonged exposure to water and/or burial in aerobic sediments;
- attack on the inorganic components of these materials by acids. Artefacts that were previously buried in an acidic soil will usually be degraded and fragile;
- attack on the organic components by alkaline reagents. A soft and crumbly matrix is the result of substantial collagen loss;
- bleaching by direct sunlight and UV radiation. UV exposure will also cause weakening of the collagen matrix and yellowing of the natural oils found in ivory;
- damage by heat. When burnt these materials become grey or blue-black in colour;
- contact with sulphur-containing compounds (for example, some rubbers and certain paints), which will turn ivory an unnatural yellow-orange colour;
- staining due to contact with corroding metals such as copper and iron. The porous nature of these materials makes them very susceptible to staining.
Figure 4: 19th century Chinese ivory screen and stand showing cracking.
Ivory tends to develop an attractive yellow-brown patina as it ages. Do not attempt to remove this patina as it is part of its history, similar to the patina developed on a pewter tankard.
Horn, baleen and tortoise shell react in similar ways to those outlined above for bone and ivory. In addition, insect pests such as dermestids have a healthy appetite for keratin and can cause considerable damage to these materials (Figure 5). Avoid contact between water and thin films or delaminating surfaces of these materials as softening and deformation are likely to occur. As many tortoise shell objects are composites of smaller pieces ‘welded’ together with heat, moisture and pressure, they are particularly susceptible to damage in a fluctuating relative humidity environment.
Figure 5: A pair of Japanese hairpins (1900 – 1930s) in cow and buffalo horn (yellow and black respectively) showing several points of attack by dermestid beetles (copyright: Gordon Turner-Walker).
Cellulose nitrate, of which French ivory is composed, is an unstable chemical compound. As French ivory ages it develops a patina that is similar to that of ivory. Rather than being desirable, however, the development of this patina is an indication of the first stage of the potentially hazardous degradation of this material (see the chapter Modern Organic Materials). Loss of plasticizers from the cellulose nitrate (identifiable as weeping from the surface) may cause cracking and crazing of the object. As thin films of cellulose nitrate have been known to combust spontaneously, isolate deteriorating artefacts from other materials.
Preventive Conservation
For conservation purposes ivory, bone, antler, horn, baleen and tortoise shell may be treated in the same manner, as they react in similar ways to given environments and treatments. For convenience, from this point all these materials will be referred to as ‘ivory’.
Although ivory artefacts are reasonably durable, as is evident from the age and condition of many prehistoric materials, they can be damaged readily if improperly cleaned, handled, stored or exhibited.
Environment
Because of the sensitivity of these materials to changes in relative humidity, keep them within a temperature range of 15 – 25 °C and a relative humidity range of 45 – 55 %, with no more than a 4 °C and/or a 5 % swing respectively within a 24-hour period. It is desirable to maintain an environment with a steady relative humidity and temperature and, most importantly, to prevent exposure to extreme conditions or rapid fluctuations.
Volumetric changes for ivory are at a minimum between 30 - 40 % but this is a risky low relative humidity for many objects. For example, a change in relative humidity from 40 % to 45 % causes a volumetric change of only about 0.35 % while a change from 60 % to 65 % causes a 1 % volume change. The effect of relative humidity changes on an object depends upon how it was cut from the tusk. Dimensional changes in the longitudinal direction are minimal and radial changes do not become apparent until above 50 %. Changes in the tangential changes are almost linear between 30 % and 100 % relative humidity, with an average increase of approximately 6 % (Turner-Walker, 2017).
As ivory materials are affected by moisture, avoid dramatic changes in relative humidity. Usually, materials from tropical regions will have a higher moisture content than similar materials from drier areas. For this reason, slow acclimatisation to a new environment is essential in order to reduce the possibility of cracking or splitting (see the chapter Preventive Conservation: Agents of Decay).
If stored in the dark, ivory appears to darken in colour. This is due to a natural and slow ageing process that leads to the development of a pale yellowish-brown patina. In the presence of light this ageing is counteracted by bleaching of the ivory surface. Ivory materials should never be placed in direct sunlight or bright artificial light however as fading of colourings and dyes or an overall bleaching of the surface will occur.
If ivory is dyed, do not allow light levels to exceed 50 lux with the UV component restricted to 30 µwatts/lumen (1500 µwatts/m2). For undyed material illumination levels should not exceed 200 lux with the UV component restricted to 75 µwatts/lumen (15000 µwatts/m2).
Handling
To prevent staining of the surface, wear cotton gloves when handling ivory materials, except for some archaeological ivories where raised splinters and cracks can catch on the knit of the cotton gloves.
When packing ivory for transportation ensure there is an adequate buffer against both physical damage and changes in temperature and relative humidity. Wrap artefacts in acid-free tissue, place in a sealed polyethylene bag, wrap with bubble wrap and then pack in an insulated box. The aim is to control the temperature and therefore the relative humidity within the sealed bag.
Storage and Display
Place ivory within a display case or cabinet as these provide protection from dust and dirt and also buffer changes in temperature and relative humidity. Due to the emission of acidic vapours from some timbers, metal cabinets are preferred to wooden ones.
Store ivory under low light and low UV levels (see Environment above). As light bleaches the surface of ivory considerable variation in colour may occur unless objects are moved in relation to the predominant light source (Figure 6). The effect of different exposures to light is usually evident in the differing colours produced on the front and back, or upper and lower, surfaces of objects. Ensure lighting has no effect on the internal temperature and hence the relative humidity of display cases used to house ivory artefacts (see the chapter Preventive Conservation: Agents of Decay).
Figure 6: Chinese sage carved from a juvenile elephant's tusk showing the effects of light causing differential colouration. One side was continually exposed to the sun over a 10 year period, leading to yellowing, drying and eventual irreversible splitting (copyright: Gordon Turner-Walker).
Additional storage and display considerations include the following:
- use inert materials, such as spun polyethylene or polypropylene to line storage shelves to provide cushioning;
- do not use rubber pads or adhesives near ivory as the sulphur in these materials will discolour ivory;
- avoid contact with iron, copper alloys and coloured materials as staining may result; and
- inspect horn regularly as it is the material most likely to suffer from insect attack.
Treatments
Very fragile ivory artefacts should only be treated by conservators. Artefacts in reasonably good condition may be cleaned of surface dirt and grime if proper precautions are observed. Refer to a conservator for the treatment of stains caused by contact with corroded metals or coloured materials.
Before cleaning or any other treatment, examine the object carefully to identify the nature of the material, to determine the strength of the object and to note whether it has been patinated or decorated. If the material is fragile, support it on a padded block which can be moved without direct handling of the object itself.
Examination
Guidelines for examination include:
- using a binocular microscope if possible. This will help estimate the depth and extent of cracks and the amount of deterioration;
- using micro-tests to determine the material of any decoration and how it is applied, as well as to determine its condition and ability to undergo any proposed treatment;
- noting and recording the presence of cracks (extent and depth), accretions, stains, old repairs, and new or recent damage; and
- observing objects under a long wave UV light (320 – 400 nm). This is usually helpful in locating old repairs and some accretions.
Cleaning
Objects in good physical condition may need only gentle dusting with a soft brush.
If brushing is not sufficient to remove the dirt and grime then careful wet cleaning may be attempted. Great care is needed if wet cleaning techniques are used. Water is potentially very damaging to these materials and non-polar organic solvents, such as toluene, have been shown to affect the organic components of ivory (Matienzo and Snow 1986). Ivory, for instance, has even been damaged by the application of damp swabs. Consultation with a conservator is highly recommended.
Follow the guidelines below if wet cleaning is necessary:
- never immerse an ivory object in water and do not apply water to cracked or porous surfaces;
- test any solvents on an inconspicuous part of any painted or decorated surface before any cleaning is attempted;
- roll a cotton bud, moistened with solvent (see below) over the surface to remove dirt. Clean only a small area at a time;
- immediately dry the surface with another cotton bud or soft tissue; and
- if necessary, remove residual soap with a cotton bud moistened in distilled water. Dry the surface immediately.
Solvents which have been used to clean ivory include:
- water;
- a solution of water and alcohol or methylated spirits (50:50);
- water containing a non-ionic detergent (see the chapter Ceramics);
- white spirit;
- white spirit containing a soluble detergent (such as Vulpex B-30); and
- leather cleaner (see the chapter Leather).
Leather cleaner has been found to be very effective. This cleaner has appeal as it has a low water content and its combination of a non-polar solvent and a non-ionic detergent, allows a range of surface contaminants to be removed. Care must be taken when cleaning ivory materials which have been deliberately painted as these attempts at cleaning may damage the original work. Even more care is needed when dealing with thin films of ivory as these are particularly susceptible to water damage.
Repair and Consolidation
Although it is strongly recommended that repairs and consolidation are left in the hands of experienced conservators, those with good hand and practical skills may feel confident enough to attempt simple repairs. Consult a conservator before taking this step however.
Objects that are broken or cracked can be repaired using pigmented resins. Do not use epoxy-based resins however as they yellow with age and cannot be removed by dissolution. This latter property makes future removal and re-treatment difficult. A further disadvantage of epoxy-based adhesives is that the adhesive is stronger than bone and ivory. Should further breakage occur it is best that the repair fail rather than cause a new break adjacent to the previous repair. Never using cyanoacrylate superglues for repairs. These have very low viscosities and run everywhere. The go deep inside the structure, closing off pores and are impossible to remove. They will cause differential responses to relative humidity changes and are capable of carrying dirt deeper inside the object.
If the ivory is flaky, powdery or delaminating, it may require consolidation using a resin and solvent combination such as Paraloid B-72 in acetone. For better penetration, work of this type should be carried out by immersion in a vacuum chamber. Colloidal dispersions such as Primal WS 12, WS 24 and WS 50 also can be used. These have better ageing properties than emulsions and due to their smaller particle size and viscosity, are better able to penetrate the ivory matrix.
Summary
- Ivory is extremely sensitive to changes in temperature and relative humidity. Maintain environmental conditions in the ranges 15 – 25°C and 45 – 55 % with no more than a 4 °C and/or a 5 % swing in temperature and relative humidity within a 24-hour period.
- Never immerse ivory in water or wet the surface.
- Always wear cotton gloves when handling ivory.
- Keep light levels low and even. Recommended light and UV levels are 50 lux and 1500 µwatts/m2 respectively for dyed ivory and 200 lux and 15,000 µwatts/m2 for undyed ivory.
- Acclimatise ivory slowly whenever it is moved from one climatic zone to another (tropical to temperate and vice versa). This is essential to minimise cracking and warping.
- Display ivory objects in a case to help buffer against rapid changes in relative humidity or store wrapped in acid-free tissue in an acid-free box.
- Obtain advice from a conservator before attempting cleaning or other treatments.
Bibliography
Godfrey, I.M., Ghisalberti, E.L., Beng, E.W., Byrne, L.T. and Richardson, G.W., (2002), The analysis of ivory from a marine environment, Studies in Conservation, 47:29 45
Krzyszkowska, O., 1990, Ivory and Related Materials: An Illustrated Guide, Bulletin Supplement 59, Institute of Classical Studies, London.
Locke, M., 2013, Bone, Ivory, and Horn: Identifying Natural Materials, PA Schiffer Publishing Ltd, Pennsylvania.
Mann, W.R., 2013, Ivory Identification: A Photographic Companion, CreateSpace Independent Publishing Platform.
Matienzo, L.J. and Snow, C.E., 1986, The chemical effects of hydrochloric acid and organic solvents on the surface of ivory, Studies in Conservation, vol. 31, pp. 133-139.
Penniman, T.K., 1952, Pictures of Ivory and Other Animal Teeth, Bone and Antler, Occasional Paper on Technology, 5, Pitt Rivers Museum, University of Oxford.
Thornton, J., 1981, The structure of ivory and ivory substitutes, in Preprints, 9th Annual Meeting of the American Institute for Conservation of Historic and Artistic Works, May 27-31, 1981, American Institute for Conservation of Historic and Artistic Works, Washington D.C., pp. 173-181.
Turner-Walker, G., 2017, personal communication.
Wood
S. R. Garcia, I. M. Godfrey and S. Lussier
Introduction
Wood is a widely used and well known material. Although its general properties are familiar to most people there is an underlying complexity to wood that is not widely appreciated. It is a natural substance made up of countless individual cells. These cells and their contents are composed primarily of:
- water;
- polysaccharides (hemicelluloses and cellulose);
- polyphenolics (lignin); and
- extractives which are usually present in small quantities. These may affect the colour and odour of the wood.
Examination of the cross-sectional surface of a tree trunk reveals three distinct zones: the bark, the light-coloured outer region (the sapwood) and the dark-coloured inner region (the heartwood). It is the heartwood that is used in furniture, building, sculpture and the thousands of other common uses to which wood is put (Figure 1).
Figure 1: A child’s toy merry-go-round made from painted wooden clothes pegs.
The tangential and radial directions may be identified on the cross-sectional surface (Figure 2). Wood properties vary in these and the longitudinal direction. For instance, when wood dries its shrinkage is greatest in the tangential (5 - 10 %) and least in the longitudinal (less than 0.1 %) directions.
Figure 2: Wood – cross-section of a typical tree trunk.
From the time a tree is felled it begins to lose moisture, first at the surface and eventually from deeper within the wood. The rate at which green timber dries depends on environmental conditions and the type of wood. It is a challenge to timber specialists to dry wood without warping, cracking and splitting. Seasoned dry wood continues to interact with its surroundings, absorbing or releasing water in response to changes in the relative humidity of its environment.
Wood samples are usually classified as either hardwoods or softwoods. These classifications are not related to the hardness or the softness of the materials, being based primarily on the presence of pores (hardwoods) or their absence (softwoods). Balsa for example, despite its inherent softness, is a hardwood.
There are also fundamental differences in the usual physical characteristics of the trees from which these timber types are derived. These are listed below:
| Hardwood | Softwood |
|---|---|
| broad leaves | needles |
| deciduous or evergreen | evergreen |
| flowers or seeds | cones or seeds |
| complex cellular structure | less complex |
Deterioration
Damage to wood and wood products may be caused by:
- poor handling, inadequate packing for transport or exposure to changing relative humidity (physical degradation);
- heat (thermal degradation);
- light and UV radiation (photochemical degradation);
- biological agents such as fungi, bacteria or insects (biological degradation); and
- acidic or alkaline chemicals (chemical degradation).
Poor handling and packing, exposure to fluctuating relative humidity levels and insects usually cause physical damage to wood whereas heat, light, fungi, bacteria and corrosive chemicals cause chemical changes to the wood substance. These latter changes can lead to the complete destruction of the wood.
Physical Degradation
Wood may be physically damaged by either poor handling or as a result of stresses induced by changing moisture gradients. Its relative softness means that wood can be easily damaged by contact with harder and sharper objects.
Excessively hot and dry conditions cause wood to shrink and crack. Conversely, cold and damp conditions cause wood to swell and warp. Substantial damage may be caused by large, rapid fluctuations in relative humidity levels. This is particularly so if wooden parts are closely joined and if their respective grains run contrary to one another. The restriction of free movement often leads to warping and cracking.
The rate of change of relative humidity levels and the way in which the wood has been sawn (along or across the grain, radially) determine whether bowed, cupped, twisted, cracked or split wood will result from exposure to inappropriate or changing relative humidity conditions.
The expansion and contraction of wood may damage either the wood itself or materials attached to it (Figure 3). Paint layers, for example, will tend to craze and flake if the underlying wood is subjected to alternating periods of expansion and contraction.
Physical damage may occur if no precautions are taken when wooden objects are transported from one climatic region to another. For example, wooden sculptures transported from tropical regions to drier areas commonly develop serious cracks as moisture is lost from the wood. Similar damage may occur if items composed of wood or other organic substances are exposed to hot sunlight during the day and cold, moist conditions at night.
Figure 3: Japanese ivory inlaid chest. Rapid or large fluctuations in relative humidity levels could cause the inlay to separate.
Thermal Degradation
The most severe form of thermal degradation is obviously the complete destruction of wood by burning. The individual components of wood (hemicellulose, cellulose and lignin) are affected by heat before the state of combustion is reached.
Heat weakens the bonds between fibres, leading to increased brittleness and fragility. For example the embrittlement of newspapers with age can be attributed largely to thermal degradation of hemicelluloses present in the ground wood pulps. The extent of degradation is determined by the type of wood concerned, the temperature and the duration of exposure. As chemical breakdown usually occurs more rapidly in an aqueous environment, the presence of moisture increases the effects of thermal degradation.
Physical damage will occur if a wooden object is placed close to a heat source. The resultant loss of moisture often results in shrinking and cracking of the wood. Thermal degradation is considered to be the most serious threat to wood kept indoors.
Photochemical Degradation
Chemical, mechanical and light energy factors combine to contribute to the deterioration of wood that is exposed outdoors (weathering). The general appearance and surface finishes of historic structures are often affected.
When wood is kept reasonably dry and exposed to sunlight or UV radiation, the surface tends to turn brown. A grey finish is observed when the effects of light and moisture are combined. The reactions are chiefly due to changes in the lignin caused by exposure to UV radiation. Colour changes are usually restricted to the surface of the wood.
In addition to the problems associated with photodegradation of wood itself, excessive light exposure will cause bleaching of certain dyes or pigments and fading or discolouration of surface finishes.
Biological Degradation
Given the right conditions, a variety of different organisms will attack wood. These include:
- bacteria;
- fungi (such as the brown, white and soft rots); and
- insects (such as termites, furniture beetles and powder post beetles).
The type and quantity of extractives present in the heartwood are important in determining the biological resistance of wood.
The sapwood of most species and the heartwood of many others are prone to attack by a number of different wood-rotting and wood-staining fungi. Wood-staining fungi (mould) flourish in damp, dirty and unventilated conditions. Although moulds merely stain the surface of wooden items, wood-rotting fungi, such as dry rot, severely damage structural timbers. Wood-rotting fungi require moisture, some air, moderate temperatures and the absence of toxic influences to develop.
Termites (white ants), black ants and other insects are also responsible for serious damage to wooden materials. The most commonly occurring wood-boring insects found in museums are the furniture beetle and to a lesser extent, the powder-post beetle.
The furniture beetle usually attacks softwoods such as pine and fir and is commonly found in damp floorboards. It also will attack mature hardwoods such as oak and walnut and is responsible for considerable damage to old furniture.
The powder-post beetle only attacks hardwoods and occurs most frequently in damp timber or in structural timbers of recent buildings.
Chemical Degradation
Wood is generally resistant to a large number of chemicals, but it is still vulnerable to chemical attack, particularly under conditions of high acidity (pH less than 2) or high alkalinity (pH greater than 11). Under these conditions the long cellulose chains and the shorter hemicellulose chains are broken producing a softer, more friable object.
Chemical degradation is enhanced by high temperatures and the presence of iron salts, sulphur dioxide and oxidising agents such as chlorine and nitric acid.
Preventive Conservation
In order to ensure wooden objects are well cared for, take the following factors into account:
- light, temperature and relative humidity;
- handling techniques;
- modes of storage, display and support; and
- protection from insects, fungi and dirt.
Environment
To maintain wooden objects in the best condition, the following environmental conditions are recommended:
- relative humidity levels in the range 40 – 60 %, with a maximum variation of 5 % in any 24 hour period;
- temperature range of 15 – 25 °C with a maximum variation of 4 °C in any 24 hour period; and
- light levels of 50 lux for dyed or painted wood, up to 200 lux for undyed or uncoated wood and a maximum of 300 lux for wooden objects that have largely been used outdoors or have otherwise lost their natural colouring. Keep UV radiation levels at or below 75 µwatts/lumen.
Never place wooden objects in direct contact with outside walls or in areas in which large variations in temperature and relative humidity are expected. Avoid placing wooden objects near fireplaces, heaters, air conditioning vents and doorways. Maintaining relative humidity levels below 65 % should ensure that fungal attack does not occur.
Where both metal and wooden components are present in an object, a compromise may be needed. In these cases, it is preferable to bias conditions in favour of wood as this material is more sensitive to changes in environmental moisture levels.
Never expose furniture and other wooden artefacts to direct sunlight. In addition to causing photochemical damage to the wood itself, veneers and glues are likely to be affected, often resulting in lifting, shrinkage, warping and cracking.
Handling
Common sense is the best guide when moving or handling any object. Follow the guidelines below:
- seek help when moving large pieces of furniture;
- plan ahead. Clear the pathway to and the final location for the object and move objects slowly and with care;
- grip objects only in areas that can support their full weight such as the rail of a chair and the apron of a table (not the legs or table top);
- remove any detachable pieces before movement;
- lift furniture clear of the floor when moving it. Otherwise the side thrust on feet or legs can place undue pressure on joints; and
- to reduce the risk of dropping wooden objects, do not use gloves.
Storage and Display
To store, display and support wooden objects safely, follow these guidelines:
- use stable, inert materials for the construction and support of artefacts (see the chapter Preventive Conservation: Agents of Decay);
- the mode of storage is largely determined by the size of the objects themselves - drawers, shelves, cupboards or even the floor itself may be appropriate;
- if drawers are used for storage, enamelled metal drawers are preferred. Wooden drawers may also be used but avoid chipboard and other composition boards;
- store flat objects on level surfaces and use specially constructed supports or padding for objects with irregular surfaces;
- padding, such as polyethylene or polypropylene foam, may be used but only if the object’s stability is not compromised;
- large flat-bottomed objects may be stored on the floor but should be raised on padded blocks to allow for air circulation;
- use dust covers for shelving and keep furniture clean and dust-free;
- do not treat historic furniture which forms part of a collection as furniture. For example, do not sit on the chairs in such a collection;
- be careful what is placed on a piece of furniture as sharp objects may scratch the surface and hot items, condensation or liquid spills can badly affect surface finishes (‘blooming’, staining or even dissolution of the finish);
- maintain a stable, clean environment;
- place bubble wrap and dust covers over large wooden objects;
- do not store or consume food and drink near wooden artefacts; and
- inspect objects regularly, looking for signs of insect attack such as flight holes or frass that may have fallen from such holes. Regular inspection is even more critical for objects which cannot be stored under cover.
Large wooden objects kept outdoors should be placed under cover on a concrete pad to protect them from weathering elements and to prevent easy access by black and white ants. Additional protection from weathering can be attained by maintaining painted or varnished surfaces. Dust these objects regularly.
Use stands to raise wheeled objects from the ground. This takes the weight of the vehicle from the wheels and reduces access by ants.
If transporting wooden objects between regions of differing relative humidity, take precautions to allow the object to acclimatise to its new environment. Packing and equilibration regimes are described elsewhere (see the chapter Handling, Packing and Storage).
Treatments
Before treating a wooden object examine it carefully, noting significant features which may affect the type of treatment chosen. Factors such as the type of original surface, the presence of maker’s marks, evidence of usage and previous repairs or alterations need to be considered when deciding on a treatment strategy (Figure 4).
Figure 4: Homemade gramophone manufactured from a variety of Western Australian timbers.
(a) Before treatment.
(b) After treatment.
Cleaning
As wooden objects and certain surface finishes are particularly sensitive to moisture, dry cleaning methods are recommended. The abrasive nature of dust must also be considered when contemplating cleaning, especially with objects that have highly polished surfaces. Only clean wooden surfaces that are either unfinished, painted or those with a robust surface finish.
For all wooden surfaces, but especially unsealed and polished surfaces (including French polished), the best approach is to use a soft lint-free cloth or a soft brush and vacuum cleaner to remove dust and loose dirt.
Objects that have a surface that is not permeable to water (for example, waxed, polyurethane finish) may be cleaned using the approach described above or by using a sponge that has been slightly moistened in water. Do not allow water to remain on the surface of the wood.
Do not use wet cleaning techniques on polished wooden surfaces.
Consolidation or Repair
Wooden objects requiring conservation or restoration can range from large structures and vehicles to extremely fine, delicate carved objects.
Understanding an object’s past and possible future roles may affect the type of treatment undertaken. For instance, repairs to a horse-drawn vehicle that is to be used will differ from those for a similar object that is to be placed on static display.
There is a variety of techniques and consolidants that may be used to ‘repair’ damaged or friable wood. These repairs include consolidating friable components, filling gaps and gluing dislodged pieces. Materials used to repair wooden objects include resins, waxes and adhesives. Some of these, not all of which are recommended for use by the way, are listed below:
- resin and wax;
- polyester resins (for example, Paraloid B72);
- polyvinyl butyral;
- polyvinyl acetate;
- epoxy resins (for example, Araldite);
- cellulose nitrate; and
- silicone rubbers;
Unfortunately, inappropriate materials are often used to replace missing wood or as fillers for gaps and cracks. Some of these include newspaper, plaster, concrete, bitumen and motor car body filler.
The type of adhesive and the filler type will be determined by the proposed use of the object. If the object is to perform a structural role then the combination of materials will be different from those that would be used for non-structural fills. For structural fills where movement of the wood is likely to be slight, an epoxy resin or micro-balloon fill has been recommended (Grattan and Barclay 1988). The use of a fill of epoxy resin and sawdust is described elsewhere (see the chapter Case Studies). A summary of traditional fillers is provided in Appendix 5.
As the techniques and chemicals used in consolidation are specialised, seek the advice of a conservator.
Furniture
Usually older style furniture is constructed and held together by dowels or pegs and animal-based glue. Although these glues are quite strong, they deteriorate with age, become very brittle and are easily broken, especially if excessive stress is placed upon the joints. Screws, brackets and hold down clamps (table tops) were used in later furniture.
If restoring period or historic furniture, take care to use correct restorative methods. Incorrect procedures can undermine both the value and the historical importance of the furniture. Research into the methods of construction of furniture is very important, often yielding valuable information which can guide any restoration process. For example, if animal glues and dowelling were used originally, use the same materials in any restoration/conservation treatment. If a new piece has to be constructed and fitted to an old object, use original methods. Retain any remaining damaged, original pieces for future repairs.
Note, despite the recommendation above, there is some support for using modern materials so that repairs and restoration work can be distinguished from the untreated components.
Staining and Marking of Furniture
Staining or marking is virtually inevitable on furniture that has been used throughout its life. These stains and marks often enhance the character and patina of the piece. Some attempts to eradicate staining and marks have damaged some fine pieces of furniture.
As the removal of stains and marks may involve the loss of both wood and patina, consider the available options before bringing the sander and sandpaper into action. Seek advice from a conservator. Drastic treatment may result in the loss of value of the piece, especially if problems are encountered with reproducing the surface finish and colour (often difficult tasks).
Inlays
A variety of materials, including brass, ivory and different woods, is used for inlays. Their differing compositions and variations in the way they react to changing environmental conditions complicate repairs. Extremes of temperature and humidity will affect each of the materials differently.
The treatment of inlays is highly specialised. Seek professional advice before attempting any treatment.
Surface Finishes
Surface finishes applied to wooden objects include:
- waxes;
- shellac (French polish);
- polyurethanes;
- paints;
- oils; and
- veneers.
Exercise care when selecting a surface coating to apply to a wooden object. The purpose of the coating may be to either protect a friable surface or to confer a pleasant sheen to a surface that has become dull. In the past it was customary to apply drying oils, such as linseed oil, or waxes such as beeswax. The former suffer from the disadvantage that they yellow with age, a tendency that is accentuated under tropical conditions and they become very difficult to remove after prolonged ageing. The latter often leave the surface of the wood slightly sticky. Sticky areas attract dust, particularly in the crevices in the wood. This creates favourable conditions for the laying of eggs by wood-boring insects.
Depending on the nature of the object, waxes may be suitable as protective surface coatings as long as care is taken to choose a suitable wax mixture which leaves a relatively hard, non-sticky surface finish. Such a wax mixture may be prepared using some commercially available synthetic waxes. A useful formulation and method of preparation is given below:
| microcrystalline wax | 100 g |
| polyethylene wax | 25 g |
| white spirit | 230 g |
- melt the waxes together and stir well to ensure that they are thoroughly mixed; and
- pour the molten mixture quickly into the white spirit and stir constantly while cooling so that a smooth paste is obtained.
Several varieties of these waxes are available and the sheen of the resultant wax film can be varied by altering the grades or the proportions of the waxes used. The high dispersive power of the microcrystalline wax helps to remove ingrained dirt from the wood as well as providing a protective coating of pleasant appearance.
Formulations made by mixing beeswax and carnauba with turpentine have been found to work well.
Several suitable commercial wood waxes are available and these give satisfactory results. Avoid waxes containing silicones (this is usually stated on the container) as they are very difficult to remove. This may cause problems if subsequent treatments are necessary.
Only use coloured waxes after careful thought as these obviously alter the appearance of the wood. Clear finish waxes are preferred.
French polished furniture has a beautiful and lustrous finish but it can be damaged easily. As French polish is shellac dissolved in methylated spirit, any wet object or alcohol will either mark or dissolve the surface. Restoring damaged surfaces will usually require the services of a professional restorer.
Polyurethane finishes are clear, hard and resistant to wear but are virtually impossible to remove without damage to the underlying wood. Their use on period or antique furniture is not recommended.
Oil-based finishes also give a lustrous shine but unless wiped down carefully can leave a ‘tacky’ finish which will attract dust. Oils which may be used on furniture include poppy seed, walnut and Danish oils.
Veneer is a thin layer, normally of some exotic timber, laid and glued over a frame of a different type of wood. If animal glue has been used and is deteriorating, the veneer may lift. If regluing is attempted, all traces of the old glue must be removed to ensure a flat finish is obtained. Refer large areas of lifting veneer to experts in the area.
Upholstery
Upholstery is a general term which includes carpets, bed hangings, curtains, chairs, sofas and the components of seat furniture. Information concerning the deterioration, care and conservation of these objects may be obtained by reading the appropriate chapters that deal with the particular material types associated with these objects.
Discussion in this section concentrates on the wooden frame, rather than with the webbing, springs, stuffing, lining, cover and other non-wood upholstery components. Despite this focus, these latter components are important (Burgin 1990, Twichel 1990, Perkins 1990). Some general aspects related to their care and conservation are listed below:
- if extremely disintegrated material is replaced, clean and store it;
- use materials such as plywood and perspex to support deteriorated webbing;
- use soft brushes and low suction vacuum cleaning to clean stuffing;
- place and mould stuffing to its original shape during replacement;
- stabilise acidic hessian by using water poultices; and
- use ethafoam if reconstruction of the under-upholstery is necessary for display purposes and the original materials are unable to be used.
As long as the original fabric has been retained, the colours, patterns and types of textiles used on covers often provide evidence of the style of a period. The conservation of covers is somewhat contentious, especially the issue of removal of the cover for treatment. Replacement is often difficult and cannot always be accomplished. Apart from cleaning robust covers with soft brushes and low suction vacuum cleaners their conservation is best left in the hands of conservators.
The frame can provide useful information about the history of an object. Breaks in the joints or members and nailing patterns, for instance, may give an insight into past wear, abuse and repairs.
Repairing a frame raises many ethical questions regarding the use of adhesives, the replacement of parts and the general extent of intervention (James 1990, Podmaniczky 1990, Graves 1990). The following principles are useful guides when considering conservation of a frame:
- if part of the frame has to be replaced, document this and retain the removed section;
- minimise intervention so that as much of the original object is retained as possible;
- if an adhesive is required for a mechanical joint, use a reversible adhesive, such as PVA;
- analyse and document any original adhesive;
- strengthen weak components by using metal plates to bridge joints or low molecular weight consolidants; and
- when re-upholstering, minimise damage to the frame by using the original holes or by nailing into plugs of white pine which have been used to fill holes.
Heavy Vehicles or Machinery
Although every artefact must be assessed individually, repairs to heavy wooden equipment and horse-drawn vehicles normally require strong consolidating agents. As maximum strength is required, animal glue is not recommended (see the chapter Case Studies).
The application of oils to the wood is not advised as dust quickly adheres to it. This in turn attracts moisture and subsequent mould development. Preventive measures, such as those outlined earlier in this chapter are recommended (see the chapter Preventive Conservation: Agents of Decay).
Summary
- Carefully check wooden objects for insect infestation or mould before adding them to a collection.
- Keep temperature and relative humidity within the ranges 15 – 25 °C and 40 – 60 % respectively with maximum variations of 4 °C and 5 % in any 24 hour period. Hot, dry conditions will cause wood to shrink and crack while excessively moist conditions will cause it to swell and warp.
- Never expose wooden objects to direct sunlight. In addition to causing photochemical damage, veneers and glues may be affected, resulting in lifting, warping or cracking.
- Do not put objects on top of polished surfaces as they could scratch or otherwise damage the surface finish.
- When storing large objects, place bubble wrap over them and dust covers on top.
Bibliography
Burgin, A., 1990, Eighteenth- and nineteenth-century chair and sofa treatments, Upholstery Conservation, Preprints of a Symposium held at Colonial Williamsburg, East Kinston, N.H., American Conservation Consortium Ltd, pp. 323-337.
Valerie Dorge, V. and Carey Howlett, F. (Eds), 1998 , Painted Wood: History and Conservation, Proceedings of a symposium organized by the Wooden Artifacts Group of the American Institute for Conservation of Historic and Artistic Works and the Foundation of the AIC, Colonial Williamsburg Foundation, Williamsburg, Virginia 11–14 November 1994, The Getty Conservation Institute, Los Angeles.
Grattan, D.W. and Barclay, R.L., 1988, A study of gap-fillers for wooden objects, Studies in Conservation, vol. 33, pp. 71-86.
Graves, L., 1990, Conservation of an 1811 sofa with nearly intact original upholstery, Upholstery Conservation, Preprints of a Symposium held at Colonial Williamsburg, East Kinston, N.H., American Conservation Consortium Ltd, pp. 356-376.
James, D., 1990, Upholstery - A Complete Course, Guild of Master Craftsman Publications, East Sussex.
Perkins, Z.A., 1990, Conservation of a Leon Marcotte side chair, Upholstery Conservation, Preprints of a Symposium held at Colonial Williamsburg, East Kinston, N.H., American Conservation Consortium Ltd, pp. 409-421.
Podmaniczky, M.S., 1990, Wooden frame conservation techniques, ibid, pp. 29-41.
Twichel, J., 1990, Experiments with ‘tackless’ upholstery: Successes (and trials) at SPNEA, ibid, pp. 232-245.
Unger, A., Schniewind, A. and Unger, W., 2001, Conservation of Wood Artifacts: A Handbook, Springer-Verlag, Berlin.
Paper and Books
U. Broeze-Hoernemann
Introduction
Paper is one of the most commonly used materials, with much of the history of mankind recorded on this medium. While the introduction of computers heralded promises of a ‘paperless society’ this has not happened. Hard copy back-ups are still used and stored in archives, printing, copying and scanning of documents has continued and paper waste has continued to increase.
Paper Making
The word paper is derived from papyrus, a long-stemmed plant Cyperus papyrus. The method that used this plant as a writing support was developed by the Egyptians about 4000 years ago. Although paper, as it is known today, was developed by the Chinese around 2000 years ago, it was not introduced into Europe until the 12th century. The Chinese used the mortar and pestle method of paper making, where cloth or bark was rinsed with water and then reduced to a pulp by grinding with the mortar and pestle. In Europe, hammers driven by water power were used to produce pulp from cotton or linen and water by beating these materials in stone or metal-lined wooden troughs.
Beating is a very important part of the paper making process as it increases the area for inter-fibre bonding, the strength and the flexibility of the paper. Paper made without mechanical treatment is usually weak. Occasionally straw from wheat and rice plants was added to cotton and linen but this produced an inferior, weaker paper. Very high quality paper is produced from cotton or linen and because of a shortage of the raw materials this type of paper was highly valued.
It was not until the 1850s that paper was produced from ground wood pulp. Wood pulp consists of both fibrous and non-fibrous components. This wood pulp paper, which usually consisted of 80 % ground wood and 20 % cellulose, was both cheap and of low quality.
The low quality and low durability of wood pulp paper are due to the rapid breakdown of the non-fibrous components when exposed to air and light. Newspaper, for example, which is made from low grade wood pulp, yellows very rapidly when exposed to light. Prolonged exposure leads to increased yellowing and brittleness.
Techniques developed in the early 20th century to separate the fibrous and the non-fibrous components of wood pulp led to the production of higher quality paper.
Paper Chemistry
Usually paper is made up of the following combination of materials:
- raw plant matter;
- sizing agents;
- fillers; and
- brighteners and colouring agents.
The basic raw materials of paper are fibres derived from wood and other plants. Good quality paper contains a high proportion of cellulose molecules with a correspondingly low lignin content. Cellulose is a polymeric substance made up of linked glucose units. The arrangement of these units and of the resultant polymeric chains determine the overall quality and mechanical properties of a paper sheet. In good quality rag paper about 1000 glucose units are linked.
High cellulose, low lignin papers are usually prepared from cotton rag or linters, whereas paper with a higher lignin content is derived mostly from wood pulp. Depending on the required use for the paper, wood pulp may be chemically treated to produce papers of varying qualities.
Paper is sized so that it repels liquids such as inks, making it suitable for writing and printing. A higher degree of size is used for the purpose of writing, to prevent ink from feathering with a lower degree used for printing so that ink can be absorbed as quickly as possible.
Traditionally sizing was carried out as a separate step. By the second half of the 19th century however, it became possible to add the sizing agents directly to the pulp (internal sizing). Combinations of alum and rosin were originally used in this process, but as these sizing agents elevated acid levels in the paper, the paper deteriorated more quickly. Synthetic cellulose components are now used as sizing agents to overcome the acidity problems, allowing pH neutral and alkaline papers to be produced.
Clay, titanium oxide and calcium carbonate are among the most commonly used fillers. These materials, added during stock preparation, serve to produce different finishes including calendared paper.
Although indigo was used originally as a colouring agent it has been replaced by synthetic fluorescent dyes and optical brighteners.
Types of Paper
Paper types are many and varied. Paper quality depends on the raw materials and chemicals used in processing and the actual production practices used. Archival quality papers, made from rag material and which use an alkaline processing system, last longer than those made from the low quality wood pulp used for newspapers. As described earlier, the latter discolour and degrade rapidly.
A list of paper and board types, which describes their components and chemical characteristics, is supplied in Appendix 6.
Deterioration
Paper is prone to attack and subsequent degradation by chemical, biological and environmental agents. Deterioration may be caused by:
- the presence of potentially damaging chemicals within the paper;
- exposure to external pollutants;
- environmental factors such as light and relative humidity;
- biological attack by moulds, insects and rodents; and
- inappropriate intervention or lack of care by those responsible for collections.
High levels of acidity in paper may be brought about by the presence of material introduced both during and after processing. These materials include alum or rosin sizing agents, high lignin pulp material, coatings and certain inks such as iron gall ink. Acidic substances attack the long cellulose chains, causing them to break into smaller units. A more brittle paper, or one containing holes, may result. Absorption and chemical reaction with oxides of nitrogen and sulphur from the air, combined with the natural ageing of paper components, may also contribute to increased acidity levels in paper.
Chemical processes can affect the appearance as well as the mechanical structure of paper. Oxidation of cellulose, catalysed by iron or copper impurities or by the presence of atmospheric ozone produced as a by-product of the photocopying process, may lead to the development of foxing stains similar to those produced by moulds. High relative humidity levels enhance this type of degradation.
Light-induced photochemical degradation, initiated by exposure to both white light and UV radiation may either yellow or bleach paper. Heating of paper, caused by overexposure to light further accelerates deterioration processes.
Dust and dirt may lead to a combination of chemical, biological and mechanical damage. The abrasive nature of dirt particles may cause physical damage to fibres. Dirt particles also act as nucleation centres, encouraging condensation, chemical attack and mould development.
Mould formation is enhanced by high relative humidity. Moulds which develop on paper cause stains known as foxing. These stains are usually brown in colour and are especially disfiguring to works of art on paper (Figure 1). Fluctuating relative humidity levels can cause physical damage to paper. Under conditions of high relative humidity swelling of paper may lead to cockling, while low relative humidity can result in paper becoming brittle.
Figure 1: Map – Shark Bay. Laminated in self-adhesive contact. This shows staining and mould as well as folds and creases.
Insects such as silverfish, cockroaches, flies and book lice and rodents such as rats and mice cause physical damage by feeding on paper. Additional damage is caused by their excreta.
Do not underestimate the influence that careless handling or treatment can have on the deterioration processes that affect paper. Some examples of this type of damage include:
- the application of adhesive tapes to paper;
- the use of metal paper clips or pins;
- the inappropriate use of backing and other materials;
- poor quality framing or mounting;
- rough and inappropriate handling; and
- deficient storage conditions
Do not use adhesive tape as a means of repair. Inevitably the adhesive tape fails, leaving behind a yellow stain that is very difficult, if not impossible, to remove (Figure 2).
Figure 2: Maps showing damage from adhesive tape and acidic backings.
Do not use pressure-sensitive or gummed tapes, sold as archival repair tapes, without first consulting a conservator.
Metal paper clips and pins are prone to rusting, cause indentations in the paper and have sharp ends with the potential to tear paper. Pins leave holes.
Acidic mount boards and inappropriate backing (such as plywood, cardboard, chipboard and straw boards) can destroy or discolour the paper objects they were meant to support. They can also cause mat burn, the brown line that imprints itself into the artwork along the window mount.
Poor framing, in which there is direct contact between the work of art and the glass or acrylic, may lead to the transfer of part of the image to the glass or acrylic. An obvious loss of part of the original image is the result.
Rough and inappropriate handling can cause tears and creasing. Stains such as fingerprints will deface paper and may be irreversible.
Deficient storage such as in damp cellars or attics, inappropriate shelving and cabinets or acidic boxes can all permanently harm a collection of paper-based objects.
Preventive Conservation
Preventing damage to artefacts must always be the highest priority. Any treatment involves intervention, which may alter the originality of an artefact or contribute to changes within its constituents.
Preventive action does not have to be complex. Simple measures and precautions go a long way toward protecting paper objects. Some of these measures include:
- hygiene and regular, careful cleaning of storage and display areas;
- storage and display under appropriate environmental conditions;
- regular monitoring of objects;
- careful handling;
- use of archival quality materials for storage and display; and
- use of appropriate storage and display techniques.
Environment
Maintaining appropriate environmental conditions within storage and display areas will enhance the longevity of paper-based materials.
Light levels of about 50 lux, with no or very low UV content (30 to a maximum of 75 µwatts/lumen), are recommended if photochemical degradation is to be minimised (see the chapter Preventive Conservation: Agents of Decay). Do not expose paper objects to direct sunlight nor place light sources close to these items and monitor light levels carefully. Limit light exposure for paper artefacts to minimise their deterioration.
As light levels associated with photocopying are very high, indiscriminate photocopying will damage paper objects. If copying is necessary, as in the case of materials needed for study or viewing (for example, newspapers, certificates), only copy the documents once. Observe copyright restrictions and use archival quality paper for copies. Some papers may yellow, even after only one exposure. Never put original documents through the feeder of a photocopier.
Maintain relative humidity (RH) levels within the range 45 – 55 % and temperatures of 15 - 25 °C with maximum variations of 5 % and 4 °C within any 24 hour period. Information on temperature and relative humidity control has been provided earlier (see the chapter Preventive Conservation: Agents of Decay). Buildings have zones that tend toward dampness and zones in which conditions fluctuate more often. Doorways, chimneys, areas near heating and air conditioning vents and exterior walls are examples of such zones. Avoid placing valuable objects in these areas.
Should it be difficult to establish the above environmental conditions, strive to maintain conditions that are as stable as possible. Slow changes during seasonal variations should allow most objects to adjust accordingly and will minimise damage. Rapid and frequent fluctuations in relative humidity levels, in which paper objects swell and contract repeatedly, will increase the rate of deterioration. Elevated relative humidity levels will increase the risk of mould development while conditions that are too dry and hot will cause brittleness and distortion.
Handling
Paper is particularly susceptible to physical damage. Careful handling and a common-sense approach is necessary to minimise damage to paper and paper products:
- wear disposable latex (rubber) or cotton gloves when handling books, documents and paper artefacts to prevent the transfer of oils, fats and acids from the skin;
- pick up paper objects with both hands, not by one corner;
- keep fragile papers secured, covered and on a suitable support until treatment begins;
- place books flat, not upright, to prevent damage to the spine;
- unfold folded papers if the condition allows; and
- use pencils for documentation purposes since accidental marking with inks, biros, felt pens or similar may prove indelible.
Storage and Display
Hygiene and regular, careful cleaning are important to maintain paper artefacts in good condition. Guidelines for storage and display of paper artefacts include:
- keep storage areas clean, dry, well ventilated and free from insect and rodent infestation;
- regularly inspect stored material;
- do not store items in cellars and attics as they are likely to be overlooked or forgotten and these areas also tend to have greater extremes in temperature and relative humidity levels; and
- do not store collections close to food sources.
Depending on the type of paper object the following storage and display techniques and media may be appropriate:
- archival quality boxes or folders;
- cardboard boxes lined with acid-free tissue or barrier paper;
- flat storage in metal drawers;
- rolled storage on the outside of large diameter, acid-free cylinders (although flat storage is preferable);
- mounting;
- framing; and
- encapsulation.
Archival quality boxes or folders provide protection for paper artefacts. In addition to providing support, protection from dust and the danger of being squashed, boxes act as buffers to environmental fluctuations.
Do not use alkaline-buffered boards and paper for the protection of paper materials that also have leather, parchment, photographic, woollen or silk components. Use neutral, acid-free materials instead.
Although archival storage boxes, made from either acid-free paper board, polyethylene or polypropylene, are commercially available, they tend to be expensive and may not be of the desired size. A do-it-yourself box is a perfectly acceptable alternative. Acid-free boards such as foam core, archival mount and corrugated boards are all suitable and pre-gummed acid-free paper can be used for their manufacture. Storage folders can be manufactured from a variety of suitable buffered and unbuffered acid-free card (Figure 3).
Figure 3: Template diagram for a storage folder.
Should the above not be applicable, or if suitable materials are not available, store artefacts in ordinary cardboard boxes, provided these are lined with acid-free tissue, special barrier paper or archival plastic liners. The lining papers must be changed at regular intervals (every 12 months). Items in boxes are not immune from danger and should be checked regularly for insect infestation and for any changes in condition.
Flat storage, preferably in metal drawers, is recommended for items such as documents, maps, newspapers and certificates. They should be stored flat, unfolded and interleafed with acid-free tissue paper, which is slightly larger than the items themselves. Do not fold aged paper as in time the creases become tears.
Take special precautions with documents that contain attachments like seals and ribbons. Ensure these are not crushed or allowed to imprint themselves onto other documents. Place these items on top of a stack to avoid damage.
To reduce pressure on items on the bottom of a box or drawer, do not cram in too many items. Arrange items according to size so large ones are beneath smaller ones. Store objects of a similar nature, size and condition together.
If an item such as a map is too large to store flat, roll it onto either a large acid-free cylinder or a large cylinder (minimum diameter of 150mm) covered with acid-free tissue or Tyvek. Cover the entire object with acid-free tissue paper or Tyvek before rolling to prevent individual layers from pressing or rubbing against each other. Protect the outer surface of the item with a further layer of acid-free paper or Tyvek. Do not roll painted or fragile objects, or those that are thick and inflexible. Use Tyvek in preference to tissue paper as it does not tear and is easier to handle.
Framing is a useful method of storage and display as it protects paper from outside influences such as dirt and handling. To reduce the amount of damaging UV light reaching the item, use UV-absorbing acrylic in preference to glass. Unfortunately, framing is often expensive or impractical, especially for large items like maps.
Mounting (matting) provides safe support for flat paper objects such as watercolours, engravings, drawings and documents (Figure 4). When mounted, they can be handled and viewed without being touched. Use acid-free mount board, preferably 100 per cent rag mount or alkaline-buffered rag mount board for this purpose. The latter will be able to counteract acidity (present or latent) in the paper item. When choosing coloured board make sure that it is 100 per cent acid free.
Figure 4: A standard window mat support.
Use acid-free hinges or make them using bookbinders’ pre-gummed (not self-adhesive) paper tape or Japanese tissue paper and starch paste, depending on the weight and condition of the paper. Consult a conservator before attempting this.
Examples of two different types of hinging are shown below (Figure 5). The T-hinge can be used when the edges of the object are to be covered by a window mount. Since they are covered by the object itself, folded hinges allow the edges of the object to be exposed.
Figure 5: Examples of a T hinge and folded hinge.
Never glue paper objects to their backings as many adhesives change their composition, turn yellow and may become insoluble as they age. Gluing also restricts the natural movement of paper. Hinging allows objects to move freely while they are held securely in place. Treatment of a previously rolled paper is shown below (Figures 6 a, b and c).
Figure 6: (a) Example of tightly rolled paper after being stored in a tube.
(b) Paper unrolled after humidification and during dry cleaning.
(c) After treatment and mounted for storage or display.
For storage and protection, cover artefacts with acid-free tissue paper. Alternatively, insert a sheet of mylar the size of the mount between the window mount and the artefact. Do not use mylar in the case of flaking paints, chalk, powdery pastels or charcoals as its electrostatic nature may dislodge pigments from the paper support. It also may burnish some surfaces. In these cases, use acid-free tissue paper instead.
A cheaper alternative to framing or mounting is encapsulation. In this technique, the paper artefact is sandwiched between two pieces of mylar or polypropylene film. Cut these pieces about 15 – 20 mm larger than the paper on all sides. Use clear, acid-free double-sided tape to join the two pieces of film on all sides apart from leaving a small uncovered length, about 20 – 25 mm (minimum), along one corner for air circulation and exchange (see Figure 7). For increased air circulation, leave one entire side un-adhered.
Figure 7: Demonstration of the encapsulation a document.
Do not encapsulate highly acidic material as the restricted air movement will accelerate deterioration. In some cases an alkaline buffered sheet can be inserted behind a document that is being encapsulated. Although this will assist in countering acidity, it has the obvious disadvantage of obscuring one side of the document.
Because of mylar’s electrostatic nature, encapsulation is not appropriate for chalk drawings, pastels, charcoals and watercolours. Materials which have attachments such as seals and ribbons are also not suitable for this method of storage. Disadvantages of encapsulation include the glossiness of mylar and its lack of UV protection.
Photographs may be encapsulated in mylar or polypropylene film. Store them upright in a box, folder or file so that they are not placed on top of each other and there is no weight pressing the encapsulating film against the photographic emulsion. Ensure that they are held in place to prevent sagging.
Tracing Paper
Tracing papers are usually translucent and have a smooth and hard surface, making them very receptive to aqueous inks. Of the variety of available tracing papers the most commonly used ones are:
- prepared tracing paper;
- parchment paper; and
- natural tracing paper.
Prepared tracing paper is manufactured from cotton pulp. The transparency of this paper is due to its impregnation with assorted gums, oils and resins.
Parchment papers (also known as pergamyn and papyrine) are produced by a process in which un-sized sheets are immersed briefly in sulphuric acid and then neutralised with ammonia. This treatment alters the cellulose structure. Sometimes glycerine or glucose is then used to coat the paper. Parchment papers are grease proof.
Natural tracing papers are produced by physically modifying the cellulose fibres. This treatment increases the surface area of the fibres without shortening them. Heat and compression treatment produce a very dense paper free of internal gaps. The surface is usually sized to make it more receptive to inks (Dobrusskin 1991).
Due to their high densities, tracing papers are very susceptible to damage caused by either exposure to high relative humidity conditions (greater than 60%) or by contact with water. These factors cause expansion, deterioration and permanent damage.
Tracing papers are among the most difficult to treat since all repairs will be obvious, due to the transparency of the paper. Any treatments must be carried out by a conservator.
Because of the difficulty of treatment, preventing damage carries even greater importance. Keep tracing papers flat and fully supported in an environment in which relative humidity and temperature fluctuations are minimised.
Books
Handling
Do not remove books from shelving by pulling the head-cap or spine. Rather, ease them out by carefully grasping them around the centre of the spine. Wear gloves when handling books.
Minimise photocopying pages of books, as the process places the spine of the book under stress. In addition, the very high light levels associated with photocopying increase photochemical degradation of the paper. If a copy needs to be obtained, taking a photograph may be a better option.
Storage and Display
Should it be desirable or necessary to display certain pages of a book, then use book cradles or blocks. These support both parts of the book, preferably on a slight angle, to avoid stress on any part of the book or spine. Keep the spine itself flat. These cradles or blocks can be bought or made using acrylic or acid-free card (Figure 8).
Figure 8: Book cradle and display.
To hold pages flat while on display, use Mylar strips, made into hoops, to ‘strap’ particular pages, including the cover. Form the loop by applying a small piece of acid-free, double-sided tape to one end of the Mylar strip. This join can be hidden underneath the book. A thin, flexible version of mylar (0.002 - 0.003 mm) is suitable for this purpose; thicker versions may damage the paper. Polyester or polypropylene films are also suitable. Turn pages regularly to avoid overexposure of any particular page.
Enclosed steel shelving is ideal for book storage. Use a curtain made from washed calico, Tyvek or similar material if enclosed shelves are not available. Store books vertically and according to their size unless they are large volumes or soft covers; store the latter flat, with minimal stacking.
Do not pack vertically-stored books too tightly, otherwise they will not be able to be removed easily by grasping around the centre of the spine. Bookends offer good support, preventing books from falling over or sagging.
To prevent the migration of acids from timber shelves, cover them with acid-free card (for example, mount board), Cell-Air or similar, cut to the width of the shelf. The card, or similar, can be replaced when dirty, worn or damaged. Treat new timber shelving with a water-based polyurethane to seal the surface.
Do not put shelving against outer walls as these areas are prone to dampness and temperature and relative humidity fluctuations.
Store pamphlets, magazines, brochures and journals in special archival folders or pamphlet boxes. These are commercially available or may be tailor-made (Figure 9).
Avoid the use of dressings on leather-bound books as their presence often complicates future conservation treatments. Always consult a conservator about the suitability of any dressing.
Figure 9: Some examples of storage boxes for paper material.
Stamps
History
The first adhesive postage stamp, the famous Penny Black, was produced in the United Kingdom in 1840. This stamp carried the head of Queen Victoria of England as its central design. The image was hand engraved, while the background was produced by a mechanical engraving process. To achieve the high detail in the printing a very smooth, good quality paper was needed. The individual corner letters in this very early example served as a precaution against forgery. Stamps were usually coated with a starch adhesive after printing. They were not perforated.
Use of the cancellation mark, to prevent the re-use of stamps, was soon introduced. Initially these marks were produced using red, water-soluble dyes (the Maltese Cross hand stamp). To minimise the opportunities for the removal of the cancellation mark and re-use of the stamps, these early dyes were replaced with carbon black printers’ ink.
Modern stamps are printed by offset lithography or photogravure techniques. Sometimes oxide pigments are added to create a holograph-like effect. The tiny pigment particles act like prisms and produce different patterns when the angle of light is changed.
Until recently stamps were usually adhered by wetting their gummed, water-soluble adhesive backings. Stamps are now usually produced with self-adhesive backings. These may cause future problems for conservators and collectors alike when the adhesive starts to break down.
Environment
Control of both relative humidity and light conditions is critical to prevent damage to stamps.
As some cancellation marks are water soluble and many of the adhesives (usually starch or gum arabic) used on stamps are hygroscopic (attract or absorb moisture), relative humidity control is important. Damage to the adhesive usually devalues the stamp. If relative humidity is not controlled, the stamp may become distorted.
Storing stamps in albums ensures that they are not overexposed to the fading influences of strong lights. If stamps are put on display, exert strict control over the level and duration of light exposure. A maximum intensity of 50 lux and 30 µwatts/lumen of UV radiation are recommended.
Storage
Although traditional stamp albums are both widely available and used, they are often not of archival quality. Plastics used to cover stamps can have serious effects. Plasticisers have the potential to act as solvents for stamp printing and writing inks.
Philatelic pages and folders manufactured to archival specifications are now commercially available. These materials provide full protection and support to the stamps without affecting the original adhesive.
Treatments
Stamp conservation treatments are extremely specialised and require the attention of a conservator.
Treatments
Using quality materials and adopting practices which minimise damage to paper-based materials are preferable to applying remedial treatments to these objects. The susceptibility of paper to deterioration however, means that a discussion of some of the available treatments is necessary.
As with all conservation treatments, a thorough assessment of an artefact's condition is essential before any treatment is applied. It is also important to test any potential treatment on an inconspicuous part of the object to minimise further damage or loss.
Familiarise yourself with the particular technique to be used by applying it to an expendable piece. Where there is any doubt about the condition or the treatment of an object, consult a conservator.
Invasive techniques such as washing, de-acidification, bleaching and use of solvents should be left in the hands of a conservator. De-acidification can cause certain papers to darken and bleaching may fade colours or delaminate certain paper types. Do not use ordinary household bleaches and peroxides under any circumstances. Approach the numerous published recipes with care as they may no longer be appropriate due to continuous modification of treatment procedures. Consult a conservator before attempting any treatment.
There is no such thing as a routine or standard treatment. Each object deserves special attention that takes into account condition, age, constituents, manufacture, origin, colour or discolouration and so on.
Carry out pre-treatment tests carefully to ensure that the object can withstand a particular action. For example, test each colour and ink individually to assess the solubility of dyes and to ascertain the suitability of the proposed treatment. Some colours may be stable at low relative humidity levels but bleed when exposed to prolonged high relative humidity levels.
Cleaning
Paper
The first step in most cleaning treatments is to remove dust and dirt. If paper is dirty but has no other signs of deterioration, such as flaking or brittleness, it may be surface cleaned.
Surface cleaning may be achieved by using:
- a soft brush;
- a soft, high quality eraser;
- grated eraser; and
- proprietary document cleaners.
A soft brush, such as a squirrel or cosmetic brush, can remove dust. Be careful however as dust particles can be quite sharp or may smear.
If brushing is not effective, try a soft, high quality eraser, but only after the type of media has been established. For instance, charcoal or pencil drawings and pastels cannot be cleaned in this way and care must be taken to avoid smudging inks and scuffing paper.
When erasing, use even strokes, going in one direction or rotating movements, covering only small areas at a time. This will minimise the risk of slipping or crushing. Use a thin, flexible slice of eraser to reduce pressure on the document. Wear a disposable latex (rubber) glove on the hand holding the document to avoid the transfer of grease and perspiration. Alternatively, wash hands before treatment to ensure they are grease-free.
Grated eraser also may be used to remove dirt. Finely grate an art eraser or cleaner (for example, Artgum, Faber Castell) using a plastic kitchen grater. Plastic is preferred as the metal variety may rust or shed small metal particles, which could damage the paper. Spread the resultant grains over the paper and lightly rotate these with the palm of the hand or the flat of the fingers until the entire area has been covered. Then brush the residue off the paper.
An alternative is to use a commercially available, non-abrasive document cleaner. Draft Clean Powder is similar to the grated eraser discussed above and is used in the same way, but the granules are of different sizes and textures. Fine powder is mixed with coarser and firmer particles but with some extra care it can be used safely.
Document Cleaning Pads use the same ingredients as the Draft Clean Powder but are ground more finely. The powder is held in a cloth pouch and with manipulation is released onto the document. With circular motions of the pouch, dirt and dust are absorbed. Dirt is not transferred to the object even though the cloth becomes dirty during the cleaning process.
As the object is obscured by the pad or the palm of your hand during the cleaning process test this method in an inconspicuous area before using it. A potential disadvantage of these techniques is that residues of the fine powder may remain in the paper grain after cleaning.
Books
Clean books by using a dry lint-free cloth or a soft brush. The use of a low suction vacuum cleaner, such as a car cleaner or one with variable suction control, may be suitable for books in very good condition but this should be discussed with a conservator before taking action.
Brushing is the preferred method as it is easily applied and controlled. Always brush dust away from the spine of a book and away from yourself to avoid breathing in dust particles or mould spores.
Should the use of a vacuum cleaner be suitable, cover the nozzle with a piece of loose weave cloth (for example, cheesecloth, gauze) and hold it a few millimetres above the paper surface. This prevents scratching and will also stop any pieces from being accidentally sucked into the vacuum cleaner.
Due to the complex composition of paper-based materials such as books, maps and stamps, apart from removing surface dust, only attempt treatment after consultation with a conservator. The mix of leather, paper, fabric, adhesive, dyes, inks and pigments found in these objects means that any treatment must be considered very carefully.
Removing Residual Sellotape Glue
Where the plastic carrier of Sellotape is stuck to the paper, a conservator is needed to remove it safely. This carrier often becomes detached with age, leaving behind the sticky adhesive. This is undesirable as it is unsightly, attracts dirt and pages could stick together.
To remove the sticky residue rub a piece of crepe rubber (available from art and craft stores) in light circular motions over the particular area. This will gather the adhesive in a small ball, which can then be carefully lifted with tweezers.
This method can only be used on strong, sturdy papers as brittle and fragile papers are likely to be damaged during this process. The stain left by the adhesive however, will remain. Removing this stain will require a qualified conservator to apply chemical treatments. In many cases it is not possible to remove the stain.
Interleafing
Interleafing with acid-free or buffered tissue paper is a protective measure that will counteract acidity to a certain extent, especially if the documents are then stored in boxes or folders manufactured from archival materials. Interleafing also minimises abrasion between documents.
High acidity levels may be countered to some extent by placing affected papers in an alkaline or neutral environment such as that afforded by boxes or folders.
Cut buffered or unbuffered acid-free tissue paper used for interleafing to a size slightly larger than the document in question. If the documents are of varying sizes, cut the tissue to the dimensions of the largest document. This will prevent slipping and ensure there is complete coverage of the documents. The resulting documents can be stored in a folder or box that has been made to size. Do not cram too many items into one box or folder.
Certain pages of books can be interleafed with unbuffered acid-free paper, especially where transfer of images, inks or smudging may be a danger. Take care to limit interleafing to a few pages as too much added bulk will put pressure on the spine and make the pages gape.
Damp or Waterlogged Paper
If an object is damp or wet, dry it out as quickly as possible using fans or hairdryers on a cool setting. Keep papers flat and held in place as any movement could cause further damage. Hold books upright with the pages opened as evenly as possible.
An even more critical situation involves complete waterlogging, which may follow flooding of a storage area. For books, insert sheets of blotting paper, slightly larger than the book pages, every fourth or fifth page so that excess water is absorbed.
If large numbers of paper objects are involved, freeze items that cannot be treated immediately. This will minimise further damage through prolonged wetness and possible mould attack. Wrap single items in plastic and defrost and treat individually at a later date.
Mould
If mould is present on paper, quick action is necessary to prevent damage. To avoid the spread of fungal spores, isolate the object immediately in a plastic bag.
As slightly damp conditions are usually needed for mould to develop, allow the object to dry partially before further treatment is attempted. This will make it easier to remove the mould. Dry the mould-affected object in a well-ventilated area, such as a fume cupboard or outside.
After partial drying, remove visible mould with a soft brush using gentle strokes away from the person to avoid inhalation of fungal matter. Treat each page of an affected book. If the paper is fragile or flaking, or fumigation is required, consult a conservator.
Mould is difficult to treat and even low oxygen and freezing techniques may not be effective. Do not use thymol or other commercial fungicides as it can permanently damage and discolour paper. It is important to seek professional help.
After treating the object and cleaning the previously occupied storage space, ensure there is no recurrence of the conditions that allowed the mould to develop in the first place. Regular, careful cleaning and preventive conservation are the best solutions (see the chapter Mould and Insect Attack in Collections).
Framing
Framing an object can be of benefit if it is done properly. Framing protects paper objects from external hazards like dust and handling and provides a relatively stable environment. Use UV-absorbing acrylic to protect the object from damaging ultra violet light. Great care has to be taken when framing pastels, charcoal or chalk drawings and any work on paper that has flaking paints or a similar friable surface as the electrostatic nature of acrylic can cause damage. UV-absorbing acrylic does not protect against the damaging effects of white light present in daylight and artificial lights. Special precautions should be taken to hang framed works so that they are not adversely affected by such strong light (see the chapter Preventive Conservation: Agents of Decay).
Use archival quality materials for all framing. Never glue framed objects to their backings regardless of the quality of that backing. Different types of boards and papers expand and contract at different rates as the environmental conditions change. This could cause paper to tear or distort. Instead, hinge paper with suitable tapes so that the paper can move freely.
Framed objects should never touch the covering glass or acrylic as this may cause transfer of paint or print media to the glass/acrylic. A margin can be created by using a window mount or spacer inserted into the rebate of the frame.
It is best not to place framed works against external walls as these vary more in temperature and relative humidity than do internal walls. If there is no alternative, attach a spacer to the back of the frame to produce a suitable gap to increase the airflow around the framed work.
Summary
- Maintain high cleaning and hygiene standards.
- Store and display paper in appropriate environmental conditions.
- Maintain relative humidity and temperature ranges of 45 – 55 % and 15 – 25 °C respectively with maximum variations of 5 % and 4 °C within any 24 hour period.
- Keep light levels to maximum values of 50 lux with no or very low UV content (30 to a maximum of 75 µwatts/lumen).
- Do not use adhesive tapes, metal paper clips, pins or fasteners.
- Use only archival quality materials for storage and display.
- Handle objects carefully using cotton or rubber gloves.
- Never hold documents by their corners or pull books by their spines. Always fully support the object.
- Do not lift framed works by their hanging cord or the frame itself – always place hands underneath and on the side of the frame.
- Discuss treatments with a conservator prior to commencing treatment of a paper-based object.
- Always use a reputable conservation framer for mounting works on paper and ask for information about framing methods.
Bibliography
Bass, S., Paper conservation, Information Sheet, Museums Association of Australia, WA Branch.
Canadian Conservation Institute, 1986, Storing works on paper, CCI Notes, 11/2, Ottawa, Canada.
Clapp, A.F., 1987, Curatorial Care of Works of Art on Paper: Basic Procedures for Paper Preservation, Lyons and Burford, New York.
Dobrusskin, S and Banik, G., 1991, Flattening of tracing papers and selected case studies, Course Notes, ICCROM Paper Conservation Course, Austria.
Engel, P., Schirò, J., Larsen, R., Moussakova, E. and Kecskeméti, I., (Eds), 2011, New Approaches to Book and Paper Conservation‑Restoration, Wien/Horn: Verlag Berger, XXIV, 748 S.
Hamburg, D.A., 1992, Library and archival collections, in Caring for Your Collections, The National Committee to Save America’s Cultural Collections, Arthur W. Schultz (Chairman), Harry N. Abrams Inc., New York, pp. 52-63.
Holben Ellis, M., 1992, Works of art on paper, ibid, pp.40-51.
Institute of Paper Conservation, The Paper Conservator and Paper Conservation News, Secretary, Institute of Paper Conservation, PO Box 17, London, WC 1N 2PE, England.
Johnson, A.W., 1988, The Practical Guide to Book Repair and Conservation, Thames and Hudson Ltd, London.
Rickman, C., 1992, Conservation of philatelic materials, in Conference Papers Manchester 1992, Institute of Paper Conservation, G.W. Belton, Lincolnshire
Smith, M.A. and Brown, M.R., 1990, Matting and Hinging of Works of Art on Paper, 2nd Revised Edition, Consultant Press, New York.
S & M Supply Company, 1992, Glossary, Useful Hints, PO Box 4296, Kingston, ACT, 2609.
Wächter, O., 1982, Restaurierung und Erhaltung von Büchern, Archivalien und Graphiken, Herman Böhlaus Nachf. Q.M.B.H., Graz, Austria.
Zetta Florence Pty Ltd, 1995-96, It’s Our Heritage, Zetta Florence Catalogue, PO Box 109, Fitzroy, Victoria, 3064.
Photographs
I. M. Godfrey and D. Gilroy
Introduction
The camera obscura described by Leonardo da Vinci in his notebooks had been used by artists for centuries as an aid to sketching landscapes. The effects of light on silver salts had also been known for some time. In the 1820s Frenchman Joseph Niépce produced images which he called heliographs using bitumen on a pewter plate. The first photograph, taken in 1826, needed an eight-hour exposure. It was not until the mid-1830s however, that the French scenic painter Louis Daguerre discovered a practical method of producing a photograph.
In the early 1830s Thomas Wedgewood experimented with making images using silver salts on paper and in 1835 Daguerre achieved a major breakthrough. By accident (a broken thermometer) he discovered that mercury fumes were able to develop a latent image on an exposed silver plate that had been sensitised with iodine. By 1837 he had developed a working process and in 1839 he formally announced his discovery. The images produced by this process became known as daguerreotypes (Figure 1).
Figure 1: A display of different photo techniques. Clockwise: Tintype; Daguerrotype; Ambrotype.
Daguerre’s work prompted Fox Talbot, an English gentleman scientist, to present papers on his own discoveries. In 1835, at the same time as Daguerre, he had produced negative images on silver sensitised paper which he called calotypes. On hearing of Daguerre’s discovery he sought to improve on his imperfect images. Eventually, in 1840 he was able to produce a paper negative from which a positive paper print could be made. These he called photogenic drawings. Also at this time another Frenchman, Hippolyte Bayard, was experimenting with sensitised paper prints, exhibiting them on June 24 1839, before either Daguerre’s or Talbot’s methods were announced.
The French Government offered Daguerre a lifetime pension if he would reveal the details of his discovery. This he did in August 1839. The process was offered free of charge throughout the world, except in England where patents were enforced.
The daguerreotype was far superior to the calotype in detail and was far more popular. The advantage of the calotype, allowing a number of copies to be made from one negative, was outweighed by the fact that it could not match the quality of the daguerreotype.
The major drawbacks of Daguerre’s method were the cost and its inability to produce multiple copies. The product was a direct positive, being exposed in the camera and then developed to produce a one-off positive image. If a second copy was required then a second sitting had to be arranged and the same price paid.
In 1851 the English sculptor and photographer Frederick Scott Archer started using collodion, a mixture of gun cotton (cellulose nitrate) and ether on glass photographic plates. A negative image could be produced if a glass plate was coated with collodion and sensitised with silver nitrate and potassium iodide, exposed and then developed while still wet or tacky. The resultant image was of greater sensitivity than either the daguerreotype or the calotype. When this image was backed with a black card a positive image was produced. This new photographic method was called the ambrotype and it rapidly superseded the daguerreotype and the calotype.
A cheaper offshoot of the collodion process was the tintype or ferrotype. Despite its name it was iron and not tin that was used in this process. A sheet of iron was coated with tacky collodion and exposed in the camera while still wet. It was then developed, fixed, dried and varnished. Popular from the late 1850s, it was used by travelling photographers until the 1940s.
It was the wet plate negative however, that dominated photography till the 1880s. When contact printed onto albumen paper and toned the result was a lovely warm, purple-brown image.
The development of the gelatin dry plate in 1880 and its use on paper signalled the end for the wet plate and albumen process. The gelatin negative and positive system became the basis of modern photography.
Photographic applications have become as diverse as its practitioners. There are photo-ceramics, photo-jewellery, cloth prints and prints on glass, leather, metal and ivory. There are also photo-mechanical processes, pigment prints and numerous colour processes. Despite the proliferation of photographic formats, this chapter focuses on those formats that are most commonly found in major collections and those in smaller institutions and private hands. The main photographic types normally found in collections are outlined in the section below.
Photographic Processes
Knowledge of photographic processes and their features is important in order to identify photographs. This knowledge allows those responsible for their care and preservation to:
- determine the most appropriate environmental conditions and storage requirements for particular photographs;
- differentiate between originals and copies; and
- separate cellulose nitrates and acetates from other photographic materials to minimise damage to entire collections.
Daguerreotype (1839 - 1860s)
Direct Positive
The process of producing a daguerrotype involved the following:
- a thin silver sheet was sweated onto a copper plate and then highly polished;
- after sensitising with iodine vapour the plate was exposed in the camera; and
- the latent image was then developed using mercury fumes.
Because the image was easily damaged daguerreotypes were housed behind glass with attractive brass mounts and leather-covered cases. Plastic cases, known as union cases, were introduced in 1854. These cases were made by heating and pressing a mixture of gum shellac and sawdust (or other fibrous material) into moulds, making this the first commercial example of a thermosetting plastic.
Daguerreotypes are recognised by their silver surface, sometimes being called the ‘mirror with a memory’.
Calotype (1840 - 1860s)
In its strictest sense the term calotype refers to the negative produced when a silver-sensitised sheet of paper is exposed in a camera. The positive prints produced from this negative, often called calotype prints or salted prints, lacked detail due to the paper fibres which produced a fuzzy appearance.
Salted Prints (1840 - 1860s)
Salted prints have the following features:
- good quality paper was coated with light-sensitive silver salts and printed out in sunlight to produce the image; and
- prints from glass negatives gave a sharper image than those from a paper negative.
Although the image was initially fixed using a strong salt solution, sodium thiosulphate (hypo) was used after 1841. The hypo dissolved out unexposed silver chloride producing a brighter image.
Ambrotype (1851 - 1870s)
Direct Positive
An offshoot of the wet collodion process, the ambrotype is an underexposed negative with a black backing. This backing gives it a positive appearance. Ambrotypes were packaged the same way as daguerreotypes, behind glass within a gilded, leather-embossed case.
Tintype (1852 - 1940s)
Direct Positive
Similar to the ambrotype, the tintype is in fact a sheet of japanned iron, coated with a sensitised collodion emulsion. Exposed in the camera and then immediately developed, the tintype exhibits a dull positive image with creamy highlights.
Although sometimes mounted in the same manner as ambrotypes and daguerreotypes tintypes were more commonly mounted in cards or albums. They are found in a range of sizes right down to buttonhole size. Abraham Lincoln’s presidential election campaign used his image on a tintype badge.
Wet Plate Process (1851 - 1880s)
Collodion Negative
Features of the wet plate process include the following:
- a glass sheet coated with collodion and sensitised with potassium iodide and silver nitrate was exposed in the camera while still wet;
- developed immediately after exposure the resulting negative produced fine detail;
- if allowed to dry before exposure a lot of sensitivity is lost; and
- the wet plate is identifiable by its creamy-grey appearance.
Most commonly used in conjunction with albumen paper to produce prints, it was very popular until the introduction of the gelatin dry plate in 1880. The fumes from preparing and exposing the wet plate affected photographers’ health.
Albumen Print (1850 - 1920s)
The albumen print:
- is coated with light sensitive silver salts and egg white solution;
- was normally produced by contact printing in daylight from a wet plate negative; and
- the image has yellow highlights with reddish-brown higher density areas.
The albumen print (Figure 2) is the photograph most often found before the turn of the century. Most visiting cards are albumen prints. Although it was still used until the 1920s, the albumen process effectively went into decline after 1880.
Figure 2: (a) Albumen print of the Swan River, Perth, Western Australia c 1897.
(b) Close-up of the surface showing paper fibres below the emulsion.
Gelatin Dry Plate Negative (1880 - Present)
In the 1870s Dr Leach Maddox developed the gelatin emulsion, which is the basis of modern photography. The gelatin plate needed no sensitising by the user and it came packaged ready to be exposed. This ease of use meant it quickly supplanted the wet plate method and glass plates. It was in common usage until recent times.
Gelatin Paper Prints (1880 - Present)
The advances made during the 1870s with gelatin emulsion resulted in the preparation of a gelatin bromide developing out paper. Developing out paper uses a chemical solution to produce a black and white image which is developed using artificial light in a darkroom.
It was not popular with photographers who were geared to printing out paper and the warm tones they produced. Printing out papers are contact printed using daylight and the particle size of the silver in these images is very small. This tends to scatter the light that hits them, giving the image its characteristic warm tone. Once the image density was satisfactory it was then fixed. The silver in developing out paper is larger than in printing out paper and produces an image that exhibits a neutral hue.
The introduction of a baryta layer (barium sulphate mixed with gelatin) below the gelatin layer added brilliance to the print. Gelatin printing out paper rapidly replaced both albumen and collodion printing out paper as the preferred print material. Improved sensitivity and speed in papers in the early 1900s increased demand for developing out papers and by 1920 printing out paper was rarely used.
Platinum Prints (1880 - 1920s)
Platinum prints:
- were admired for their tonal range and soft image;
- did not fade; and
- were usually steel-grey in colour but prints could be produced with a brown tone.
As platinum became increasingly expensive in the early 1900s, imitations were manufactured using silver-gelatin and also collodion. As the paper fibres of the platinum print are discernible under low magnification microscopic examination, it is easy to differentiate an original from a copy.
Collodion Prints (1880 - 1920)
Collodion prints exhibited the following characteristics:
- the same high gloss and reddish-brown tones as gelatin printing out paper;
- could be manufactured with a matt finish to imitate platinum prints. With gold and then platinum toning the image is very stable and this, coupled with its resistance to moisture, means that these prints have resisted fading extremely well; and
- are easily distinguished from platinum prints as they have a baryta layer below the emulsion. The paper fibres are not visible under microscopic examination.
Cyanotypes (1880 – 1920)
Originally developed in the 1840s this process was soon forgotten, only to reappear some 40 years later. Its bright blue appearance meant it never really gained widespread popularity and its main claim to fame was its use in the reproduction of engineers’ drawings. From this came the term ‘blueprint’ (Figure 3).
Figure 3: (a) Cyanotype c 1890.
(b) Close-up of the surface showing the image within the paper fibres.
Celluloid (Cellulose Nitrate) (1889 - 1950)
A refinement of Alexander Parkes’ 1861 invention, cellulose nitrate film was coated with a silver gelatin emulsion. Available in both sheet and roll format, eventually it was to dominate as the preferred negative material.
Using roll film in a suitably controlled camera, it was possible to expose a number of negatives rapidly. The smaller size of these negatives necessitated the use of developing out paper material, signalling the end of the glass plate and the printing out paper method of photography.
Cellulose Acetate (1930 - 1960s)
The inherent instability and flammability of cellulose nitrate resulted in the production of cellulose acetate ‘safety film’. This was in turn superseded by cellulose triacetate film (1950) which in turn was overtaken by polyester (1965).
Photomechanical Processes
Photomechanical prints include:
- collotype (1870 on);
- photogravure (1880 on); and
- letterpress half-tone (1885 on, Figure 4).
They are not true photographs as they have no emulsion and are printed by machine. Low magnification shows up the printed pattern.
Figure 4: (a) Postcard – letterpress half-tone.
(b) Detail of the child’s face showing the dot pattern.
Pigment Prints
Using inorganic pigments and the reaction of bichromates to render gelatin or gum arabic insoluble, these prints do not fade. Although a large range of pigments could be used, the colours chosen were normally warm chocolate browns.
Examples of pigment prints include:
- carbon print (1860 - 1930s);
- gum bichromate (1890 - 1930s); and
- woodburytype (1865 - 1890s).
The woodburytype was an early photomechanical process that used pigmented gelatin to produce the image.
Opaltypes (1880 – 1920)
Opaltypes (Figure 5) are characterised by:
- a positive image on milky white glass;
- many are hand tinted or retouched; and
- the image layer can be either carbon, silver-gelatin or platinum.
Figure 5: Opaltype – hand-tinted image on opal glass c 1890.
Lantern Slides (1851 - 1900)
Lantern slides can be identified by the following:
- the emulsion layer can be either collodion, albumen, carbon pigment or silver-gelatin;
- these were often tinted or hand painted; and
- the slide was usually formed by sandwiching two sheets of glass together to protect the image.
Stereograph (1851 - 1920)
Although there are examples of stereoscopic daguerreotypes and calotypes, the vast majority of these images are in the form of albumen prints. Silver-gelatin and collodion prints were also produced in stereographic pairs.
Photo-ceramic (Photo Enamel) (1950s - Present)
The photo-ceramic process involves:
- using pigments in a variety of ways to produce an image on porcelain or metal;
- the image is sealed by glazing; and
- the images do not fade.
Colour (1860s - Present)
Hand-colouring of images began at the inception of photography. There are many fine examples of early hand-tinted daguerreotypes, ambrotypes, prints and emulsions of all sorts. Before 1900 all colour photography involved either hand-tinting, pigment prints or photomechanical processes. In 1904 the Lumière brothers invented the autochrome process, an additive process, but it was not until 1935 that the modern era of colour photography started with the introduction of Kodachrome films.
A few of the major developments of colour processes are listed below.
- carbon print (1860s - 1930s);
- gum bichromate (1890s - 1930s);
- collotype-photomechanical (1868 - present);
- autochrome-additive process (1904 - 1940s);
- modern colour photography (1935 - present);
- instant colour process (1963 – present, Polaroid); and
- digital output photography - electrostatic, ink jet and dye sublimation prints (1985 – present)
A tabular summary and guide to the identification of the various photographic processes is provided in Appendix 7.
Structure of Photographs
Photographs are made up of:
- a support – usually glass, plastic, paper or metal;
- a binder/emulsion layer – albumen, collodion or gelatin; and
- the final image material – suspended silver, platinum, colour dyes or pigments in the emulsion/binder layer.
The composite nature of photographs complicates their care as the respective needs of the various components must be catered for. The paper support for instance will be strongly affected by fluctuations in relative humidity levels, the binder may shrink or crack if the relative humidity is too low and the dyes may be affected by inappropriate light levels (see Deterioration/Conservation next).
Deterioration/Conservation
In order to appropriately care for photographic collections, it is necessary to:
- identify and document all photographic materials in a collection;
- examine each of the photographs and assess their respective conditions; and
- determine the most appropriate environmental conditions and storage/housing for all photographs in a collection.
General Considerations
The major factors that influence the deterioration of photographic materials are (Robb 2004):
- storage or display in inappropriate environmental conditions;
- the use of poor storage enclosures or housings;
- rough or careless handling; and
- poor processing techniques in the original production of some photographs (e.g. the presence of residual processing chemicals and the use of exhausted processing chemicals).
Unless a particular photograph or photographs are of major significance it is far better to focus attention and resources on improving preventive conservation measures than on costly conservation treatments of deteriorated photographs. Aim to improve the environments to which photographs are exposed, encourage appropriate care and handling practices and use archival quality materials for storing and displaying photographs.
Significant silver deterioration will occur if photographs are not correctly processed and washed. For example, if the image is not well fixed it will eventually blacken, while if residual fixer has been left then the silver image may fade accompanied by yellowing of the image, binder and support (Robb 2004).
In addition to suffering the same problems as other paper-based materials, photographic images have other in-built problems. Some of these problems include:
- the emulsion layer is particularly attractive to insects as a food source;
- gelatin emulsions are very susceptible to mould attack caused by high humidity;
- continual changes in relative humidity may cause silver mirroring;
- images on glass are easily scratched; and
- tinted emulsions may fade due to prolonged exposure to light.
The environment to which photographic materials are exposed is critical to their longevity and preservation. The damaging effects of light are well known. Keep light exposures at 50 lux or less with minimal exposure to UV radiation.
The effects of varying relative humidity levels are manifold. For example, high relative humidity levels may soften gelatin while low relative humidity levels may cause binders to shrink and crack and overall flexibility to be reduced. Dyes deteriorate four times faster at 60 % relative humidity than at 15 % relative humidity and halving the relative humidity at which cellulose triacetate bases are stored doubles their life expectancy (Lavédrine 2003). Many ink jet prints are particularly susceptible to damage if relative humidity levels exceed 50 %.
For a mixed collection of historical photographic prints, slides and negatives, or if the collection comprises only photographs, keep the relative humidity in the range 30 – 40 % with only a 5 % daily variation. Higher levels of relative humidity can be tolerated if lower storage temperatures are maintained (Table 1, Robb 2004).
Table 1: Relationship between storage temperatures and acceptable relative humidity levels:
| Storage temperature | Acceptable relative humidity levels |
|---|---|
| 7 °C | 20 – 30 % |
| - 3 °C | 20 – 40% |
| - 10 °C | 20 – 50 % |
Temperature control is also critical as higher temperatures will accelerate degradation processes. For extended storage aimed at long-term preservation, cellulose nitrate, cellulose acetate and chromogenic dye photographs require cool (10 – 16 °C), cold (2 – 8 °C) or freezing conditions (less than 0 °C). Use vapour-proof packaging to avoid increased relative humidity levels and condensation during low temperature storage (Robb 2004).
Air pollutants will damage many photographic materials. Oxidising gases, particularly oxides of nitrogen and ozone, particulate matter and environmental fumes are particularly damaging to silver-based photographs and some ink-jet prints. Separate photographic materials from pollutant sources including industrial pollutants, untreated wood products, varnishes, paints, poor quality storage materials, chlorine-containing cleaning products, bleaches and photocopiers (Robb 2004). Strategies for ameliorating the effects of pollutants are provided elsewhere (see the chapter Preventive Conservation: Agents of Decay).
Storage Systems and Enclosures
Common sense and a knowledge of compatible archival materials goes a long way when considering storage systems for photographic materials. Some general storage considerations include the following (Robb 2004):
- strike a balance between ‘tight’ and ‘loose’ storage of photographic prints. If prints are too loose they may curl while handling damage is increased if they are too tightly packed;
- stainless steel, anodised aluminium and powder coated steel shelving or containers pose minimal risk to photographic materials;
- never use uncoated wood pulp products, glassine or PVC materials to house photographs;
- use buffered archival quality paper or board (in the form of sleeves, envelopes, folders and document boxes) to store silver, acetate and nitrate prints;
- use unbuffered archival quality paper to store chromogenic prints, cyanotypes and architectural drawings;
- use plastic enclosures (polyester, polythene, polypropylene, spun-bonded polyolefins and polystyrene) to store frequently used collections. These provide support and protection against fingerprints;
- do not use plastics that contain large amounts of plasticisers or have fillers, coatings or UV stabilisers;
- keep rubber cement, pressure sensitive tape, paper clips and elastic bands away from photographic materials; and
- if it is necessary to mark a photograph use a soft lead pencil on the reverse side of the image.
The conservation treatment of photographic images is a highly specialised subject and is fraught with potential difficulties for the amateur. Do not attempt to clean photographs other than to brush them with a clean soft brush, proceeding from the centre of the photograph towards the edges. Consultation with a conservator is recommended for almost all conservation problems.
Aspects related to the conservation of specific photographic processes are described in the sections below.
Daguerreotypes
Deterioration
Deterioration likely to affect daguerreotypes includes:
- tarnishing of the silver image;
- damage of the fragile image by poor handling when out of its frame;
- mechanical damage from the brass mount or broken glass; and
- corrosion due to high relative humidity levels.
Conservation
Exercise great care when handling these images and do not attempt to treat them. Consult a conservator for advice and note the following points:
- the silver-mercury amalgam image is formed on the surface of the plate and can be wiped off if carelessly handled. Wear gloves and handle the plate by the edges only;
- protect the case by placing it in a four-flap paper enclosure;
- physical damage such as scratching is irreparable. Make photographically restored prints from damaged images;
- store daguerreotypes in a low relative humidity environment (45 - 50%); and
- if condensation is present on the inside of the glass cover, disassemble the mount and clean the glass with alcohol. Hold the daguerreotype plate by the edges when reassembling. If inexperienced, only carry out this process in consultation with a conservator.
Although thiourea silver dips have been used to remove tarnish from daguerreotypes, this treatment is not recommended. It is extremely hazardous as surface coatings may have been applied and the image may have been hand tinted.
Unless the tarnish is so bad as to almost obscure the image, do not attempt to remove it. Seek advice from a conservator.
Ambrotypes
Deterioration
Deterioration of ambrotypes involves:
- mechanical damage to the emulsion layer by scratching; and
- breakage of glass.
Conservation
Methods of conserving ambrotypes include:
- minimising mechanical damage to the emulsion by placing a black acid-free card behind the image;
- protecting the case by placing it in a four-flap paper enclosure;
- if the image bearing glass is broken, do not attempt to glue it. Instead copy it and sandwich it between two sheets of modern glass; and
- removing dirt by using a soft brush or a moistened cotton bud. Do not use organic solvents as they may dissolve the emulsion.
Tintype
Deterioration
Factors most likely to cause deterioration of tintype plates include:
- not housing them in a case or mount so they become bent, causing the collodion emulsion layer to crack;
- high humidity which causes the iron plate to rust, resulting in further blistering of the emulsion; and
- scratching, tarnishing and dirt that will damage unmounted tintypes.
Conservation
The simplest way to conserve Tintypes is to mount them. A mount, comprising unbuffered acid-free backing board, spacer, window mount and a glass or perspex cover will protect the image.
Prints
Deterioration
All prints will suffer damage if:
- handled carelessly;
- exposed to inappropriate storage or display conditions such as high light, temperature and relative humidity levels; and
- exposed to insect attack.
Staining and foxing of prints disfigures them. Lignin in paper causes it to discolour and become brittle, while metallic impurities and localised mould growth can result in foxing. Light and high humidity will accelerate these forms of deterioration.
Silver prints are susceptible to damage from:
- sulphide formation;
- oxidation and reduction; and
- deterioration or staining from poor quality mount boards.
Sulphiding of the silver may result from impurities in the mounting material or the presence of residual processing chemicals such as the fixer (sodium thiosulphate). The result is a general fading and yellowing of the print or image.
Oxidation of silver is caused by the reaction of oxidant gases with particles of silver, converting them to highly mobile silver ions. These silver ions can migrate through the emulsion layer and if reduced back to metallic silver be redeposited in a new area. This results in fading of the image and colour changes. Sources of oxidant gases include industrial pollutants and poor quality mount boards.
The extremely small particles of silver in printing out paper are more susceptible to oxidative damage than the coarser particles present in developing out paper. In printing out paper the image tends to become more yellow and red whereas developing out paper tends to exhibit a bluish-silver mirroring effect.
Platinum prints and pigment prints do not usually fade. The main damage to these images is usually caused by the support material becoming stained or brittle. For platinum prints high temperature and relative humidity or pollution can cause image transfer with close contact mounts or covers.
Conservation
Conservation of photographic print images is enhanced by:
- careful control of temperature, relative humidity, light and pollutant levels;
- the use of unbuffered, acid-free storage containers; and
- the use of archival quality, acid-free mounting materials.
Specialist conservators and some professional photographic organisations carry out photographic restoration work. Some problems that can be tackled include:
- the removal of mounts and remounting. Many photographic prints are brittle or may suffer if exposed to aqueous treatments. Removal of mounts is extremely difficult in these cases;
- the repair of physical damage such as that caused by insect attack or tearing. Repairs can be made using infill paper fibres, retouching and then coating with gelatin or methyl cellulose as the binder; and
- restoration of silver mirroring. Silver mirroring can be tackled by applying a gelatin layer over the top of the mirrored emulsion. This masks the effect and makes for easier copying.
Conservation specialists are required for these tasks, particularly in the case of important original photographic works.
Make copies before beginning any restoration work and use retouched copies for display if the originals are badly deteriorated.
Because of the catalytic effect of the platinum in platinum prints store these print types in polyester or polypropylene sleeves to separate them from direct contact with other photographic materials.
Some of the chemical treatments that can be used to restore images include:
- intensification;
- bleaching;
- redevelopment; and
- reduction.
Glass Plate Negatives
Deterioration
The most common problems encountered include:
- scratching of the emulsion;
- breakage; and
- silver-gelatin may exhibit silver mirroring or the effects of inadequate processing.
Conservation
Store plates on edge in an enamelled metal box. Other materials that can be used for boxes are unbuffered acid-free board, heavy duty polyethylene and foam core. Fit polyethylene channel of the same width as the glass along two adjacent sides of the plate, to allow them to stand separately and to avoid crowding. This allows an airflow between the plates and prevents them sticking together. Do not stack glass plates.
Store at 30 – 40 % relative humidity to minimise glass decomposition and flaking (Robb 2004).
Cellulose Nitrate
Do not store cellulose nitrate near any other material as it is inherently unstable. In addition to giving off noxious gases as it deteriorates, cellulose nitrate has been known to ignite spontaneously. Seek specialist advice if you have a substantial collection of cellulose nitrate materials (see the chapter Modern Materials).
Modern Negatives
If stored in the correct environment modern negatives should last for hundreds of years. Careless handling is the most common cause of damage.
Colour Material
Although colour photography has been around since just after the turn of the century the initial additive process was cumbersome and did not gain widespread popularity. Colour photography gained popularity in the 1930s with the introduction of the chromogenic system, a subtractive process. In the 1960s the more stable silver dye bleach was reported but was not used for negative print material.
Digital output prints are probably the most common form of photographic imaging used by the general public. As such, ink jet, electrostatic and dye sublimation prints are likely to form the bases of many future collections. Ink jet prints are prepared when very small ink droplets are deposited on a paper or plastic support. The inks may be either organic dyes or pigments. Dye sublimation prints involve the use of a thermal transfer process to create images. Dyes are made gaseous and then condensed onto a coated paper that is specifically designed to receive the dyes. Dye sublimation prints are expensive in comparison with ink jet and electrostatic prints. Electrostatic prints are produced when heat is used to fuse a toner (containing resin and pigment) onto paper. These sort of prints are generally of lower quality than either ink jet or dye sublimation prints.
It is important to differentiate between true colour photographs and hand-tinted black and white images or pigment prints. Most pigment-based systems are quite tolerant to light exposure.
Deterioration
Colour photographs are inherently unstable. This is because the image is formed using organic dyes rather than metallic silver. Organic dyes fade in response to inappropriate light, temperature, relative humidity and pollutant levels.
Until the advent of digital photography, the most popular types of photographs were the colour negative and print system. These photographs are the least stable. This system, the chromogenic process, uses colour couplers during the processing to produce the dyes. As well as fading at uneven rates this process can exhibit yellow staining even when stored in the dark.
Colour slides are particularly susceptible to fading. Kodachrome materials fade in strong light but have excellent colour stability if stored in the dark (Robb 2004). The light fastness of inks used in digital printing has improved but there is still concern at the moisture sensitivity of ink jet inks and of their susceptibility to damage from pollutants.
A more stable system is the silver-dye-bleach system in which dyes are incorporated in the emulsion during manufacture and selectively removed during processing. This process is often used for making prints from colour slides.
While modern colour material has improved stability, images from the 1940s and 50s are often found in a severely faded or stained state. Photos from the 1960s and 1970s may also show severe deterioration, depending on their method of manufacture and their storage and display conditions. Some dye systems, especially those used in the early to mid-1990s, are very sensitive to light (Robb 2004).
Conservation
Descriptions of the full range of colour material from the 1940s to the present, is too extensive for inclusion here. Obtain advice from photographic conservators and by consulting appropriate specialist publications.
Some basic guidelines do apply however:
- restrict light levels to no more than 50 lux for displayed items and limit the duration of exposure to light sources;
- exclude sources of UV radiation if possible. Otherwise restrict levels as much as possible;
- maintain relative humidity levels in the range 30 - 40%;
- as long as relative humidity is controlled, store colour materials in a cool place (16 – 20 °C). The lower the temperature, the longer colour material will last;
- mount prints with unbuffered acid-free board behind perspex or glass. Glass is cheaper but perspex does not break as easily. Never use chipboard, hardboard, plywood and particle board to mount prints;
- avoid direct contact with glass or perspex to prevent any transfer of the image; and
- maintain a high standard of cleanliness in display and storage areas to decrease the attractiveness of these areas to insects and rodents.
Correctly storing photographic prints, negatives and slides will increase their durability (Figure 6). Ideally each photograph should have its own enclosure to protect it against rapid changes in relative humidity, dust, insect attack, pollutants and excessive handling. Archival products are available from conservation supply companies and high quality photographic albums can be obtained from most photographic stores.
Figure 6: Examples of enclosures for photographic materials.
The following storage guidelines will increase the life of colour prints:
- never use self-adhesive or ‘magnetic’ albums for storing prints as they are harmful to the image;
- store slides in their boxes or in uncoated polypropylene or polyester sleeves;
- store negatives in uncoated polypropylene or polyester sleeves. Glassine or paper envelopes are not recommended;
- only use acid-free boxes or those manufactured from polyethylene, polypropylene or polyester and store these on enamelled metal cupboards;
- wrap large prints with unbuffered acid-free tissue and store them in an acid-free cardboard box, which should then be stored on a shelf or in a metal cabinet;
- if using paper envelopes to store prints, ensure they are unbuffered, acid and lignin-free;
- never use PVC plastics, rubber bands, paper clips and poor quality adhesives;
- do not store glass plates and cellulose nitrate material in plastic enclosures; and
- regularly inspect and clean storage areas to ensure there is no insect attack. Change tissue regularly as it will become contaminated with impurities from original mount boards;
Summary
- Treat and store most photographic collections in the manner as described for paper objects.
- Control temperature and relative humidity to 16 – 20 °C and 30 – 40 % respectively.
- Avoid direct sunlight and control light levels to 50 lux or less with as little UV radiation as possible.
- Do not use self-adhesive albums under any circumstances.
- Do not touch emulsion surfaces with bare hands.
- Support prints evenly. Do not lift by a single corner.
- Inspect regularly to avoid insect attack and to monitor the general condition of photographs.
Bibliography
Booth, L. and Weinstein, R., 1977, Collection, Use and Care of Historical Photographs, American Association for State and Local History, Nashville.
Davies, A. and Stanbury, P., 1985, The Mechanical Eye in Australia, Oxford University Press, Melbourne.
Lavédrine, B., 2003, A Guide to the Preventive Conservation of Photographic Collections, Getty Conservation Institute, Los Angeles, California.
Martin, E., 1988, Collecting & Preserving Old Photographs, Collins, London.
Pénichon, S., 2013, Twentieth-Century Color Photographs: Identification and Care, Getty Conservation Institute, Los Angeles, California.
Reilly, J., 1988, Care and Identification of 19th Century Photographic Prints, Kodak Publication No. G-25, USA.
Rempel, S., 1987, The Care of Photographs, Nick Lyons Books, USA.
Robb, A. (revised and updated by M. Roosa, 2002), 2004, Care, Handling and Storage of Photographs, International Preservation Issues Number 5, International Federation of Library Associations and Institutions Core Activity on Preservation and Conservation (IFLA-PAC), Bibliothèque nationale de France, Paris, France.
Wilhelm, H., 1993, The Permanence and Care of Colour Photographs, Preservation Publishing, Grinnell, Iowa.
Paintings
D. Gilroy, I. M. Godfrey and I. Loo
Introduction
Ancient cave and rock paintings provide evidence of the lifestyles and relationships between prehistoric people and their environments. These earliest of works, as with modern paintings, vary greatly in their subject matter, style, techniques and use of materials.
Paintings most often conjure images of framed pictures using oils, watercolours or acrylic on canvas, paper or wood panels. While watercolours will be referred to occasionally in this chapter, as much of the conservation focus for watercolours relates to the paper support, readers are directed to the Paper and Books chapter for further information about the care of these materials. The care and conservation of frescos and murals is also not covered in this chapter. The term ‘paintings’, for the purpose of this chapter therefore, will refer primarily to works on canvas, wooden panel and boards with media ranging from oils and egg tempera to synthetics. There are of course, a great many types of supports as well as finishes and materials. If we consider some of these materials it is obvious that the traditional term needs to be viewed in a broader context. Inks, chalks, acrylics, pastels, charcoal and other materials, either alone or in combination, together with a variety of grounds or varnishes may all be applied to a variety of supports. The addition of other materials, as in collage or ethnographic material, further blurs the boundary between painting and object.
Structure
Paintings (easel paintings in particular), usually comprise the following elements (Figure 1):
- a support, predominantly a textile canvas, but may be composed of other materials such as wood, metal, ivory, bone, leather, glass or stone;
- an auxiliary support such a stretcher or a strainer to keep the painting taut. Keys, usually flat triangular wooden or plastic wedges, are used in the corners to adjust the tension of the fabric and to maintain a smooth appearance;
- a size, such as animal glue, is used on a canvas to fill pores, isolate coatings or to make surfaces suitable to receive coatings (Mayer 1991);
- a ground, such as gesso or pigments mixed with oil, usually to produce a white background, uniform texture, degree of absorbency, as well as an intermediate structural layer between the support and acidic painting layers;
- a paint layer composed of pigments (either organic or inorganic) and binders such as oils, egg tempera, gums, wax, or synthetic polymers and resins; and
- a varnish layer, applied to the surface of an artwork that may be either a natural resin like dammar, mastic or shellac or a synthetic resin such as alkyds, acrylics or ketones. Many acrylic paintings are not varnished.
Figure 1: A cross-section showing the structure of an easel painting.
Added to the above could be other material such as feathers, sand and wood, all of which react differently to the agents of deterioration.
Deterioration
Paintings are composite structures and there are complex interactions between the different components. Deterioration in paintings can stem from:
- poor artistic technique and material selection;
- chemical changes with time (natural ageing);
- changes due to external environmental conditions; and
- mechanical fatigue and physical damage.
Of these, poor artistic technique and material selection may be unavoidable and can contribute to a range of problems, particularly if successive paint layers were applied before the underlying layers dried sufficiently. In addition to problems associated with this ‘inherent vice’ of a painting, deterioration factors that most severely affect paintings include:
- temperature and relative humidity;
- light;
- pollution, including dust;
- biological deterioration; and
- physical effects including vibration, impact and poor handling
Fluctuations in temperature and relative humidity can cause painted canvas or wooden panels to expand under humid conditions and contract under dry conditions. These fluctuations may disrupt the bond between the paint layer and the support, leading to flaking and/or cracking paint, layer sagging or stretching of the support, desiccation and splitting, distortion or warping of the wooden elements and even mould growth under high relative humidity conditions. High relative humidity may also account for a chemical change from azurite pigments (blue) to malachite (green) compounds and the development of ‘blooms’ (a bluish-white haze) in varnishes, both of which affect the aesthetics of a painting. Exposure to elevated temperatures will accelerate chemical deterioration and may also cause paint binders to soften or break down.
Over-exposure to light is a major cause of deterioration for displayed artworks. Light can cause bleaching and fading of colours, particularly those derived from the dyes and lakes that are often used in watercolours (Figure 2). Light, particularly UV radiation, can promote chemical degradation such as chain scission of the cellulose in canvas which can potentially cause weakness (and subsequently tears) in the support or changes to the paint binders.
Figure 2: Watercolour painting showing fading due to light exposure.
Air pollutants such as sulphur dioxide, carbon dioxide, hydrogen sulphide and ozone will also damage paintings. Acids formed by sulphur dioxide and carbon dioxide in the presence of moisture will damage organic components, hydrogen sulphide can react with lead-based pigments and cause them to blacken and ozone, a powerful oxidiser, may cause fading, loss of tensile strength and accelerated aging.
Dust can cause deterioration by attracting moisture and insects and also by abrading the surface of a painting.
Mould is usually caused by excessive exposure to moisture, either as a result of high relative humidity (> 70 %) or flooding. As moulds feed on the binding medium, sizing in canvas or the paste used in a lining, they are most commonly seen on the reverse side of paintings.
Rodents and insects such as beetle larvae, termites and silverfish can attack the wooden panel supports or the wooden stretchers of canvas paintings. Take action to deter cockroaches and flies (see the chapter Mould and Insect Attack in Collections) as their excrement is disfiguring, can be very difficult to remove from the surface of artworks and because it is acidic, may damage the paint or varnish layers.
Many paintings on stretched canvas are very susceptible to physical effects such as vibrational forces, shock and impacts. Continual or excessive vibration, particularly during transportation or storage in areas subjected to extreme vibrations, can lead to paint loss. Paintings can also be damaged by poor handling or storage which may lead to tears, chipping, abrasion, loosening or even breakage of frames (Figure 3).
Figure 3: Oil painting damaged by poor handling and storage.
Paintings may also suffer because of the inherent instability of the materials from which they are made. Examples of these additional problems include:
- flaking of ochres as the support material for a bark painting attempts to return to its original shape;
- breakdown and yellowing of natural oil or resin-based varnish layers; and
- changes in colour and material failures as a result of using less stable, non-traditional materials. This is particularly so for paintings produced in the 20th century due to the immense range of synthetic materials that have become available to practising artists.
Poorly selected restoration materials may eventually lead to a visually incohesive artwork as those materials degrade and fade over time.
Preventive Conservation
Environment
Maintain an appropriate, stable environment and control light levels to slow the ageing processes that contribute to the deterioration of paintings. A stable environment is also important to minimise the damage to aged, less flexible canvas and to prevent distortion of wooden backing panels.
Ideally the storage and display environment for paintings should have temperatures and relative humidity levels in the ranges 15 -25 °C and 45 - 55 % respectively with maximum fluctuations of 4 °C and 5 % in any 24 hour period.
Most of the common backing materials, such as canvas, wood, parchment, vellum and even bone and ivory will respond to changes in relative humidity. It is important therefore, when deciding where to hang an artwork, to choose a location that is not prone to large variations in temperature and relative humidity. Do not, for example, hang a painting above a fireplace due to the increased temperatures of the brickwork, the resultant lower relative humidity environment and the possibility of smoke damage. Maintain conditions that will neither encourage embrittlement and desiccation nor too much flexibility and/or mould growth. Methods for controlling relative humidity fluctuations are described elsewhere (see the chapter Preventive Conservation: Agents of Decay).
As watercolours and other paints formed using dyes and lakes are the most sensitive to damage by exposure to light, restrict light levels to 50 lux with a maximum UV level of 30 µW/lumen (1500 µW/m2). Oil, tempera and acrylic paintings can tolerate higher light levels up to 200 lux and 75 µW/lumen (15,000 µW/m2).
Never expose paintings to direct daylight. If windows or skylights are present, use curtains or blinds to eliminate daylight. Cover fluorescent lights with UV filters and install individual switches for each aisle or storage area so that only the minimal quantity of light required for work is used. When the area is not in use, switch off all lights with the exception of emergency lighting. Full details of other light control techniques are available elsewhere (see the chapter Preventive Conservation: Agents of Decay).
Frames and Framing
Frames are both functional and decorative elements. They protect the artwork they surround, provide a means of attaching paintings to the wall and enhance the overall aesthetics of the paintings that they house. Frames original to the painting or selected by the artist are often over-painted, removed or discarded, depending on the current fashion of the day. It is recommended that existing frames on paintings be left ‘as is’ until a significance assessment and condition report have been prepared by a conservator.
For paintings that no longer have frames, framing can provide the correct tension for the canvas, enhance exhibition potential, make storage and handling easier and buffer against changes in ambient conditions. A backboard, for example, minimises relative humidity changes for the support and may help to prevent paint from flaking. Although paintings are generally not glazed as it can detract from the artists’ intent, it serves to protect valuable and fragile paintings by buffering against changes in ambient conditions and by preventing the ingress of dust, dirt and insect excrement.
Commonly used glazing materials include glass and acrylic materials such as Perspex™. Although chemically safe, glass is heavy and can shatter and damage a framed work, whereas acrylics are lighter and shatter-resistant. A further advantage of acrylic glazing is the opportunity to use acrylics that filter UV light. Do not allow direct contact between the painted surface and the glazing as this will increase the risk of mould growth and the abrasion of pigments.
The framing and rehousing of paintings has become a specialised field within conservation (‘conservation framing’) with different materials and methods used from those of typical commercial framing operations. Some differences include the:
- use of archival materials;
- use of a backing board to protect the painting from physical damage, dust and changes in environmental conditions;
- fixing of attachment brackets only to the frame and not to the back of the painting;
- use of padding or a spacer in the gap between the painting and frame to provide a buffer;
- use of UV-filtering acrylic glazing; and
- avoidance of direct contact between the glazing and the surface of the painting.
Before proceeding with framing, make sure that you have checked the following points with the framer:
- the depth of the frame, ensuring that there is room for a spacer and for the painting to be safely positioned;
- the method by which the painting is to be fixed within the frame;
- the types of framing materials that will be used; and
- the types of backing boards and glazing materials used for the painting.
To provide additional environmental protection for particularly valuable paintings, conditioned silica gel or Artsorb® sheets can be incorporated into the frame. Do not attempt this type of treatment without professional advice however as there are risks if correct procedures and conditioning of the silica gel are not carried out.
Handling
Avoid contact with the painted surface and the back of the canvas when handling paintings. This will reduce the chance of leaving fingerprints on varnishes or of dislodging fragile surfaces. Although wearing white cotton gloves is generally recommended when handling paintings, powder-free latex or nitrile gloves are equally acceptable, especially where cotton fibres may catch on uneven surfaces or be deposited on soft paint layers. Take care when handling works displaying impasto techniques or similar artworks, as there is the possibility of the gloves catching on the protruding paint. Other handling recommendations include:
- plan all handling activities carefully. If moving a painting for instance, clear all obstacles from the proposed route and make all necessary preparations for the safe, final placement of the painting;
- clean hands, roll up sleeves and remove jewellery to reduce the risk of damaging the paint surface;
- hold unframed canvases or panels only at the edges;
- handle framed paintings at the sturdiest part of the frame and not the decorative ornamentation. Never hold frames by the top as this weakens the frame which may break apart if the mitres are already weak;
- inspect paintings and frames carefully before moving them as some older, ornate frames may have sections that are loose;
- as long as the frame is in good condition, carry the framed painting with one hand underneath the bottom of the frame and the other on the side, ensuring that the image side of the painting is facing inwards towards your body;
- if the frame is in poor condition, place it on a support and carry the support;
- if the painting is large, ensure that there are at least three people available to move the painting, one on each end and the other to look out for obstacles and to warn pedestrians;
- have padded blocks available so that the painting can be rested off the floor if necessary; and
- if possible, consider transporting large paintings on padded trolleys. Secure the paintings well before moving to a new location.
To reduce vibration and shock from movement, transport paintings in protective crates with foam padding and use a professional art handling and transportation company where necessary. When particularly valuable objects are moved by commercial transport companies, include vibration and shock data loggers with the paintings to monitor handling practices. These loggers will record the date and time of any physical shock or excessive vibration to which the painting may have been subjected while in transit or storage.
Storage and Display
Before hanging a painting for display, check the frame and hanging system to ensure they are in good order, are sufficient for the weight of the painting and are arranged so the weight is evenly distributed. If there is no hanging system in place, do not simply hammer in nails or use string or cord to hang paintings. Take the painting to a conservation framer for advice on the most appropriate hanging method.
A storage space for paintings should be flexible and take into account the nature of the collection, potential collection growth and changes in exhibition and storage policies. There are many different options ranging from metal bins and storage units to wire mesh moving screens.
Hanging storage using wire mesh moving screens is a good way to store paintings (Figure 4). Wire mesh screens, usually composed of a rigid wire mesh supported on a metal or wooden frame, provide an economic use of floor space and paintings can be easily located and examined in situ. Paintings can be hung (using an appropriate hanging system) on both sides of the screens. These are attached to an overhead and floor track that allow them to be moved manually. Two or more people are normally required to remove paintings from these racking systems.
Figure 4: Wire mesh screen used to store paintings.
Follow the guidelines below if considering the use of wire mesh moving screens to store paintings:
- ensure that the painting is equipped for hanging and is in good condition. Consult a professional framer if it does not have a frame or other form of hanging system;
- consider attaching a backing board to a painting to protect the verso (back) of the painting from damage;
- test the strength of the hanging system and the hooks in the racking before hanging;
- hang heavier paintings lower than lighter paintings;
- check that frames will not damage adjacent frames;
- do not hang paintings in high traffic areas or narrow spaces where they may be accidentally damaged;
- remove or replace wire and hanging hardware that protrudes too far from the back of a painting; and
- do not use vertical storage for paintings that are in poor condition, are fragile or have flaking paint.
If framed images are not hung, store them according to the following guidelines:
- stand paintings upright and in the right orientation;
- place sheets of acid-free board or Fome-cor®, larger than the paintings, between each frame;
- place padding, such as Fome-cor ®, underneath the stack to protect the edges of the frames;
- raise the stack from the floor by using ethafoam blocks, over skidproof mats, or place a wedge against the outermost frame to prevent slippage;
- stack framed works, alternating face-to-face and back-to-back. This prevents the fittings on the back of the frame from scratching the front. Where possible, use pieces of board or other suitable material in between each frame;
- when stacking uneven sized framed works, ‘bridge’ the works so that the frames rest on each other and do not make contact with the painting itself; and
- do not lean or stack paintings against exterior walls.
A custom wooden storage unit consisting of a number of bins can be made to accommodate two to three paintings in each section (Figure 5). Seal all wood (exterior grade plywood), preferably with two to three coats of a water-based polyurethane sealer to reduce off-gassing from the wood. Exterior walls should be at least one inch thick with separating dividers placed in grooves at the top and bottom. Raise the base of the unit so that it is at least 15 cm off the ground and pad the bottom of each section with ethafoam. Place units against an interior wall for added structural and environmental stability. If there is more than one painting in a bin slot, separate each one with some board or other appropriate material.
Figure 5: Custom wooden storage unit comprising individual bins for paintings.
Protect unframed paintings, fragile paintings or those with flaking paint by storing them in custom-made boxes. Construct these boxes from archival materials and store them horizontally in enamelled metal cupboards, map drawers or shelves.
Inspect and monitor paintings regularly, particularly if they are in storage.
Do not use inks or sticky labels on the backs of paintings as they may eventually bleed through to the front or cause puckering to the front of the work. Chemical residues from the adhesive on the labels may also migrate to the front of the work. Catastrophic damage can also be caused by spilling inks or other liquids.
Do not use aerosols and spray cleaners near exposed paintings, as the solvent propellants have the potential to cause softening and damage to paint surfaces.
Treatments
Documentation
Carefully document the history and condition of any artwork as soon as it enters a collection. Record details concerning the painting and the frame, including:
- notes about the artist, the date of the painting, dimensions (framed and unframed) and the title of the work;
- photographs including overall shots of both sides and any detailed images taken from various angles to highlight special features such as labels, damage or other interesting features; and
- a condition report recording the dimensions, materials used in the painting and supports, details of any previous restorations or irregularities, descriptions of the type and condition of all materials present (even if unsure of their nature) and labels or writing on the edges or back.
Evidence of an underlying work may require specialist examination using infra-red, UV or X-ray photography.
Cleaning and Repairing
Conservation treatment of paintings is a specialised area of work, requiring high levels of skill and training. As inappropriate treatments have the potential to damage and compromise the integrity and value of a painting, any decision to treat a painting must be made only after consulting conservation and curatorial professionals.
Each painting is unique and no general guidelines can be set as to the extent of treatment required. Bearing the above cautionary notes in mind very brief details are given below of the type of work that would require the services of a conservator. These include:
- removing dirt and stains from the surface;
- removing yellowed varnish using solvents to reveal the original colours of a painting;
- consolidating friable and powdery pigments or grounds;
- reattaching loose or flaking paint or relaxing blind cleavage of paints;
- repairing tears or holes;
- lining or re-lining a weakened canvas or strip lining to support a weak tacking edge;
- re-stretching a canvas. Great care is needed to prevent splitting as aged canvas loses its flexibility; and
- re-integration. This involves filling and in-painting the losses of paint so that visual continuity is achieved.
It is important that all conservation work is reversible as conservation materials will also deteriorate over time. Thus, when a recently applied varnish eventually ages and deteriorates, it will be able to be removed. Similarly, materials used in retouching may age at a different rate to the original and may have to be removed at some time in the future.
An example of a painting that required treatment is described below (Figure 6). While not an example of the treatment of an easel painting, the decision making process when planning a conservation treatment remains the same. The painting, a modern Aboriginal bark painting in an acrylic medium, was in the process of being given a collection number when ink was accidentally splashed onto it.
Figure 6: Acrylic painting showing damage from careless handling of ink.
The proposed treatment of this work of art was to:
- assess the damage to the painting and prepare a condition report;
- photograph the painting, including close-ups of damaged areas;
- sketch stained areas to highlight those damaged areas which may not show up sufficiently in a photograph;
- determine the chemical nature of the ink;
- search the literature for all known solvents or reagents which will dissolve the ink;
- conduct spot testing to determine if the chosen reagent will remove the ink without damaging the underlying image; and
- remove the ink area by area.
Should ink removal techniques be likely to affect the underlying paint layers, an alternative to removing the ink may be to over-paint.
All conservation treatments must be fully documented and reversible.
Summary
- Document all aspects of a painting, including details of the artist, title of the work, photographs, sketches and condition report.
- Maintain temperatures and relative humidity levels in the ranges 15 -25 °C and 45 - 55 % respectively with maximum fluctuations of 4 °C and 5 % in any 24 hour period.
- Restrict light levels to 50 lux and UV levels of 30 µW/lumen (1500 µW/m2) for watercolours and paintings based on dyes and lakes. Maintain light levels at 200 lux and UV levels at 75 µW/lumen (15,000 µW/m2) for oil, tempera and acrylic paintings.
- Do not touch front or back surfaces with bare hands.
- Be extremely careful when handling paintings, use appropriate systems for hanging them and obtain conservation framing advice for large and heavy works.
Bibliography
Bomford, D., 1984, Conservation and Storage: Easel Paintings, in Thompson, J. M. A (Ed.), Manual of Curatorship: A Guide to Museum Practice, London, Butterworths, Second edition.
Canadian Conservation Institute. CCI-ICC Notes. Ottawa, Ontario: Canadian Conservation Institute.
10/3, 1993, Storage and Display Guidelines for Paintings.
10/4, 1993, Environmental and Display Guidelines for Paintings.
10/10, 1993, Backing Boards for Paintings on Canvas.
10/13, 1993, Basic Handling of Paintings.
Gettens, R.J. and Stout, G. L., 1966, Painting Materials, Dover Publications Inc., New York.
Keck, Caroline K., 1965, A Handbook on the Care of Paintings. Nashville, Tenn., American Association for State and Local History.
Leisher, W.R., 1992, Paintings, in Caring for Your Collections, National Committee to Save America’s Cultural Collections, Arthur W. Schultz (Chairman), Harry N. Abrams Inc., New York, pp.30-39.
Mayer, R., 1991, The Artist’s Handbook of Materials and Techniques, Fifth Edition, Revised and Updated, Viking Penguin, USA.
Moser, K. S., 1992, Painting Storage: A Basic Guideline, in Bachmann, K. (Ed.), Conservation Concerns: A Guide for Collectors and Curators, Cooper-Hewitt, National Museum of Design, Smithsonian Institute, New York and Smithsonian Institution Press, Washington and London, pp. 57-61.
Simpson, M.T. and Huntley, M., (Eds), 1992, Caring for Antiques, Conran Octopus, London.
von Nostitz, C., 1992, When Is It Time to Call a Paintings Conservator?, in Bachmann, K. (Ed.), Conservation Concerns: A Guide for Collectors and Curators, Cooper-Hewitt, National Museum of Design, Smithsonian Institute, New York and Smithsonian Institution Press, Washington and London, pp. 63-67.
Ceramics
C. Corvaia
Introduction
The term ceramic is used to describe a variety of fired clay objects. The transformation of an earthy substance by fire produces a durable material, examples of which have survived from ancient times until the present.
The basic criteria for categorising ceramics are clay composition, firing process and glazing. Clays are formed from the weathering of metamorphic and igneous rocks in the earth’s crust, by the action of hot gases, chemical and physical erosion. Primary clays are found at their site of formation and are quite pure. China clay for example, is 98 % kaolinite (hydrated aluminium silicate - Al2O3.2SiO2.2H2O). Secondary (or sedimentary) clays are deposited far from their site of origin. They have smaller particles and more impurities which result in higher plasticity and a range of colours. Examples of secondary clays include ball clays, red clays, earthenware clays, marls and fire clays.
Clay minerals have a relatively small particle size and are able to adsorb water chemically. The water acts as a lubricant between clay particles and as the water evaporates, the particles are drawn closer together until a rigid form is created. Fillers, such as sand, ground shells or grog, are added to clay bodies to control shrinkage and aid in shape retention. Fluxes, such as alkaline metal earth oxides, are added to control the fusion point of clay during firing.
The firing cycle includes an initial or biscuit firing of the clay vessel followed by glaze firing. Biscuit firings are usually within the range 900 to 1100 °C. In biscuit firing, chemically bound water is driven off at 400 to 600 °C and the clay particles are joined by sintering. At 800 °C vitrification or the fusion of fluxes and free silica begins and the ceramic attains maximum porosity. At higher firing temperatures, 1100 to 1300 °C, the ceramic undergoes shrinkage and fusion of the clay body continues until all pores are closed.
Glazes, essentially a thin layer of glass fired onto the ceramic ware, are composed of silica, metal oxide fluxes (such as sodium, potassium, calcium, magnesium and lead) and stabilisers (commonly aluminium oxide). The glaze is usually applied to the biscuit ware as a slip (ground ingredients suspended in water) and then fired when dry. Fusion of the glaze begins at 600 °C and the body and glaze of a ceramic start to integrate at 1100 °C. Glaze colourants are produced from metallic compounds and may be applied under the glaze, incorporated into the glaze slip or applied as enamels on glazed ware. Under glaze colours are more durable, whereas the lower firing temperatures of enamels (750 °C) render them more vulnerable to damage.
The major ceramic categories are earthenware, stoneware and porcelain. Earthenware bodies are derived from naturally occurring secondary clays. Low firing temperatures (600 – 1100 °C) produce a porous ware (> 15 % porosity) and a range of colours (yellow, buff, grey, red and brown). Earthenware includes terracotta (usually unglazed red ceramic), ancient and medieval wares, tin glazed earthenware (Majolica, Faience and Delft ware) and transfer printed Creamware.
Stoneware bodies are composed of modified secondary clays, fired to high temperatures of 1200 to 1300 °C to produce a vitrified, hard and durable ceramic. The porosity of stoneware is < 3 % and colours include white, buff, grey and black.
A hard-paste porcelain body is made from 50 % kaolinite, 25 % feldspar and 25 % quartz or flint. It is fired to a high temperature of 1400 °C to produce a vitreous, white, non-porous ceramic with a glassy fracture surface. Porcelain was first made in China and then developed in Europe in 1709. Soft-paste porcelain is fired to a lower temperature (1150 °C) than hard-paste porcelain and is slightly more brittle, more porous and fractures with a grainy texture. Bone china, as developed in the late 18th century in England, contains 50 % bone ash, 25 % kaolinite and 25 % Cornish stone. It is fired to 1250 °C, producing a non-porous, pure white translucent body.
Many further distinctions may be made within these groups according to the type of body, decoration, style or function of the object. It is important to assess ceramic objects before treatment, as the type of ceramic obviously affects the treatment options.
Deterioration
The most common ceramic conservation problems include:
- breakage;
- deterioration of previous repairs;
- flaking painted decoration or glaze;
- soiling or staining;
- loss and cracking; and
- damage from salt efflorescence.
Damage from salt contamination may occur in unwashed objects recovered from buried or underwater sites. As the object dries, chloride and sulphate salts form crystals which expand and break up the ceramic. Signs of salt damage are white crystals on the surface, shallow pits on the ceramic body or missing spots of glaze (Figure 1).
Figure 1: (a) Surface damage due to salt contamination on a small ceramic jar.
(b) A ceramic plate that also has surface damage due to contamination from salt.
Preventive Conservation
Environment
Ceramics are generally less sensitive to extremes or fluctuations in environmental conditions than materials like paper, wood and ivory. As this applies only to objects in good condition however, it is wise to protect all ceramics by storing or displaying them in a stable environment, with temperatures in the range 15 - 25 °C and within a relative humidity range of 40 - 60 %. Limit temperature and relative humidity fluctuations to 4 °C and 5 % respectively within any 24 hour period.
Extremes, or sudden changes in temperature and relative humidity levels may cause susceptible ceramics and glazes to crack. Adhesives used for repairs may also be adversely affected. If an object has been contaminated by soluble salts, fluctuations in relative humidity may cause disruption to the clay fabric and glaze as the salts either crystallise or redissolve.
Avoid heat build-up from lighting sources. For display, place lighting outside showcases and if possible direct light onto ceramic objects by reflection rather than direct illumination.
Handling
Take care when handling ceramic materials as they are often fragile and easily broken. Observe the following guidelines when handling ceramics:
- avoid unnecessary handling;
- use clean, bare hands or disposable rubber gloves;
- check for any breakages, cracks or old repairs;
- remove any loose parts such as lids before moving;
- do not pick up objects by handles or protruding parts;
- carry only one object at a time. Place one hand underneath the base and use the other hand to support the side of the object; and
- if a quantity of objects need to be moved, use a tray lined with bubble wrap, a thick, clean towel, cottonwool or crumpled tissue paper and pad between each object.
Storage and Display
Protect ceramic objects against dust, harmful vapours and physical damage in storage. Achieve these aims by:
- storing ceramic objects in boxes, closed cupboards or on shelves that are not subject to vibration, jarring or shock;
- keeping objects clearly visible and accessible so that handling is minimised;
- using metal cabinets in preference to unsealed wooden cupboards or display cases. These latter units may emit organic acid vapours which are harmful to low-fired, unglazed ceramic objects;
- padding objects in boxes with bubble wrap or acid-free tissue paper;
- lining shelves with inert polyethylene foam sheet or acid-free paper and leaving enough space around each object for easy access; and
- not stacking objects. If stacking is unavoidable, as in the case of plates, separate objects with acid-free paper that has been cut to size and limit the height of the stack.
If using wooden or wood-based composites for storage and display, seal them appropriately (see the chapter Preventive Conservation: Agents of Decay).
Treatments
Examination
Before beginning any treatment, thoroughly examine the ceramic, noting:
- the condition of the ceramic body;
- the extent of previous repairs;
- any unfired decoration or blistering, weak and flaking glaze; and
- the presence of stains and residues.
Pay particular attention to any unfired decoration or weak and flaking glaze, because if these are undetected they could be damaged during treatment. Note the presence of any stains and residues as these indicate the history and use of an object and, depending on their significance, it may be appropriate to retain them. Use notes, drawings and photographs to document the condition of the ceramic before it is treated. Record all observations and pertinent investigations.
Cleaning
As cleaning removes dirt which could otherwise be embedded further during subsequent treatment stages, it is usually the first stage of a conservation treatment. Cleaning techniques which may be applied to ceramics include:
- brushing;
- vacuuming;
- wiping with damp swabs; and
- wet chemical cleaning.
Start the cleaning process by using the most gentle and least toxic materials. Always attempt dry cleaning before wet or chemical cleaning. Remove loose dirt using a brush and gentle vacuum suction. Wooden sticks will remove accretions and some of the more stubborn dirt. Do not use metal probes as they are likely to cause damage.
Do not wash objects with flaking glaze or soluble painted decoration and if extremely fragile do not brush them. Clean robust sections of vitrified glaze on such objects using damp swabs. Never fully immerse ceramics in water, as cracks in the glaze could retain water, leading to further damage.
Test any solvents to be used on an inconspicuous area and on decoration or gilding before application.
Some dirt can be removed using cotton swabs moistened in distilled or deionised water. Roll the swabs over the surface. Do not scrub them back and forth. To remove grime, use a solution containing a few drops of a concentrated, non-ionic detergent (such as Lissapol) in water (100 ml).
Alternatively, prepare and use a pure soap solution as outlined below:
- dissolve one gram (about one teaspoon) of pure soap flakes in a little hot water;
- add enough cold water to make a total of one litre of solution;
- add 100 ml of soap solution to 100 ml of water;
- apply with a cotton swab by rolling over the ceramic surface; and
- remove detergent or soap residues using cotton swabs moistened with distilled water.
This method is particularly suited to small intricate objects and porous, unglazed ceramics.
Poulticing
Poulticing is also suitable for cleaning porous, unglazed ceramics. The steps in preparing and applying a poultice are detailed below:
- tear acid-free blotting paper into small pieces;
- wet the paper with distilled water;
- mash the wet paper blend to make a pulp. A heavy-duty domestic blender is a very effective ‘masher’. Note that a large amount of water needs to be added to the paper for correct functioning of the blender (about 300 ml of wet paper to 1500 ml of water);
- drain excess water from the poultice, using either a strainer or hands, before applying;
- cover the ceramic surface with an acid-free tissue to avoid the paper pulp becoming trapped in the ceramic pores;
- apply the poultice. As it dries it absorbs dirt from the pores of the ceramic;
- cover the poultice with a polyethylene sheet if the relative humidity is low. A poultice which dries too quickly may not be effective;
- leave the poultice to dry completely and fall away; and
- several applications may be required to clean the ceramic surface satisfactorily.
Wash ceramics which are sound, glazed or less porous using a more conventional method, as outlined below:
- use a large plastic container or line a sink with towels and wash only one object at a time;
- use cold or warm water (1 L) which contains either a concentrated, non ionic detergent (1 ml or 0.25 teaspoon) or 100 ml of soap solution (see above for preparation);
- use small brushes to remove stubborn dirt;
- rinse the ceramic thoroughly with distilled water; and
- drain the ceramic on cloth or paper towelling and dry it with a soft cloth.
Stain Removal
Always test potential solvents on an inconspicuous part of the ceramic to ensure that they have no adverse effects. Try solvents such as methylated spirits, alcohol and acetone on stubborn stains. Apply these with cotton swabs. If using acetone, take care, avoid contact with skin, wear eye protection and do not inhale the vapours.
On porous, unglazed ceramic surfaces, use a paper poultice prepared with tissue paper and the chosen solvent. To slow the evaporation of the solvent, cover the poultice layer with plastic film.
Remove stains found in the bottom of old tea cups and in cracks by using oxygen-releasing detergent powders. These powders, which are often marked ‘Contains Oxygen Bleach’, contain sodium perborate, which is converted to hydrogen peroxide in water. To remove these stains:
- prepare a 2 % solution by dissolving 20 g of powder (about one tablespoon) in 1 L of water;
- leave the porcelain or other glazed ceramic in the solution for about two hours;
- check the object periodically, brushing the stained area gently at these times;
- begin the treatment in the morning and continue until the stain is removed;
- if necessary, store the ceramic in clean water overnight and place it in fresh bleaching solution the following day;
- when the stain has been removed, rinse the object thoroughly by soaking it in distilled water for two hours; and
- drain and dry the ceramic.
Although it is more expensive than the oxygen-releasing detergent powders and has a limited shelf life, hydrogen peroxide is effective in removing stubborn stains from porcelain. Always test decorative elements first to make sure they will not be affected. If there are no adverse effects then apply hydrogen peroxide as described below:
- pre-soak the porcelain in distilled water before applying the hydrogen peroxide;
- lightly roll some cotton wool and soak it in 3 % v/v hydrogen peroxide. Up to 30 % hydrogen peroxide solution may be used;
- place the swab directly over the stain, leaving it in place for two or three hours;
- check periodically, repeating the process until the stain is removed;
- if the treatment needs to continue the following day, place the porcelain in water overnight and then continue the application of hydrogen peroxide until the stain is removed;
- rinse the porcelain thoroughly by leaving it to soak for two hours in distilled water; and
- allow the porcelain to drain and dry.
As hydrogen peroxide is a very powerful oxidising agent, wear rubber gloves and eye protection when using it.
Copper and iron stains may result from clamps or dowels used in old repairs or from contamination on burial sites. Removing these stains is difficult and requires the use of stronger chemicals. Consult a conservator before attempting treatment of these types of stains.
Desalination
If a ceramic shows signs of salt damage (see Deterioration earlier) it must be desalinated. For ceramics with a friable surface, poulticing is recommended, rather than washing. Apply a fine tissue that will not ‘catch’ on the ceramic surface before the paper pulp is applied (see Poulticing above). In the case of very friable ceramics seek advice from a conservator.
Porous ceramics whose surface is not friable should be wet gradually to avoid further damage. This may be achieved by:
- placing the object in a large plastic container, adding enough tap water to cover the base of the ceramic and covering the container with a tight-fitting lid;
- check the ceramic periodically;
- water will be drawn up into the ceramic by capillary action, allowing air to escape;
- add more water, up to the ‘wet mark’ on the ceramic; and
- continue this process until the object is submerged. Desalination then proceeds.
Keep objects wet that have been recovered from damp burial (terrestrial) or underwater sites until desalination can begin. Transport them in individual, sealed polyethylene bags, with some wet sand or water to cushion them. Place the bags in rigid containers, then transfer the objects to plastic containers, buckets or tubs for treatment. Keep containers covered to avoid evaporation of the wash solution.
Desalinate ceramics recovered from marine sites by following the regime below:
- place the ceramic in a 50:50 seawater/tap water solution for two weeks;
- transfer to pure tap water and leave for four weeks;
- transfer to distilled or deionised water and wash until no more chloride salts are released. This will involve periodic changes of solution after several months in each bath; and
- if slime forms on the ceramic, indicating that bacteria are active, add a biocide to the wash solution. Consult a conservator if bacterial contamination is suspected.
The time required to complete desalination varies greatly from object to object. Ideally the chloride content of the solutions should be monitored and the solutions changed when the chloride levels in solution have stabilised. This process requires access to sophisticated equipment. A simpler approach is described below.
As a general guide, test for chloride salts each month and change the solutions if salts are present in the wash solution. To test for chloride salts, use the following procedure:
- place 2 ml of wash solution in a test tube;
- add two drops of 10 % w/v nitric acid to the wash solution;
- add two drops of silver nitrate solution to the nitric acid/wash solution. The silver nitrate solution is prepared by dissolving about 15 g of silver nitrate in 100 ml of distilled water;
- if a white precipitate forms, then chloride salts are present. Change the wash solution and continue desalination for a further month; and
- continue washing until tests show that no chlorides are present (four to five months in most cases).
Previous Restorations
Previous restoration attempts may be indicated by the presence of large metal staples, dowels, glues, resins and fills. Staples and dowels are usually left in place as removing them can cause damage. If, however, they are corroding and damaging the ceramic, treat them to stop the corrosion or remove them. Contact a conservator for advice on the most appropriate procedure.
Adhesive repairs and residues are usually apparent as they often become yellow and unsightly over the years. Some common adhesives used to repair ceramics include starch paste, animal glues, shellac, cellulose nitrate, soluble nylon, epoxies and emulsions such as PVA. Depending on the type used, old adhesives can often be redissolved. Unfortunately the solubilities of many adhesives change as they age. Soluble nylon, for instance, is probably better referred to as insoluble nylon! Comprehensive information regarding the preparation and properties of consolidants, adhesives and coatings is provided elsewhere (Horie 1987).
A conservator can provide advice regarding adhesive type and solubility. If solvents are used to soften or dissolve adhesives, always test painted surfaces to make sure they will not be affected.
To test the solubility of an old adhesive, follow these steps:
- carefully cut a small chip of adhesive with a sharp scalpel;
- place it in a covered glass container;
- soak it in water initially;
- if the adhesive does not dissolve in cold water then try warm water, alcohol (ethanol) or methylated spirits (95% ethanol and 5% methanol) and acetone (in that order);
- stronger solvents are needed to soften and/or dissolve adhesives like epoxy resins. Consult a conservator before attempting to remove these adhesive types; and
- if a chip of adhesive cannot be removed then apply the solvent to an exposed spot of adhesive and note its effect.
Take the usual precautions (rubber gloves, eye protection and non-inhalation of vapours) when using organic solvents such as acetone and alcohols.
To dismantle an old repair, try the following techniques:
- work on a padded surface, or line a container so that pieces that fall apart will not be further damaged;
- keep an accurate record of each fragment’s position in the ceramic so that subsequent reconstruction will be easier;
- paint the solvent repeatedly over the joins while very gently manipulating the fragments to test for any movement;
- when using alcohol, methylated spirits or acetone, cover the joins with cotton wool wicks soaked in solvent. Place the object in a plastic container with a tight fitting lid;
- clean excess adhesive from the edges of separated fragments while the adhesive is still soft (use a stiff brush dipped in solvent or a sharpened stick). Take care not to remove any of the clay fabric; and
- leave fragments to dry.
If it is necessary to completely immerse the join in solvent, wet the porous ceramic gradually. Avoid full immersion in acetone or alcohol if possible, due to the cost and exposure to the solvents themselves. Consult a conservator if this step is deemed necessary.
Joining
Adhesives selected for joining ceramics should be reversible and have good ageing properties. They should be able to be redissolved if necessary, should not yellow, become brittle or lose adhesion with age.
Certain acrylic and polyvinyl acetate adhesives meet the above criteria and are suitable for ceramic repairs. Paraloid B-72, an ethyl methacrylate and methyl acrylate copolymer, has been used widely (Koob 1986) and UHU All Purpose Adhesive, a polyvinyl ester, has shown good results. Both adhesives can be removed or diluted with acetone. Paraloid B-72 is available from conservation materials suppliers and UHU All Purpose Adhesive is available from art materials or stationery suppliers.
Joining fragments requires both skill and patience, as illustrated in the following procedure (see also Figure 2):
- have a practice run of the joining sequence, holding the fragments together with tape (no adhesive). Record the joining sequence to ensure that no fragments are locked out of the structure (see below for more details);
- degrease all broken edges before joining. Apply methylated spirits (or alcohol) with a small cotton swab. Take care to remove any cotton fibres that may cling to the broken edges;
- prime porous ceramic fragments with a dilute adhesive solution before joining together. Dilute the adhesive with an appropriate solvent by mixing one part adhesive to four parts solvent. Brush the dilute solution over all broken edges and allow to dry;
- to repair a broken ceramic vessel commence by joining the base fragments and proceed upwards;
- small fragments can often be joined together first to make a few large fragments which can ultimately be fitted together;
- use a sand tray to support ceramic fragments while the adhesive dries. Use only clean white sand and place a piece of soft tissue under the ceramic;
- stand the larger of the two fragments being joined in the sand - the weight of the other fragment (if correctly balanced) will tighten the join;
- select two fragments to be joined and apply adhesive along the centre of one edge;
- push the fragments together and pull apart slightly to check for an even distribution of adhesive;
- press the fragments together and manipulate to get the correct position. Running a fingernail across the join can help to check for a good fit;
- should the join need realigning, apply solvent with a brush to soften the adhesive and allow time for adjustments;
- remove excess adhesive while still wet, or semi-dry, with an appropriate solvent or if necessary with a sharp scalpel when dry. Apply a minimum amount of solvent to prevent weakening of the join; and
- apply a suitable tape across the join, on both sides of the ceramic and leave the fragments supported in a sand tray until the adhesive sets.
Work methodically so that fragments are not locked out at the end of reconstruction. A practice run of the joining sequence should ensure this. Use a tape which will not bond too strongly to the ceramic for the test run. By doing this no adhesive residue will be left behind nor will the ceramic surface be damaged when the tape is removed.
Figure 2: Repair of a ceramic dish
(a) The materials used for the repair.
(b) Application of Paraloid B-72 adhesive to the broken sides of the dish.
(c) Adhesive tape holding parts of the ceramic dish together until the adhesive sets.
Some of the self-adhesive (pressure-sensitive) tapes available from stationery or art suppliers are suitable. Archival quality paper tapes, which are self adhesive and pressure sensitive, are preferable but these are only available from conservation materials’ suppliers. They range from strong, thick paper tapes, such as Filmoplast P90 and Tyvek Tape, to finer tissue paper tapes, such as Document Repair Tape and Filmoplast P. Do not apply tape to fragile glazes, painted decoration or friable, unglazed ceramics.
Dowelling is not generally recommended as it involves removing part of the object by drilling holes. If an object is too heavy to be joined with an adhesive, display it on a support which holds fragments as if they are joined.
Gap filling is not always necessary, as there is some tolerance for loss in artefacts. If ceramic loss is visually disturbing or provides structural problems, filling may be carried out. Note that the aim should not be to make the object look new. Restrict filling and in-painting to areas of loss and do not cover original parts of the object. As filling and in-painting require considerable practice, seek advice from a conservator if you consider these treatments necessary.
Summary
- Maintain ceramics in a stable environment with temperatures in the range 15 - 25 °C, within a relative humidity range of 40 - 60 % and with maximum variations of 4 °C and 5 % respectively within any 24 hour period.
- Avoid extremes or sudden changes in temperature and relative humidity to minimise damage to glaze, ceramic or adhesives.
- Store in a stable dust-free environment. Avoid stacking.
- Handle carefully, with disposable rubber gloves or clean, bare hands.
- Carry objects one at a time, with support provided at the base and side. Use a padded tray to carry a group of objects.
- Examine and document objects thoroughly before beginning cleaning or other treatment.
- Use dry cleaning methods before wet or chemical treatments. Test water, solvents and any other chemicals which come into contact with ceramic materials, on an inconspicuous part of the object.
- Desalinate objects recovered from burial or marine sites. Do not allow objects to dry before desalination is complete.
- For repairs, choose adhesives that are reversible and have good ageing properties. Methodically plan and execute the joining of broken ceramics.
Bibliography
Buys, S. and Oakley, V., 1993, Conservation and Restoration of Ceramics, Butterworth-Heinemann, Oxford.
Craft, M., 1992, Decorative arts, in Caring for Your Collections, National Committee to Save America’s Cultural Collections, Arthur W. Schultz (Chairman), Harry N Abrams Inc., New York, pp. 96-107.
Horie, C. V., 1987, Materials for Conservation, Butterworths, London.
Koob, S., 1986, The use of Paraloid B-72 as an adhesive: its application for archaeological ceramics and other materials, Studies in Conservation, vol. 31, pp. 7-14.
Little, M., 2000, in The Winterthur Guide to Caring for Your Collection. Chapter 5: Ceramics and Glass, Landrey, G. J. (Ed.), London: University Press of New England. pp. 57–66.
Newton, C. and Logan, J., 1990 (revised 1997, 2007), Care of Ceramics and Glass - Canadian Conservation Institute (CCI) Notes 5/1, Canada.
Williams, N., 2002, Porcelain: repair and restoration, a handbook, London: The British Museum Press.
Glass
C. Corvaia
Introduction
Glass manufacture is believed to have originated around 5000 years ago in Mesopotamia or Egypt. The glass beads, figurines and vessels produced were similar in appearance to ceramic objects. They were made using the techniques of core forming, mosaic, fusion, mould casting and cold cutting. Glass blowing was developed approximately 2000 years ago, most probably in Syria. The techniques for hand working glass have continued essentially unchanged since that time.
Ancient glass was formed from a mixture of silica (sand, crushed quartz or flint), alkali (soda or potash from plant ash) and lime (probably included as an impurity in the sand). Oxides of metals such as copper, iron, cobalt and manganese were added to produce coloured glass. Some glasses which were not purposely coloured had yellow or green tinges. This was due to iron oxide impurities in the sand. A colourless glass was first produced about 1900 years ago by adding manganese dioxide to the usual glass components.
Until about 1000 years ago soda from the ashes of marine plants were universally used to modify the silica network. After this time the glass makers of Northern Europe replaced soda with potash obtained from beech wood ash. The resultant glass was known as ‘forest glass’ and was mainly green or brown in colour.
By the 15th century Venice was established as the most prominent glass manufacturing centre in Europe. ‘Cristallo’, a fine clear glass was developed by adding lime to the soda-silica mixture. In Bohemia in the early 16th century, a clear solid crystal glass was produced when lime was added to the potash-silica mixture. This glass was ideal for cutting and engraving. Lead glass, also known as ‘glass of flint’, was developed in Britain in the 17th century. This glass, with a 30 per cent lead oxide content, is characterised by its clarity and brightness.
Mould casting was revived in North America in the early 19th century. The use of press moulding allowed intricate patterns to be produced cheaply and quickly. Early pressed glass objects were made predominantly from colourless lead glass. In 1864 a ‘lime’ glass was developed which was most suitable for pressing. It resembled lead glass but cost less. This was important as the production of glass containers became mechanised in the late 19th century. Hand blown bottles were still produced as late as the 1930s but only for certain types such as pharmaceutical bottles and cosmetic ware.
Most of the glassware used during the 18th and 19th centuries in Australia and other parts of the then British Empire was imported from Britain. In comparison with the common ‘black’ glass bottles, there is a scarcity of the colourless and pale green flint glass objects on early Australian sites. This is due to manufacturing limitations and differences in excise duty that existed between flint glass and black glass in Britain from 1746 to 1845 (Boow 1991). Older, cheaper methods of manufacture, such as those using wooden moulds and push-ups, were continued for black glass bottles until about 1870.
Deterioration
Apart from the obvious fragility of glass and its tendency to crack and break, there are other forms of deterioration which occur when glass is in contact with moisture and aqueous solutions (Figure 1).
Figure 1: Examples of glass deterioration in a bottle collection
Surface weathering produces effects which vary greatly, from a loss of transparency to the formation of iridescent layers, crizzling and scaly encrustations.
The reaction of glass with water can be described as “an inward diffusion of water molecules, which then react with non-bridging oxygen atoms to produce hydroxyl ions that migrate out with the alkali cations” (Newton 1989). The surface layer of the glass becomes alkali depleted and protons (hydrogen ions) replace the alkali ions in the glass network. As protons are smaller, this results in shrinkage of the leached surface layer of glass. When the glass dries various forms of deterioration may be observed. The surface may become opaque or iridescent and fine lamellae or thick flakes may fall away.
When flat sheets of glass are stored ‘face to face’ in a humid environment, the trapped moisture will quickly form a leaching solution and attack the glass.
Crizzling, the formation of very fine surface cracking, occurs in glass with a disproportionate composition (excess alkali and insufficient lime). This type of composition is often found in glass of the 16th to the 18th centuries. Crizzled glass objects ‘weep’ when placed in a humid environment, with the droplets of moisture on the surface continuously leaching the excess alkali.
Other environmental influences which adversely affect glass include:
- carbon dioxide and sulphur dioxide which combine with moisture in the air to produce weathering crusts of calcite (CaCO3) and gypsum (CaSO4) as found for example, on old window glass;
- slightly acidic or alkaline soils;
- soluble salts which are inevitably present in glass recovered from a marine environment. If the glass is allowed to dry before being thoroughly washed, crystallising salts will cause surface exfoliation; and
- exposure to sunlight. Decolourised glass, which contains manganese salts, develops a purple hue after prolonged exposure. This effect has even been found in shards recovered from shallow water sites.
Preventive Conservation
Environment
Optimum conditions for storage and display of stable glass objects are 40 - 60% relative humidity and a temperature range of 15 – 25 °C with maximum variations of 5 % and 4 °C respectively within any 24 hour period.
Relative humidity control is important as a moist environment will adversely affect any glass surface and a desiccating environment will cause further damage to weathered glass. In addition, adhesives used for repairs may ‘cold flow’ if exposed to high relative humidity or high temperatures.
High temperatures may damage painted, crizzled or weathered glass. After appropriate treatment, keep chemically unstable, crizzled and weeping glass at 42% relative humidity. This strict condition is necessary as higher relative humidity levels will dissolve salts and lead to their migration while lower relative humidity levels increase the risk of cracking. Use a sealed container and conditioned silica gel or an appropriate saturated salt solution to maintain this relative humidity level and seek advice from a conservator.
Light levels are not critical for most glass as fading is not usually a problem. Sunlight and other UV sources will affect decolourised glass, giving it a purple hue. Light levels of up to 300 lux, with a UV content of 75 µwatts/lumen (22,500 µwatts/m2) are acceptable for stable glass objects.
It is important to avoid heat build-up from lighting. Place display lighting outside showcases and if possible direct light onto glass objects by reflection.
Handling
Glass is a fragile material which is easily broken if not handled carefully. Take the following guidelines into account when handling glass objects:
- check for breakages or failing adhesive;
- remove any loose parts such as lids or stoppers before carrying;
- only carry one object at a time with the weight supported uniformly and one hand under the base;
- do not wear cotton gloves as glass surfaces are smooth and slippery. Instead handle objects with bare, clean hands or disposable rubber gloves;
- line trays used to carry objects with bubble wrap or cottonwool covered in tissue paper. Insert bubble wrap or crumpled tissue paper padding between objects; and
- keep handling of iridescent or weathered glass to a minimum.
Storage and Display
Do not store flat glass ‘face to face’ as trapped moisture will damage the glass surface. Use perforated acid-free board to separate the glass sheets and allow air exchange.
Store glass vessels in rigid cardboard boxes padded with inert polyethylene foam, bubble wrap or crumpled acid-free tissue paper. Use foam core board or ethafoam to build special cradles for top heavy or damaged objects.
Unless the surfaces are properly sealed (see the chapter Preventive Conservation: Agents of Decay), do not use wooden cupboards or showcases for storing or displaying glass objects. Acid vapours given off by hardwoods such as oak and birch and by composite boards are damaging to glass that has a high soda content. Enamelled or powder-coated metal cabinets or shelving are recommended. Line shelves with a non-slip material such as closed cell polyethylene foam. Attach this foam firmly to the shelving.
Treatments
Examination
Thoroughly examine glass objects before storing, displaying or treating them in any way. Photographs, as well as notes and drawings, are useful for documenting the condition of objects before and after treatment.
Identify and clearly describe signs of deterioration. These include the presence of:
- cracks;
- old repairs;
- missing parts; and
- surface deterioration such as opacity, iridescence (or opalescence), crizzling, pitting, delamination and encrustations.
Also note any marks that indicate the place, date or method of manufacture and original contents of bottles and jars. Record the presence of any content residues. Ensure these residues are maintained during any subsequent treatment.
Keep accurate records of any treatments that are carried out and any changes that occur to the object while it is in storage or on display.
Cleaning
Only clean glass if it is in sound condition. Do not brush or wet any glass that has poorly adhering paint or surface weathering. Do not clean or chemically treat degraded glass (for example, exfoliated, crizzled, weeping, encrusted) or painted glass without consulting a conservator.
Guidelines for cleaning sound glassware are described below:
- use dry methods of cleaning first;
- remove surface dirt with a soft, clean cloth or a brush and gentle vacuum suction;
- if wet cleaning is necessary, then examine the object for any previous restoration, as some adhesives may be affected by water;
- clean the surface of repaired objects by applying distilled water with cotton swabs;
- to wash sound glassware, use cold or warm water (one litre) and add either a few drops of a concentrated, non-ionic detergent (such as Lissapol) or about 100 ml of pure soap solution. (The soap solution is prepared by dissolving one gram or about one teaspoon of pure soap flakes in a little hot water and adding enough cold water to make one litre.);
- use a large plastic container or a sink lined with towels;
- do not leave glass to soak in the water;
- only wash one object at a time;
- use soft brushes, cotton swabs or pliable sticks to remove stubborn dirt from wet glass;
- thoroughly rinse the glass with distilled or deionised water (in a large container) and drain on cloth or paper towelling;
- dry glass immediately with a soft cloth or by immersing it in a bath of methylated spirits; and
- use methylated spirits to remove stubborn dirt. Apply with a cotton swab, after testing any painted areas.
Rinse ‘weeping’ glass gently in deionised or distilled water. Do not leave it to soak. Dry it quickly and thoroughly by passing through two baths of methylated spirits. The ideal storage conditions for this type of glass is in an environment maintained at a relative humidity of 42 %. This will avoid further ‘weeping’.
Desalination
Place glass recovered from waterlogged land sites or marine environments immediately into sealed polythene bags to prevent drying. For glass recovered from the sea, partially fill the bags with seawater.
Washing is necessary to remove soluble salts, especially chloride salts, which will otherwise damage the glass when it is dried. Guidelines for desalination are described elsewhere (see the chapter Ceramics).
Removing Encrustations
Calcium encrustations can be removed mechanically from sound glass using pliable wooden spatulas and brushes while the glass is being desalinated. Calcium encrustations harden and become more difficult to remove if allowed to dry. Remove surface encrustations with great care as some forms of surface degradation, such as iridescence and exfoliation, are not apparent when the glass is wet.
Using polyphosphate water softeners, such as ‘Calgon’, to remove calcium encrustations is not recommended for any weathered glass as these are damaging to the glass (Horie 1989).
Use water softeners with caution for the treatment of strong, unweathered glass. A 2 % solution of Calgon in cold or warm water, sufficient to cover the object, may be used for this purpose. Initially the glass may be soaked for a few hours, periodically brushing away the calcium encrustations as they soften. Monitor this treatment carefully.
Repair
Joining broken glass is made difficult by the transparency of the material, its smoothness and the lack of ‘tooth’ or ‘key’ on broken edges (Figure 2).
Although epoxy resins have been used to repair glass their general use is not recommended. They tend to yellow as they age and are difficult to remove. A few epoxy resins have been developed specifically for conservation use and these have good ageing properties. They are available from conservation materials suppliers but appear to have a limited shelf life and are very expensive.
Some acrylic and polyvinyl acetate adhesives used for ceramic repair, Paraloid B-72 and UHU All Purpose Adhesive respectively, are also suitable for glass repair. The principles, guidelines and techniques for repair and reconstruction previously outlined for ceramics apply equally for glass fragments (see the chapter Ceramics). Points specific to glass are described below:
- before joining, degrease the edges of glass fragments with a cotton swab soaked with either methylated spirits or acetone;
- do not place tape, used to hold fragments together, on fragile surfaces;
- if the artefact is flat, lay fragments together on a flat surface and hold with tape;
- place a release material, such as wax paper or silicone release paper, under the glass fragments to prevent excess adhesive adhering to the support;
- paint the adhesive lightly over the joins. The adhesive will be drawn into the joins by capillary action; and
- remove excess adhesive later, using a sharp scalpel.
Figure 2: Broken glass – advertising sign.
(a) The glass sign before conservation and restoration.
(b) The glass sign after conservation and mounting behind Perspex.
Often synthetic casting resins are used for filling losses in glass. Gap filling causes some stress to the glass and the resins have a tendency to yellow. Only carry out filling if it is structurally or aesthetically necessary. It is a complicated procedure and consultation with a conservator is essential.
To strengthen a crack in glass to avoid further damage, dilute adhesive with an appropriate solvent and paint along the crack. Even a well repaired join in clear glass usually remains visible. This occurs because the refractive indices of the glass and that of the adhesive are usually different.
A broken glass stem may require dowelling as well as adhesive for a successful repair. The difficulty of drilling precise holes into a broken glass stem can be overcome by using a metal collar and a glass drill bit (Jackson 1982). The dowelling technique is complex and it is best to seek advice from a conservator.
Consolidation of glass is not generally recommended. If it is considered necessary, consult a conservator. Exfoliating, iridescent glass will lose its ‘rainbow’ colouring if a consolidant is used.
Bottles
Bottles and jars form the basis of many collections. As most bottles are made from glass the aspects of deterioration, care and conservation outlined earlier in this chapter apply to these objects. It is most important to be aware of the history of collected bottles, as the burial environment from which they were recovered will influence deterioration processes.
Deterioration
In addition to the usual factors which affect the deterioration of glass, internal stresses will be present in hand- or machine-blown glassware. This is due to differences in cooling and shrinkage rates between the thin and thick sections of the molten glass vessel. Exposing bottles to sudden changes in temperature may upset the balance of these internal stresses, resulting in the glass fracturing. For this reason always allow glass to adjust gradually to new environmental conditions. Such allowances should be made following excavation, washing and movement from one climatic region to another.
Weathered glass attains a variety of colours and textures depending on the environmental conditions to which it has been exposed. Bottles that have been in a moist environment will become iridescent or silvery and the surface may exfoliate. Glass buried in an alkaline environment such as found in guano sites for example is characterised by pitted, opaque surfaces.
Clear glass exposed to sunlight for a long time may become purple, indicating that manganese was used in its manufacture. Some clear glass will become amber, an indication that selenium rather than manganese was used as the decolourising agent. As selenium was used between 1915 and 1930 and manganese was used predominantly between 1880 and 1915, these forms of deterioration are important as dating indicators.
As long as they are placed in a suitable environment, most weathered glass objects will not deteriorate further after soluble salts have been removed from them.
Preventive Conservation
During and after excavation, do not allow wet bottles to dry. Keep plastic containers with tight-fitting lids, polyethylene bags and bubble wrap on hand to store the glass as it is recovered.
Store and display glass bottles under the conditions previously recommended for glass objects. In view of the internal stresses present in bottles, control temperature and relative humidity conditions carefully.
Treatments
Cleaning
Before washing, allow bottles excavated from wet sites to stand for 24 hours in a partially closed bucket with 10 millimetres of water covering the base. This will allow the bottle to adjust to the ambient conditions.
Gradually humidify dried bottles that require washing in a similar fashion.
Remove softened accretions with a nylon brush, such as a toothbrush. Loosen any sand packed inside bottles with a pointed wooden tool and then gently shake it out. Avoid using metal probes as these may scratch and mark the glass. Water will also help loosen and remove packed material from inside bottles.
Soften stubborn accretions and remove soluble salts by immersing the bottles in tap water. Soaking for a few days may be necessary. Do not use warm or hot water as the temperature change may crack the bottles.
Chemicals are generally not recommended for cleaning glass bottles. Although a quick result may be achieved with the use of acids, soda or household bleach, these chemicals will attack weathered glass and leave harmful residues.
An alternative cleaning technique involves the use of an ultrasonic bath. A high frequency sound produces shock waves, which loosen dirt from the glass object. Use this technique cautiously however, as friable glass may disintegrate in the process.
Corks, Caps and Labels
Some bottles may retain the original contents, cork, lead cap or paper label. In order to keep as much information about the bottle as possible, conserve these objects intact.
Paper labels are very fragile and may be obscured by dirt and mould. Remove dirt from the glass and paper by gentle dry brushing. Take precautions so that dust which contains mould spores is not inhaled. A cotton bud moistened with water and wooden points can be used to clean the glass. Do not wet the paper during the cleaning process.
Lead caps on bottles are usually corroded and require chemical treatment to stabilise them. Although details of lead treatment are given elsewhere (see the chapter Metals) consult a conservator before embarking on any treatment of lead caps.
Following all treatments, microcrystalline wax paste can be applied to the lead and any exposed cork to seal the bottle and contents. A suitable wax paste and its method of application are described below.
| microcrystalline wax | 5 g |
| white spirit | 10 ml |
- apply the paste with a small, stiff brush and allow it to dry; and
- repeat the process until a layer approximately 2 mm thick coats the lead and exposed cork.
If no lead cap is present but the cork is sound and the contents have been retained, the bottle may be cleaned and washed as described in the section above for empty glass bottles.
After cleaning, seal the bottle to ensure the cork remains moist and swollen and that the contents do not evaporate. Apply microcrystalline wax paste to the cork and lip of the bottle (as described above).
Consult a conservator if more information on sealing bottles is needed.
Polishing Glass
Do not use abrasive powders or chemicals to polish glass. In these processes a layer of the original object is destroyed, breakage may result from heat build-up and chemical residues may be deposited which may cause further damage.
Summary
- Store sound glass in a stable environment with temperature and relative humidity ranges of 15 - 25 °C and 40 – 60 % respectively with maximum variations of 4 °C and 5 % respectively in any 24 hour period.
- Handle glass objects with disposable rubber gloves or clean bare hands.
- Carry objects one at a time, with support at the base and side. Alternatively use a padded tray to move a group of objects.
- Never store flat glass face-to-face. Separate the sheets to allow for air exchange.
- Examine objects thoroughly and record their condition, old repairs, makers’ marks or content residues before undertaking any cleaning or other treatment.
- Consult a conservator before treating degraded or painted glass.
- Desalinate glass recovered from burial or marine sites. Keep the glass wet following excavation and during desalination.
Bibliography
Boow, J., 1991, Early Australian Commercial Glass: Manufacturing Processes, Ed. J. Byrnes, Heritage Council of NSW, Sydney.
Craft, M., 1992, Decorative arts, in Caring for Your Collections, National Committee to Save America’s Cultural Collections, Arthur W. Schultz (Chairman), Harry N Abrams Inc, New York, pp. 96-107.
Horie, V., 1989, Materials used for glass conservation, in Conservation of Glass, Eds R. Newton and S. Davison, Butterworths, London, pp. 165-185.
Jackson, P.R., 1982, A dowelling technique for glass restoration, The Conservator, vol. 6, pp. 35-36.
Koob, S., 2006, Conservation and Care of Glass Objects, Archetype Publications, New York.
Newton, R., 1989, Deterioration of glass, in Conservation of Glass, Eds R. Newton and S. Davison, Butterworths, London, pp. 135-164.
Newton, C. and Logan, J., 1990 (revised 1997, 2007), Care of Ceramics and Glass - Canadian Conservation Institute (CCI) Notes 5/1, Canada.
Tennent, N. (Ed.), 1999, The Conservation of Glass and Ceramics: Research, Practice and Training, James & James (Science Publishers) Ltd, London.
Stone and Geological Collections
Introduction
Many of the most famous landmarks and elements of the world’s cultural heritage are made of stone. Buildings, monuments and statues including the pyramids and Sphinx in Egypt, the temple city of Angkor Wat, the Taj Mahal, the statue of David and even the Sydney Opera House exemplify the significance of structures made from stone. While many of these structures have existed for millennia they will continue to deteriorate unless maintained and protected from various elements of decay.
Rocks are essentially aggregates of different minerals. Some rocks, such as limestone and quartzite, are composed of only one mineral, calcite and quartz respectively. Once cut and dressed, a rock is then referred to as a stone. Rocks are classified into three major groups:
- igneous;
- sedimentary; and
- metamorphic.
The distribution of rocks in the first 16 kilometres of the earth's crust is about 95 % igneous, 4 % clay rocks, 0.75 % sandstone and 0.25 % limestone. Of the rocks outcropping on the earth's surface (including the underwater surface) 5 % are igneous rocks, 4 % are metamorphic and 75 % are sedimentary with the rest being covered by ice.
Igneous rocks are formed as magma cools. They are either glassy such as obsidian and pumice (frothy glass), or crystalline such as granite, porphyry and dolerite. Igneous rocks are primarily silica (35 – 80 %) with smaller amounts of alumina (up to 25 %), potash, soda, lime, magnesia and iron oxides also present.
Sedimentary rocks are formed following cycles of weathering, sedimentation and lithification. Transportation of the sediments is followed by settling and then lithification (transformation into rock). All rock types (igneous, sedimentary and metamorphic) are subject to weathering. Sedimentary rocks are generally stratified, fine grained and heterogeneous. They may contain pebbles, sand, clay, shells, mineral grains and fragments of older rocks.
Sandstone is formed from sand particles cemented by secondary silica or calcite. Shale is formed from clay minerals plus mica and quartz. Limestones, which represent 25 to 35 % of all sedimentary rocks, are formed from either the precipitation of fine calcite (CaCO3) or from the build-up of fossilised shells. Soapstone is formed by the weathering products of talc (steatite) while alabaster is an aggregate of gypsum formed by chemical sedimentation.
Metamorphic rocks are formed when existing rocks are transformed by intense pressure, stress or heat. Their mineral components are recrystallised in the solid state, without melting or solution. All rock types, igneous, sedimentary and metamorphic, may undergo metamorphosis. For example as a result of metamorphic processes, granite is transformed to gneiss, sandstone to quartzite, limestone to marble and shale to slate.
Deterioration
Although stone artefacts may be damaged by factors as diverse as vandalism, floods, tourism pressures and even earthquakes these factors will not be examined in any detail in this chapter. Rather other significant agents of decay such as the following will be examined:
- weathering and eroding agents (sun, wind and rain);
- pollution;
- salt contamination; and
- biological activity.
Igneous stones such as granite are hard, non-porous and fairly stable. Even so, the surface of a granite monument will deteriorate when exposed to weathering agents and pollution. It may become obscured by soot or damaged by biological growth.
Sedimentary stones such as sandstones and limestones are relatively soft, porous and have friable surfaces. The matrix which cements the various particles together is readily damaged by weathering, pollution or salts. The surface of the stone is weakened and disintegration follows.
The characteristics and durability of metamorphic stones are variable. Marble for example, is of medium hardness, able to be polished and porous. It stains easily and deteriorates when exposed to conditions which promote weathering. Heat, pollutants and acidic conditions are damaging. Slate is a fine-grained, foliated rock that is susceptible to weathering and splitting into thin sheets (Figure 1).
While the chemical composition of stones may be similar, deterioration may vary depending on other factors such as the porosities of the stones and the size and distribution of their grains. Anything that causes a difference in the behaviour of the outer surface of stone structures compared to the inner regions can lead to stresses that eventually cause cracking and exfoliation of the outer surfaces.
Figure 1: Slate headstone showing exfoliation caused by exposure to the elements.
All porous or rough stone surfaces are dirtied by the deposition of airborne particles such as dust and smoke. Moisture condensing on a stone surface will increase the amount of deposition. In addition to disfiguring the stone, accumulated debris can contribute to chemical and biological attack.
Carbon dioxide and sulphur dioxide in the environment are incorporated in falling precipitation known as acid rain. Acid rain will dissolve the calcite in limestone, marble and sandstone. Acidified rainwater slowly dissolves the calcite in limestone monuments, leaving whitish patches. In areas protected from direct rain, the dirt accumulates as a black gypsum powder or crust. Studies have shown that the blackness of these crusts is largely due to anthropogenic sources, in particular the combustion of fossil fuels (Přikryl et al 2004). Diesel emissions are particularly disfiguring to stone structures.
Concern has also been expressed about the role that climate change may play in stone deterioration. In Scotland for example, higher temperatures and increased rainfall is expected to lead to increased biodeterioration of stone structures (Duthie et al 2008).
Salts may form in stone from airborne pollutants (sulphates and nitrates in particular) or be blown by wind from the sea onto stone structures. Porous stone in contact with the ground will also eventually suffer from salt damage. The base of the stone absorbs water and soluble salts which rise by capillary action. A cycle of wetting and drying is established with the pressure exerted by crystallising salts eventually disrupting the stone. Deterioration occurs in the area of stone which experiences fluctuating humidity, not where the stone is constantly wet. Visible damage includes pitting, spalling, crumbling and delaminating and is accompanied by salt efflorescence. The amount of salt in stone is correlated to the severity of the damage present in the stone. In addition to the damage caused by crystallisation, salts can also damage stone due to differential rates of thermal expansion between the incorporated salts and the stone crystals. Salts such as sodium chloride for example, have a much higher expansion rate than calcite crystals at the same temperature. Numerous examples of salt damage can be seen on sandstone, marble and slate gravestones and monuments (Figure 2).
Figure 2: Salt crystals forming on a limestone wall.
Moisture also contributes to the corrosion of metal components on stone monuments. Green, black or brown stains from corroding metal can disfigure stone and corroding iron dowels can cause fracturing.
Biological activity on stone is encouraged by a combination of factors including light, warm temperatures, high humidity levels and the presence of organic matter (from pollution or oils and waxes from previous conservation treatments). The type of organism likely to thrive on a stone substrate will be determined by the particular conditions associated with the site. Algae for example, need only light, a few inorganic compounds and a little water to develop. They may be found in relatively dry places. Once established algal growth is able to trap water and establish an environment conducive to the growth of other organisms such as bacteria, lichens, mosses and ferns. Damage to the stone is both chemical and physical. The growth process releases chemicals such as acids and chelating substances which attack the stone. Penetration of the stone surface by the organism exerts pressure which may lead to fracturing of the stone surface (Figure 3).
Figure 3: Limestone headstone showing erosion and discolouration from lichen.
Although damage to stone objects is not just an outdoors’ issue, moveable objects may be protected from extreme conditions and pollution by moving them indoors. Even then factors such as heat, humidity, acidity, salt and dust can continue to cause problems. Heat from spotlights and fireplaces for example, can cause irreversible damage to marble. The calcite crystals of marble have different directional coefficients of thermal expansion. Heating, even to 100°C, causes more expansion of the crystals in one direction than in the other. This distortion causes stresses and cracking on the marble surface, which may develop a white ‘sugary’ appearance.
Acidic vapours can build up in timber showcases or storage areas, especially at high temperatures and relative humidity and damage calcareous stones such as limestone and marble.
Careless handling can result in breakage, staining or scratching of softer stones.
Stone analyses are important so that deterioration mechanisms and rates can be determined. Analyses range from the simplest visual inspections and photographic documentation to more high powered techniques like 3-D laser scanning, fluorescence light detection and radar (LIDAR), ultrasonic scans, magnetic resonance imaging, thermography and even ground penetrating radar. While the former techniques (to LIDAR) are well suited to surface characterisations, the latter techniques are capable of providing information about the interiors of stones. For many situations however, the outer appearances provide enough information about stone deterioration to guide conservation treatments and the implementation of preventive conservation strategies.
Preventive Conservation
Preventive conservation practices for stone objects should involve minimal intervention. Attempt to do something to improve the stone object’s environment and limit the use of treatment materials that may be damaging to either the stone or the environment. In addition to controlling the temperature and relative humidity levels associated with stone structures, other preventive measures could focus on keeping water away from the stone, pollution and ground water control, visitor management, construction of shelters and wind breaks and even reburial (Doehne and Price 2010).
Environment
Avoid sudden or large changes in temperature and relative humidity for stone on display or in storage. Although preferred environmental conditions will vary depending on the particular type of stone, if possible maintain temperatures of less than 20 °C and relative humidity levels in the range 45 – 55 % with maximum variations of 4 °C and 5 % respectively within any 24 hour period.
Do not expose marble or limestone to direct heating from strong lights, sunlight, radiators and the like.
Handling
Potential problems associated with handling of stone objects include:
- scratching the surface of highly polished or soft stones (talc, soapstone, marble);
- the absorption of dirt, oil and salts from hands by porous materials (marble, alabaster, limestone); and
- breakage when carelessly handling or moving objects.
To minimise the risk of damage, wear cotton gloves when handling stone. Wear clean disposable latex gloves to reduce the risk of dropping smooth, highly polished stone objects.
When moving stone objects, adopt the following practices:
- check the attachment between an object and its pedestal or base before moving;
- move large objects one at a time. Rest them on thick, soft padding such as high density polyethylene foam;
- use padding such as soft tissue paper, dacron or polyethylene bubble wrap both on the tray and between small objects being moved; and
- pack around protruding parts and distribute the weight evenly.
Storage
When storing stone objects consider the following guidelines:
- store small, lightweight objects in acid-free cardboard boxes that have a rigid base;
- place padding under and around objects. Clean cottonwool, acid-free tissue or polyethylene bubble wrap are suitable for padding. Do not compromise the stability of the object by this padding;
- to minimise dust problems, place large heavier objects in closed cupboards or on open shelves with curtains;
- store on painted metal trays or shelves rather than in or on wooden furniture;
- place the largest objects on the lowest shelves; and
- line the shelves with layers of acid-free blotting paper or cotton towels.
Seal wood or wood-based composite materials if they are used for storage (see the chapter Preventive Conservation: Agents of Decay).
Stone Monuments
Control salt contamination, biological attack and weathering of outdoor stone monuments by isolating the stone from water and salt sources. Achieve this by adopting the following strategies:
- construct a shelter for protection from rainwater. Direct the run-off away from the base;
- construct wind breaks to reduce drying impacts and the impact of airborne salt; and
- isolate the stone monument from the ground or any cement (which also contains soluble salts). Place an impermeable layer such as lead sheet under the stone.
Chemical methods for creating an impermeable layer have also been investigated. Seek the advice of a conservator so that the most appropriate isolation method is used.
Avoid applying protective coatings such as oils, waxes or acrylic resins as these will degrade over time. Although many water-repellent coatings have been developed, review their use carefully before application as these materials have the potential to trap water behind the treated surface layer. In the longer term this may cause surface spalling.
Treatments
Examination
As with all objects, thoroughly examine and document the condition of stone objects before beginning any treatment. Record this information through a combination of notes, diagrams and photographs. Describe any deterioration, usually indicated by changes to the surface or structure of the stone. Such visible effects may include:
- staining and other discolouration;
- salt efflorescence;
- encrustation; and
- pitting, crumbling, spalling, erosion, delamination and breakage.
Take samples of any salt efflorescence as future analysis may be required. Note any previous repairs and marks which provide information about the history of the object.
Cleaning
Cleaning methods aim to remove unwanted substances without leaving behind any soluble salts or chemical residues and without abrading the stone surface. While laser cleaning is now routine in many countries and in large institutions, the need for specialist equipment and expertise precludes a full discussion of this technique here. It is worthwhile noting however, the advantages of laser cleaning – there is no direct physical contact with the stone (hence delicate objects and surfaces can be cleaned), no solvents or water are used and there is a high degree of control of the cleaning process (Dajnowski et al 2009).
Both dry and wet cleaning methods may be applied to stone objects. As dry methods involve the least intervention and pose the least risk to stone objects, try these methods first. Follow the guidelines below when dry cleaning stone objects:
- use a low suction vacuum cleaner with the end covered with clean, soft muslin and a soft brush;
- do not dust with a cloth as this tends to force dirt particles into the stone;
- use a soft brush or soft wooden splint to help to dislodge accretions; and
- take care not to scratch the surfaces of soft stones such as alabaster, soapstone or marble.
If required, wet cleaning may be attempted after dry cleaning. The following guidelines should be noted:
- avoid solvent cleaning with damaged or friable stone;
- always test solvents on an inconspicuous part of the stone before cleaning;
- avoid using large quantities of water as most stones are fairly porous;
- use cotton swabs, dampened with distilled water or a mixture of 50 % water and 50 % methylated spirits to remove dirt and grime from marble and other smooth stone surfaces;
- roll the swabs over the stone surface and discard them as soon as they become dirty; and
- do not scrub the swabs back and forth as this forces dirt into the stone pores.
If dirt persists, add a small quantity of soap solution to the water or water and methylated spirits mixture. Prepare the soap solution in the following way:
- dissolve one gram or about one teaspoon of pure soap flakes in a little hot water;
- add enough cold water to make one litre of solution. Then add 100 ml of this soap solution to 100 ml of water or water and methylated spirits;
- apply the soap solution with cotton swabs in the manner described above;
- use a cotton swab soaked with distilled water to rinse the soap from the stone surface; and
- do not use brushes on soft or porous stone as this will scratch or force dirt into the surface.
For cleaning more porous or rough stone surfaces, use a poultice. The steps in preparing and applying a poultice are outlined elsewhere (see the chapter Ceramics).
Poultices are also useful for removing soluble salts from objects when immersion in water is not practical or advisable. If salt contamination is suspected, for stone recovered from a marine or burial site or on the basis of a previous treatment, consult a conservator for advice on identification and removal techniques.
Stain Removal
Removing stains usually requires some form of chemical treatment. Seek advice from a conservator before attempting this type of treatment. Also consider the following points:
- some stones such as marble acquire a patina as they age. This is an intrinsic part of the stone and should not be removed;
- exercise care if strong acids or alkalis (caustic soda, ammonia) are used as they will destroy patinas (and some stones);
- indiscriminate use of chemicals on stone may result in salts forming, disintegration of the stone or changes in colour;
- it is often difficult to remove chemicals completely after treatment;
- iron and copper stains require specialist conservation treatments;
- do not treat iron-stained stones composed of calcium and magnesium minerals with chelating agents such as disodium ethylenediaminetetra-acetic acid. In addition to iron these chelating agents tend to also remove calcium and magnesium;
- hydrochloric acid reacts with marble and limestone;
- acids cause brown stains on sandstone with a high iron content;
- alkali cleaners used on porous stone lead to salt efflorescence; and
- stains often penetrate deeply into stone and may become insoluble with age.
For these reasons, consult a conservator before any stain removal is attempted.
Cleaning oil and grease stains poses less risk to the stone matrix. Hydrocarbon solvents such as white spirits or X-4 solvent are more successful at dissolving oils and greases than water-soluble solvents like acetone and methylated spirits. Steps in the removal of oil and grease stains include:
- initial testing to determine the most effective solvent;
- testing to ensure that the stain does not spread further;
- using a cotton swab, cottonwool strip or paper poultice to apply the chosen solvent; and
- if applying a poultice, slow the evaporation of the solvent by either placing the object in a sealed container or covering the poultice with polyethylene film.
Cleaning Stone Monuments
In some cases it is appropriate to clean outdoor stone monuments by nebulisation. In this process small nozzles, such as those used in greenhouses, spray a very fine mist of water near the stone surface. Only the mist contacts the monument, not the direct water spray. Water particles slowly deposit onto the stone, giving a mild cleaning action. The small size of the water droplets results in a greater wetting and cleaning effect for the small quantity of water used. Collect the run-off water from the base of the monument.
Consult a conservator regarding the use of neutral chemical poultices to treat stains and encrustations.
Before cleaning biological growths such as lichen, algae and moss from stone, kill the growth by applying an appropriate biocide. Choose a biocide that will have no chemical action on the stone, is non-polluting and is safe to the user. The best time for treatment of outdoor stone is either spring or autumn, at the beginning of vegetative development. The dead biological crust can be removed by the use of a poultice, low suction vacuum cleaning or gentle brushing.
Seek a conservator’s advice on the most suitable cleaning products, biocides and procedures.
Repair
There are many adhesives and consolidants that may be used on stone objects and research is continuing into the best materials and techniques for repair of these objects (Price 2007). It would be prudent therefore, to consult a conservator before attempting any repairs to stone objects.
Small and medium sized stone objects can be repaired with Paraloid B-72 and UHU All Purpose Adhesive (see the chapter Ceramics). These adhesives, which can be removed or diluted with acetone, meet the required conservation standards.
Steps involved in the repair of stone objects are outlined below:
- prime porous stone fragments before joining. Dilute the adhesive with an appropriate solvent by mixing one part adhesive to four parts solvent;
- brush the dilute solution (primer) over all surfaces to be joined and allow them to dry completely;
- for a multiple repair and to avoid ‘locking out’, practise the order of joining the pieces before applying any adhesive;
- use a shallow container filled with clean, dry sand to support fragments;
- begin joining at the base of the object where appropriate;
- select two fragments to be joined and apply adhesive along the centre of one broken surface. Fit the two fragments together, pull slightly apart to allow some evaporation of solvent and to check distribution of adhesive and then push firmly together again;
- place the joined pieces in the sand tray for support while the adhesive sets. Balance the top fragment carefully and ensure the weight of the stone pushes down onto the join to help tighten it; and
- remove excess adhesive with a cotton bud dampened in solvent or by careful trimming with a scalpel after the adhesive has set.
If a large or very heavy stone needs to be repaired then dowels may be needed to strengthen the join. Although most epoxy resins yellow with age and are difficult to reverse, it may be necessary to use such an adhesive if high cohesive strength is required.
Seek help from a conservator if there is any doubt about the materials or techniques required for stone repairs.
Geological Collections
Introduction
Rocks and minerals may be collected for either research, education or aesthetic reasons. The colours and crystalline forms of many minerals make them particularly attractive to collectors (Figure 4).
Figure 4: (a) and (b) Examples of rocks, minerals, ores and fossils.
General rock types, their modes of formation, factors affecting deterioration and conservation were described at the beginning of this chapter. Whereas the materials described earlier in this chapter were considered stable, being used for monuments and similar structures, the many and varied samples that make up geological collections are not necessarily so.
Expressions such as ‘solid as a rock’ give the wrong impression of the stability and fragility of many materials that make up geological collections. It has been estimated for instance, that about 10% of all minerals are unstable (Howie 1992) and prone to deterioration unless adequately cared for.
One of the main purposes of this section is to alert readers of the need to care for rocks and minerals as they are often overlooked and consequently neglected because of their perceived stability.
Deterioration
The usual environmental factors, light, heat, dust, relative humidity and pollutants affect rocks and minerals in similar ways to which they affect materials considered to be more sensitive. Certain minerals, realgar (AsS) and pyrargite (Ag3SbS3) for example, are so sensitive to light that they only retain their true colours if they are stored in the dark.
In addition to light-induced damage, deterioration mechanisms for rocks and minerals include:
- physical damage of fragile specimens due to abrasion and poor handling;
- dissolution of specimens by absorption of water from the environment;
- loss of water to the environment and subsequent changes in chemical composition and properties;
- corrosion of components;
- fracturing or volatilisation of crystals by exposure to heat or cycles of hot and cold;
- chemical attack by acidic pollutants released by certain wood types such as oak, birch and chipboard used in storage cabinets and attack by agents used in cleaning and other cosmetic treatments;
- biological attack and chemical degradation under conditions of high relative humidity; and
- deterioration by radioactive decay.
Dust is potentially very damaging to minerals and rocks. In addition to disfiguring surfaces dust encourages corrosion and other reactions by providing nucleation sites for the absorption of water and pollutants from the air.
One of the problems associated with collections of rocks and minerals is the presence of impurities in some specimens. It has been suggested that the presence of impurities may account for the different behaviours of supposedly identical minerals exposed to the same conditions. Some brown topaz specimens for example, fade in light while others are stable (Nassau 1992). Thus, although guidelines can be given for the care of rock and mineral collections, these may be compromised by impurities which lead to the deterioration of some specimens.
Note that while some deterioration processes are rapid, others may only become evident after many years.
Preventive Conservation
Unlike materials made from leather, paper or a particular metal, it is not possible to recommend generalised storage and display conditions which will satisfy the conservation requirements of all rock and mineral samples. This is because of the potentially differing conditions needed to preserve the range of chemical types that may comprise such a collection.
Unfortunately in a publication of this size it is also not possible to specify all mineral types and their particular conservation requirements. As conditions for storage and display may have to be tailor-made to cater for the differing sensitivities of materials in a collection, custodians of collections will need to refer to specialised publications (Howie 1992) and contact experts in the field for more specific information.
It is obviously very important to identify the minerals and rocks that make up a collection. Unless materials are correctly identified their needs cannot be adequately catered for. Consult experts and textbooks to ensure that correct identifications are made for all specimens in a collection.
General information can be provided however, which will act as a guide for the care of these types of collections. Protect materials against:
- physical damage by abrasion or shock;
- unfavourable environments;
- inappropriate chemical treatments; and
- poor handling.
Environment
It is generally accepted that rocks and minerals are best stored in clean, dustproof surroundings in which conditions of low light and stable, moderate temperatures and relative humidity levels prevail.
Ideal conditions have been described as 50 % relative humidity at 15 – 20 °C (Price 1992). These ‘ideal’ conditions however cannot be broadly applied as deterioration mechanisms and the impact of changes in factors such as relative humidity for example, vary from mineral to mineral Apply strategies previously described to minimise damage from overexposure to light or inappropriate conditions of temperature and relative humidity (see the chapter Preventive Conservation: Agents of Decay).
Of these factors, relative humidity control is the most critical as inappropriate relative humidity conditions can lead to corrosion, gain or loss of water from crystal structures, changes from one crystal phase to another and fracturing of crystals by mechanical stresses induced by cycles of moisture gain and loss.
Store specimens prone to corrosion at relative humidity levels between 30 and 60 %. Stability is enhanced as the relative humidity is lowered. Pyrite is one example of a mineral that will oxidise unless the relative humidity is strictly controlled.
Handling
Begin the care and conservation of rocks and minerals at their point of collection. From this time ensure that:
- poor handling does not lead to physical damage;
- specimens are not ‘over-cleaned’; and
- environmental fluctuations are taken into account in transporting the specimens from the point of recovery to their new environment.
Some samples such as fluorite, wulfenite, apatites and fibrous zeolites are susceptible to physical damage. Follow the usual guidelines when handling these objects (see the chapter Handling, Packing and Storage). If delicate samples of these types are to be packaged for transport take additional care, as outlined below:
- wrap specimens in acid-free tissue and place in labelled, washed cotton or linen bags to minimise physical damage; and
- seal the wrapped specimens in polythene bags to buffer against environmental changes that may occur in transit.
For transporting particularly vulnerable specimens such as wulfenite and zeolites “open tissue-lined trays and transport by hand is perhaps the only practical method” (King 1992a).
Storage and Display
When designing storage conditions, take into account the needs of the specimens and of the people that care for them. For example, store mercury in sealed containers to prevent loss through evaporation and poisoning by inhalation of toxic vapours. Take similar care when storing radioactive materials. The degree and type of radioactive emission (alpha, beta or gamma radiation) will determine the type of storage facility required.
Use archival quality materials for any materials that are likely to come into contact with the specimens so that their chemical stabilities are not jeopardised.
Materials used in the construction of the storage building and in storage or display areas may also affect specimens. The alkaline nature of concrete for example, is likely to affect metals, sulphides and silicates. A comprehensive list of common construction materials, their likely effects on mineral specimens and recommended actions is provided in Howie (Appendix I, 1992).
Storage options for particularly sensitive specimens include:
- sealing in glass ampoules or tubes;
- refrigerated containers or environments; and
- buffered micro-environments (silica gel, zeolites).
In all cases the chemical stabilities and sensitivities of specimens must be known before undertaking a particular type of storage. Transparent containers are recommended so that the condition of samples can be monitored easily.
Treatments
General guidelines for the cleaning, ‘development’ and repair or consolidation of rocks and minerals are provided by King (1992b). Some of the key points made by King and others in the same publication are outlined below.
Cleaning
Only undertake any treatment if the mineral type and its properties are well known. Irreparable damage may occur if inappropriate treatments are applied.
Restrict cleaning of rocks and minerals to the removal of dust, dirt, clay and similar materials.
If it is necessary to immerse rocks during cleaning then ensure the liquid and the rocks are at the same temperature before immersion. This will reduce the risk of thermal shock.
Water will affect some minerals. Rock samples are generally more tolerant of water-based cleaning than are mineral specimens. Ethanol and propan-2-ol have been used to remove clay from water-soluble minerals. Some wet cleaning methods which may be useful for water-resistant samples are described earlier in the Stone section.
Dry cleaning techniques including gentle brushing, vacuuming with a soft brush attachment, air-blowing with a photographer’s hand blower and ‘airbrasive’ methods, may achieve the desired result without involving potentially damaging liquids. Airbrasive methods involve the use of fine cork or powdered walnut as abrasives.
Development
Chemicals have been used to etch surfaces, to improve the appearance of coloured crystals and to remove unwanted mineral species. Such treatments are not generally recommended and if necessary, as preparation for scientific examination for example, should only be carried out by specialists. The potential loss of information and the risk of long-term damage to the specimen outweigh the usually sought after benefits of these processes.
Repair and Consolidation
The nature of the sample and the reason for the repair will determine the type of repair technique and the adhesive used. Do not use very strong adhesives such as polyesters, cyanoacrylates (‘superglues’) and epoxy resins to repair minerals (King 1992c).
Repair techniques and suitable adhesives for the repair and consolidation of stone are described earlier in this chapter. A summary of commonly used adhesives, their constituents and features of their application is provided elsewhere (King 1992c). Note that any materials used to consolidate stone materials should have similar thermal expansion properties to the stone in question. If not, differential thermal expansion could result, leading to significant damage to the object.
Summary
- Store or display stone in an environment with temperatures below 20°C and a relative humidity in the range 45 - 55 % with maximum variations of 4 °C and 5 % respectively within any 24 hour period.
- Do not expose marble and limestone to direct heating.
- Use cotton gloves for handling most stone objects and disposable latex gloves when handling highly polished stone.
- Protect specimens from dust and store in enamel-coated metal cupboards.
- If wooden storage or display cabinets are used they must be properly sealed to protect calcareous stone objects from acidic vapours.
- Isolate outdoor stone monuments from water sources to avoid or control salt contamination, biological attack and weathering.
- Examine and fully document objects before any treatment.
- Use dry cleaning methods before any solvent cleaning is undertaken. Take care to avoid abrasion of surfaces.
- Test treatments on an inconspicuous part of the object before any large-scale application.
- As most stones are porous, use a minimum amount of water or solvent for cleaning.
- Use easily removable adhesives that have good ageing characteristics to repair stone. Large or heavy stone repairs may require dowels and stronger adhesives.
- Mild cleaning techniques, such as nebulisation, may be suitable for some stone monuments.
- Apply a suitable biocide to biological growths on stone monuments before removing them by mechanical cleaning.
Bibliography
Booth, B., 1993, Rocks and Minerals, Quintet Publishing, London.
Dajnowski, A., Jenkins, A. and Lins, A., 2009, The use of lasers for cleaning large architectural structures, APT Bulletin, vol. 40, pp. 13-23.
Doehne, E. and Price, C. A., 2010, Stone conservation: an overview of current research, 2nd edition, Getty Conservation Institute, Los Angeles.
Duthie, L., Hislop, E., Kennedy, C., Phoenix, V. and Lee, M. R., 2008, Quantitative assessment of decay mechanisms in Scottish building sandstones, in J. W. Lukaszewicz, J. W. and P. Niemcewicz (Eds), Proceedings of the 11th International Congress on the Deterioration and Conservation of Stone, 15 – 20 September 2008, Nicolaus Copernicus University, Toruń, Poland, pp. 73-80.
Howie, F.M. (Ed.), 1992, The Care and Conservation of Geological Material: Minerals, Rocks, Meteorites and Lunar Finds, Butterworth-Heinemann, Oxford.
King, B., 1992a, Appendix II: Collecting rocks and minerals, ibid, p. 127.
King, B., 1992b, Appendix III: Cleaning minerals, ibid, pp. 128-132.
King, B., 1992c, Appendix IV: Repair and consolidation of minerals and rocks, ibid, pp. 133-134.
Nassau, K., 1992, Conserving light sensitive minerals and gems, ibid, pp. 11-24.
Price, M., 1992, The stability of minerals, ibid, pp. 1-10.
Price, C., 2007, Consolidation in A. Henry (Ed.), Stone Conservation: Principles and Practice, Donhead Publishing, Shaftsbury, UK, pp 101-126.
Přikryl, R., Svobodová, J., Zák, K. and Hradil, D., 2004, Anthropogenic origin of salt crusts on sandstone sculptures of Prague’s Charles Bridge (Czech Republic): Evidence of mineralogy and stable isotope geochemistry, European Journal of Mineralogy, vol. 16, pp 609-18.
Wheeler, G. S., 1992, Stone objects, in Caring For Your Collections, National Committee to Save America’s Cultural Collections, Arthur W. Schultz (Chairman), Harry N. Abrams Inc. New York, pp. 122-127.
Metals
S. R. Garcia, D. Gilroy and I. D. MacLeod
Introduction
The significance of metals to human society is so great that two of the major eras of prehistory are described in terms of the Bronze Age and the subsequent Iron Age. The earliest metallic artefacts were beaten from naturally occurring copper metal and date back more than 6000 years.
The development of western and eastern societies has been closely linked with the working of metals. These materials have been used, either in pure form or when combined with other metals, to produce an enormous variety of objects including weapons, tools and decorative art objects. Consequently, metal objects make up a large part of many collections kept in museums, historical societies and private households.
Alloys
Properties of metals, such as appearance, strength, malleability and chemical reactivity can be altered by alloying with other metals or by the presence of other impurities. Iron for example, can be alloyed with carbon to form cast iron or with chromium and nickel to form stainless steel. Copper is often combined with zinc to form brass and with tin to form bronze.
Distinctive colours were often prized and as a result the compositions of metals were manipulated to obtain the desired effect. Chinese bronzes and Japanese sword guards are examples of objects where colour is an integral part of the object.
Patina
The patina is a film of metal corrosion products which forms on the surface of an object, either as a result of exposure to the elements or because of deliberate artistic intervention (Figure 1).
Before any decision is made to remove the patina from an object the nature of the object and its history must be considered very carefully. For instance, under no circumstances should the patina be removed from an ancient bronze sculpture. On the other hand, as Victorian era silver candelabra were usually kept in a highly polished state, accumulated tarnish should be removed.
Do not confuse the patina with a lumpy, pustular or uneven corrosion mound that may lie above the original surface of an object. If in any doubt, avoid any treatments that will remove these minerals until professional advice has been obtained.
Figure 1: Bronze Buddha head showing patina and gold-leaf additions.
Corrosion
The tarnishing or corrosion of metals is the major issue of concern confronting those responsible for the care of metal items.
Gold, silver, platinum, mercury and copper are the only metals stable enough to be found in their natural metallic state, with only small amounts of the latter four elements being found. All other metals are more stable when combined with other elements to form oxides, sulphides, chlorides, carbonates and other compounds. There is therefore, a natural tendency for most refined metals to return to their more stable ‘corroded’ states. As a consequence, metal objects need to be protected from environmental conditions and pollutants which encourage corrosion.
In some cases as the metal corrodes the oxide film that forms acts as an ‘insulating’ barrier, slowing the rate of corrosion to an acceptable level. Copper and aluminium are two such metals in which oxide coatings form protective, passivating layers. When iron corrodes however, it does not form a protective film. The corrosion of iron will continue until no metal is left unless action is taken to protect it from the elements.
Deterioration
The main causes of deterioration of metals include:
- exposure to conditions of high relative humidity;
- the presence of oxygen;
- exposure to salty conditions;
- reaction with pollutants;
- contact with other metals;
- stresses induced during manufacturing processes; and
- careless handling.
Moisture and oxygen are required for corrosion (oxidation) of metals to occur. Chloride ions, present in common salt (sodium chloride), may originate from human or animal contact (perspiration) or from airborne sea salts. They can speed up the corrosion rate and are capable of penetrating protective oxide layers on metals such as copper and aluminium to form metal chlorides. These latter materials do not form a coherent surface layer, effectively removing the corrosion resistance of the metal. Oils and sweat from people’s hands are potential agents of decay, with the organic acids and chloride ions transferred upon contact between skin and metal, capable of causing significant attack on metallic surfaces.
Any agent that affects protective films on metals may enhance corrosion of the underlying metal. Physical damage to painted or coated surfaces, or the uneven application of oil coatings for example, will alter the access of oxygen to the metal surfaces. This usually causes one part of the object to corrode at the expense of another.
Normally unreactive metals such as copper and silver can suffer significant corrosion if sulphide-containing species are in the same environment as the metal. Sulphide pollutants are usually associated with the breakdown of plant matter and the decomposition of sulphur-containing proteins such as wool. Common pollutants include hydrogen sulphide and carbonyl sulphide.
Inorganic acids such as hydrochloric acid derived from the decay of plastics such as polyvinyl chloride and nitric and sulphuric acids formed from air pollutants and moisture, will attack metals that are in the same storage environment or in the open air. Outdoor monuments and sculptures are particularly vulnerable to this type of attack.
Corrosion will also occur if dissimilar alloys and metals come into contact with each other. This type of corrosion is known as galvanic corrosion. In this situation the more reactive metal or alloy corrodes while the less reactive metal is protected. If for example iron and copper were in direct physical contact, then in the presence of moisture and oxygen, the iron would corrode preferentially while simultaneously protecting the copper from these agents of corrosion. A galvanic series, which lists metals in increasing order of reactivity is provided elsewhere (see Appendix 8). Many problems associated with galvanic corrosion can be overcome by avoiding direct contact between dissimilar metals.
Corrosion may be increased by stresses imparted to metals during their manufacture. Changes in the microstructure of metals, produced by processes such as hammering, drawing and rolling, usually encourage corrosion and in doing so reduce the service life of affected metals.
Handle metal objects carefully as it is easy to over-estimate their strength and toughness. Metal objects can be easily dented, bent or mis-shaped if handled inappropriately, resulting in unnecessary damage that may be difficult to repair.
It is important to remember these basic issues when examining corroded artefacts or when assessing storage environments. Removing chloride salts, restoring oxide coatings, repatinating metals with aesthetically pleasing patinas, coating metals with protective materials such as lacquers and paints and modifying environmental storage and display conditions are all effective tools in the conservation battle against corrosion.
Preventive Conservation
Environment
While it is generally acknowledged that relative humidity levels in storage and display areas should be kept below 45 % for most metals and below 35% for most iron objects, the presence of particular corrosion products will affect recommended levels. For example relative humidity levels of 15 % or less must be maintained to prevent corrosion of chloride infested iron and levels of 12 % or less are necessary to prevent corrosion of iron that is in contact with mixtures of the corrosion products Akageneite (β-FeOOH) and hydrated ferrous chloride (FeCl2.4H2O, Watkinson and Lewis 2004).
While high light levels are not damaging to metals, a maximum level of 300 lux is usually recommended so that other more sensitive objects in the vicinity are not adversely affected. Techniques to control the relative humidity and light levels are described earlier (see the chapter Preventive Conservation: Agents of Decay).
Storage, Display and Handling
Since the major agents of deterioration for metals are oxygen, water and airborne pollutants, any storage system which minimises their effects will extend the life of a metal. Simple steps such as storing objects wrapped in acid-free tissue, in acid-free boxes, on painted, preferably baked enamel or powder coated metal shelving will increase their longevity. If more than one metal object is stored in a box, use acid-free padding to separate objects and prevent abrasion. Steps such as these will help avoid both environmental attack and galvanic corrosion.
Never place objects directly on shelves or in drawers. Line these with polyethylene foam (e.g. Ethafoam) to minimise vibrations and abrasion. If metals are stored on open shelving, in addition to wrapping objects, use drapes made from washed cotton, polyethylene or Tyvek to further reduce exposure to dust.
Avoid storage in or near cabinets made of chipboard or wood as these materials give off formaldehyde gas and organic acids which can accelerate corrosion. If there is no option but to store metal objects in cabinets made of these materials, take the following steps:
- coat wood with a water-based polyurethane finish to seal the wood; and
- paint chipboard with a solution of urea (400 g) in water (1 L) and then seal with a water-based polyurethane finish.
Do not seal objects in plastic bags which may trap moisture and increase corrosion. Avoid polyvinyl chloride (PVC) bags in particular as they can give off hydrogen chloride, an acidic gas which will attack most metals.
When handling metal objects wear well-fitting plastic or white cotton gloves. This will prevent the transfer of sweat and fats from the skin to the metal object, minimising potential corrosion problems. Wash cotton gloves regularly to avoid the build-up of salts and organic acids. Do not handle silver objects with latex rubber gloves as there is an increased risk of tarnishing the silver.
Silver
The lustrous appearance, relatively low natural abundance, corrosion resistance and ability to be easily worked has ensured that silver has always been a prized metal, often being used for coinage and jewellery. Most silver objects in collections of former British colonial countries will be sterling silver or plated silver.
Sterling silver is the standard alloy used in jewellery and cutlery and is made up of silver (92.5 %) and copper (7.5 %). The addition of copper to silver increases the hardness of the alloy without any significant loss of lustre or colour.
There are two common forms of plated silver, Sheffield Plate and silver plate or electroplate. Silver plate or electroplate is formed when a thin layer of pure or sterling silver is deposited electrolytically on the surface of a base metal. Common base metals include copper, brass, nickel silver (an alloy of copper, zinc and nickel) and Britannia metal (a tin alloy with 5 – 10 % antimony). Electroplated materials are often stamped EPNS or EPBM for electroplated nickel silver or electroplated Britannia metal respectively. As commercial electroplating was developed in the 1840s it is likely that many artefacts in Australian collections will be made of silver plate.
Sheffield plate is a duplex alloy where sterling silver has been fusion bonded (‘sweated’) to both sides of a copper sheet. It is subsequently worked to produce the desired object.
Deterioration
Unless kept polished, silver artefacts will usually tarnish, forming a layer of black silver sulphide. Artefacts excavated from underground or from the sea may be coated with grey silver chloride and blue-green copper corrosion products (Figure 2).
Figure 2: Silver knife handle with high copper content (green corrosion) and evidence of a rusting iron shaft beneath ivory.
With age and polishing, silver may be removed from the high spots of plated silver, exposing the base metal which often looks duller than the silver layer. Even if the gentlest polishing techniques are used, all electroplated silver ultimately will show pinpricks of corrosion as the plating wears thin. Once the plating has been perforated the underlying metal is prone to pitting corrosion and gradually the surface will become covered with a blotchy black and green-blue corrosion matrix.
Preventive Conservation
Apply the guidelines for safely storing and displaying metals described in the general introduction to this chapter.
If there is no option but to place an object in a display case previously shown to be corrosive towards silver, add acid-free blotter impregnated with either zinc oxide or zinc carbonate, to the base of the case. This will minimise tarnishing by absorbing acidic and sulphurous compounds.
Zinc carbonate-impregnated blotting paper can be prepared as follows:
- in a flat tray, prepare a solution which contains a soluble zinc salt such as zinc sulphate, by dissolving 10 g of the salt in 1 L of water;
- immerse a sheet of acid-free blotting paper in the solution;
- once the blotter is wet, pour a solution of sodium carbonate (20 g in 1 L of water) into the bath, producing a white cloudy solution of zinc carbonate; and
- remove the blotter from the bath and allow it to dry under glass to prevent puckering.
When dry, place the blotter underneath textile coverings in the base of a display or storage cabinet, or rolled up and placed in a support underneath a raised platform within a display cabinet. This is a very effective means of minimising corrosion.
Alternatives to blotting paper are commercially available sintered zinc oxide pellets or sachets of multi-metal vapour phase corrosion inhibitors.
Treatments
Cleaning
Only clean silver when absolutely necessary and not as a routine treatment, as any cleaning will remove minute amounts of silver. If a piece is in good condition, maintain it in that condition rather than continually cleaning it and wearing down the silver coating. Wiping with a silver cloth, followed by storage and display under low relative humidity conditions will provide the simplest method of protection. If cleaning is necessary, avoid abrasive cleaners as they can cause fine scratching of the surface and will remove small amounts of silver.
Take care to differentiate between tarnish and decorative treatments which are an intricate part of the object and which would be destroyed by cleaning. An example of such a decorative treatment that should not be removed is niello, a black silver sulphide deliberately used to highlight incised sections of silver jewellery and silver ornaments.
Many commercially available ‘silver dip’ solutions readily remove tarnish. These are usually made up of thiourea and acid mixtures. Only use silver dips when the object is badly disfigured and apply them with care. Never use silver dip on objects with decorative treatments such as niello or on composite objects with bronze, stainless steel or organic components. Also avoid the use of silver dips on objects that have hollowed components as there is a danger of the liquid entering any cavities. If using a silver dip, only apply or dip the solution for as long as it takes to remove the tarnish. It is safer to use a cotton bud (or similar) to apply the dip to corroded areas. Following treatment with the dip, rinse the object in hot water to remove residues and then dry it with a lint-free cloth. After drying, use a silver cloth to apply a thin layer of corrosion inhibitors to the surface of the silver.
Any kind of cleaning may expose areas of fire scale (copper oxide) that is sometimes formed during manufacture. These marks can discolour the surface and are very difficult to remove.
If Sheffield plate is in reasonable condition, just wipe it with a silver cloth and display or store it under conditions of low relative humidity. Do not replate the object as it completely devalues it by removing the technological evidence of its manufacture.
Electroplate or silverplate objects in good condition, but on which the silver has been worn away to reveal underlying metal, can be restored by using commercially available solutions which gradually deposit small amounts of silver on worn areas. This is a better way to rejuvenate the surface than standard electroplating. The latter process is a lot more costly and is not always successful.
Electroplate which shows signs of blotchy black and blue-green pitting corrosion will not usually respond to treatment with silver polishing cloths, silver dips and cleaning foams. If confronted with materials of this type, remove the gross corrosion by using a solution made up of thiourea and citric acid. This treatment will remove much of the silver corrosion since thiourea is a very strong complexing agent that also dissolves silver sulphides. To prepare and use this solution:
- dissolve thiourea (10 g) and citric acid (50 g) in water (1 L);
- immerse the object in the solution and gently brush the corrosion areas with a soft brush;
- after cleaning, place the object in a bath which contains sodium carbonate (10 g) in water (1 L). Leave the object to soak for about one hour to neutralise and remove any citric acid from beneath the electroplate; and
- remove any residual sodium carbonate by a final wash in deionised or distilled water.
If the corrosion damage is not too severe then touch up the underlying metal with one of the commercially available silver solutions that gradually redeposit small amounts of silver. Only use this treatment for electroplate or silverplate after carefully considering the history of the object. Polish with a silver cloth to complete the cleaning process.
Coatings
There are commercially available lacquers for coating silver objects that slow tarnishing processes significantly. On the downside, these lacquers can be troublesome to remove if they break down. In addition, unless an even coating is applied, a patchy and blotchy tarnish may develop on the surface.
Nickel Silver
Most 19th and 20th century nickel silver objects will be found either as the unchanged copper-nickel-zinc alloy or with a thin film of electrodeposited silver on the surface. A simple spot test may be used to distinguish these materials (Appendix 9).
One very easy way to recognise the presence of nickel, either as nickel plating or its presence in an alloy, is to look for the bright lemon-green corrosion products which characterise nickel (II) compounds. The colour is a much more lemon-yellow-green than the characteristic blue-green of copper.
In Australia only coins minted before the introduction of decimal coinage (1966) contain any significant amounts of silver. To remove tarnish from coins containing silver, follow the procedures specifically outlined for silver.
For coinage and other nickel silver objects, treat corrosion products according to the methods outlined below for copper and its alloys (brass and bronze).
To treat electroplated nickel silver, follow the guidelines for silver objects.
Copper and Alloys
Copper, a lustrous red-brown metal is regarded as the first metal commonly used by man. It is often combined with other elements to produce a range of alloys with different mechanical properties and corrosion resistance. Things made from copper and its alloys are used in almost every facet of life and human activity.
The two main categories of alloys are those created when copper (Cu) combines with zinc (Zn) to form brasses and those with tin (Sn) which are known as bronzes.
Some typical brass compositions are:
| Yellow brass |
65 % Cu 35 % Zn |
| Red brass |
85 % Cu 15 % Zn |
| Muntz metal |
60 % Cu 40 % Zn |
| Gilding metal |
95 % Cu 5 % Zn |
Although the primary components of bronzes are copper and tin, secondary elements such as lead (Pb), nickel (Ni), zinc and even silver (Ag) and gold (Au) have been incorporated into these materials.
Some typical bronze compositions are:
| Bell bronze |
75 - 80 % Cu 20 - 25 % Sn |
| Lead bronze |
80 % Cu 10 % Sn 10 % Pb |
| China silver |
65 % Cu 20 % Sn 13 % Ni 2 % Ag |
| Statuary bronze |
65 - 85 % Cu 10 - 30 % Zn 2.5 - 5 % Sn |
Spelter bronzes, popular from the 1850s to the early 1900s, are not bronze at all but are a white, zinc-based metal to which various coatings have been applied to give the effect of patinated bronze. Any attempt to chemically clean these ‘bronzes’ renders them worthless.
Deterioration
Constant high relative humidity, pollutants such as sulphide gases, acids and careless handling causing physical damage can all result in the deterioration of copper-based objects. Heating and acidic cleaning solutions can etch the zinc from brasses, leaving a copper-red discolouration on the surface. Objects with special surface coatings, such as lacquers, can be damaged easily by scratching or improper cleaning.
The types of corrosion products formed on copper and its alloys depend on the environment and the metal composition. The most common corrosion products are copper oxides, basic copper sulphates and basic copper carbonates. These are generally stable and protect the underlying metal from further corrosion. The corrosion products are sometimes produced artificially to provide the attractive green-brown patina seen on outdoor bronze statues.
As noted in the general discussion on metal corrosion, the passivating layers of copper corrosion products tend to break down in the presence of chlorides. Whether the chlorides are derived from the sea or from ground water the overall impact, accelerated corrosion, is the same.
In a humid environment the presence of chlorides in copper alloys may lead to the development of the cyclic corrosion phenomenon known as bronze disease. Copper and copper alloys which have been buried or recovered from a wet site may suffer from this type of corrosion. Bronze disease corrosion is characterised by the presence of a light blue-green, powdery and eventually crumbly outgrowth on the surface (Figure 3). If this is brushed away a pit will be evident on the surface. The tests for and treatment of metals affected by bronze disease are described later in this chapter.
Figure 3: Close-up of bronze disease.
It is important to note the difference between bronze disease and a natural patina. Many bronzes are formulated specifically to obtain a certain coloured patina. If you are not sure, consult a conservator before attempting any treatment. This is especially important for Chinese and Japanese bronzes and for bronzes from the Renaissance period onwards as the patinas of these objects are intrinsic to the objects and should not be removed.
Preventive Conservation
The preventive conservation guidelines described in the general introduction to this chapter are applicable to copper-based objects.
Treatments
Cleaning
Use a dry cloth to wipe copper-based objects that are in good condition. Use ethanol to remove greasy stains but only after spot testing to ensure there are no surface coatings that may be affected by this solvent.
If a badly tarnished copper alloy has to be cleaned, immerse it in a solution made up of citric acid and thiourea. Thiourea is an inhibitor which prevents chemical attack on the metal itself. If thiourea is not used in the treatment solution dissolved copper will be redeposited on the surface of the object, leaving a salmon pink blush on the surface. This then has to be removed by polishing.
Wear rubber or preferably nitrile gloves when cleaning and coating copper objects so that no marks are left on the surface of the metal.
A typical treatment regime is as follows:
- prepare a solution containing citric acid (50 g) and thiourea (10 g) in water (1 L);
- place the object in the solution and leave it until it is clean. This can take from several minutes to several hours depending on the condition of the object;
- fully immerse the object in the citric solution to prevent the development of ‘tide lines’ on the object as these are difficult to remove, requiring extensive polishing;
- brush with a soft bristle brush, such as a toothbrush, to speed up the process;
- after cleaning, wash the object thoroughly to remove all traces of acid. Immerse the object in baths of clean water (preferably distilled) or under running water; and
- if the object has been treated for a prolonged period or is porous, immerse it in a bath containing sodium carbonate (5 g) in water (1 L) to neutralize acid residues and then rinse it with clean water.
Ideally the pH of the metal surface and that of the wash water should be checked to ensure that the washing has been effective. Washing can be considered to be complete when the pH values of the wash solution and the metal surface are both neutral.
Note that this cleaning procedure will not produce a bright shiny surface finish on the metal. If this is required a proprietary metal polish can be used. Avoid repeated polishing however as it tends to wear the metal surface.
If the above solution is not effective in removing tarnish then the amounts of citric acid and thiourea can be increased (up to twice the strength). A fine pumice powder can be used as a mild abrasive if necessary.
After washing and before any protective coating is applied the metal surface must be dry and free from grease and dirt. Wear gloves so that fingerprints do not get on the object between the cleaning and coating stages. Any such contamination may show up later in the form of corrosion areas.
If oven drying at 100 °C is not appropriate or possible, dewater the object by ‘painting’ it liberally with acetone or methylated spirits. These organic solvents dissolve water in crevices and cracks, ensuring that the metal is dry. The metal is considered dry when there is no longer any smell of acetone or methylated spirits. This treatment must be carried out in a well ventilated area.
Bronze Disease
To determine if corrosion products on an object are derived from bronze disease, expose it to conditions of high relative humidity (greater than 85 %) for a period of about two weeks. For smaller objects this may be achieved by placing the object in a large clear plastic bag with about 100 ml of water. Do not let the object come into direct contact with the water. Seal the bag and inspect it after the two-week period. If droplets of green solution are observed on the surface of the metal or if new fluffy outgrowths of pustular green corrosion products are found, then bronze disease is indicated.
If the object is too large or too valuable for the above procedure, then take samples from the suspected bronze disease areas and test them (using X-ray diffraction) to determine the nature of the corrosion products. The presence of basic copper (II) chloride (atacamite or paratacamite) is indicative of bronze disease.
The main aim of the treatment is to remove the majority of the chlorides from affected objects. This is done most simply by immersing the object in a solution of sodium sesquicarbonate. The preparation of this solution and its application are as described below:
- remove any protective coating (wax, lacquer, resin) from the surface of the object before treatment;
- dissolve sodium carbonate (10 g) and sodium bicarbonate (10 g) in water (1 L);
- allow the object to soak in the solution for two to four months;
- prepare a fresh solution and immerse the object for a further four to six months;
- remove residual chemicals by immersing the object in baths of clean water;
- dewater the object using either acetone or methylated spirits; and
- soak or paint the object with benzotriazole (BTA, 3 g) dissolved in methylated spirits (100 ml). Wear gloves and avoid breathing dust from BTA as it is a potential carcinogen.
If the object originally had a bright metal surface this treatment will produce a green-brown patina. This patina is quite attractive and stable. If a clean metal surface is desired, remove the patina after treatment using the citric acid stripping process described earlier in this chapter.
This method will be effective for all cases of bronze disease but treatment times will vary greatly from object to object. The treatment times given above are sufficient for most cases. If an object subsequently shows signs of renewed bronze disease, repeat the process.
As artefacts made of essentially pure copper normally do not contain significant amounts of chloride ions, one long wash of about six months is usually sufficient to stabilise them. Brass and bronze objects however, need at least two washes and possibly a third one if they are extensively corroded.
Roseate blue crystals can form on the surface of the objects that have been previously stripped of corrosion products in a thiourea-inhibited, citric acid solution and are then treated with sesquicarbonate solution. These crystals can be removed by soaking the artefacts in an alkaline Rochelle salt solution (20 g sodium hydroxide and 50 g sodium potassium tartrate in 1 L of water).
If the desalination treatment outlined above is not practical, stabilise artefacts by maintaining the relative humidity below 25 %. This slows the corrosion rate to an acceptably low level. Other treatment options include excavation of pits and chemical treatments which involve the application of corrosion-inhibiting chemicals or waxes to seal out moisture.
Mineralised and heavily corroded copper-based objects may need to be impregnated with wax to consolidate them. Consult a conservator if this is thought necessary.
Coating
Apply a protective coating (lacquer or wax) to maintain a clean shiny surface on copper-based objects. Remember that the patinas (except bronze disease) which form on bronze and copper objects are attractive and stable and do not need any form of protective coating unless they are in a harsh environment. In the latter case, consult a conservator for advice.
Microcrystalline-polyethylene wax mixtures can be used as protective coatings. A recipe that has been found to be useful is comprised of:
| microcrystalline wax | 100 g |
| polyethylene wax | 25 g |
| white spirits | 250 ml |
Prepare the paste as follows:
- melt the wax components together and stir well to ensure thorough mixing; and
- quickly pour the mixture into the white spirits and stir constantly while it cools to produce a smooth white paste.
The sheen of the resultant wax film can be altered by varying either the grades or the proportions of the waxes used. When it is dry the wax can be either polished for a shiny finish or left untouched for a matt finish. If subsequent bronze disease treatment is found to be necessary this wax can be removed with white spirit.
An alternative coating is an acrylic lacquer containing a corrosion inhibitor. This has proved most satisfactory in preventing re-tarnishing of bronze and copper. A commercially available lacquer (‘Incralac’) can be obtained either in a spray can or as a brush-on paint. If necessary this product can be removed with acetone.
Iron and Alloys
Iron is the most useful and abundant metal and would probably be the most common metal type found in collections. It has been known from prehistoric times and in its various forms, such as cast iron, wrought iron and various steels, is the element upon which our present industrialised civilisation has been built.
Deterioration
In the presence of oxygen and moisture iron and steel (except some stainless steels) corrode to form rust. Rust is a term used to describe non-specific corrosion products which form on the surface of degraded iron (Figure 4). It is a mixture of ferrous and ferric hydroxides and hydrated ferric oxide. Iron chlorides usually form in the presence of aggressive salts such as sea water.
Unlike copper, the surface layers of iron corrosion products are not protective and tend to accelerate corrosion of the metal by forming localised corrosion cells.
When an object is first acquired, examine it to determine the extent of deterioration and to ascertain whether the corrosion is still active. If the surface is covered with brown droplets, active corrosion is still occurring and the presence of salt is indicated. This necessitates a specialised conservation treatment which involves the removal of chloride ions.
Figure 4: Horse-drawn vehicle spring. Severe rusting is forcing the leaves apart.
Preventive Conservation
Although the general guidelines outlined in the introductory section of this chapter also apply to iron and its alloys, a few additional points need to be made. As iron is one of the most reactive of the commonly used metals, effective control of the storage environment is essential to ensure objects made from iron do not continue to deteriorate. To minimise corrosion the preferred relative humidity for storage and display of iron objects is less than 35 %. As noted earlier in this chapter however, the presence of particular corrosion products will affect recommended relative humidity levels for iron objects. Relative humidity levels of 15 % or less must be maintained to prevent corrosion of chloride-containing iron and levels of 12 % or less are necessary to prevent corrosion of iron that is in contact with mixtures of the corrosion products Akageneite (β-FeOOH) and hydrated ferrous chloride (FeCl2.4H2O, Watkinson and Lewis 2004). Details of methods used to control relative humidity are described elsewhere (see the chapter Preventive Conservation: Agents of Decay).
Once an object has been treated and coated, correct storage or display conditions and careful monitoring will maintain its stability.
If it is not possible to house large objects such as machinery and vehicles (horse-drawn and motor) in controlled environments at least provide some protection from the elements. This protection may be in the form of a shed, a veranda or even a lean-to. Unless some protection is provided moisture and dust accumulation will soon initiate deterioration processes.
If an object is displayed in the open, raise and support it above ground level, monitor it regularly for signs of deterioration and treat as necessary.
Clean and re-oil metal components frequently, particularly those of firearms (see the chapter Case Studies) and keep them in a protective environment if possible.
Coat highly polished metal surfaces that are not protected by a clear lacquer with a light machine oil or spray them periodically with a commercial product like CRC or similar. As long as they are stored in a dust-free environment this is a simple and effective means of preventing deterioration.
Treatments
Although many objects may be covered with thick scales of rust there is often sound metal underneath. Do not clean an object that has very little metal remaining, but instead store it in a plastic bag containing silica gel (desiccant) to keep it dry. Note the following points:
- self-indicating silica gel is orange when active, changing to either colourless, pale yellow or green when no longer acting as a desiccant (colour change depends on the type of silica gel used);
- replace the desiccant when it changes colour;
- regenerate the activity of the silica gel by heating it in an oven (105 - 110 °C) until the orange colour returns; and
- before storing it, totally dry the object. If appropriate this may be done by placing it in an oven at 110 °C for three to four hours. Alternatively a brush down or soak in acetone or methylated spirits will assist moisture removal. The effectiveness of the silica gel is improved by removing moisture from fissures deep within the metal.
The future role of the object, either display or storage, will affect the choice of treatment method. If the purpose is to display an object in its working mode perhaps no treatment may be necessary other than maintenance, to keep it in a dry environment and/or coat it with an appropriate protective layer.
As with every metal type there is a range of treatment options available, with the final decision depending on the balance between aesthetics, economics and the proposed way in which the object will be used (for example, static display or as a functioning component).
Surface Cleaning
Dirt, grease and loose or flaking rust must be removed before protective coatings can be applied to iron objects. Such deposits can be removed by chemical, mechanical and/or thermal techniques.
Chemical cleaning techniques include:
- using detergent solutions to dissolve grease and remove surface dirt;
- immersing the object in an aqueous alkaline solution (caustic soda) to remove grease and paint. Concentrations in the range of 20 - 40 g sodium hydroxide per litre of water are normally used for this purpose; and
- stripping corrosion products by immersion in a solution of citric acid (50 g) in water (1 L). Do not use this solution on spring steel however. Do not use acids such as hydrochloric and phosphoric acids as they attack the underlying metal.
As the effect of some mechanical and thermal cleaning techniques can be severe, be careful when using this option, especially with small or fragile objects. Techniques which may be applied include:
- wire brushing – either manual or rotary power driven, depending on the condition of the object;
- abrasives or sandblasting; and
- flame cleaning.
Wire brushing is often very effective in removing loose or flaking rust. As wire brushes are available in a range of bristle materials (steel or brass) and grades (coarse to fine), select the one appropriate for the condition of a particular object. Never use a brass brush on an iron object however as a thin layer of brass can build up on the surface being brushed and this, along with any entrapped shedding bristles, will increase the risk of galvanic corrosion.
Abrasives or sandblasting, which uses a high speed jet of particles, may be applied to either small or large iron and steel objects. It is especially suited to large objects, such as agricultural machinery. This method is quick and produces an excellent surface for long-life coatings. Owing to the associated airborne dust problem sandblasting usually requires approval from local authorities. The use of an enclosed abrasive blasting cabinet for smaller objects will avoid this issue.
An alternative form of sandblasting, wet sandblasting, uses a suspension of sand in water combined with a corrosion inhibitor. This method causes less pollution and is more acceptable to local authorities. In both cases the work should be done by commercial operators with conservators close at hand to monitor the process and ensure damage is avoided. On drying and to prevent flash rusting, apply a protective coating immediately following wet sandblasting.
Flame cleaning involves the use of a blowtorch or an oxyacetylene flame to remove paint and rust quickly and effectively. Apply this technique very carefully as thin section metal is likely to distort rapidly and spring steel will lose its ‘temper’ and ‘spring’ if overheated. Wear eye protection as there is a risk of injury as rust particles fly off rapidly with this method.
All of the techniques described above can be used in conjunction with each other.
A typical cleaning scenario involving a steel object may proceed as follows:
- use a steel wire brush to remove as much loose rust or flaking paint as possible;
- immerse the object in a caustic soda solution to remove grease, old paint and dirt. This may require immersion for some hours. Occasionally remove the object, wash it with water, scrub it and replace it in the caustic solution;
- rinse the object under running water;
- transfer the object to a tub containing citric acid. Dissolution of rust may take several hours. Periodically remove, inspect and brush the object;
- fully immerse the object in the citric solution to prevent the development of ‘tide lines’ on the object as these are difficult to remove, often requiring extensive polishing;
- when the rust has dissolved, place the object in a caustic soda solution for a few minutes. This neutralises excess citric acid which would otherwise cause further rusting;
- thoroughly rinse the object with water and then immediately rinse it with acetone, methylated spirits or dewatering fluid to prevent further rusting. Brush these liquids onto the surface and allow the object to dry; and
- apply a protective surface coat to the object.
While citric acid is relatively safe to use on most objects, do not leave cast iron, cast steel and spring steel, or combinations of these metals unattended for long periods in a citric acid bath as they will corrode. Bubbles rising to the surface of the bath indicate that the surfaces of these iron materials are corroding. In the case of harder alloys, this can lead to hydrogen embrittlement and result in pitted, weakened or destroyed objects. Iron objects that are sprung can spontaneously break as they weaken during this corrosion process.
If in doubt regarding the type of iron or steel or the duration of acid treatment required, spend more time removing corrosion products by mechanical means. Once the worst deposits are removed, a short treatment in citric acid should clean the object with reduced risk of damage. Some spots of rust may remain on the object despite citric acid treatment. These can be picked off mechanically.
Large Steel Objects
In many cases it is impossible to find containers or tubs large enough to immerse an object for caustic or citric treatment. In such situations the acid or alkaline stripping solution can be applied to the surface by using a bentonite paste. Higher concentrations of chemicals are needed when a paste is used.
Bentonite paste is prepared and applied in the following way:
- prepare solutions of caustic soda (80 g/L of water) and citric acid (100 g/L of water);
- sprinkle and mix enough bentonite powder into each of the prepared solutions to make spreadable pastes;
- apply the pastes directly to the area to be treated in the order described immediately above;
- if the surface is not smooth, place a water-dampened tissue over the treatment area first and then apply the paste. This will minimise ‘clogging’ of surface indentations;
- if possible cover the paste layer with plastic film to prevent it drying out. Repeated applications of the paste may be required;
- remove the paste by hosing the surface with water and scrubbing with a bristle brush; and
- dry the object as described previously.
Avoid breathing caustic vapours and wear eye and skin protection when preparing and using caustic soda solutions. If large quantities of caustic solutions are used they must be disposed of according to government regulations.
Composite Materials
Consult a conservator for advice before treatment as composite objects made up of different metals or metal and organic components require specialised treatments. For instance, if an object is made up of iron and aluminium or iron and zinc, do not clean it in a caustic solution as that solution will react with the aluminium and the zinc.
Likewise treatment of a composite of iron and brass in a citric acid solution will result in the copper from the brass corrosion products ‘plating’ out on the iron and accelerating the iron corrosion. Suspension and partial immersion of the iron portion only in the citric bath, or the localised use of bentonite paste (see above), may allow such a problem to be overcome. The selective application of a protective layer of wax may also be used to isolate and protect the surfaces that would otherwise be damaged by the citric acid solution.
Bentonite paste treatment is recommended if solder joints or related fastenings are present as these are also attacked readily by citric acid.
Plated Iron
Iron may be plated with other metals including zinc (galvanised iron), tin, copper, chromium or nickel. These coatings protect the base iron sheet from corroding and also provide a bright surface finish. Corrosion usually occurs when the surface plate breaks down, exposing the iron which in turn begins to rust.
To remove rust, a citric acid solution containing an inhibitor can be used. The inhibitor is included to prevent any attack on the plating metal. Before the solution described below is used, test it on an inconspicuous area of the object or on a scrap piece of the same material. Prepare and apply the solution as follows:
- dissolve citric acid (50 g) and thiourea (10 g) in water (1 L);
- immerse the object in the solution, periodically remove it from the solution and brush it gently with a soft bristled brush;
- when the rust has been removed rinse the object thoroughly with fresh water followed by immediate rinses with either acetone, methylated spirits or dewatering fluid; and
- clean the plating metal with methylated spirits or, if there are rust stains present, with a mild abrasive such as pumice powder in methylated spirits.
After a final cleaning, if a bright surface finish is required, apply a proprietary metal cleaner as a once-only polish. The artefact may then be coated with a clear lacquer.
Finishing Techniques
There are many methods available to give the object the ‘right’ colour and protective coating. The type of finish chosen will depend on the intended role of the finished object, with the final decision being a balance between aesthetic, practical and personal considerations. The most commonly used techniques include:
- tannic acid-based rust converters;
- fish oil;
- oil quenching;
- ‘blueing’;
- painting;
- clear lacquers;
- microcrystalline wax;
- flame colouring; and
- natural patina.
Tannic acid-based rust converters are commercial products which can be applied to an object that has been cleaned either chemically, mechanically or which still has light rusting present on its surface. This product initially turns the object a brown-black colour. Subsequent applications darken it further until it is totally black. This coating system results in the formation of stable iron tannates which passivate the metal and protect it from further corrosion. Do not use this treatment on iron objects which will be displayed outdoors unless an additional protective coating is applied. To maintain the black appearance, tannic acid-based rust converters can be sealed with clear acrylic lacquers (see below for details).
A mixture of 80 parts white spirit to 20 parts fish oil can be applied to freshly cleaned iron objects with great effect. Thinning of the mixture with white spirit allows it to soak into micro-fissures and any light rust on the steel. It usually dries within minutes. Several coats can be applied and when dry the object can be painted if required. This mixture does not change the metal colour and gives effective protection.
Oil quenching is an old blacksmith’s method which provides effective protection from rust. The end result is a deep blue-black object. This method works best on low carbon steel as flaking occurs in small patches on high carbon or alloy steels. Wear protective clothing and eye protection to avoid injury. Steps in this method are as follows:
- heat the iron object to a dull red colour using either an oxyacetylene torch or a forge and then plunge it into old, dirty engine oil (the dirtier the oil, the blacker the final colour);
- agitate the object for 30 - 60 seconds (depending on size), remove it from the oil and then wipe it with a rag; and
- repeated applications of this method will darken the object further.
‘Blueing’ is a method that has been applied to many types of firearms, especially their barrels, to produce a lustrous dark blue finish. Although this is usually done by commercial gunsmiths, a ‘blueing’ paste is available from gunsmiths and is easily applied. Take care when handling ‘blued’ objects as acids from skin contact etch these surfaces.
There are numerous paints available, both enamel and water-based, that protect and beautify metal surfaces. A range of primers, undercoats and topcoats may be used. If applied correctly to properly prepared and cleaned surfaces adequate protection should be maintained for many years. For iron objects displayed outdoors, particularly in aggressive marine environments, use an inorganic zinc primer, a high build epoxy top coat and a final clear polyurethane coating with a UV-absorbing agent in the paint.
Clear lacquers are available in spray cans or can be applied by brush. Obtain the desired surface finish and colour before applying the lacquer according to the instructions on the product. Provided the entire object is coated, this finish gives a lasting protection against oxide build-up. If air or moisture penetrate beneath this layer however, lifting will occur and oxidation will recommence.
Vinyl co-polymer based Senson Ferroguard FS (Full Spectrum) with vapour phase corrosion inhibitor is also an appropriate sealer for bare metals but being a less durable coating is only suitable for objects that are infrequently handled such as those in museum collections.
Microcrystalline wax provides both thorough protection and an attractive finish to iron objects. Its preparation and application are described below:
- mix the wax with white spirit until it forms a smooth paste;
- apply using a soft rag; and
- allow the wax to harden and then gently buff the surface to the desired finish.
Microcrystalline waxes are available commercially for a range of metals and timbers, each formulated for a particular use. Use white spirit to remove the wax at any time.
Flame colouring involves alteration of the colour of iron and steel by applying direct heat from a forge or an oxyacetylene flame. After cleaning and de-rusting, apply a gentle flame to the object. The colour will change from light straw through to deep blue. When the object has attained the desired colour, plunge it into water. Note that this method can change the molecular structure of the steel depending on the grade and its carbon content. As the temper or spring will be lost if flame coloured, do not use this method on spring steel.
If an iron object is in a stable condition, with only a lightly rusted surface, it may be that this natural patina is the type of finish you require to demonstrate the history and past use of the object. Such finishes can be maintained if the storage and display conditions are controlled to prevent further corrosion.
Lead and Pewter
Lead is a soft grey metal that easily conforms to desired shapes and surfaces. In the past it was used for water storage and transmission through pipes. In combination with tin it forms pewter. Due to toxicity problems associated with the use of pewter food vessels the lead in pewter was replaced in the 18th century with antimony and some copper. Modern ‘leadless pewters’ are usually alloyed tin (Britannia metal).
Deterioration
Lead and pewter are prone to attack from acetic acid and other organic acid vapours given off by poor quality papers, some fabrics and various woods (Figure 5). The main corrosion product formed on lead and pewter not affected by organic acid vapours is white-grey, basic lead carbonate. This provides a deep, protective patina to the metal surface and should not be removed.
Figure 5: Lead musket balls with surface corrosion caused by exposure to organic acid vapours while displayed in a plywood display cabinet.
If pewter and lead have been in a low oxygen environment and exposed to sulphide compounds, a rich lustrous grey-black patina of metal sulphides forms on the surface. These minerals are stable and should not be removed.
Both tin and lead are very soft and susceptible to denting, tearing and scratching. Handle carefully.
Preventive Conservation
Adhere to the general guidelines described in the introduction to this chapter.
As lead and pewter objects are particularly susceptible to attack by organic acids emanating from certain woods, storage or display in enamelled metal cupboards is very important. If silicon sealants are used to assemble glass display cabinets for example, then ensure they are neutral cure and not acetic curing types.
Treatments
Cleaning
Do not remove the stable patinas that form on lead and its alloys, the white-grey lead carbonate and the dark lead sulphide, as they form a protective layer that prevents further corrosion. Other corrosion products may require treatment.
Carry out general cleaning in the following way:
- wash with warm water and a pure soap;
- rinse the object with fresh water. Do not soak in distilled water however as it will corrode lead;
- wipe with methylated spirits;
- polish with a soft cloth; and
- apply a protective surface coating of microcrystalline wax if necessary.
As it is difficult to obtain very mild abrasives, their use is not generally recommended on soft metals. If however, the white bloom that forms on the surface of these metals (lead or tin acetate) is thin, and one micron grade alumina powder is available, use a slurry of this alumina in water as a polish to remove the deposit from the surface.
If the white acetate layer is pustular or thick it is best removed by either electrochemical techniques or chemical reduction. These specialised techniques require the skills of a conservator.
Thin layers of corrosion products can be removed by soaking the objects in a solution of disodium ethylenediaminetetraacetic acid (EDTA, 50 g in 1 L of water). Avoid prolonged soaking as the dissolved oxygen in the solution will accelerate corrosion.
Tin
Tin is a soft white metal found in essentially pure form in some objects such as ingots but is more commonly encountered as plating on food cans. Tin is also a constituent of pewter when alloyed with lead.
In the 19th and 20th centuries tin was combined with a number of other elements to produce a range of alloys used principally for utensils and ornamental ware. Typical examples are Britannia metal (93% tin, 5% antimony, 2% copper) and leadless pewter (alloyed tin).
Britannia metal was developed in England during the mid-1700s in response to the threat to the pewter utensil industry from cheap porcelain. Old pewter was dull and undesirable as a food container because of its lead content. Although the new alloy was brighter and stronger it eventually lost favour as a metal for the production of household utensils.
Deterioration
Although it is normally quite stable, tin reacts slowly with the atmosphere to form grey stannous oxide and finally, stable white stannic oxide.
Many objects made of tin or its alloys are found covered with a dull grey coating of corrosion products. These form a protective patina and unless the corrosion is very pronounced or unsightly, retain this patina where possible.
Preventive Conservation
Observe the general guidelines mentioned at the beginning of this chapter.
Treatments
Cleaning
Although tin objects are quite strong, careless handling will still damage their surfaces. If an object has to be cleaned, try the following regime:
- use a pure soap in warm water to remove dirt and grime;
- rinse with fresh water;
- wipe with methylated spirits; and
- polish with a soft cloth.
For badly deteriorated objects, seek the advice of a conservator.
Aluminium
Most aluminium objects found in museum collections will be alloys containing copper as a minor component. The addition of only 3 % (by weight) of copper trebles the mechanical strength of the parent metal.
As aluminium corrodes the oxide layer that forms protects the surface against further corrosion. Under normal environmental conditions the metal does not corrode to any great extent.
Deterioration
If allowed to come into contact with metals such as copper and iron, or in the presence of chloride ions (such as found in sea water), aluminium and its alloys corrode appreciably.
Do not allow aluminium to come into contact with mercury as mercury prevents formation of the protective oxide patina, promoting rapid corrosion of the aluminium.
Preventive Conservation
Apply the guidelines described in the general introduction to this chapter to aluminium and its alloys.
Treatments
Cleaning
Clean aluminium with methylated spirits or a soft brush to remove dirt. Do not use any abrasives on aluminium as these may remove the protective oxide layer.
Never use caustic soda to remove grease or paint from aluminium objects as it reacts vigorously with aluminium. Remove heavy deposits of oil, grease and petroleum products, commonly encountered on vintage car parts, with kerosene or similar products.
If the metal is heavily stained or corroded, apply a solution of phosphoric acid (1 %). This will produce a mild uniform etch on the metal surface which, after thorough washing and drying, should be left for a day to enable the protective oxide film to reform through contact with the air.
Coatings
Coat aluminium surfaces with a protective clear lacquer after cleaning. This form of protection is not usually needed unless the aluminium is likely to be affected by salt such as found at a seaside location.
Gold
Gold has been used from the earliest times. It is yellow, lustrous and the most malleable and ductile of the metals. As a rare metal, it is used extensively for jewellery and coinage.
Gold is often applied as a decorative surface coating in the form of gold leaf for manuscript illumination, as a top layer on prepared gesso and as gold amalgam for gilding copper and silver. It is also alloyed with copper and silver to improve its mechanical properties.
Treatment
As gold is resistant to corrosion it will usually only require polishing with a soft cloth.
No coating is required on pure gold but if it is alloyed with copper or silver, apply a clear acrylic or nitrocellulose lacquer to protect against tarnishing.
Summary
- Identify the type of metal before attempting any cleaning.
- Only consider removing a patina after ascertaining that the surface of the object is not as originally intended and that the patina is not providing protection against further corrosion.
- Wear gloves when handling highly polished artefacts.
- Keep relative humidity below 45 % for most metals in good condition and below 35 % for iron and metals showing signs of corrosion.
- Observe maximum light levels of 300 lux for metal objects and lower levels as appropriate for composite objects with light sensitive components.
- Where possible, store metals in enamelled or powder-coated metal cupboards or acid-free boxes.
- Do not carry out any treatment if unsure. Contact a conservator for advice.
- Contact a conservator for advice regarding the treatment of composite objects.
Bibliography
Canadian Conservation Institute, CCI Notes, Ottawa, Canada.
- N9/1 Recognizing Active Corrosion (2007)
- N9/2 Storage of Metals (2007)
- N9/3 The Cleaning, Polishing and Protective Waxing of Brass and Copper (2007)
- N9/4 Basic Care of Coins, Medals and Medallic Art (2007)
- N9/5 Tannic Acid Coating for Rusted Iron Artifacts, formerly published under the title Tannic Acid Treatment (2013)
- N9/6 Care and Cleaning of Iron (2007) N9/7 Silver - Care and Tarnish Removal (2007)
- N9/8 Mechanical Removal of Rust from Machined Ferrous Surfaces (2007)
- N9/9 Care of Objects Made of Zinc (2007) N9/10 How to Determine Metal Density (2016)
- N9/11 How to Make and Use a Precipitated Calcium Carbonate Silver Polish (2016)
Department of Materials Conservation, Western Australian Museum, 1981, Metals, in Conservation and Restoration for Small Museums, 2nd Edition, Western Australian Museum, Perth, pp. 35-48.
Drayman-Weisser, T., 1992, Metal objects, in Caring for Your Collections, National Committee to Save America’s Cultural Collections, Arthur W. Schultz (Chairman), Harry N. Abrams Inc., New York, pp. 108-121.
Selwyn, L., 2004, Metals and Corrosion: A Handbook for the Conservation Professional, Ottawa, ON: Canadian Conservation Institute.
Turner-Walker, G., 2008, A Practical Guide to the Conservation of Metals, Wang Show-Lai, Council for Cultural Affairs, Taiwan.
Untracht, O., 1975, Metal Techniques for Craftsmen, Doubleday, Garden City, New York.
Watkinson, D. and Lewis, M., 2004, ss Great Britain iron hull: modelling corrosion to define storage relative humidity, in Metal 04: Proceedings of the International Conference on Metals Conservation, 4–8 October, Canberra, Australia. Canberra, Australia: National Museum of Australia, pp. 88–103.
Modern Organic Materials
I. M. Godfrey and I. Loo
Introduction
Plastics and rubbers have played important roles in human endeavours since the beginning of the 20th century, pervading all aspects of modern societies. Their uses range from packaging (the ubiquitous plastic bag), sporting equipment such as surf boards and tennis racquets, information storage media such as tapes and disks, adhesives, paints, textiles and works of art to motor vehicle components. The sheer range of modern plastic and rubber materials, the different forms into which they can be shaped or moulded, from films, foams and fibres to three dimensional objects and their huge range of different physical and chemical properties have ensured their prominence in modern life. This prominence suggests that objects composed of these types of materials will make up an increasing proportion of museum and private collections in the future.
Plastics and rubbers belong to a group of substances known as polymers. Polymers are chemical compounds made up of smaller units (monomers), linked together to form larger structures that may be either natural or synthetic. Examples of naturally occurring polymers include cellulose in wood, collagen in proteins, latex from the para rubber tree (Hevea brasiliensis) and shellac from the female lac bug. The earliest man-made polymers can be considered to be semi-synthetic as they were made by chemically modifying natural polymers.
Some polymers form links which result in long chains with very little cross-linkage between the individual chains. Small side-chains or branches may also be present at intervals along the main polymer chain (Figure 1). These substances, known as thermoplastic resins, do not undergo any change during moulding other than a change of shape. They will soften if the temperature is raised, form a rigid solid when the temperature is lowered and tend to be soluble in organic solvents.
Other polymers form cross-links between long chains, an arrangement which usually leads to the production of a much harder and less soluble polymer than the purely chain-like equivalent. These polymer types, known as thermosetting resins, undergo a chemical change (curing) due either to the effect of heat or a catalyst, which makes them infusible. They do not soften again, even if exposed to heat and tend to be insoluble in organic solvents.
Figure 1: Types of polymers.
(a) Straight chain polymer - polyethylene.
(b) Branched chain polymer – typical structure.
(c) Cross-linked polymer - vulcanised rubber with disulphide cross-links.
The chemical nature of the polymer itself, the length of the polymer chains, the number and type of side chains that branch from the main chain, the presence of cross-linkages between chains and additives such as plasticisers, UV absorbers, fillers, stabilisers, flame retardants and colorants all affect the properties of a particular plastic. High density polyethylene for instance, which has few branches from the main polymer chain is more chemically resistant and stronger than low density polyethylene which has more branches. This is because as the number of branches increases, it reduces the ability of the polymer chains to pack tightly together, thereby reducing the polymer density.
The first polymers developed were those that involved the chemical modification of natural polymers. Cellulose nitrate was first prepared in 1833 (developed as the explosive ‘gun cotton’ in 1846) and rubber was vulcanised in 1839. In this latter process sulphur atoms were used to form cross-links between the natural rubber chains, allowing a new moulding material to be produced with markedly different properties.
Other important milestones included the preparation of a type of thermosetting plastic used in the production of ‘union’ cases in 1853 (see the chapter Photographs), the production of mouldable cellulose nitrate in the 1860s (‘Parkesine’), its subsequent plasticising with camphor in the mid-1860s, the preparation of cellulose acetate in the 1890s (commercially viable by 1910) and that of casein-formaldehyde plastic in 1899.
The first fully synthetic polymer was produced by reacting formaldehyde with phenol. This polymer, developed by J. L. Baekeland in 1907 was dark in colour, hard and brittle (‘Bakelite’). Bakelite dominated the domestic market until the 1950s and was used for items as diverse as toasters, clocks, radios, ash-trays, toilet seats, electrical fittings, car components and even coffins. The subsequent development of urea-formaldehyde and combined urea and thiourea-formaldehyde resins provided an unlimited colour range to complement the rather dark, sombre tones of the phenol-formaldehyde range.
The ‘poly’ age began in the 1930s. Thermoplastic resins began to make an impact with the development of polyvinyl chloride (PVC) and polystyrene. Polymethyl methacrylate (‘Perspex’) was first produced commercially in 1933. Its shatter-resistant properties were soon in demand. The development of polyethylene (‘polythene’) soon followed in the 1940s. The commercial development of polyesters, silicones, polyamides such as nylon 6, 6 and polyurethanes all occurred about this time.
Although the speed and number of developments in the history of polymers preclude any further discussion here, texts are available which document these developments and provide details of major polymer types, physical and chemical properties, preparation and technology (Kaufman 1963, Kroschwitz 1987, Mossman 1997, Shashoua 2008).
This is an area in which there is continuing research and development. The next generation of plastics is being produced by combining resins, both together and with fillers, and reinforcing agents. Advances in electronic and automotive engineering depend heavily on plastics. This, combined with the increasing use of plastics in household appliances, sporting goods, electronic devices and a myriad of other areas will ensure that these objects will be collected, forming the basis of historical and technological collections.
Identification
For collectors the identification of a polymer type is important because it may provide useful information about the origin and authenticity of an object and also about how it is likely to deteriorate if not looked after carefully.
Although a few simple tests have been described which may allow the more common plastics to be identified (Braun 1996, van Oosten 1999, Shashoua 2008), the identification of plastics is not particularly easy. Some plastics such as cellulose nitrate have characteristic appearances (Figure 2) while others have distinctive odours. Cellulose acetate for instance, has a vinegar-like smell, whereas plasticised PVC has a ‘new car’ vinyl odour when warmed under running hot water. The odour of degrading or very new polymers is often informative.
Figure 2: 1930s cellulose nitrate imitation of tortoise shell powder bowl and lid (Copyright: Museum of Design in Plastics, Arts University, Bournemouth, Wallisdown, United Kingdom).
For some polymers it may be possible to use visual clues such as design, colour and trademarks to assist in identification. Function, touch, date of manufacture, flotation, solubility, density and flame tests may also allow a tentative identification to be made. Some of these tests are destructive however and should be undertaken with caution and only after careful familiarisation with the techniques involved. As the number and type of polymers is constantly growing, it is beyond the scope of this book to attempt to describe characteristic features of all commonly used plastics and rubbers. Readers are encouraged to refer to excellent texts such as Conservation of Plastics (Shashoua 2008) for further information.
Where a doubt exists as to the identity of a plastic it may be necessary to use analytical techniques such as Fourier transform infra-red (FTIR) spectroscopy, Raman spectroscopy or combined pyrolysis gas chromatography-mass spectrometry to allow a conclusive identification to be made. Shashoua (2008) provides copies of FTIR spectra of commonly collected polymers. Both FTIR and Raman spectroscopic analyses can be carried out non-destructively. Depending on the nature and amount of additional components present in an object the spectra can sometimes be difficult to interpret. Thus while these techniques will be able to identify at least the major organic component (the polymer) of a plastic, other techniques are more suited to the identification of plasticisers, stabilisers, dyes, pigments and fillers which may also be present in these substances (Shashoua 2008).
In addition to identifying the components of a polymeric substance, analytical techniques can also characterise the extent of degradation of the substance and often the degradation mechanism or mechanisms that are operating. This knowledge is very useful as it can be used to guide decisions regarding conservation and preservation options.
Deterioration
As plastics not only form part of collections but are often used to store and conserve artefacts, it is important to be aware of the agents that contribute to the deterioration of these materials. Although many polymers are considered to be imperishable and potentially a worldwide pollution problem, in reality they are not. Collectors on the other hand invariably wish that these materials were less prone to deterioration. Polymeric substances that are most prone to degradation include cellulose nitrate, cellulose acetate, polyurethane foams, PVC and rubber (Shashoua, 2008).
Degradation may be reflected by changes in the chemical composition and the physical and chemical properties of a polymeric object. These changes will affect the form and possibly the function of an object, therefore altering its significance and possibly its ability to be interpreted as part of a collection or a museum display.
Signs of deterioration may include:
- distinctive odours (e.g. camphor from degrading cellulose nitrate);
- changes in colour, shape or surface appearance (blooms, cracks or crazing);
- the corrosion of metal components; and
- the discolouration of associated packing materials
Deterioration of plastics may be due to chemical, physical or biological activity. As with most organic materials, polymeric objects will be affected by elements such as light (especially ultra violet radiation), heat, moisture, oxygen and pollutants. Unfortunately it is not easy to recognise deterioration in its very early stage (the ‘induction’ period). This is problematic because once started, deterioration can be autocatalytic, with the degradation products stimulating further attacks on their own polymer chains.
Light and heat can provide sufficient energy to break weak bonds in a polymer chain, leading to depolymerisation and subsequent alteration of its properties. As the rate of chemical reactions increases with increasing temperature, the rate and extent of degradation of polymers likewise increases as the temperature rises. As well as stimulating chemical change, heat can cause physical changes in thermoplastics, the distortion and buckling of vinyl records being a classic example.
In addition, oxidation reactions are enhanced by the presence of heat, light, metal ions and elevated relative humidity levels. Light and UV radiation in particular may cause colour changes via either alteration of the polymer itself or of the pigments and dyes present in the matrix. Discolouration of clear polymers is often an indication that oxidation has occurred. Low density polyethylene, polyamides (e.g. nylon 6) and acrylics (e.g. polymethyl methacrylate) all yellow when exposed to UV radiation and light, with the former two polymers also becoming more brittle on prolonged exposure.
Certain atmospheric pollutants, such as oxides of nitrogen and sulphur, are acidic and under conditions of high relative humidity can cause considerable damage to plastics. Polymers containing ester linkages such as cellulose acetate, polyesters and polyester-based polyurethanes are more prone to hydrolytic cleavage than are simpler molecules like polyethylene. Ozone is particularly damaging to rubber and to polymers containing unsaturated linkages in the polymer chains.
Inappropriate handling, cleaning or repairs can also accelerate deterioration due to the associated physical stresses and the impacts of some solvents. Areas of physical stress are more prone to chemical attack and bond-breaking. Solvents may not only dissolve a plastic but may also leach out plasticisers or cause the plastic to swell, thereby making the object more susceptible to chemical attack. These latter effects of solvent damage are often not immediately visible, with changes only becoming evident over a prolonged period.
Biological attack may occur, but this mode of deterioration is usually confined to semi-synthetic polymers derived from natural sources such as cellulose and casein and to some acrylic polymers (Shashoua 2008). This type of attack is favoured by high relative humidity levels.
Physical ageing is a less well known phenomenon in which polymeric materials (thermoplastics) continue to alter for long periods after their manufacture. Physical ageing is due to changes in the arrangement of the polymer chains with respect to one another. These changes are reflected in properties such as brittleness, stiffness, solubility and optical characteristics. A typical example is the slow hardening of natural rubber. The effects of physical ageing would be reversible were it not for the complications introduced by associated chemical degradation.
It is rare for only one mechanism of degradation to operate within a polymeric material. Usually changes in the chemical make-up of polymeric materials are reflected in corresponding changes in properties and appearance. For instance, evaporation or migration of plasticisers from a plastic will produce a material with reduced flexibility and increased brittleness. Shown below (Figure 3) is a cellulose acetate doll damaged by both the migration of plasticisers from the polymer and autocatalytic degradation caused by acetic acid released following hydrolysis of acetate groups in the polymer.
Figure 3: Cellulose acetate doll showing the effects of plasticiser loss and acetic acid attack.
Chemical attack on the polymer chain or on the cross-links between chains is likely to produce a weaker material with an altered resilience and changed stress relaxation. On the other hand, chemical changes which introduce cross-links into a plastic will produce a material with a reduced ability to stretch, reduced tear resistance and with an increased chance of suffering fatigue cracking. These sort of changes may be brought about by heat and oxidising conditions.
It is difficult to predict the precise behaviour of a particular object to a set of conditions. The formulations of many of the early polymers varied considerably, even for materials which were meant to be the same and the conditions of use and exposure of many polymeric objects will not be known. The use of impure materials in manufacturing processes also contributed to the variation in properties of early polymers. Thus with age, rubber may become hard, brittle and cracked or it may soften, becoming sticky and even liquefy. Plastics may shrink as they age and the surfaces of rubbers and plastics may craze or become chalky. More information regarding terms commonly used to describe polymer degradation, examples of these and summaries of the causes of degradation is provided elsewhere (Shashoua 2008).
It is likely that many recently produced polymers will have a greater resistance to deterioration due to the use of improved stabilisers and purer starting materials. Despite this, collection managers and conservators need to face the reality that some polymeric objects are inherently unstable and may simply have to be left to their inevitable fate.
Preventive Conservation
Rather than use the term preventive conservation when describing ways in which deterioration of polymeric substances can be slowed down, Shashoua (2008) prefers to use ‘inhibitive’ conservation. This is probably more accurate as it is generally accepted that once degradation has commenced in polymeric substances it cannot be stopped, merely ‘inhibited’ or slowed down. The type of preventive or inhibitive action that can be taken will be largely dependent on the following factors:
- the type of polymer;
- the current condition of the polymer; and
- the use to which the polymer is to be put.
Although there are no international guidelines regarding environmental conditions for polymers, knowing the polymer type and the likely causes of degradation will obviously assist in determining the optimum storage conditions. Precise specification of preservation guidelines is also complicated by the complex compositions of most polymers. Rarely are they just one component; rather they comprise a myriad of ingredients (co-polymers, fillers, flame retardants, plasticisers, dyes etc), many of which affect the stability and longevity of the object. Thus while some general guidelines may be given for polymeric substances, quite specific conditions must be maintained for those materials for which deterioration mechanisms are well known. Almost all polymers for example, benefit if light and UV radiation levels are limited and low temperatures are maintained. It is mainly polyester and ester-based polyurethanes however, that benefit from storage under low relative humidity conditions that limit hydrolytic degradation.
Environment
Conditions which slow the rate of deterioration of most plastics include:
- low temperatures;
- relative humidity levels of less than 50 per cent;
- low oxygen levels; and
- low light levels.
Storing most plastics and rubbers at low temperatures and low relative humidity (less than 50%) will retard the rate of chemical deterioration. Common wine refrigerators are quite good polymer storage units as they maintain low temperatures and relative humidity levels while allowing the condition of objects to be monitored visually. Note that nylon and casein formaldehyde polymers should be stored at about 60 % relative humidity to minimise shrinkage and brittleness.
As the rate of chemical reactions halve for every 10 °C drop in temperature, storage of most polymers in frost-free deep freezers or cold rooms will slow chemical deterioration. Caution is still needed however as some plastics may undergo stress cracking at very low temperatures and some materials such as painted animation cels (early cartoon materials) and laminates are at risk due to differential shrinkage rates of their components. In addition many polymers are brittle and therefore susceptible to physical damage if handled inappropriately while still very cold. Although research is continuing in this area, it is considered safe to store thin-walled polymers including cellulose nitrate, polystyrene, polyesters and acrylonitrile-butadiene-styrene copolymers in polythene bags in a freezer (Shashoua 2008). While thicker polymers can also be stored in freezers, they cannot simply be bagged and put directly into the freezer. To minimise the risk of damage, thicker polymers should be progressively cooled, moving from ambient conditions to cooler storage, then to a refrigerator before finally being moved into a freezer. This slow acclimatisation reduces the risk of water damage as the temperature is reduced. Conversely, thicker polymers should also be slowly acclimatised to warmer conditions should they be removed from a freezer (Shashoua 2014).
Self-indicating silica gel may be used to maintain a dry environment, but is not recommended for plasticised PVC as it has been shown to absorb phthalate plasticisers from the polymer, leading to accelerated deterioration (Shashoua 2001). As for all artefacts, it is wise to maintain stable conditions to minimise problems associated with adjustment to a different environment.
Oxygen exclusion will also enhance the longevity of most plastic and rubber artefacts. Achieve this by using an inert storage atmosphere (nitrogen or argon) or a chemical oxygen scavenger such as those described previously (see the chapter Mould and Insect Attack in Collections). There are obvious practical difficulties associated with building and maintaining a large, oxygen-free storage area. It is more practical to seal sensitive artefacts with oxygen scavengers in transparent, oxygen-impermeable envelopes. In 1991, British Museum staff sealed approximately 50 assorted polymeric objects in bags with oxygen scavengers. When these objects were examined about 10 years later, those objects still in sealed bags were essentially unchanged, unlike others that had been either inadvertently or deliberately opened (Dyer et al 2011). If this approach is adopted, monitor the activity of the oxygen scavengers and replace them when necessary.
Remember that placing polymers in a sealed container is not recommended for polymers like cellulose nitrate and cellulose acetates that produce damaging gases as they age and deteriorate. Enclosing these polymers in a sealed environment will accelerate their deterioration.
Transparency is an important feature of storage media as it allows objects to be monitored without having to open them. To adsorb degradation and other potentially damaging products in sealed containers, incorporate materials such as activated carbon, zeolites, potassium permanganate pellets, Artsorb® board, Microchamber™ papers and boards and buffered tissue paper in storage envelopes.
To minimise photochemical degradation, store objects in the dark or maintain light levels at 30 lux with a maximum UV exposure of 50 µwatts/lumen (1500 µW/m2).
Storage and Display
Regardless of the storage medium it is essential to regularly monitor the condition of plastic artefacts, especially when they are stored in closed environments. In these situations, if degradation continues, deterioration may be accelerated by the build-up of a harmful microenvironment in the closed system. The deterioration of cellulose acetate for example is usually accompanied by the release of acetic acid vapours. These would build up in a closed system and increase the rate of degradation of an already degrading object. Acid detection (A-D) strips, which change colour as the acidity of an environment changes, can be used in a closed system to detect the build-up of acid vapours. They can also be used to determine when a zeolite or activated charcoal absorbing material has lost its activity and needs refreshing. Consult a conservator to receive the most recent advice on the use of these and other monitoring methods.
Isolate deteriorating plastics from other materials to prevent damage to unaffected objects. Do not store deteriorating objects in a closed environment; instead, store them in open metal cupboards, protected from dust and light by muslin (or similar) curtains or in ventilated polypropylene containers. This arrangement will permit maximum ventilation. Use buffered acid-free paper to scavenge free acids and acid-free card to line the metal shelving.
Acid-free paper, silicone release paper, polyester wadding and polyethylene foams are suitable for wrapping or supporting most polymers.
Make replicas of particularly valuable objects and use these for display. Store the originals under the best conditions possible (cold, dark and with both low relative humidity and oxygen levels).
Support flexible objects, such as rubber-based materials, at all times. As rubber degrades and plasticisers are lost from some plastic objects, artefacts made from these materials may harden over time. Support these objects in their correct shape using polyethylene foam or tightly crumpled acid-free tissue paper.
Do not allow objects which contain a high proportion of plasticisers, such as those made from cellulose acetates and PVC, to come into contact with each other or with other plastics. This will avoid the possibility of migration of plasticiser from one object to another, a process which could lead to either the softening of objects or of their ‘welding’ together.
Special mention needs to be made of objects composed of cellulose nitrate, cellulose acetate, plasticised polyvinyl chloride, polyurethane foams and rubber as these polymers are particularly susceptible to deterioration.
Cellulose nitrate-based materials were produced extensively during the period 1860 to 1930 and include imitation tortoise shell and ivory objects, cutlery handles, toys, films and negatives. As cellulose nitrate objects degrade there is an increased risk of fire. In addition, the release of acidic or oxidising gases by degrading cellulose nitrate objects increases the risk of continued damage to the object itself and damage occurring to metal and other objects that may be stored in close proximity. Camphor was used as a plasticiser in some cellulose nitrate objects. Loss of the volatile camphor from the polymer is usually indicated by a characteristic smell, increased brittleness and cracking of the object’s surface (Figure 4).
Figure 4: Cracking in a cellulose nitrate buckle and accelerated corrosion of the attached metal bar due to nitric acid release from the degrading plastic (copyright Cordelia Rogerson, www.materials.ac.uk/events/doc/plastics-rogerson.ppt).
Segregate cellulose nitrate objects from other objects in a collection in a well ventilated, fire-proof area. Do not circulate vented air to other areas of the collection. Obviously isolation from heat and ignition sources is also essential.
Store cellulose nitrate motion picture film in perforated cans to allow gases to vent and store negatives in buffered paper envelopes. If stored in boxes, add activated charcoal cloth, charcoal paper, Microchamber™ papers and boards or other zeolites to absorb damaging gases that are given off as the polymer degrades.
Copy degrading films and negatives to ensure that the information that they contain is not lost. As specialist equipment is needed to reformat these materials, consult a conservator.
Careful monitoring is critical in these cases. Stages of degradation include progressive yellowing, the formation of bubbles or foam, embrittlement and shrinkage. Store these artefacts at 2 – 5 °C, at a relative humidity between 20 and 30 % and at maximum light and UV levels of 50 lux and 75 microwatts/lumen respectively (Shashoua 2008). Dark storage is strongly recommended.
As the gases given off by degrading cellulose nitrate objects are damaging to health, take appropriate precautions when working with these materials. Work in a well ventilated area and wear protective clothing including nitrile gloves.
Cellulose acetate objects including films, combs, toys and other moulded goods were mainly produced from the late 1920s to the 1970s. Whereas films and fibres were made primarily from cellulose triacetate, three-dimensional objects were usually made from cellulose diacetate.
Many cellulose acetate objects contain plasticisers (often phthalates) which can migrate from the polymer structure and acetate groups that can react to produce acetic acid. Migration of plasticisers to the polymer surface can produce an acidic environment and warping of the plastic whereas hydrolysis of the acetate groups produces acetic acid and a characteristic vinegar-like smell. If cellulose acetate butyrate is present in the polymer, it will smell more like rancid butter as it degrades. The presence of bubbles or crystals (plasticiser) on the surface of an object or a mild vinegary smell is an indication that active degradation has commenced.
Acetic acid will break down the polymer chain and can also attack any susceptible objects like metals, textiles and paper that are in the same vicinity. It is important therefore to segregate cellulose acetate objects from other sensitive objects.
As well as storing cellulose acetate films and negatives in appropriate conditions, copy them so that their original information is preserved. If there is no option but to store cellulose acetate films in sealed metal or plastic cans, incorporate zeolite packages in the containers to absorb damaging moisture and acetic acid vapours (Shashoua 2008).
Store cellulose acetate objects in a ventilated area, at 2 – 5 °C, at a relative humidity between 20 and 30 % and at maximum light and UV levels of 50 lux and 75 microwatts/lumen respectively (Shashoua 2008). Again dark storage is also strongly recommended.
Plasticised polyvinyl chloride objects, including toys, waterproof clothing and electrical cabling were initially produced in the 1940s and are still made today. Pure PVC materials are hard and rigid, with plasticisers added to give them flexibility and softness.
Discolouration (yellowing and darkening) and warping are often the first signs of degradation. Other signs include cracking and an acidic and/or ‘plastic’ smell from the breakdown of the polyvinyl chloride or migration and loss of the phthalate plasticisers respectively. As a PVC object degrades, hydrochloric acid may be given off. This may be reflected in the corrosion of metal components of an object or brittleness of paper wrappings, signs that degradation has started.
The migration of plasticisers is a major problem as the PVC objects lose flexibility, shape and integrity and related degradation is accelerated. Phthalate plasticisers can form a ‘bloom’ on the surface of objects. This should not be removed unless absolutely necessary as it will merely encourage the migration of more plasticiser to the surface. Isolate objects from direct contact with other objects but exercise caution if wrapping is the only isolation alternative as there is a risk of damage to soft, deteriorating surfaces.
Store plasticised PVC objects in cool, dark conditions, enclosed in non-absorbent materials like glass and polyester envelopes. The use of non-absorbent materials minimises plasticiser loss from the polymer. Low density polyethylene is not a good storage medium because it readily absorbs plasticisers (Shashoua 2008). Ideally these objects should also be stored in an oxygen-free environment.
It may be necessary to support some PVC objects in their preferred shape as they age and become more brittle.
Polyurethane foams have been used in the production of toys, packaging, textiles (including fake leather) and cushioning from the 1940s to the present.
Polyether-based polyurethanes are susceptible to oxidative degradation, particularly in the presence of light, while polyester-based polyurethanes, although more resistant to oxidation, are more vulnerable to hydrolysis in moist conditions. Degradation is usually indicated by a pungent odour, discolouration and/or loss of mechanical properties. Degradation can be quite rapid because of the large surface area of these foams and can result in the complete crumbling of the whole object.
If possible separate deteriorating foam objects from others and unless opting for low oxygen storage, provide good ventilation.
Store polyurethane foam objects in cool, dark, low oxygen conditions and polyester-based polyurethanes in low relative humidity conditions (20 – 30 %, see the chapter Preventive Conservation: Agents of Decay). The addition of activated charcoal or zeolites to any sealed storage system will help to minimise the build up of potentially damaging degradation products.
Synthetic rubber products have been available from the late 1830s when sulphur was introduced to cross-link the natural rubber chains. The hardness and elasticity of the products was determined by the amount of incorporated sulphur, with the hard rubbers like ebonite and vulcanite containing up to 30 % sulphur. As rubbers were also prone to oxidation, stabilisers were often added to rubber products. The off-gassing of sulphur-based vapours and the migration of volatile stabilisers are major problems of degrading rubber.
Because of the different initial properties of assorted rubber objects, their deterioration may be indicated in number of different ways. They may discolour, become harder or softer, less elastic, more brittle, stickier or even develop a more powdery surface. Hydrogen sulphide gases are emitted and sulphuric acid may be deposited on the surfaces of degrading objects. Paper or plastics in contact with rubber objects may become stained as coloured stabilisers migrate from the rubber. Silver is particularly susceptible to tarnishing in the presence of rubber-based objects.
As rubber objects emit damaging gases, separate them from other objects, preferably in a well-ventilated area. If ventilation is not possible, seal them in enclosures with activated charcoal or zeolites.
As oxidation is the major degradation pathway for rubber objects, store them at low relative humidity levels, low temperatures and in low oxygen environments. Although low temperatures will result in an alteration of the crystallinity of the rubber, causing it to lose its elasticity, this change is reversible on warming (Smithsonian Institute). Low temperature storage is acceptable for rubber objects in either good or degraded condition. If rubber objects are sealed in low oxygen environments, make sure that acid scavengers (such as activated charcoal or zeolites) are also included with the oxygen scavengers to avoid the build-up of damaging microenvironments.
Regular monitoring of the condition of objects is essential.
Treatments
Interventive treatments should only be considered if they are absolutely necessary to minimise further deterioration or to preserve the significance of an object. Approach the treatment of plastic materials with utmost caution. Before undertaking any treatment, determine the type of plastic in the object. Because of the sensitivity of many plastics to solvents, cleaning agents and adhesives and the difficulty involved in identifying them, contact a conservation professional for advice rather than attempting to treat objects yourself. There is a significant risk of damage to objects otherwise.
Cleaning
Reasons for cleaning plastic objects include the removal of surface degradation products, the improvement of unsightly appearances and the removal of dust which can enhance degradation. Few reports have been made about cleaning and stabilising degraded plastic and rubber because of their delicate nature, susceptibility to further damage and relative impermeability.
Physical cleaning may involve either brushing, gentle wiping with soft, lint-free and/or microfibre cloths, vacuuming or blowing air to remove adherent particles. Great care must be taken if physical methods are used because of the risk of damage to the plastic surface.
Although aqueous cleaning may be problematic for polymers that are susceptible to hydrolytic breakdown (such as semi-synthetic polymers, polyesters and polyester-based polyurethanes), some plastics may be safely washed with warm water containing small amounts (3 - 5 %) of a non-ionic detergent (for example, Lissapol, Teric N9, Arkopal N090) and a soft cloth or brush. Objects should never be immersed in water however. To avoid the possibility of swelling dry washed objects immediately after wet cleaning with either a soft cloth or tissue. This approach has been successfully used on plasticised PVC (Huys and van Oosten 2005) and on a polyether-based polyurethane sculpture (Winkelmeyer 2002). It is most important to use soft, lint-free swabs that minimise surface abrasion when applying the detergent and during subsequent rinsing and drying.
Do not use water on (Morgan 1992):
- vulcanite (hard rubber) that is beginning to degrade;
- surface-dyed casein;
- degrading cellulose nitrate or cellulose acetate where the surface is cracked or crazed; and
- objects which contain metal components which may corrode.
The use of non-aqueous solvents is not generally recommended due to the increased possibility of damage occurring to the polymer (Shashoua 2008). If it is necessary to use a non-aqueous solvent either as a cleaner, to remove an adhesive or to reverse an earlier repair for instance, it is best to consult Hildebrand solubility parameters (as modified by Hansen 2007) to ensure that the solvent used will not damage the polymer. Once a potential solvent has been selected, test it on an inconspicuous part of the object before use because the solubility properties of the polymer may have changed as it degraded.
Some collectors have used commercial acne cleaners to remove green copper staining from doll’s PVC skin and commercial polishes to remove scratches to improve the appearance of plastic objects (Shashoua 2008). As most commercial polishes are silicone-based, the latter treatment is likely to be irreversible. In addition these treatments have not been evaluated to determine any possible long-term effect on polymer preservation.
Stabilising Deteriorating Objects
There have only been a few descriptions of attempts to stabilise deteriorating polymeric objects.
Despite the reservations expressed above (Morgan 1992), deteriorating cellulose nitrate beads were washed in water to remove acid and then soaked in very dilute sodium carbonate solution to neutralise any remaining acid and to buffer future acid formation. This approach was successful in stabilising these objects. It would be unlikely to be effective in the treatment of large objects due to the lack of porosity of cellulose nitrate (Green and Bradley, 1988).
The consolidation and repair of a pair of severely degraded rubber bathing shoes has also been described (Maltby 1988). The shoes had areas of differing degradation, soft and slightly tacky in some areas, hard and brittle in other areas and supple and undegraded elsewhere. Specialised techniques were used to reshape the shoes, fill lost areas and strengthen fragile areas. A fitted padded support was constructed from ethafoam and a specially designed display mount was prepared. As the shoes were extremely fragile and could not be strapped in place, a tin plate insole was inserted in each shoe and magnets fixed under the acid-free mount. Removal of the magnets allowed the shoes to be ‘freed’. To enhance the longevity of the shoes they were stored in a nitrogen atmosphere.
Repairs and In-Painting
Before embarking on the repair or treatment of plastics there is a number of factors that must be considered. These include the:
- basic nature of the plastic including the extent of degradation and surface tension;
- solvent and plastic interaction;
- properties of possible adhesives including coefficients of expansion, flexibility, ageing characteristics and refractive indices; and
- necessity for pre-treatments to improve adhesion
To repair or even in-paint a plastic object effectively, it is necessary for a bond to form between the applied adhesive or in-painting medium and the substrate. If this is not the case then there will be no effect as the adhesive will not hold and the paint will fall off. Implicit in this process is the use of a solvent which will not adversely affect the plastic in some way.
While water-based adhesives would seem to be the least likely to damage most polymers, large differences between the surface tensions of these materials limits the effectiveness of these adhesives. Although information is available which matches adhesive types with specific plastics and descriptions are given of other joining techniques including heat and solvent-welding, it is strongly recommended that a conservator is contacted before attempting this type of treatment (Blank 1988, Shashoua 2008).
Consolidating, impregnating and filling plastics are highly specialised tasks. While successful treatments have been applied to crumbling, cracking polyurethane foams and crazing cellulose nitrate objects, these types of treatments require specialist knowledge (Shashoua 2008).
Labelling Objects
If labelling of plastics is needed, use either a soft pencil on a discrete surface (suitable for polyethylene and PVC) or an ink based on an acrylic dispersion medium with carbon black or rutile titanium white as pigments (Shashoua 2008). While tie-on labels with cotton tape can be safely used, there is always a risk of detachment or loss of the label. Avoid applying a barrier layer between the plastic and the ink and also avoid the use of solvent-based inks and paints, rubber bands or adhesive tapes.
Summary
- Store most plastic and rubber materials at low temperatures (a freezer is acceptable for most polymers) and maintain relative humidity levels below 50%.
- Maintain low oxygen environments and low light levels (30 lux with a maximum UV exposure of 1500 µW/m2, but preferably no light) to enhance stability of plastics.
- Monitor the condition of plastics carefully to prevent damage to nearby artefacts.
- Support flexible objects in their desired shapes.
Bibliography
Blank, S., 1988, Practical answers to plastic problems, in Modern Organic Materials, Preprints of the Meeting, Edinburgh, 1988, Scottish Society for Conservation & Restoration, Edinburgh, pp. 115-122.
Braun, M.D., 1996, Simple Methods for the Identification of Plastics, 3rd edition, Hanser/Gardner Publishing Inc., Cincinnati.
Dyer, J., Ward, C., Rode, N., Hacke, M. and Shashoua, Y., 2011, Reassessment of Anoxic Storage of Ethnographic Rubber Objects, in Preprints of 16th Triennial Conference, ICOM-CC, Lisbon, Portugal, 19–23 September 2011, J. Bridgland (Ed.), pp. 1-10.
Green, L. and Bradley, S., 1988, An investigation into the deterioration and stabilisation of nitrocellulose in museum collections, in Modern Organic Materials, Preprints of the Meeting, Edinburgh, 1988, Scottish Society for Conservation & Restoration, Edinburgh, pp. 81-96.
Hansen, C.M., (Ed.), 2007, Hansen Solubility Parameters: A User’s Handbook, 2nd Edition, CRC Press, New York.
Huys, F. and van Oosten, T.B., 2005, The ‘Aeromodeller 00-PL; the conservation of a PVC balloon,, in Preprints of the 14th ICOM-CC Triennial Meeting, The Hague, 12 -16 September 2005, James & James Ltd, pp. 335-342.
Kaufman, M., 1963, The First Century of Plastics - Celluloid and its Sequel, Plastics and Rubber Institute, Chameleon Press, London.
Kroschwitz, J.I., (Ed.), 1987, The history of polymer science, in Encyclopedia of Polymer Science and Engineering, vol. 7, Wiley-Interscience, New York.
Lavédrine, B., Fournier, A. and Martin, G., (Eds), 2012, Preservation of Plastic Artefacts in Museum Collections, Paris: Comité des travaux historiques et scientifiques.
Maltby, S.L., 1988, Rubber: the problem that becomes a solution, in Modern Organic Materials, Preprints of the Meeting, Edinburgh, 1988, Scottish Society for the Conservation & Restoration, Edinburgh, pp. 151-157.
Morgan, J., 1992, The cleaning and care of plastic artifacts, Polymer Preprints, vol. 33, pp. 643-644.
Mossman, S.T.I., 1997, Early plastics: Perspectives 1850-1950, Cassel, London.
Shashoua, Y.R., 2001, Inhibiting the degradation of plasticised poly(vinyl chloride) – a museum perspective, Ph.D. thesis, Danish Polymer Centre, Technical University of Denmark.
Shashoua, Y., 2008, Conservation of Plastics: Materials Science, Degradation and Preservation, Butterworth-Heinemann, Oxford, United Kingdom.
Shashoua, y., 2014, A safe place: Storage strategies for plastics, in Conservation Perspectives, the GCI Newsletter, Conservation of Plastics, vol 29 (1), pp. 13–15.
Smithsonian Museum Conservation Institute, http://www.si.edu/mci/
Van Oosten, T.B., 1999, Identifying plastics: Analytical methods, in A. Quye and C. Williamson (eds), Plastics: Collecting and Conserving, NMS Publishing Limited, Edinburgh.
Winkelmeyer, I., 2002, Perfection for an instant-restoration of a polyurethane soft sculpture by John Chamberlain, in T. van Oosten, Y. Shashoua and F. Waentig (eds), Postprints of the ICOM-CC Modern Materials Interim Meeting, 12 – 14 March 2001, Siegls Fachbuch Handling, pp. 153-164.
Ethnographic Material
C. Corvaia, D. Gilroy and C. Harley
Introduction
Because they can be constructed from almost any type or mixture of materials, the care of ethnographic objects, probably more than any other type of collective material, presents a tremendous challenge to conservators and collectors alike (Figure 1).
It is worth listing some of these materials to highlight the high degree of care and sensitivity needed in handling, documenting and treating these artefacts. Materials used in ethnographic objects may include textiles, metals, plant material, stone, ceramics, skins, leather, furs, glass, feathers, shells, ochres, pigments and ivory, coupled with dyes, resins, oils, paints, blood and so on. Each of these material types can be further subdivided to give an even more imposing list of possible components which make up the class of collectables known as ethnographic objects. Plant material, for instance, can include wood, gourds, bark, paper, linen, cloth, reeds, leaves and vines.
Figure 1: This parang shows the range of material types that can be found within one object.
Note that some traditional societies have introduced modern materials into their objects. A background knowledge of the recent history of an artefact is therefore pertinent. It is also very important to understand the social and cultural backgrounds associated with objects so that no offence is caused, for example, by having a particular object on display.
In order to preserve ethnographic material it is essential to identify both the material components and the agents of deterioration.
Deterioration and Handling
Deterioration
Because of their complex nature many ethnographic objects are extremely susceptible to damage from the usual agents of decay (relative humidity, light, temperature, pollutants, dust, insects and poor handling).
As materials such as wood, leather, furs, paper and animal sinew react at different rates to changes in relative humidity, stresses will develop in composite objects if they are exposed to rapid changes in these conditions. Painted or pigmented surfaces for example, may become detached or powdery due to changes in either relative humidity or extremes of temperature.
Potential damage to the patina of metals, to low-fired clays, problems of salt incorporation in objects recovered from buried or wet sites and the effects of high temperatures on resins and waxes all complicate the already difficult situation of caring for these material types.
Objects that are moved from one climatic zone to another need special attention. Cellulose-based materials moved from the tropics to more temperate regions for example, should be slowly acclimatised to their new environment if drying stresses are to be avoided. Suitable storage and display environments, handling and acclimatisation of sensitive materials are described elsewhere (see the chapter Handling, Packing and Storage).
Documentation and Handling
Always wear cotton or rubber gloves when handling ethnographic objects. As many ethnographic objects have been treated with toxic chemicals, this will protect both the artefact and the handler.
Thoroughly examine the object and make notes on its condition, history (if known), the materials from which it is composed and the presence of any previous repairs or alterations. Record all components even if positive identification of the material type is not possible (for example, a specific resin type). Photographs and sketches are extremely important components of the overall documentation.
As these objects are often susceptible to insect infestation and fungal attack it is wise to have an inspection area away from any other objects that may be affected by cross-contamination.
Note that as some materials may be poisonous by intent, arrow tips or material in gourds for example, take great care during the examination process.
Good handling, storage and display practices are essential if ethnographic objects are to be appropriately cared for. Choose conditions and practices that are best for the most sensitive component of a composite object. As the range of ethnographic materials is too diverse to cover in this book, the following section on bark paintings has been included to illustrate a general approach to the care of ethnographic material
Bark Paintings
Introduction
Bark paintings produced by Australian Aborigines are usually made from sections of the outer bark cut from eucalyptus trees. The bark is heated and weighted to produce a flat surface, scraped and then sometimes treated with natural resins before being painted.
Traditionally natural ochres, clays, minerals and charcoal were used for pigments. These were sometimes mixed with natural binders such as plant gums or blood. More recently PVA emulsion has been used to bind pigments. For the past 40 years, commercial acrylic paints have also been used.
Deterioration
Most conservation problems associated with bark paintings are associated with relative humidity. High relative humidity levels encourage mould and fungal attack on binders and can cause bark fibres to relax and return to their original curved form (Figure 2). Some of the traditional pigments, clays in particular, are able to absorb moisture from the air. This may eventually cause them to break up by flaking, blistering or cracking.
In addition, fluctuations in relative humidity cause bark to expand and contract, usually across the grain. Pigments, because of their different composition, generally react to fluctuations in relative humidity to a lesser degree than the bark. This causes tension at the pigment-bark interface which if left unchecked will cause the two to separate.
Initially, pigmented areas crack, then ‘tent’ and finally spall off. White pigment, perhaps due to its relatively coarser grain, appears to be more sensitive than other colours. Problems with changes in relative humidity are common due to the fact that many bark paintings may be produced in a humid area but end up in a drier region. Low humidity can cause shrinking in bark fibres and splitting and flaking of paint.
Physical damage may also be caused by insect attack of the bark itself.
Figure 2: Aboriginal bark painting. Ochre paint is flaking due to bark curling.
Preventive Conservation
Store and display bark paintings at relative humidity levels of 45 – 55 % with a maximum fluctuation of 5 % in any 24 hour period. A stable environment is most important as twisting and warping may occur otherwise. Maintain temperatures in the range 15 – 25 °C with a maximum variation of 4 °C in any 24 hour period.
To prevent dust accumulation, store bark paintings flat and covered with acid-free tissue or in archival quality cardboard boxes. Support any curved areas with dacron or polystyrene beads in washed cotton or linen (Figure 3). Keep the storage area clean.
Figure 3: Decorated bark from New Britain. A cloth mask needs support before going into storage.
To minimise fading of dyes and natural pigments, maintain light levels at a maximum illuminance of 50 lux with minimal UV radiation (less than 30 µwatts/lumen).
As bark paintings respond to changes in their environment they will be damaged if they are attached to rigid supports which restrict these responses. It is important to allow the painting some flexibility. Recently, fibreglass backings have been applied to some bark paintings with foam inserts which permit movement. Unfortunately, the fibreglass backing technique is time consuming, involves the use of toxic chemicals and is very expensive. More practical methods using aluminium strips and polyethylene foam have been developed (Coote 1995). As the backing procedure is highly specialised, consult a qualified conservator for advice.
Inspect paintings regularly to guard against insect attack.
Treatments
While some details are given below of ways in which bark paintings can be treated, this work should be left to conservation professionals. Seek advice from a conservator rather than attempt to carry out work yourself.
Cleaning
Cleaning bark paintings which contain traditional pigments may be difficult because these pigments often become powdery as they age.
If consolidation of the pigments is needed, and dust is found on the painting, remove the dust to prevent staining of the pigment during consolidation. Use a very soft brush, preferably sable, with a very light action. Due to the sensitivity required, ask a conservator to carry out this work.
Although it is possible to clean acrylic painted areas in good condition with cotton swabs that have been slightly moistened with water, avoid using water and organic solvents to clean bark paintings. If moistened cotton swabs are used, do not contact the bark and dry the cleaned areas immediately. Use dry cotton swabs or something similar for this latter task.
Consolidation
Traditional pigments used in bark paintings often require consolidation. The main risk associated with consolidation is staining or darkening of the pigments by the consolidant. As results vary from painting to painting, test a range of possible consolidants before commencing full-scale treatment. Consolidation is a specialist task, requiring the skills of a conservator.
Although cellulose-based consolidants have less cohesive and adhesive strength than their synthetic counterparts, their use is generally recommended. Synthetic resins are not in keeping with the natural materials used in bark paintings and may produce a surface which is both glossy and prone to yellowing.
Carboxymethyl cellulose (CMC, 5 g in 100 ml of water) is a widely used consolidant that rarely stains pigments. As CMC may affect any water-soluble pigments present in a painting, test it before application.
If flakes are lifting, introduce a consolidant beneath the flakes, with the flakes then gently laid down with the aid of silicon-release paper and weights.
Powdery areas may require application of the consolidant over the pigment surface. Do this by wetting out the pigment with ethanol (after testing for staining) and then manually applying the consolidant. The ethanol helps to draw the consolidant into the pigment and in some cases helps to reduce staining.
Occasionally, consolidants are sprayed over the bark surface. Although time-efficient, this procedure may not provide the thoroughness or penetration of consolidant that is achieved by working manually.
Other adhesives, which can be used include ethulose, potato starch, Klucel G and Klucel EF. Although the Klucel products (cellulose ethers) do not give a particularly strong bond, they have the advantage of being soluble in ethanol. Klucel EF is especially useful as it has a lower molecular weight than Klucel G and a more concentrated solution can be achieved without the viscosity which makes application difficult.
Note that cellulose-based consolidants are prone to mould attack. Display and store paintings treated with these materials in a stable environment with a relative humidity in the range of 45 – 55 %.
Insect Attack
Consult a conservation specialist if insect attack is a problem.
Oxygen deprivation is the most appropriate technique for insect control in bark paintings. Details of this technique are provided elsewhere (see the chapter Mould and Insect Attack in Collections). This approach is the least likely to damage the pigments.
Chemical fumigants and freezing techniques are not recommended as both will have deleterious effects on pigments in bark paintings.
Summary
- Identify all materials within the object.
- Obtain as much background detail or history before starting any treatments.
- Handle only with cotton or rubber gloves.
- Maintain temperatures and relative humidity levels in the ranges 15 -25 °C and 40 – 60 % with maximum variations of 4 °C and 5 % respectively in any 24 hour period or at levels suitable for the most sensitive material of a composite object (see the chapter Preventive Conservation: Agents of Decay.)
- Avoid direct sunlight and control display lighting.
- Consult a conservator before treating ethnographic materials.
Bibliography
Coote, K., (1995), Mounting Aboriginal bark paintings, SSCR Journal, vol. 6, pp. 7-9.
Horton-James, D., Walston, S. and Zounis, S., 1991, Evaluation of the stability, appearance and performance of resins for the adhesion of flaking paint on ethnographic objects, Studies in Conservation, vol. 36, pp. 203-221.
Léculier, A., 2000, Recommendations for Storage of Aboriginal Bark Paintings: A Technical Note, Studies in Conservation, vol. 25, pp. 37-40.
Rose, C.L., 1992, Preserving Ethnographic Objects, in K. Bachmann (Ed.), Conservation Concerns: A Guide for Collectors and Curators, Smithsonian Institution Press, Washington and London, pp. 115-122.
Tsuneyuki Morita, T. and Pearson, C. (Eds), 1988, The Museum conservation of ethnographic objects, 9th International Ethnological Symposium, 1985, National Museum of Ethnology, Osaka, 290 pp.
Wet Materials
J. Carpenter, I. M. Godfrey, I. D. MacLeod and V. L. Richards
Introduction
Materials recovered from marine, freshwater or wet terrestrial sites pose quite different conservation problems to those excavated from dry sites. Both the extent and the type of deterioration that occur in wet environments differ significantly from those that take place under dry conditions.
Factors that affect the extent of deterioration in a wet environment include the following:
- temperature;
- degree of oxygenation;
- presence of bacteria, fungi and other organisms;
- light;
- period of immersion or burial;
- nature of the material surroundings;
- extent of burial/exposure cycles; and
- development of encrusting concretions.
Warm, moist conditions usually increase degradation processes whereas cool, dry conditions are less damaging. Damp surroundings encourage breakdown of materials through chemical and biological processes. Water is essential for many chemical reactions, the corrosion of iron and the hydrolytic breakdown of the cellulose fibres of wood and textiles being examples of two such reactions. Moisture also encourages fungal and bacterial attack on susceptible materials.
The aqueous environment from which an object has been recovered will give an indication of the type and extent of degradation to which an immersed object has been subjected. Preservation chances improve when the temperature is low and when there are low levels of dissolved oxygen and light. Wood buried in low oxygen surroundings for instance, has been known to survive in marine environments for thousands of years. On the other hand, timbers exposed on the seabed will be broken down rapidly by marine borers, microorganisms, chemical attack and the abrasive action of waterborne particles.
The nature of the material surroundings may affect deterioration significantly. The chemical composition of the burial environment (e.g. acidity, salt content, dissolved oxygen levels), the presence of a sacrificial metal in contact with a less reactive metal (leading to protection of the latter) and the diffusion of metal corrosion products into porous organic objects that then either stain the objects or in some cases protect the objects from biological deterioration are just some of the possible effects of differing burial environments.
For objects found in wet terrestrial sites additional factors such as soil acidity and the chemical characteristics of the ground water influence degradation processes.
Some objects are fortunate enough to be afforded protection from their surroundings by being buried, encapsulated in concretion (a cement-like corrosion product) or by being under the protective influence of another material that is present in a neighbouring object. The process of removing objects from these protective surroundings upsets these relatively stable states. Unless appropriate conservation steps are taken immediately accelerated degradation will result.
Although the emphasis in this section will be on materials recovered from marine sites, the same principles can be applied to objects recovered from freshwater and wet terrestrial sites. Changes are expected in the condition of materials from these different environments with respect to the nature and extent of degradation and obviously the degree of salt contamination.
As wet ceramics and glass have been discussed in separate chapters dealing with those particular material types, this chapter will focus on organic materials and metals. Materials that contain at least an organic component include wood, leather, bone, ivory, horn, textiles and any materials made from natural fibres such as rope and matting. Organic materials may be found as discrete objects or as parts of composite objects that also incorporate other materials such as metals or ceramics.
Identification
It is essential to identify the materials from which an artefact is made. This information, when combined with knowledge of the environmental conditions to which an artefact has been subjected, will assist in determining its likely condition before it is handled and treated. Once identified, specific recommendations can be made regarding storage and treatment procedures.
Often familiarity with the type of object is a reliable initial indicator of its usual material composition or likely material of manufacture. The types of corrosion products associated with metallic objects are also good indicators. The colours and formation of corrosion products can provide information about the material type and the burial conditions to which an object has been subjected. In aerobic conditions for example, iron corrodes to produce characteristic orange-brown rust colours whereas copper corrosion under similar conditions produces distinctive blue-green corrosion products. If the site is anaerobic however, metals are generally blackened as metal sulphide corrosion products predominate.
Following excavation and recovery artefacts may visibly react to the changes in environmental conditions and in doing so may provide information about the artefact’s composition. Silver corrosion products for example may blacken when exposed to light. Corrosion products also sometimes produce smells that assist in materials identification. Iron corrosion products for example, have a characteristic odour.
Note that a magnet can be used to detect the presence of residual iron or magnetite.
On-site Storage Considerations
Following excavation, an artefact is exposed to a set of conditions quite different from those of its former burial environment. It will be vulnerable to both physical damage and chemical changes. For example a corroded iron object recovered from a reducing, anaerobic environment will usually exhibit black or grey corrosion products. Subsequent exposure to aerobic conditions results in a transformation to orange-brown rust. With time, the expanding products of the oxidation process are capable of destroying these objects.
It is important to provide stabilising conditions as soon as possible following excavation and to be prompt when recording information about recovered objects lest changes occur in the meantime. If the documentation procedure is prolonged then keep artefacts wet with a fine water spray and/or dampened cloth covers.
As the extent of material degradation of recovered artefacts is not always immediately apparent, handle objects with great care to minimise further damage. Label all artefacts and storage containers and include precautionary comments if required.
As there are too many possible scenarios for excavated wet objects, only basic guidelines can be given.
Metals
The guidelines listed below will afford recovered wet metal objects some protection:
- store in water, with freshwater preferred to salt water. Do not use soft water that is low in mineral salts as it will promote corrosion of lead and lead alloys;
- only store like metals in the same container;
- retain adherent concretions;
- remove the majority of marine organisms and plant matter if possible;
- use common sense if putting more than one object in a container with smaller, lighter objects on top;
- store fragile objects separate from more robust objects; and
- do not store metals in the same container as organic materials unless they are part of an inseparable, composite object.
Further details are provided for individual metal types later in this chapter.
Organic Materials
Adhere to the following guidelines for organic materials:
- keep the object wet;
- support large or fragile objects;
- wrap fibrous objects with smooth materials that are unlikely to mark or otherwise damage the surface;
- retain concretions;
- separate objects that are contaminated with iron corrosion or similarly coloured products from uncontaminated objects;
- do not expose objects to direct sunlight;
- store objects at low temperatures (4 - 5 °C) and in the dark where possible;
- change the storage water if biological growth is observed;
- use fungicides in solutions if storage is prolonged and biological growth is a problem. Do not add any fungicides to a storage solution if the object is to be used for subsequent analyses such as radiocarbon dating; and
- begin treatment as soon as possible after recovery.
Upon recovery, do not allow organic materials to dry out. In most cases irreversible damage will be done if this occurs. Wood for example, is prone to shrinking, cracking and warping upon drying (Figure 1). Many objects recovered from buried wet sites appear black and it is sometimes difficult to identify the object’s composition. If unsure of the nature of the object, keep it wet.
Figure 1: (a) Conserved wood fragment from the wreck of the Rapid (1811) after drying.
(b) Untreated Rapid wood after drying. The red outline in both images shows the shape of each piece before drying.
When lifting large objects such as wood, or fragile materials such as leather and rope:
- support them on planks, netting or similar materials. Place padding between large objects and the support. If object surfaces are very soft use support materials that will not leave an impression in the surface. Netting without padding may leave damaging marks;
- lift objects by gripping the supports, not the objects; and
- protect against accidental damage by cushioning any fastenings or retainers used to keep the object in place. Provide padding and additional support for any protuberances.
To prevent fibre loss and damage due to water movement when storing fibrous materials such as rope and textiles:
- wrap them in materials such as tulle which will not snag the fibres;
- store them in lidded containers completely filled with water to minimise damaging ‘slopping’ movements; and
- alternatively wrap the objects in tulle and then wrap them again in water-saturated paper towel or cloth and then place the wrapped object in a sealed polyethylene bag or container.
Horticultural gel media products used to retain moisture around cultivated plants are also useful for wet organic materials storage. A wrapping is still advised if the gel is likely to intermingle with fibrous or other similar materials.
Store small objects in polythene bags or containers. Initially water from which the object was recovered may be used to keep the object wet. Placing one bag inside another provides additional protection against both drying out and physical damage.
Use freshwater for longer term storage, in conjunction with an appropriate fungicide if biological growth cannot be eliminated by changing solutions. A range of fungicides is available including Kathon (used as a 0.1 – 2 % solution), Panacide (0.2 %), Shirlan Plus (1 %), Dowicide (1 %), Densil P (0.3 %) and thymol crystals (excess in tap water). The choice of fungicide depends on the nature of the material in storage. Dowicide and Panacide for instance, are not suitable for use with textiles or leather due to their alkaline character (Pearson 1987). Exercise care when handling fungicides as many are toxic. Use appropriate personal protective equipment and observe all precautions described in their respective material safety data sheets.
Begin treating wet materials as soon as possible after their recovery. Long-term storage is not recommended as deterioration not only continues but often accelerates during such storage. If long-term storage is unavoidable, attempt to maintain conditions which minimise deterioration. Keep temperature, light and oxygen levels as low as possible. The latter two factors may be assisted by the use of narrow, deep storage tanks that conform as closely as possible to the dimensions of the object. Use refrigeration to minimise biological degradation and to reduce the need for biocides but do not freeze objects. Do not expose objects to direct sunlight (Keene 1977).
Where possible, retain adherent concretions until treatment begins.
If polythene bags, tanks and other containers are not available, wrap materials in dampened, water-absorbent material such as cotton cloth or hessian (or Burlap in the USA), wrap them again in plastic and seal joins with adhesive tape. Self-sealing plastic cling wrap is also good for maintaining moisture. Inspect the wrapped materials regularly to check that the object is still moist and that there have been no outbreaks of mould.
Packing and Transportation
As for on-site storage, care and common sense are needed when packing wet materials for transportation to a treatment laboratory. Find a balance between the maintenance of an appropriate storage environment, support for the object and the weight of the object and its storage medium. If 100 % relative humidity can be assured, actual immersion in water may not be necessary thereby reducing the overall weight. Avoid using biocides in solutions used to transport objects as the chemicals may have detrimental consequences should they leak. Pack objects according to the type of conditions that they are likely to encounter while in transit so that they will not be damaged. Packing to prevent damage to objects being transported by sea for example, is challenging if damage is to be prevented in rough sea conditions. An overview of packing and transportation is provided by Leskard (1987).
Containers used for wet packing must be waterproof with lids that form tight seals. Plastic containers, liners and bags, although still susceptible to physical damage by puncturing or fracturing are preferred to glass containers for transportation.
Avoid problems of excess weight or the possibility of damage being caused to an object by water movement by using damp wrapping and padding materials.
Do not use packing materials that will contribute to the further deterioration of the object or that are difficult to remove when the object is unpacked. Improvise if suitable padding materials such as bubble wrap are not available. Use materials such as the original supporting matrix (e.g. soil, concretion), sawdust, seaweed, undyed fabrics and even moss to maintain a damp supportive environment (Lucas 1982). Preferably wrap the object prior to padding especially if the improvised packing/padding materials could deteriorate and contaminate the object during prolonged transit.
When using improvised packing/padding materials be aware that most countries will not allow the importation of foreign soils and plant materials. Quarantine delays may compromise the preservation of artefact materials.
Do not expose objects to extreme conditions such as direct sunlight during transport. Use insulating materials around supportive packaging to avoid this problem.
Metals
Wet metals are generally much more reactive than their dry equivalent. Of the factors that affect the deterioration rate of wet materials three are probably more significant for metals than they are for other materials. These are the:
- development or otherwise of a layer of encrusting material;
- concentration of dissolved oxygen available to the metal surface; and
- location and relationship to other materials.
Some metal compositions encourage biological growth. Iron objects provide a good substrate for marine encrustation and often become encased in cement-like concretions. By providing a barrier to the inward diffusion of dissolved oxygen and salts, concretions serve to slow destructive corrosion processes (Figure 2). They also provide reinforcement for the weakened structure of encapsulated objects and provide protection against physical damage that may be caused by moving sand and wave action. Copper and its alloys tend to be toxic to marine organisms and encrustation is generally much less on objects made from these materials than on iron and its alloys.
Figure 2: Examples of bronze astrolabes. One was protected by concretion while the other was exposed to changing conditions on the sea bed.
Dissolved oxygen concentration is influenced by factors such as salinity, temperature and depth of burial in the sediments. The depth of the water at an archaeological site becomes significant as it will affect the ambient environmental conditions. As water movement and turbulence are greater in shallower sites more oxygen is supplied to the metal surfaces leading to increased corrosion rates.
The least reactive of two metals in contact or close proximity can be protected by the other. In this process the most reactive metal or alloy corrodes while protecting the least reactive metal at the same time. For example if copper and iron were in contact the iron would preferentially corrode and the copper would be protected.
A beneficial example of this process is demonstrated by the use of sacrificial anodes attached to the hulls of ships. Similar protection can exist with the metal of an artefact. Unfortunately it will frequently mean that another part of the artefact, or a connected metal artefact, will suffer more severe corrosion to provide this protection. Note that a sacrificial anode in electrical connection with an iron object that remains submerged in seawater will protect the iron object from further corrosion and also begin its desalination in–situ.
Metals and their alloys most commonly recovered from wet sites include gold, silver, copper, lead, tin, pewter, iron and aluminium. Of these pure gold is the most stable and aluminium the most reactive (see Appendix 8). The following sections contain information on the identification, handling and stabilisation of these more commonly recovered metals. The current recommendation concerning the initial storage of wet metals is to maintain them in a wet state.
Gold
Identification
The appearance of gold and its extensive use in jewellery manufacture usually allow this material to be easily identified. It is possible however, that corrosion products from any alloyed metals, commonly copper and silver, will disguise the gold appearance. Alternatively selective corrosion of these metals can cause surface enrichment of the gold component giving an impression that the artefact is very pure.
Handling
As pure gold is soft, mishandling can damage the surface and/or distort gold artefacts. Alloyed copper and silver impart strength to uncorroded gold artefacts but selective corrosion of these metals causes structural weakening.
Initial Stabilisation
- store in freshwater as most gold artefacts are alloys. Pure or uncorroded gold may be rinsed with fresh water and stored dry;
- store any gold which shows signs of copper corrosion either in freshwater or preferably in an aqueous benzotriazole solution (BTA, 10 g in 1 L of water); and
- store any gold which shows signs of silver corrosion in freshwater so that any potentially recoverable surface details contained within the corrosion products will be retained.
Silver
Identification
Silver corrosion products are usually grey or black. Silver salts react in the presence of light and in some instances blackening of freshly exposed silver corrosion products has been observed in strong light. Blue-green copper corrosion products may also be present on alloyed silver artefacts recovered from aerobic sites.
Handling
Silver artefacts from freshwater sites are more likely to retain structural strength. As more extensive corrosion is expected in artefacts recovered from saltwater sites, handle these materials carefully.
Retaining corrosion product layers is very important as archaeological information can be preserved and recovered from them.
Initial Stabilisation
To stabilise silver recovered from a wet site, observe the following guidelines:
- store objects in freshwater initially. If the silver is sound, clean and uncorroded then rinse the artefact with freshwater and allow it to dry;
- keep the silver in freshwater if the artefact is mineralised or possesses corrosion product layers; and
- store silver-copper alloys in a solution of benzotriazole (10 g in 1 L of water).
Copper and its Alloys
Identification
In aerobic and particularly alkaline (high levels of carbonate) conditions, the presence of copper is often indicated by green-blue corrosion products (copper hydroxycarbonates) which frequently stain the surrounding burial material (Figure 3). Under anaerobic conditions protective layers of black copper sulphide are formed instead.
Figure 3: Before and after treatment of the bell from the Cambridgeshire (1875).
Due to the toxicity of copper compounds towards marine organisms copper objects usually possess little encrustation or concretion.
Selective corrosion in copper alloys can result in the formation of a surface corrosion layer derived from the alloying metal. This complicates identification. For example, under low oxygen conditions the galvanic corrosion of bronze produces a grey-coloured, tin-rich corrosion layer. Weight loss, diminished strength and an increase in porosity result. Corroded bronze objects can appear to be made solely of copper if there is extensive destannification. Dezincification of brass has a similar result.
Handling
Although artefacts made of copper and its alloys are frequently recovered in very good condition, support will be needed if extensive corrosion of sheet metal has occurred or if thicker more robust objects have been severely eroded. Handle cast brass and bronze objects with caution as sometimes they will have soft and weakened surfaces due to selective corrosion of the more reactive component metals of the alloys.
Initial Stabilisation
To stabilise copper artefacts, follow the procedures outlined below:
- store recently recovered and structurally sound copper objects in freshwater;
- immerse badly corroded and structurally unsound copper objects in a solution of sodium sesquicarbonate (10 g of sodium carbonate and 10 g of sodium bicarbonate in 1 L of freshwater). This washes out the chlorides and stabilises the object.
Iron and its Alloys
Identification
The following features indicate the presence of iron:
- a large concreted mass or concretion layer (cement-like corrosion product combined with burial material); and
- orange-brown rust colours (in aerobic conditions).
Iron found in a wet site is usually weakened, with the loss of strength related directly to the extent of corrosion. It is important to distinguish between cast and wrought iron as the effect of corrosion processes is different.
Carbon, some in the form of graphite, is a constituent of cast iron. This inert substance does not corrode and often will help retain the original physical shape and dimensions of the object even when the iron content has decreased significantly. Corrosion is directly associated with weight loss and diminished structural strength. Concretion protects structurally weakened surfaces and reinforces corroded cast iron artefacts.
The corrosion pattern of wrought iron is determined by its manufacturing process. Since the metal is forged, beaten and folded into shape, the object acquires inclusions of impurities and different qualities of metal are laid down. In addition, manufacture sometimes imparts stresses to the metal which become a focus for corrosion activity. Consequently corrosion processes produce a furrowed surface not unlike the weathered grain of wood. The amount of uncorroded residual metal and the extent of interconnection of the remaining structure usually determines how well an object survives.
Handling
Handle all concretions carefully as the encapsulating medium, while providing protection for the encased iron object(s), may also contain other fragile components or materials. Provide support and do not lift concretions by protuberances.
Initial Stabilisation
To stabilise iron objects recovered from wet sites:
- store them initially in either the water from which they were excavated or in freshwater which contains an alkaline agent such as sodium carbonate (washing soda);
- for long-term storage, keep iron in a solution of sodium hydroxide (caustic soda, 20 g in 1 L of water) or sodium carbonate (50 g in 1 L of water);
- store iron from freshwater sites initially in distilled or deionised water; and
- in the short term, place small iron objects in an airtight container with a desiccant such as self-indicating silica gel.
Note that on safety grounds it is generally advisable to transport iron artefacts in water and not in caustic or other alkaline solutions.
Alkaline solutions will attack composite iron objects such as tinned wares, enamelled wares and any associated organic materials and should not be used to store composite objects which contain these components.
Lead
Identification
Indicators that an object may be made of lead include:
- a high weight-to-size ratio;
- grey appearance;
- cream-white encrustation (aerobic conditions); and
- areas of black corrosion products (anaerobic conditions).
In wet alkaline environments a combined layer of lead sulphate and calcium carbonate may form. This protective cream-white layer may have surrounding debris attached.
Under anaerobic conditions an inert layer of grey-black lead sulphide will form. Aerobic conditions can transform this layer to lead sulphate. Passivation of lead in aerobic and anaerobic conditions protects it from further rapid corrosion.
Lead is susceptible to attack by organic acids however, such as those found in peat and clay deposits and those formed when organic matter decays.
Handling
Handle lead artefacts with gloves as lead and its corrosion products are toxic. Wear a dust mask to avoid inhalation of dry corrosion products.
The passivating nature of lead corrosion products usually ensures that these objects are often found intact. The innate softness of lead means that it is highly susceptible to physical damage. Lead objects are often found deformed, torn, or abraded.
Handle lead objects carefully to prevent further damage to the surface of the lead or to its shape. Large objects, especially those made of sheet lead, will need support to prevent bending under their own weight. Corrosion products impart little reinforcement and easily fracture and detach if bending occurs.
Initial Stabilisation
To stabilise lead objects:
- store in seawater or freshwater containing sodium sulphate (1 g in 1 L of water).
- remove any marine growth to prevent attack from organic acids produced during the decay of these organisms; and
- after treatment and when dry, store away from potential sources of organic acid vapours such as acetate adhesives and unsealed wood including composite wood products such as chipboard.
Do not place lead in distilled, deionised or soft tap water as it will speed up corrosion. If untreated lead is stored dry it may make later removal of concretion more difficult.
Pewter
Identification
Depending on environmental conditions, pewter recovered from the sea can be found in excellent condition. Pewter surfaces are usually grey to dark grey in colour. Cracks and damaged surfaces will sometimes be defined by contrasting lighter corrosion products. Surfaces may exhibit a uniform-sized, blistered appearance with occasional large, sporadically distributed blisters.
Handling
As pewter is a relatively soft alloy it is susceptible to physical damage. Handle it carefully. Do not force distorted pewter artefacts back into shape as the metal may have become brittle.
Initial Stabilisation
To stabilise pewter artefacts recovered from wet sites:
- keep wet and remove any marine growth to avoid potential corrosion problems associated with their decay; and
- store in freshwater containing sodium sulphate (1 g in 1 L of water) and BTA (10 g in 1 L of water).
As for lead, avoid storing pewter in deionised water and soft tap water as it increases corrosion rates.
Tin
Identification
The type of object (e.g. an ingot or a food can) can indicate the use of tin in its manufacture or construction. Aerobic tin corrosion products are usually crumbly and whitish in colour.
Handling
Handle carefully objects made from either tin or coated with tin plate so that the corroded surfaces are not damaged and the intact metal is not subject to additional stresses. Support thin objects.
Initial Stabilisation
Initially store tin artefacts in the water from which they were recovered.
Aluminium
Identification
Aluminium has a light grey or silvery grey, naturally oxidised surface.
Handling
Aluminium objects need support when perforated by corrosion. Avoid exposing aluminium to alkaline and acidic substances and solutions.
Initial Stabilisation
Store all aluminium and aluminium alloys in the water from which they were recovered.
Treatments
The treatment of wet metals is a specialised area and one in which research is ongoing, particularly in the area of composite objects. Consult a conservator and/or conservation websites before attempting any treatment of wet metals to obtain the most up-to-date advice on particular techniques and treatments.
Storage and Display
For preservation it is important that artefacts are kept in a suitable environment following treatment. The optimum is not always possible as museum preferred standards are difficult to achieve. An awareness of the best environmental conditions for an artefact will however, allow collectors to assess their own particular environments and strive for the best possible conditions. It is generally easier to establish a suitable environment when artefacts are placed in storage than when they are on display.
Principles for storing and displaying stabilised metals are described elsewhere (see the chapter Metals). Specific details pertaining to particular metals may be found in the relevant sections of that chapter. In some cases formerly wet metals that have been stabilised will be more susceptible to damage by the environment and by inappropriate materials used in storage and display areas than will their historic counterparts.
Organic Materials
Wood
Identification
In some cases, as in the recovery of a blackened object from an anaerobic site, it is not always easy to identify the material type from which the object was made. The appearance of an object and its probable usual use, along with the fibrous nature of wood usually allow wooden objects to be identified.
Consult timber specialists if it is important to identify the wood species from which an object has been made. By examining either a polished end-grain surface or by preparing a microscope slide of the end-grain, the identity of a wood sample can usually be determined. Take samples from the least obtrusive part of the object to minimise damage to the object. Identification is relatively straight forward if the sample’s cell structure is in good condition and the wood is not heavily stained or blackened.
Handling
Ascertain the condition of wet wood before handling it as its appearance can be deceptive. The condition of recovered wet wood can vary from solid to mushy. Handle it accordingly, especially as the surface is usually soft. Use a very thin needle to determine the ‘softness’ of the surface and interior of the object. Test the softness in a number of places so that the overall condition of the wood can be determined. Being bulked by water, a wooden object can appear quite robust when in reality it is highly degraded and in need of support before it is moved.
Follow the general guidelines described in the Introduction to this chapter (On-site storage considerations) for wooden artefacts.
Initial Stabilisation
To stabilise wood recovered from wet sites:
- keep objects wet;
- maintain the support provided by water for smaller fragile wooden objects recovered from underwater sites and raise them in a suitable container, preferably sealed with a lid;
- store objects at low temperatures and in the dark if possible;
- change the water if biological growth is observed;
- use freshwater with a fungicide if biological growths are persistent and storage is prolonged (sample wood before adding biocides if a subsequent dating determination is planned); and
- store metal-contaminated wooden objects separately from non-contaminated objects.
Wet wood must be kept wet once recovered. Irreversible damage will occur if it is allowed to dry before treatment (see Figure 1). Use baths, plastic bags or containers, tubs or even wet cloths covered with plastic to keep artefacts wet.
Initially store wooden objects in water from their recovery sites. If sufficient freshwater is available then use it for objects excavated from a marine environment so that desalination can begin. Incorporate a fungicide such as Kathon (0.1 – 2 %) in the solution if biological growth cannot be controlled by changing water, refrigeration or other means of low temperature storage.
Leather
Identification
The ease of identifying leather is directly related to its condition. Highly degraded wet leather may appear as nothing more than mush or just as a mass of fibres held together by corrosion products. Often however, wet leather retains its shape and its characteristic appearance, making its identification relatively easy.
If an object is thought to be leather but there is some doubt, confirm its composition by infra-red spectroscopic analysis. This is a specialised technique which only needs a pin-head sized sample for the analysis.
Handling
When handling leather objects:
- use supports; and
- wrap in gauze or similar material and sew the edges together.
Handle thin or fragile leather extremely carefully as it is prone to tearing while wet. The best method for handling is to insert a support beneath the leather in its storage solution and to ‘float’ the leather onto the flat surface. Use the support, not the leather, when lifting the object.
Wrap small leather objects in soft gauze (e.g. tulle) and sew the edges together to make handling easier and to ensure that all parts of the object will be retained.
Initial Stabilisation
To stabilise leather from a wet site:
- store wet;
- store at low temperatures and in the dark if possible;
- change the water if biological growth is observed;
- store in freshwater containing an appropriate fungicide if biological growths persist; and
- store metal-contaminated leather objects separately from uncontaminated objects;
Do not allow wet leather to dry out before it is treated. For marine objects, seawater is acceptable for short-term storage before transferring them to a freshwater solution. If a fungicide is needed, only use pH neutral or slightly acidic fungicides such as Densil ‘P’ as alkaline fungicides contribute to leather breakdown. If possible store wet leather in a refrigerator or similarly cool environment. Do not store wet leather for long periods as deterioration processes continue.
Bone, Ivory and Horn
Identification
Identifying bone and related materials is often complicated by their dark colouration (due to burial in predominantly anaerobic conditions) or staining by corrosion products. As a consequence, these materials have been mistaken for materials such as wood and ceramics. If bone and ivory objects are incorrectly identified, they may be treated inappropriately. Use microscopic examination to distinguish these materials (Penniman 1952).
If microscopic identification is inconclusive, use infra-red (IR) spectroscopic analysis. IR analysis will allow bone and ivory to be clearly distinguished from other material types. The IR spectra of bone and ivory are similar however, particularly if samples are degraded.
Handling
Bone, ivory and horn objects are often fragile and require careful handling.
If these objects have been closely associated with iron objects they are often heavily contaminated with iron corrosion products. These often create a hardened exterior surface which can hide a multitude of problems, including a highly degraded core (Figure 4). Take care not to dislodge these protective outer layers as they can be quite brittle. Wrap ivory and bone objects in bubble wrap or similar materials for protection.
Figure 4: (a) Tusk fragment from the Vergulde Draeck (1656) shipwreck showing contamination with iron corrosion products.
(b) Cross-section of the same fragment showing different areas of deterioration in the inner parts of the tusk.
Initial Stabilisation
To stabilise bone, ivory or horn materials recovered from wet sites:
- store wet;
- use water from the excavation environment or freshwater;
- store at low, but not freezing temperatures if possible; and
- store metal-contaminated objects separately from uncontaminated objects.
Ensure these objects remain wet as the laminated structures of ivory and horn are usually coherent while wet but tend to delaminate upon drying. Short-term storage in the water from which the objects were recovered is acceptable.
After initial storage, place the items in freshwater at low temperatures (about 5 °C) to begin desalination, thus avoiding the need to incorporate a fungicide. This is important as the complex nature of these material types (inorganic and organic components with different pH tolerances) means that the choice of an appropriate fungicide is very difficult.
Textiles
Textiles include materials made up of cellulosic fibres such as cotton, flax, hemp, jute and sisal, and proteinaceous fibres such as wool and silk. Fabrics, rope and matting have all been recovered from wet sites. Usually textile materials will survive in a wet environment only if the site is anaerobic or if they have been protected from their surroundings by encapsulating concretions.
Identification
Identifying fibres usually requires a high power, good quality microscope and access to appropriate references which highlight the features of different fibre types. As textile fibres from wet sites are usually highly degraded, choose the best fibres for examination to ensure that characteristic features are still evident.
Handling
When handling wet textiles:
- support them so they do not carry their own weight;
- use flat supports for flattened textiles; and
- use sewn netting for three-dimensional objects.
Of the organic materials wet textiles are often the most difficult to handle because of their fragility and inability to maintain their own shape when removed from their aqueous environment. At all stages of treatment most textiles need some sort of support to maintain their structural integrity.
Support flat textiles on a glass plate or similar, separated from the support by interleaving with synthetic papers or screening material.
Three-dimensional textiles like rope usually need to have a support sewn around them to maintain the overall integrity of the object and to prevent fibre separation and loss. Gauze screening, tulle for example, is preferred as it allows relatively easy access for cleaning and offers little resistance to both the outward diffusion of dirt, salts and corrosion products and to the inward movement of consolidants and other treatment chemicals.
Initial Stabilisation
To stabilise wet textiles:
- store wet, using either the water from which the textile was recovered or freshwater;
- support and wrap fibrous textiles while in the wet state;
- store at low temperatures and in the dark if possible; and
- consult a conservator for advice on incorporating appropriate biocides if longer term storage is likely.
Treatments
As many of the current treatments for wet organic objects require access to specialised equipment (analytical and technical) and research into treatments is on-going, an overview of some treatment processes are described rather than specific treatments for particular object types. Contact a conservator to obtain the most up-to-date information.
Generally, treatment of wet organic materials involves four distinct stages:
- cleaning - physical and chemical;
- desalination;
- consolidation; and
- drying.
Physical Cleaning
Clean the surfaces of wet organic objects before chemically treating them. This allows the material type to be determined, improves the rate of outward diffusion of any absorbed salts or corrosion products and improves both the object’s appearance and its permeability to stabilising consolidants.
During cleaning take care not to damage an artefact’s surface as it is important not to remove or disfigure potentially useful archaeological information.
Depending on the nature and condition of the object in question, either remove soil and similar materials by careful brushing in water or use ultrasonic agitation if appropriate. Monitor the removal of detritus through a microscope to ensure that surfaces of small valuable items are not damaged during cleaning.
To minimise the damage to the surface of soft materials like wood, bone and leather, use wooden and plastic scrapers rather than metal ones to remove more stubborn encrustations from the surface. Remove adherent concretion with dental tools or by gentle percussion. Wash off or carefully wipe debris from the surface while keeping the object wet at all times.
The fragility of wet textiles, including rope and matting, complicates their cleaning. Support these materials on either glass, perspex sheets or netting while cleaning them. As brushing will inevitably lead to fibre damage, use a fine spray of water or careful immersion (still on a support) to clean the object. Carefully applied ultrasonic techniques have also successfully cleaned these fragile materials. If possible conduct a test on a sample section before using ultrasonic techniques on a larger scale.
Chemical Cleaning
Organic objects excavated from wet sites will have absorbed substantial amounts of salts from their surroundings. For shipwreck objects the most commonly incorporated materials, apart from the ubiquitous salt, are metal corrosion products which originate from nearby corroding copper and iron artefacts (Figure 5).
Figure 5: (a) Lace from the Batavia (1629) shipwreck before treatment.
(b) The same sample after treatment to remove corrosion products.
In many cases incorporated iron corrosion products are not only disfiguring but chemically damaging to objects. In conditions of elevated relative humidity the presence of iron corrosion products and reduced sulphur in conserved wood for example, leads to the development of damaging acidic regions (Sandström et al 2003). Cellulose breakdown follows. Other cellulosic materials, such as rope and many textiles, are also at risk in the presence of iron corrosion products.
Treatments are aimed at removing these incorporated minerals from organic objects. This is achieved by using chelating or complexing agents to remove the intrusive corrosion products. The chemistry associated with these processes is not simple. It is essential to utilise the services of a conservator who can monitor treatments regularly to determine treatment effectiveness and the rate at which corrosion products are removed.
Desalination
Desalinate wet organic objects before any impregnation or consolidation treatment. Apply the procedures outlined earlier in this book (see the chapter Ceramics). Note that the more porous nature of organic materials means that desalination times will be less than for metals and glass. If necessary incorporate a fungicide in the desalination solution to protect objects while salts are being removed.
Consolidation Treatments
As organic objects deteriorate in a wet environment the soluble degradation products that are generated during this deterioration leach into the surroundings. In many cases the object is bulked by water which takes the place of the leached chemical constituents. This helps to maintain the shape of the object, but only while it is in its wet state. Unfortunately, as drying takes place supporting structures are lost and cell collapse, shrinkage and warping result.
The aim of consolidation treatments is to prevent this damage by progressively replacing the water in degraded organic objects with chemicals (consolidants and bulking agents) which will bond with the residual chemical constituents of the object. These consolidants provide objects with added structural integrity when they are dried.
If an organic artefact needs to be analysed, sample it before any chemicals such as fungicides or consolidating agents are used to treat it.
Drying
Damage to wet objects becomes obvious if drying is uncontrolled. Wood may warp, crack or shrink, ivory delaminate and leather shrink. Drying damage is irreversible for objects like wood, bone and ivory. Although leather objects can be retreated if their shrinkage is unacceptable (> 5 %), avoid this if possible.
The key to success in drying is to ensure that drying stresses are minimised. Vacuum freeze-drying is the best method to dry objects such as wood, rope and textiles as it gives a much better end product than air drying. This is because the freeze-drying process allows moisture to be removed as vapour directly from ice (sublimation). Drying stresses induced by the strong surface tension forces of water are avoided when the liquid state is bypassed in this way and any water–based consolidants cannot drain away as could happen if the ice reverted to liquid form.
Although vacuum freeze-drying is the most efficient technique, it requires the use of sophisticated and expensive equipment. It is used primarily for drying small objects. A frost-free freezer is also very effective at slowly freeze drying conserved organic objects without the need for an applied vacuum. Monitor the weight of objects as they dry to determine when the drying process is complete.
Controlled air drying is usually needed for larger objects. Controlled dehumidification over a prolonged period is the next best alternative to freeze-drying. This process may involve the use of expensive, electronically controlled dehumidification chambers or improvised materials to construct a chamber in which the temperature and relative humidity can be regulated. One simple way of slowing the drying process is to place objects under polyethylene sheeting, venting the saturated atmosphere that builds up under the plastic once a week. Alternatively, place small objects in plastic bags that have been pierced with pin-sized holes.
As mould formation is enhanced when the relative humidity is high, monitor the progress of drying operations, especially if objects are placed in or under plastic.
Preventive Conservation
Wet organic objects are often incomplete and are generally more degraded than their dry historic counterparts. Extra care is needed when handling, storing and displaying these objects.
Environment
Store and display treated wet organic artefacts under the conditions recommended for the material type in question. These may be obtained by referring to the relevant chapters of this book.
As for all materials, the key to improving the stability of wet organic objects is to maintain appropriate conditions that are as steady as possible. This is particularly important for wet organic materials, as in many cases the proteinaceous or cellulosic components of these materials will be substantially degraded.
Extra consideration and care should be taken with:
- cellulosic-containing objects that still contain iron corrosion products and reduced sulphur compounds; and
- objects for which incorporation of consolidating chemicals was necessary.
In both of these cases special attention may have to be paid to the environmental conditions to prevent continued deterioration of the treated artefact. For instance, under conditions of high relative humidity, oxidation and hydrolysis of incorporated iron corrosion products and sulphur compounds can lead to increased acidity and subsequent damage to dried, formerly waterlogged wooden objects. Maintain relative humidity levels of less than 55 % in order to prevent this type of deterioration.
The incorporation of polyethylene glycol (PEG) into an artefact will affect its response to its environment as low molecular weight PEGs are hygroscopic. Under high relative humidity conditions, PEG-treated artefacts may take on a sticky, greasy appearance. Mould formation and bacterial attack also are enhanced by the presence of a food source such as PEG and by high relative humidity conditions.
Handling
Many formerly wet organic archaeological objects are more degraded than their historic counterparts and consequently require more careful handling. For fragile objects, the construction of supports that allow them to be handled without actually touching the objects themselves is recommended.
Whatever the final choice for a support it should allow the object to be manipulated with minimal risk of damage. A support that is suitable for both storage and display is probably the ideal. Choose the support on the basis of the fragility of the artefact and its future use, be it storage, display or research (see the chapter Handling, Packing and Storage).
In all cases the media used to construct supports must be of archival quality and compatible with the artefact. Acid-free materials in contact with proteinaceous artefacts such as leather and silk, for example, should not contain alkaline buffering agents as these substances increase protein hydrolysis (see the chapter Preventive Conservation: Agents of Decay).
Summary
Metals
- Keep wet.
- Retain adherent concretions.
- Store separately from organic material.
- Do not store dissimilar metals in the same storage container.
- Consult a conservator for treatment advice.
Organics
- Keep wet.
- Retain concretions until treatment commences.
- Store objects contaminated with metal corrosion products separately from uncontaminated artefacts.
- Support fragile material on planks or netting.
- Lift by the supports, not by the object.
- Place cushioning between objects and the support material.
- Begin treatment as soon as possible after recovery. Seek advice from a conservator.
Bibliography
Godfrey, I., 2014, The Conservation of Waterlogged Wood - An Overview of Developments, in Shipwrecks around the World: Revelations of the Past, Ed. S. Tripati, Delta Book World, New Delhi, pp. 624- 657.
Grattan, D.W. and Clarke, R.W., 1987, Conservation of waterlogged wood, in Conservation of Marine Archaeological Objects, Ed. C. Pearson, Butterworths, London, pp. 164-206.
Jenssen, V., 1987, Conservation of wet organic artefacts excluding wood, ibid, pp. 122-163.
Keene, S., 1977, An approach to the sampling and storage of waterlogged timbers from excavation, The Conservator, vol. 1, pp. 8-11.
Leskard, M., 1987, The packing and transportation of marine archaeological objects, in Conservation of Marine Archaeological Objects, Ed. C. Pearson, Butterworths, London, pp. 117-121.
Lucas, D.A., 1982, On-site packing and protection for wet and waterlogged wood, Proceedings of the ICOM Waterlogged Wood Working Group Conference, Eds D.W. Grattan and J.C. McCawley, Ottawa, pp. 51-55.
North, N. A., 1987, Conservation of metals, in Conservation of Marine Archaeological Objects, Ed. C. Pearson, Butterworths, London, pp. 207-252.
Pearson, C., 1987, On-site storage and conservation, ibid, pp. 105-116.
Penniman, T.K., (1952), Pictures of Ivory and Other Animal Teeth, Bone and Antler, Occasional Paper on Technology, Pitt Rivers Museum, University of Oxford.
Sandström, M., Fors, Y. and Persson, I., 2003, The Vasa’s new battle: Sulphur, acid and iron, Vasa Studies 19, The Swedish National Maritime Museums, Stockholm.
Case Studies
U. Broeze-Hoernemann, C. Corvaia, S. R. Garcia, D. Gilroy and I. M. Godfrey
The aim of this section is to demonstrate approaches to the treatment of particular objects, rather than to describe procedures themselves. Where specific procedures are referred to, readers are directed to the appropriate chapters of this book for further details.
Firearms
S. R. Garcia
Introduction
There is an increasing interest being taken in the conservation and restoration of firearms. Firearms have figured prominently in Australia’s history and are present in great numbers, particularly in the rural community. Gun laws are generally strict, even for display purposes. Contact police in your state regarding regulations which apply to the repair and handling of firearms.
Construction and Deterioration
Firearms are composite objects usually made up of steel of various grades, wood and inlays of varying material types. Take care when treating them, especially when components have corroded into a solid rusty mass. This is a common problem as the components of the mechanisms are small and intimately positioned. Dirt and unfavourable environmental conditions can ‘fuse’ these components together.
Safety
Before work of any kind is attempted on a firearm, check that it is not loaded or cocked. If there is any doubt as to its safety, seek help from an approved agency or person.
Documentation
Before treatment, take full notes, diagrams and photographs of the object’s condition.
Treatments
Cleaning
If a weapon is in a good state of repair, following the guidelines below will assist in maintaining that condition:
- wear gloves when handling the firearm to stop oils and acids from the skin etching the metal surface;
- light oiling may be all that is needed to maintain the firearm’s steel components. Use an approved light gun oil and a lint-free rag;
- if necessary strip the firearm, clean the components in an approved degreaser, dry, lightly re-oil and reassemble the firearm. Use a lint-free rag when cleaning and oiling;
- dissolve heavy grease with caustic solution;
- a touch-up ‘blueing’ solution is available if this finish is applicable. Clean the surface to remove all dirt, oils and grease prior to applying the ‘blueing’ solution; and
- clean inlays according to their material type (see relevant chapters).
If on the other hand a firearm is in a badly corroded condition more intervention will be necessary. Such a situation is well illustrated by examining the treatment of a .32 calibre Japanese pistol (Figure 1). For this object treatment consisted of:
- stripping the firearm as far as possible;
- immersing the corroded iron components in a solution of caustic soda (20 - 50 g) in water (1 L) to remove all dirt, paint, grease and similar materials. No aluminium or wooden components were immersed;
- separating other components, using a combination of gentle heating, along with a lubricant such as CRC or WD 40 to loosen and remove nuts and screws. No heat was applied to springs;
- soaking the dismantled components (except the springs) in a solution of citric acid (20 – 50 g) in water (1 L) and gently brushing to remove rust;
- washing the components with caustic soda solution (see above) to neutralise any residual acid, then with fresh water to remove excess caustic and finally with a dewatering agent such as CRC or WD 40;
- wiping the parts dry and coating them with a solution of fish oil (20 %) in white spirit (80 %). A light gun oil is an acceptable alternative;
- washing the plastic hand grips in fresh water and physically cleaning them with a soft brush; and
- re-assembling the pistol. The mechanism could be activated following assembly.
Figure 1: Japanese pistol.
(a) Before treatment.
(b) After treatment.
Wooden Components
Clean polished or waxed stocks and handgrips with a clean soft rag or soft brush. Gun stock oils are available to refurbish wooden components if desired.
Preventive Conservation
After treatment the weapon was wrapped in acid-free tissue and stored in an enamelled metal cabinet. Check stored firearms every six to twelve months for signs of deterioration.
Fruit Tin Label
U. Broeze-Hoernemann
Condition
The coloured waxed paper label from the C Tuckey and Co. Peel Inlet Preserving Works was fully adhered to a backing that had been cut from a commercial cardboard box. The label had numerous tears, one of which had separated it into two pieces. There were also areas of loss, creases, surface abrasion, dirt and stains present.
Treatment Proposal
The proposed treatment of the label was drawn up as follows:
- document the label’s condition;
- surface clean the label while still adhered to the cardboard;
- remove the cardboard backing;
- de-acidify the label if necessary;
- depending on the condition of the label, strengthen it by applying a Japanese tissue backing; and
- encapsulate the label in mylar.
The cardboard backing was removed because its acidic nature would accelerate deterioration of the label. The methods used to remove backings are determined by the nature of the backing material.
The decision to reinforce the label with Japanese tissue could be made only after determining the fragility of the isolated label. Such decisions should never be taken lightly as they involve the introduction of a new component, thus changing the integrity of the object.
Encapsulation allows the label to be handled without touching the label itself while still allowing air circulation around it.
Tests Carried Out
The pH of the label was 4.6.
Stabilities of the colours and of the waxed surface were tested in water and calcium hydroxide solution. All appeared to be stable in both media.
Treatment
The treatment of the label is described below and in the accompanying images (Figure 2). The surface of the label was dry cleaned using a thin flexible slice of a high quality soft eraser.
The cardboard backing was thinned initially by removing it layer by layer with a flat wooden spatula until only one thin layer remained. The remaining layer was moistened section by section with damp cotton wool until it was soft enough to be scraped off with a scalpel. This type of backing removal is not always possible. If yellow strawboard has been used as a backing, do not introduce moisture as it is likely to irreversibly stain any attached paper.
The label was washed several times in distilled water until the water remained clear, de-acidified for 30 minutes in a calcium hydroxide solution buffered to pH 9 and then air dried on a Reemay® support.
Since the object remained fragile and because of the sheer number of tears and creases, a Japanese tissue backing was applied for added stability. Kozo tissue paper was used. A piece larger than the label was pasted to the back of the label using a thin and even layer of wheat starch paste.
The reinforced label was dried between blotting paper lined with Reemay® and under a sheet of glass as weight. Blotters were changed as they became damp. Reemay® is a spun polyester which prevents adhesion of the object to the blotting paper during the drying process. After drying, the Japanese tissue was trimmed to a size slightly larger than the label.
After a paper object has been exposed to moisture, such as in the procedures described above, it is very important that it is dried thoroughly. The drying process usually takes several days but may take more than a week in some cases.
When dry the label was encapsulated in mylar. Acid-free double-sided tape was used to adhere two sides of the mylar, thereby allowing free air circulation and easy access should the label have to be removed. A strip of buffered Archive Text paper (pH 8.5) was inserted behind the label to counteract any residual acidity.
A window mount was cut from buffered 100 % rag mat board (pH 8.5) and the above described ‘parcel’ was held in place by four photo corners handmade to size from mylar and double-sided tape. This type of storage supports the object and facilitates handling and display at the same time.
Figure 2: Fruit tin label.
(a) Before treatment.
(b) Dry cleaning with sliced flexible eraser.
(c) Removal of backing using a wooden spatula.
(d) Spot testing for colour fastness using a fine brush, water and blotting paper.
(e) Application of backing.
(f) After treatment. Stored in a window mount for display, handling and storage.
Horse-drawn Vehicles
S. R. Garcia and D. Gilroy
Introduction
Horse-drawn vehicles are synonymous with Australia's history. From the Cobb & Co Coach and the ‘Sydney’ sulky to the bullock dray, horse-drawn vehicles have contributed significantly to Australia’s advancement. In the past few years hundreds of these wonderful vehicles have disappeared. Even today there are many vehicles just left to disintegrate in paddocks. With a few simple precautions, these can be saved from further deterioration.
Deterioration and Examination
The main materials used in the construction of horse-drawn vehicles are wood (one type or a mixture of woods), steel, paint and leather. All of these materials deteriorate when exposed to the elements. The normal modes and extent of deterioration of these material types is described elsewhere (see the chapters Wood, Metals and Leather).
If a vehicle is exposed outside the sun, rain and insects will soon damage spokes, felloes (wheel rims) and joints, eventually immobilising the vehicle.
Carefully examine and record the condition of a vehicle before attempting any work on it. Documentation should include:
- sketches and photographs of the vehicle and its components;
- notes on the condition of components;
- information regarding the original colours used on the vehicle. Scraping back to the original coats is usually necessary. Take paint samples if possible;
- details of any lettering, numbering or patterns present on the vehicle. Make a stencil of these; and
- any other details that may be of benefit in the conservation and restoration process.
Preventive Conservation
Conservation work may not always proceed immediately. If this is the case, move the vehicle under a shelter with the wheels and shafts supported and raised from the ground. These simple steps will prolong the vehicle’s life indefinitely. Stopping exposure to sunlight and periodic bouts of wetting and drying will minimise rot in the wood and rusting in metal components.
Make a simple stand to support the shafts and steel stands to support the axles. The latter stands are designed to raise the wheels about 6 – 12 mm above the ground.
A cover for the vehicle will help to prolong its life by protecting it from dust and the problems associated with the build-up of dirt.
Monitor the condition of the vehicle regularly. For instance, take photographs every 12 months and compare them. Take close-ups of susceptible areas.
Treatments
Conservation or Restoration
Conservation of a vehicle usually involves taking steps that will prevent any further deterioration in its condition. Restoration involves both conservation and additional work designed to restore the vehicle to something approaching its original condition.
As the current condition of a vehicle is a true reflection of its history, display in a ‘conserved only’ state is often desirable. Do not look upon complete restoration as a first option.
Wood Consolidation
If the vehicle has been exposed to the elements the wood is usually in a very poor condition. Leaving the vehicle standing on its wheels usually results in split and cracked spokes and felloes.
Unless the wood is badly deteriorated or load-bearing, use as much of the original wood as possible in any restoration. Retain all old wood, no matter how deteriorated and use as templates for the manufacture of replacement pieces. Keep these pieces in storage when not in use.
It may be necessary to split badly cracked pieces that are still robust enough to use before consolidating them. The wood can then be treated as follows:
- clean out all of the dirt and rotten wood;
- glue the sections with an appropriate wood glue and sawdust mixture and clamp them together. Do not use water-soluble glues if the vehicle is to be displayed outside;
- fill all cracks with a glue and sawdust mixture;
- sand it back to shape when the glue is dry; and
- paint the timber using a primer, an undercoat and a top coat. The top coat should match the original colour sample.
The last three steps outlined above can be used for all pieces of wood from the vehicle.
Wheel Repair
Wheels are often in a very sorry state, especially if termites have made them their home. Rebuilding wheels is a specialist craft. Seek expert guidance before disassembling and rebuilding them.
Another common problem is a build-up of rust between the inside of the tyre and the outside of the felloe. This type of problem may necessitate the removal of the tyre for treatment. If the tyre has to be removed, work upon the felloes and spokes becomes much easier. Consult a wheelwright if work of this type is necessary.
Chemical de-rusting of the tyre can be accomplished as described elsewhere (see the chapter Metals).
If the work required is of a minor nature, then splitting the felloe, cleaning as mentioned above and regluing may be all that is needed.
The case studies below demonstrate different treatments that can be applied to horse-drawn vehicles, with the particular treatments being determined by their respective conditions.
Wagon (New Norcia, Western Australia)
New Norcia is a farming community founded by Benedictine monks in the mid-19th century. Like all farming communities there was an abundance of horse-drawn vehicles, ranging from sulkies and buggies to general farm wagons. With the advent of the motor car and truck, horse-drawn vehicles fell into disuse and disrepair. They were left to rot in paddocks, lost in bushfires or broken up. Their numbers diminished alarmingly.
This was the case in New Norcia when the local historian realised that of all their horse-drawn vehicles, only one example of a four-wheeled general purpose cart remained.
Condition of the Vehicle
This vehicle had been on ‘display’ at the entrance to the town for many years and was in an advanced state of deterioration. The vehicle had been standing unsupported on its wheels, which had collapsed under the weight, was infested with black and white ants, had been modified and had dry and wet rot (Figure 3 a).
Initially it was felt that the vehicle was beyond redemption. As it was especially significant to the New Norcia community however, being the last of its kind and having been manufactured locally, it was decided to restore the vehicle.
Figure 3: (a) New Norcia wagon showing its pre-restoration condition.
(b) The wagon after restoration.
Research
Research is a critical factor in any restoration project. Relevant information to be considered included:
- photographs;
- plans;
- paint samples;
- traces of pin-striping or signage;
- wood identification; and
- condition of the object itself.
Paint samples were taken for colour matching and tracings were made of pin-striping and signage so that patterns could be reproduced accurately. This information was needed to ensure that when restored, the object would reflect its original state.
Photographs were taken before, during and at the completion of the project. Combined with written records of treatments, repairs and details of replacements of sections and parts, photographs form an essential part of the object’s more recent history.
Treatment Regime
Once the research had been completed the following work program was carried out (Figure 3 b):
- as much of the original timber as possible was used;
- timbers that were to be replaced were used as templates and then placed in storage;
- repairs were made to timber using sawdust and epoxy resin;
- timber was reshaped, primed and undercoated;
- all steelwork was removed and treated. Note that care was taken when treating the springs;
- steelwork was coated with a solution of fish oil and white spirit to protect the steel components and give a lustrous steel-grey finish. This was painted as required;
- the vehicle was top-coated with pin-striping and signage added as per the original; and
- stands were manufactured to fit under the axles to take the weight from the wheels.
Butcher's Cart (Fremantle, Western Australia)
A two-wheeled butcher’s cart was originally used to deliver meats in the Fremantle area.
Condition of the Vehicle
The exterior of the vehicle was ravaged by the elements with wood rot, deteriorating and flaking paint and rotting leather and waterproofing (Figure 4 a). As the interior of the vehicle held the meat, it was kept scrupulously clean and well maintained during the cart’s working life. As a result no treatment was needed for this part of the vehicle (Figure 4 b).
Research
All possible documentary and physical evidence was collected regarding the original appearance of the vehicle. In addition to the usual research and paint sampling, fabric samples were taken for identification. The sign writing was photographed, noting the colouring, type of shadowing and italics used.
Treatment Regime
The wood and steelwork were restored as described for the New Norcia vehicle. The cart was then painted to match its original colours (Figure 4 c).
Figure 4: Butcher’s Cart.
(a) Before treatment with the wheels and shafts missing.
(b) The worn interior of the cart was left in original condition.
(c) After restoration with replacement wheels and shafts.
Farm Wagon (Brookton, WA)
The four-wheeled farm wagon was built in 1903 in the Brookton area. The vehicle was housed in various sheds throughout its life and except for minor repairs carried out during its life, remains a good original example of a horse-drawn vehicle of the period.
Condition
Grease had solidified over the paint on the wheels and the wagon was covered with sand and dust. As sand and dust attract moisture, which begins the corrosion and rotting cycles, these needed to be removed.
Treatment Regime
- dust and sand were removed by careful brushing and dusting;
- minor repairs were made to cracking woodwork using an epoxy glue and sawdust mixture;
- solidified grease over the paint on the wheels was removed by careful brushing with soft brushes; and
- some minor surface rusting on the steelwork was treated.
Summary
The vehicles described above are now housed under cover, supported on stands which take the weight from the wheels. Regular monitoring and cleaning ensures there will be little need for further repairs for many years.
An important factor in the preservation of any object is the environment in which it is stored or displayed. Keep vehicles and machinery clean, dry and under cover. If objects cannot be stored indoors then this cover should be on two or three sides to prevent driving wind and rain from coming into contact with the objects.
Time Capsules
D. Gilroy and I. M. Godfrey
Introduction
The most popular notion of a time capsule is something resembling a giant vitamin pill crammed with photographs, coins and assorted memorabilia, which is either buried or placed in the foundations of a building for a period of 100 years. This method, or variations of it, were employed in Victorian times. Unfortunately the use of incompatible or unstable materials and poor packing techniques have meant that little material was recovered in good condition from time capsules of that era.
As time capsules are sealed containers, deterioration may be accelerated, particularly if unfavourable microenvironments develop in the capsule. Unfavourable conditions may arise if:
- stored materials deteriorate;
- capsules are not made from appropriate materials or are not well sealed; and
- unstable storage conditions lead to fluctuations in internal temperatures and relative humidity levels.
The lack of air exchange with the surroundings means that if for example, acidic vapours are released by an object as it ages then the rest of the interred objects will be subjected to an increasingly damaging environment. Some wood, paper and modern materials such as polyvinyl chloride behave in this fashion.
Changes in external conditions also affect the internal environment unless the storage conditions of the capsule are well controlled. A large drop in temperature, for instance, would produce an increase in relative humidity, a condition which may lead to condensation in the capsule. The growth of mould on organic objects and the corrosion of metals would be encouraged under these conditions. Conversely, if the temperature increases too much then the resultant low internal relative humidity may lead to damage such as the embrittlement of paper and wood and crazing or cracking of paint layers. Internally and externally insulating the time capsule will minimise relative humidity fluctuations.
Relative Humidity and Site Selection
The factors affecting relative humidity and strategies that may be used to control it are discussed earlier (see the chapter Preventive Conservation: Agents of Decay).
In order to ensure the long-term survival of materials placed in time capsules, pack the capsule when the ambient conditions are cool and the relative humidity is low. While these conditions are usually better for the long-term preservation of most material types there is a risk of desiccation of susceptible materials. As long as the capsule is stored in a stable environment then internal fluctuations will be small. If the capsule is packed on a day of very high relative humidity then that moist atmosphere and moisture laden materials will be sealed in the capsule - a recipe for disaster unless moisture-controlling agents are incorporated in the time capsule.
In selecting the interment site, consider:
- the temperature range associated with the site;
- the nature of the site in which the capsule is to be buried: and
- the likelihood of the site being disturbed before the time capsule is due to be opened.
The burial site may be below ground, in a wall or building or even on the ocean floor! As each site will have its own set of unique environmental parameters, the nature of the site necessarily dictates the type of construction materials that should be used for the capsule. Chemical features of the soil, depth of the water table and drainage are some of the factors which must be considered for a land site.
If the capsule is to be buried below ground then an appropriate stainless steel container is recommended, either sealed with an o-ring or with a welded lid. This type of container will minimise corrosion and leakage problems. Depending on the size of the capsule such a container could be very expensive. Alternatively if the capsule is to be placed in a crypt within a building then cheaper materials such as polyester powder-coated iron could be used.
Capsule Construction
Factors affecting the construction materials and the type of capsule include:
- length of time the capsule is to be buried;
- volume of material to be included in the capsule;
- location and nature of the burial site; and
- available funding.
For burial below ground the following materials are suitable:
- certain grades of stainless steel;
- copper and its alloys; and
- high density polyethylene (HDPE) pipe.
Materials suitable for above ground storage include:
- galvanised metal;
- polyester powder-coated iron; and
- enamelled metal.
Capsules that are either seamless or of welded construction are preferred. HDPE provides a cheaper, though less durable material for underground burial. This material may be sealed by hot-air welding, thus avoiding the use of adhesives which would be prone to breakdown in the soil. HDPE is not recommended for above ground use unless it is protected from weathering agents such as the sun and rain.
Do not use polyvinyl chloride tubing or iron materials that are not galvanised, enamelled or polyester coated as they are all prone to deterioration.
The lid on the capsule should either be welded or have an o-ring seal on the lid section and be constructed so there is an even pressure exerted on the lid. This may be achieved by having bolts evenly spaced around the lid or by using a screw-on lid. If bolts are used to secure the lid, locate them on the outside of the o-ring seal so that the seal is not compromised. An airtight seal is important if moisture, dirt and insects are to be excluded from the capsule.
Silicone sealant can only be used externally as the fumes given off as it cures could harm the contents of the capsule.
Insulate the capsule if it is to be interred above ground. The effect required is similar to a thermos flask where the box in a box principle operates with a key aim being to minimise changes in internal conditions. This may be achieved for example, by placing the capsule inside an insulated box which is then stored in the centre of an air conditioned building. If interred below ground the surrounding earth provides the insulation.
Materials for Inclusion in the Capsule
It is most important to think long and hard about just what is to be included in the time capsule. Factors to consider include:
- significance;
- interest;
- durability of materials;
- quantity and size of objects;
- compatibility of materials; and
- likely future availability of technology to replay included objects such as audio or video materials.
Think carefully about the objects to be placed in a time capsule and choose objects that most appropriately represent the present time. Avoid things that are likely to survive in other places such as in newspaper archives for instance.
Some materials are more prone to decay than others. Only include unstable objects in the capsule if they are highly significant and if they can be effectively isolated from the other objects in the capsule and treated to enhance their longevity (via oxygen exclusion for instance). The most suitable objects are those that are self-contained and self-explanatory. That is, they don’t need technology to either read, interpret or use them.
Seek the advice of a conservator regarding objects for inclusion in a time capsule so that unsuitable materials may be excluded and any materials that require treatment to increase their chances of surviving the burial period can be identified and treated prior to their inclusion in the capsule. Newspapers for example, are notoriously poor in quality and should be double packed to ensure that there is no contamination of other materials. Wrap them in alkaline-buffered paper and encapsulate in polyester to minimise contamination risks. A better alternative is to use photocopies of newspaper articles made using archival quality paper.
Where possible, use archival quality papers for included documents. As for newspapers, if original documents are printed on poor quality papers, copy them onto alkaline-buffered paper for inclusion in the capsule.
Many audio-visual materials, such as video and cassette tapes, are inherently unstable and may not last more than a few decades before suffering serious deterioration. If argon or nitrogen flushing is not possible then vacuum packing or storage of these materials in a sealed container with Ageless® oxygen scavenger is recommended. Their inclusion must also be weighed up against the likely availability of the equipment needed to replay them when the time capsule is opened. Will video technology still be available for playback?
Do not include synthetics materials such as PVC, rubber and plasticised materials. Plastics considered safe for use in time capsules include polyesters, polyethylene, polypropylene, polycarbonate and polystyrene. As it is sometimes difficult to differentiate between these synthetic materials seek professional advice before making a decision to include them in the capsule.
Photographs are popular inclusions in time capsules. Colour photographs are less stable than their black-and-white counterparts. Cibachrome processing is recommended if colour prints are to be included. Use archival standard processing techniques to increase the longevity of images that are included in the capsule. Do not stack photographs on top of each other without a sheet of polyester film between them. This will stop the photographs from sticking to each other (see the chapter Photographs for more guidelines).
If textiles are included in the capsule, make sure they have been cleaned, are free of insect and microbiological infestation and are conditioned to the humidity of the capsule. Wrap them in unbuffered, acid-free tissue.
Packing the Capsule
Rather than specifying a long list of ‘dos and don’ts’ regarding packing, it is better to stress the importance of common sense and care when packing the capsule. Where possible, either individually wrap all items or at least group similar materials together and wrap these as one (Figure 5). For example keep paper apart from metals. This can be done most cheaply by using either heavy-duty polyethylene bags or polyethylene containers. Heat seal the bags. Put heavy items on the bottom of the capsule.
As mentioned earlier in this section, pack the capsule when the temperature and relative humidity are at the most appropriate levels for the materials that will be included in the capsule.
Avoid folding objects, as it introduces stresses into them. If materials such as papers and textiles cannot be laid flat then roll them for storage. It is wise not to cram too many objects into the capsule.
Flushing the capsule with an inert gas such as nitrogen or argon or using oxygen scavengers such as Ageless® will help to prevent deterioration of the contents by excluding oxygen. To avoid damaging the capsule contents, use a long pipe and trickle feed system to introduce the gas. In this way the contents will not be subjected to a sudden drop in temperature and possible condensation. Argon, although more expensive than nitrogen, is preferred as it is heavier and less likely to be lost from the capsule over time. Add silica gel or zeolites to the capsule if low relative humidity conditions are required.
Note that if the capsule is flushed with an inert gas, also flush any materials that are sealed in polyethylene bags with the same gas. If this is not done deterioration due to oxidative processes will continue in the sealed bag, defeating the purpose of flushing the capsule with the gas.
Figure 5: Time capsule showing individually packed materials.
Administrative Considerations
Label objects included in the capsule and unless the object is a document or something similar which tells its own story include some information relevant to the object in question. Use archival quality paper and card for object labels, write on these with non-water soluble inks and attach the labels to the objects with stable tapes or cords or include them in sealed bags with the objects.
Lodge details concerning the location, contents and future plans for the time capsule with the appropriate authorities. This may be a local government agency, a museum, library or historical society. Provide this information to more than one organisation.
Mount Margaret Woven Basket
C. Corvaia
Introduction
The basket was made some time before 1947 and was obtained during a visit to Melbourne by a group of Mount Margaret school children. The woven basket was donated to the Western Australian Museum by Grace and Joyce Dodge in 2010. The basket was made by stitching a plaited fibre strip. Two circles, formed in a spiral pattern, were joined at the sides and base by a wide band and two handles were added at the top.
Condition
The basket had been flattened during storage and dust and dirt had accumulated on the decorated (upper) side. The other side was relatively clean with only a few brown stains visible. The decoration of eucalyptus ‘gum’ nuts had suffered some damage. Several gum nuts had abrasion losses, some sticks were broken and there were losses of the fragile green raffia stitching. The plaited fibre strips had frayed and broken edges, especially on the handles and at the top of the sides. The dark brown raffia stitching was broken and missing in areas and plastic-coated wire had been used for repairs on these joins. The textile lining of the basket was detached along the top and had stains, dirt, creases and frayed edges.
Treatment
The distortion of the shape and loss of stitching were placing stresses on the object. The accumulated dust and dirt were contributing to the deterioration of the natural fibres and continued handling caused further losses of the fragile green and dark brown raffia stitching.
Proposed treatment of the basket involved:
- dry cleaning of the surfaces (Figure 6);
- dehumidification and re-shaping (Figure 7);
- repair of loose and broken stitching (Figure 8);
- construction of an internal support to maintain the shape of the basket (Figure 9); and
- packing for storage (Figure 10).
In order to safely re-shape the flattened basket, the fibres needed to be humidified to increase their flexibility. Before introducing moisture to the natural fibres, the basket surfaces were cleaned using dry methods, with a brush and vacuum to remove loose dust. The basket was then placed on a supporting screen in a humidification chamber. During the first four hours of humidification the basket was constantly checked and balls of tissue paper were used as padding to progressively restore the correct shape. The following day the basket was removed from the humidification chamber and allowed to air dry. The tissue paper padding was left inside the basket while work continued. The decorated side of the basket, which still had a film of dirt, was cleaned with damp cotton buds using deionised water. Care was taken to lift the dirt out of the textured surfaces (not push it further into the weave) and to avoid the areas of fragile raffia.
Figure 6: Surface cleaning the basket.
Figure 7: Basket in the dehumidification chamber during re-shaping.
All the loose and broken stitching on the basket required stabilising to avoid further losses. The loose ends of brown raffia binding on the decoration were humidified, re-wound, secured in position to dry and then attached with methyl cellulose adhesive. Elsewhere, the brown raffia stitching had loose, brittle ends associated with losses. These were carefully manipulated into the woven plait joins and uncoloured natural raffia (a good colour match for the plaited fibre material) was used to secure the joins. The top edges of the basket at both sides had extensive loss of brown raffia stitching and the cotton lining was loose. Uncoloured raffia was used to re-stitch the lining in place, threading the blunt needle through the existing needle holes in the cotton fabric (Figure 8).
Figure 8: (a) Basket before repair of the seam between right side and back panels.
(b) Basket after repair using uncoloured raffia.
The tissue paper padding inside the basket was replaced with a more stable support which would not change over time. An internal support was constructed using Tyvek® to form a circular ‘bag’ which conformed to the inside shape of the shopping basket. Part of the perimeter was made slightly rigid with an Ethafoam™220 insert (fitted into a gusset) and Dacron™ sheeting was used for padding (Figure 9). The internal support extended to the edges of the circular sides but was not visible at the top, so that the basket could be displayed without further modifications to the support.
Figure 9: Basket and its internal support.
To avoid direct handling of the basket and further losses of fragile fibres, the basket was placed on an acid-free corrugated board and secured in position with Ethafoam™220, Cell-Aire® and cotton tapes. The board was fitted into a box and secured for short-term storage and travel. The shopping basket was displayed at the WA Museum of the Goldfields in Kalgoorlie in 2010.
Figure 10: Basket packed for transport.
Appendices
Appendix 1: Measuring Light Levels with a Camera
Equipment Required
- 35 millimetre camera with a built-in light meter; and
- white cardboard (about 30 - 40 square centimetres).
Method
- place the cardboard in the same position and at the same angle as the object or area that is being measured;
- set the camera to 800 ASA and without casting a shadow on the white cardboard, take an f-stop and shutter speed reading with the camera;
- the cardboard should fill the frame in the viewfinder of the camera; and
- use the coordinates obtained to determine the light level using the table shown below (for example, f8 at 1/30 sec = 700 lux).
| Lux | 88 | 175 | 350 | 700 | 1400 | 2800 | 5500 | |
| F-stop | 2.8 | 1/30 | 1/60 | 1/125 | 1/250 | 1/500 | 1/1000 | 1/2000 |
| 4 | 1/15 | 1/30 | 1/60 | 1/125 | 1/250 | 1/500 | 1/1000 | |
| 5.6 | 1/8 | 1/15 | 1/30 | 1/60 | 1/125 | 1/250 | 1/500 | |
| 8 | 1/4 | 1/8 | 1/15 | 1/30 | 1/60 | 1/125 | 1/250 | |
| 11 | 1/2 | 1/4 | 1/8 | 1/15 | 1/30 | 1/60 | 1/125 | |
| 16 | 1 | 1/2 | 1/4 | 1/8 | 1/15 | 1/30 | 1/60 | |
| 22 | 2 | 1 | 1/2 | 1/4 | 1/8 | 1/15 | 1/30 | |
| 32 | 4 | 2 | 1 | 1/2 | 1/4 | 1/8 | 1/15 | |
| Shutter speed in seconds | ||||||||
The values quoted in the table were obtained using a Gossen Lunasix 3 light meter, cross referenced with a range of Nikon cameras. Regard the readings as approximations only.
Appendix 2: Environmental Criteria for Materials
The information in this appendix was compiled from ‘Museum Methods: Practical Manual for Managing Small Museums’, Section 3 Preventive Conservation (Museums Australia Inc. NSW 1994) and adapted to accommodate recent changes in environmental guidelines for particular material types.
Minimal relative humidity (RH) fluctuations are essential to prevent damage to susceptible materials. Well sealed display cases give additional buffering to environmental changes and pollution ingress. Very sensitive and sensitive materials should be rotated on and off display as indicated.
| Environment | Materials | Special conditions |
|---|---|---|
| Very Sensitive Materials | ||
| Display: Temperature 15 - 25°C Relative humidity 45 - 55% Max lux 50 UV less than 30 µw/lumen Display period 3 mths per 12 mths Storage: Same Temp and RH Eliminate light |
Baleen |
|
| Cardboard | ||
| Drawing – charcoal, crayon, gouache, ink | ||
| Feathers | ||
| Fur, hair | ||
| Lacquer (oriental) | RH critical | |
| Leather dyed | ||
| Nylon | RH 60 % preferred | |
| Paper, works on paper | RH critical | |
| Parchment | RH ~ 55% preferred and Temp sensitive | |
| Pastel | Fragile surface | |
| Photographs | 16 - 20 °C, RH 30 – 40% | |
| Plant material, seaweed | ||
| Tapa | RH critical | |
| Textiles, including hemp | Dust free | |
| Water colours | ||
| Sensitive Materials | ||
| Display: Temperature 15 - 25°C Relative humidity 40 - 60% Max lux 200 Max UV 75 µw/lumen Display period 6 mths per 12 mths Storage: Same Temp and RH Eliminate light |
Bakelite, casein | Casein – RH 60 % preferred |
| Bitumen | Dust free | |
| Bone | RH critical (45 – 55%) | |
| Canvas | Dust free | |
| Composite frame mouldings | ||
| Coral | Acid sensitive | |
| Cork | ||
| Fibreglass | ||
| Gesso | Acid sensitive | |
| Horn | RH critical (45 – 55%) | |
| Ivory | RH critical (45 – 55%) | |
| Leather - undyed, tawed | Some sulphur sensitive, RH 45 – 65% | |
| Linoleum | ||
| Paint, protective coating | ||
| Paintings, oil, tempera, acrylic | RH critical (45 – 55%) | |
| Shell, mother-of-pearl, pearl | Acid sensitive | |
| Shellac | Temp. sensitive | |
| Tortoiseshell | RH critical (45 – 55%) | |
| Wax | Temp & solvent sensitive, dust free | |
| Wood, bamboo, cane, straw, wicker | RH critical | |
| Non-sensitive Materials | ||
| Display: Temperature 15 - 25°C Relative humidity 30 - 60% Max lux 300 Max UV 150 µw/lumen Display period unrestricted Storage: Same Temp and RH Eliminate light |
Aluminium | Acid and alkali sensitive |
| Amber | Solvent sensitive | |
| Brick | ||
| Ceramics, porcelain | 40 – 60% RH | |
| Copper, bronze, brass | Less than 45% RH | |
| Enamel | Temp sensitive | |
| Glass | 40 – 60% RH | |
| Gold | ||
| Iron, iron alloys | Less than 35%RH | |
| Lead | Less than 45%RH, organic acid and formaldehyde sensitive | |
| Marble, some sandstone | Acid sensitive | |
| Plaster | Acid sensitive | |
| Silver | Less than 45%RH, sulphur sensitive | |
| Stone | Less than 20 °C, RH 45 – 55 % | |
| Tin/tin plate | Less than 45%RH | |
| Plastics | ||
| Display: Temperature as low as practical Relative humidity less than 50% Max lux 50 Max UV 30 µw/lumen Display period 3 mths per 12 mths Storage for most plastics: Temperature 2 - 5°C Relative humidity less than 50% Eliminate light Reduced oxygen environment |
Acrylic plastics e.g. perspex | Solvent sensitive, display period 9 mths per 12 mths |
| Magnetic tape (audio/video) | Use copy, cool store original | |
| Micro forms (fiche/films) | Use copy, cool store original | |
| Plastics | Cool, oxygen free best, off gas pollutants | |
| Rubber | Cool, oxygen free best, off gas pollutants | |
Appendix 3: Chemical Treatments of Insects
The information contained in this appendix is based on a Technical Bulletin prepared by Dawson (1992).
Only a few representative chemicals are included in this appendix. Inclusion is not a recommendation for use, with a few commonly used pesticides included to alert readers to some of the potentially damaging effects of these products. Use this information as a guide when considering what action to take in response to insect attack on collections. Always remember to consult a conservator if in doubt about the impact of a particular treatment on objects in a collection. Also check with local authorities regarding the application of any large scale pest treatment to ensure compliance with regulations and laws regarding the use of potentially toxic chemicals.
Fumigants
As long as the concentration and exposure times are appropriate, fumigants should be effective against all stages of insect development, from the egg to the adult. Fumigation does not however, provide any long-term protection. Treated artefacts must be well aired before they are removed from the fumigation chamber. The duration of airing will depend on the type of fumigant used.
Common fumigants include:
Dichlorvos (DDVP, Dichlorfos, Vapona)
- is the active ingredient in resin pest strips;
- is useful in storage environments and against general household pests;
- lacks penetration and is ineffective against insect eggs;
- reacts with alkaline materials;
- has been found to discolour some textiles, is corrosive to mild steel and black iron and can tarnish copper, silver and brass. It deposits a film on zinc, tin and lead;
- may damage artefacts if they come into contact with them;
- should be handled carefully as it is toxic to humans (acute oral LD50 of 56-80mg/kg for rats) and is absorbed easily through the skin; and
- is not recommended for use in museum collections.
Ethylene Oxide
- has been widely used in the past, but its use is no longer recommended for the treatment of museum objects;
- is effective against major infestations, but is problematic due to its long retention by some materials and its reactions with some material types; and
- is a carcinogen and known to cause mutations.
Methyl Bromide
- is used to fumigate stored materials and soils;
- reacts with materials which contain sulphur;
- should not be used with woollens, viscose, rayons, vinyl, paper (sulphide process), rubber, furs, horse hair, feathers, leather goods and photographic chemicals;
- has no effect on oil paintings on canvas but some powdered pigments are affected;
- is very toxic to humans and is a potential carcinogen; and
- should only be used if there is a major infestation and if there are no other methods available.
Naphthalene (Mothballs, White Tar)
- is used as a fumigant and a repellent for general and domestic purposes;
- is only effective if used in well-sealed containers with exposure times of two to six weeks at ambient conditions;
- is considered non-corrosive and non-staining but has discoloured wool and may dissolve fats in biological specimens;
- should not come into direct contact with artefacts because it may damage them; and
- is a risk to the health of users as it is a skin irritant and inhalation of vapour is known to cause nausea, headaches and acute haemolytic anaemia.
Paradichlorobenzene
- is used as a fumigant and repellent for general and domestic purposes;
- is more volatile than naphthalene and is generally more effective - two weeks at room conditions is sufficient to kill the common clothes moth;
- can affect zinc white, lithopone, scarlet pigments, some cellulose acetate dyes, polystyrene foams, styrene and cellulose nitrate plastics, paper and ink; and
- is a health risk to users via inhalation, ingestion or eye and skin contact. Signs and symptoms of poisoning include vomiting, headaches, liver cirrhosis and kidney damage.
Organochlorine Insecticides
Insecticides in this group include aldrin, chlordane, dieldrin, lindane and pentachlorophenol. Due to their damaging effects on artefacts and health considerations they should not be used on museum artefacts or in buildings which contain collections.
Organophosphorous Insecticides
These compounds are generally more toxic than the organochlorine group but are usually applied at much lower concentrations, reducing the health risks slightly.
Chlorpyrifos
- is used as a contact insecticide and may be applied in a variety of forms (solution, granules, spray);
- has a residual action of about thirty days indoors but has poor knockdown and flushing capabilities. It can persist on wood for several years and has a longer residual action on non-porous materials than most insecticides;
- may affect nearby artefacts if they are not covered during its application;
- is corrosive to copper and brass and produces colour changes in some red dyes (acid red and disperse dyes); and
- is moderately toxic to humans via skin absorption, inhalation of dusts and ingestion. Symptoms may be mild (nausea and dizziness) or severe in extreme cases (fever, coma and respiratory failure).
Diazinon
- is used as a contact insecticide and is available in a variety of forms;
- has a residual activity of about 30 days indoors with a longer life on porous surfaces;
- is moderately to very toxic to fish, birds and bees;
- causes slight to very slight colour changes in acid red and disperse red dyes;
- may affect uncovered artefacts near the application site; and
- is a health risk to users in a similar fashion to that described for chlorpyrifos.
Malathion
- is a contact insecticide formulated as a wettable powder, a dust or an emulsifiable concentrate;
- is corrosive to iron, steel, tin plate and copper and produces unacceptable colour changes in acid red and disperse red dyes. As malathion’s effects on other materials are unknown caution is advised in its use; and
- is considered to be the least toxic of the organophosphorous insecticides but is highly toxic if ingested and may cause foetal abnormalities. Care must be taken when using it.
Carbamates
These materials are less volatile than organophosphates and consequently pose less of a risk of vapour poisoning.
Bendiocarb (Ficam)
- is a contact insecticide formulated as a dust or wettable powder. It has no fumigant properties;
- has a residual activity for weeks or months, depending on the environmental conditions;
- has no effects on acid red, telon red or disperse red dyes as it is applied as a powder; and
- poses some risk to health via inhalation, skin or eye contact or ingestion, though this is less so than with materials which possess higher vapour pressures.
Carbaryl (Sevin)
- is a contact insecticide available in a variety of formulations;
- has a moderate residual action depending on conditions (three to four days to several months);
- is non-corrosive but solvent effects may occur if it is allowed to contact artefacts;
- should not be allowed to come into contact with artefacts due to its residual activity; and
- is moderately toxic to people via inhalation, skin or eye contact or ingestion, toxic to bees, is a carcinogen (in rats), has caused genetic mutations in experiments and foetal abnormalities in many animals.
Propoxur (Baygon)
- is an emulsifiable concentrate which is also available as a pressurised spray and solution;
- has a good flushing action, rapid knockdown and a residual activity indoors of up to forty-five days;
- appears to have little effect on materials, though excessive wetting of plastics, rubber, asphalt and floor coverings should be avoided. Do not use on any materials prone to staining (carpets, curtains, wallpaper and the like). Avoid direct contact with artefacts; and
- is moderately toxic to humans via inhalation, skin or eye contact or skin absorption. It is also toxic to birds, fish and other wildlife.
Botanicals
Botanical insecticides are those derived from plants. The pyrethrin class is the most significant of the botanical insecticides. Commercially available synthetic pyrethrins (pyrethroids) have a greater residual activity and higher toxicity than their naturally occurring counterparts.
Pyrethrins
- act as contact insecticides and are available as pressurised sprays, dusts and oil solutions;
- are unstable and breakdown quickly to produce non-toxic residues;
- have rapid knockdown and flushing capabilities but do not always kill all of the insects knocked down;
- are often combined with other chemicals to increase their effectiveness;
- should not be allowed to come into direct contact with artefacts; and
- are of little danger to mammals but are toxic to fish.
Inorganics
Boric Acid
- is a stomach poison that is effective against crawling insects. It is relatively slow acting, taking from two to ten days to kill;
- can remain active for up to twelve months if applied in clean, dry areas;
- should not be applied directly to artefacts or be placed in areas where it will be contacted as no specific information is available regarding its reactivity with materials;
- should be handled carefully despite the relatively low risk of poisoning associated with its use; and
- has been used extensively in natural history collections as a substitute for arsenic.
Diatomaceous Earth
- is a desiccant insecticide often used in combination with pyrethrins;
- should not be allowed to come into direct contact with artefacts or be placed in areas where it is likely to be contacted as there is no specific information available regarding its reactivity;
- extends the persistence of pyrethrins when these compounds are combined; and
- can be forced into cracks and crevices where liquids would not be effective.
Bibliography
Dawson, J. E. (revised by T. J. K. Strang), 1992, Solving museum insect problems: Chemical control, Technical Bulletin No. 15, Canadian Conservation Institute, Otttawa, pp. 1-26.
Appendix 4: Insect Pests
The summary below of common insect pests is based on information provided in a previous Western Australian Museum publication (1981).
Case-bearing or Case-making Clothes Moth
Figure 1: Cocoons of the case-bearing clothes moth (image courtesy museumpests.net).
- Webbing clothes moth (Tinea biselliella – Figure 2):the moth lays 100 or more very small eggs on almost any fabric or material of animal origin (wool, feathers, fur, hair, skin) particularly if dusty or dirty; • the eggs hatch in about one week and the tiny caterpillars (larvae) do the damage while feeding;
- the larvae are creamy-white with dark heads and are about 12.5 mm long when fully grown;
- the larvae spin cocoons and carry them with them throughout their lives, enlarging the cocoons as necessary; and • when ready to emerge from their cases as moths, the larvae often stray away from their food so that small woven cases containing pupae may occasionally be found suspended from the bare walls or ceiling of a room.
Figure 2: Larva of the webbing clothes moth (image courtesy museumpests.net).
- the larvae of the webbing clothes moth spins a loose silken web or tunnel on the surface of its food material. Dusty or dirty material is preferred;
- the larval stage may last several months or even years;
- when the larva is ready to emerge a silken cocoon is formed, into which small pieces of wood, grass and similar materials are incorporated; and
- the adult emerges after two to five weeks, after which it spends a brief time mating and laying eggs.
Hide Beetle (Family Dermestidae)
Figure 3: Hide beetle (image courtesy museumpests.net).
- the adult beetle is a small ovoid, dark-coloured insect, often with patterns of coloured scales or hairs;
- it is usually found on flowers in the garden;
- the larvae are oval with distinct segments and the body is densely covered with long hairs, some of which may be spear-headed or clubbed;
- the larvae feed on dry animal material of high protein content such as skins, hides, furs, leather and textiles as well as foodstuffs (bacon, cheese); and
- when about to emerge, the larvae leave their food supply and burrow into and consequently damage neighbouring material. The adults, about 6 to 10 mm in length, are often found in materials on which they cannot feed.
Carpet Beetle (Anthrenus sp)
Figure 4: Carpet beetle
(a) Adult carpet beetles.
(b) Carpet beetle larvae.
(image courtesy museumpests.net)
- one of the most common carpet beetles is Anthrenus australid, the Australian carpet beetle;
- the beetle is a small round 3 mm long insect, dark in colour with four distinct wavy white bands across its back, giving it a mottled appearance;
- although commonly found in flower beds, the adult lays its eggs indoors, preferably on materials such as wool, feathers, silk or fur. These serve as a food supply for the larvae;
- the eggs hatch after about 14 days and the larvae may be active for several months depending on temperature and humidity; and
- as they grow the larvae shed their skins. The empty hairy skins are one of the characteristic signs of this insect.
Furniture Beetle (Anobium sp)
Figure 5: Furniture beetle.(By ©entomart, Attribution, https://commons.wikimedia.org/w/index.php?curid=438007).
- the adult beetle lays white, lemon-shaped eggs in cracks and crevices of wooden furniture and timber, particularly in the end grain;
- the eggs hatch in about four to five weeks and the grub then bores into the timber;
- the larvae attack pine, Australian cedar, European oak, beech and elm but not eucalypts;
- when fully grown the larva is about 5 mm long, has dark brown jaws and is covered with short, yellowish hair;
- damage is caused by the burrowing larvae tunnelling into the timber and using the bore dust or ‘frass’ to pack the tunnel behind it;
- the frass may be used as a diagnostic aid with that being produced by Anobium being abundant, loose, gritty and not unlike fine table salt;
- on reaching maturity the larva excavates a small chamber near the wood surface, changes into a pupa and then, in six to eight weeks, into an adult. The adult then bores its way out, leaving an exit hole about 1.5 mm in diameter, to fly away and wreak havoc elsewhere; and
- factors which favour furniture beetle attack are high moisture content, warm environment, wide sapwood, low resin content and the presence of fungal decay in the wood.
Silverfish (Family Lepismatidae)
Figure 6: Silverfish.
(By Christian Fischer, CC BY-SA 3.0, https://commons.wikimedia.org/w/index.php?curid=28984904).
- the silverfish is the most common pest found in paper and textile collections;
- it is rarely seen because of its preference for dark, quiet, humid and secluded places;
- the insect is silvery-grey in colour and when mature is about 15 mm in length;
- the insects emerge from the eggs as miniature adults and grow through a series of moults;
- the life span of this insect can be up to four years. The eggs hatch in ten to sixty days and sexual maturity is reached in two to three months;
- of most concern to collectors are those silverfish which feed on cellulosic materials such as paper, sizing, glue, cotton materials and rotting wood. If unchecked these species can seriously damage books, drawings, prints and cotton fabrics; and
- if a silverfish is detected, inspection of the whole collection and appropriate treatment is needed.
Book Lice (Order Psocoptera)
Figure 7: Adult booklouse (image courtesy museumpests.net).
- are not true lice and are very small (1 – 2 mm in length) with a ‘slightly transparent’ brown colour. The adults do not have wings;
- the young (nymphs) hatch from eggs and look like miniature adults when born
- prefer warm, high humidity environments (conducive to mould growth) in quiet, undisturbed places like under books and paper, in furniture and along the sides of windows;
- feed on microscopic moulds on the surface of paper-based materials, glues, binders and paper sizing and any mouldy plant-based material; and
- damage caused by book lice is similar to that caused by silverfish.
Biscuit or Drugstore Beetle (Stegobium paniceum)
Figure 8: Adult biscuit beetle (image courtesy museumpests.net).
- is a very small brown beetle that is in the same family as the wood-boring beetles (see Furniture beetle above) and is commonly found in old bird nests;
- is similar in appearance to the cigarette beetle but is slightly larger (about 3.5 mm long) and is distinguished by its characteristic antennae, each of end in 3-segmented ‘clubs’;
- the white larvae are very small but active when they hatch, feeding and growing for about 2 months;
- feeds on dried plant matter such as tobacco, nuts and dried plant samples. They may also feed on high starch paper objects (e.g. papier-mache) and dried animal specimens;
- the larvae pupate inside cocoons, often within their food source, before emerging via holes that resemble typical wood-boring exit holes; and
- is capable of causing considerable damage in susceptible materials.
Spider Beetle (Ptinus tectus)
Figure 9: Spider beetle (image courtesy museumpests.net).
- is a small brown insect covered with short hairs;
- larvae are large (5 - 7 mm), yellowish-white with a brown head and a ‘curled’ body covered with fine hairs. The adults are relatively small (2.5 – 4 mm long), slow moving, nocturnal and with a slight resemblance to spiders;
- larvae feed on general debris including other dead insects, boring holes into their food sources. They will infest all types of dry animal and vegetable matter;
- cause damage when the larvae bore holes in which to pupate as well as by contaminating objects with faeces and silk webbing. Adults will also damage packaging such as bags and sacks.
Cigarette Beetle (Lasioderma serricorne)
Figure 10: Cigarette beetle.
(By Andybrookestar (talk) (Uploads) - Own work, Public Domain, https://en.wikipedia.org/w/index.php?curid=9674070).
- the adult is yellowish to reddish brown in colour, about 2.5 mm long and similar in appearance to the biscuit and the common furniture beetle;
- larvae are creamy-white in colour with a worm-like shape. They feed on dried and processed foods, tobacco (obviously!), book bindings and dried plant material; and
- they prefer warm (> 20 °C) dark areas.
Bibliography
Department of Materials Conservation, Western Australian Museum, 1981, Mould and insect attack in museums, in Conservation and Restoration for Small Museums, 2nd Edition, Western Australian Museum, Perth, pp. 20-31.
Museumpests.net – A product of the integrated pest management working group.
Appendix 5: Wood Fillers
The fills mentioned are ones used traditionally by cabinet makers or in the conservation field. This list of fills is an introduction to this broad subject and is not extensive. Experiments often will be needed to determine the best type of fill for a specific object.
Gypsum Plaster
- is mixed with polyvinyl acetate AV 101 and methyl methacrylate AC 135 in proportions of 3:1:1 with 2.5% methyl cellulose; and
- is a strong fill which can be worked and coloured.
Shellac Burning-in Stick
- traditionally used to fill cracks on wood where French polish has been applied; and
- skill is needed to apply this material but it is easy to sand and colour.
Two-part Filler
- uses an epoxy or polyester resin;
- can be mixed with micro-balloons, fine sawdust or an epoxy filler to produce hard fills which can be worked as well as coloured with pigments or paint; and
- the fills yellow with age.
Paraloid B-72
- a 15 % solution in either acetone or ethanol can be mixed with micro-balloons to produce a fill which can be carved, sanded and coloured with pigments or paints;
- this type of fill can be soft or hard depending on the quantity of micro-balloons used; and
- it will not yellow with age, unlike epoxy or polyester fills.
Plaster of Paris
- may be mixed with micro-balloons to make a lightweight fill;
- can be moulded, carved, sanded, tooled, coloured with pigments, painted, waxed and so on; and
- traditionally, linseed oil was applied over plaster to make a transparent fill. This yellows with age.
Polyfilla
- is a cellulose derivative;
- may be mixed with sawdust or micro-balloons to produce a very lightweight material which can be easily worked and coloured; and
- should not be used for fills that will be stressed or strained.
PVA
- polyvinyl acetate adhesive or white glue is best mixed with fine sawdust or micro-balloons to prevent shrinkage of the fill; and
- it can be easily worked but may be difficult to colour.
Vulcanising Silicone Resin (RTV)
- the RTV resin (Dow Corning 734 and 738) may be mixed with micro-balloons (2-3 parts resin to 1 part micro-balloons) to produce a lightweight fill which can be moulded, carved, sanded and painted; and
- do not use on wooden objects which have metal components as it may enhance corrosion.
Wax
- beeswax, microcrystalline wax and carnauba have been used for fills;
- these waxes may be used individually or mixed to vary the individual qualities of the waxes (e.g. to increase hardness);
- they may be purchased coloured or may be coloured with pigments; and
- fills made from wax can be moulded, carved and worked with heat and solvents.
Wax and Resin
- tree resin such as dammar is often mixed and melted together with flakes of shellac;
- sawdust and micro-balloons may be added to the molten mixture to make a lightweight fill; and
- this fill is difficult to sand, carve, colour with pigments or paint.
Appendix 6: Packing, Storage and Mounting Materials
Listed below are details of some of the materials likely to be encountered by those responsible for the packing, storage and mounting of objects in collections. Note that not all of these are recommended for conservation purposes.
Acid-free Tissue Paper
- contains cotton fibres with alpha cellulose from which all acids, lignin, alum and impurities have been removed;
- unbuffered with a neutral pH;
- available in reams, translucent and usually shiny one side;
- 17 gsm;
- is used for general storage, as tissue balls for lightweight support in storage;
- good for storage of metal and leather artefacts and non-sensitive materials;
- not suitable for direct contact with textiles or paper artefacts; and
- available from packaging suppliers.
Alpha Cellulose Mat
- contains cellulose derived from cotton with all impurities removed;
- high stability and longevity; and
- used in picture framing.
Activated Carbon Cloth
- specially prepared cloth containing activated charcoal that absorbs atmospheric pollutants including organic acids and ozone;
- available as a cloth 95 cm wide that can also be machine sewn;
- available from conservation suppliers; and
- used with pollutant-sensitive objects within a sealed display case or storage box.
Adhesives
- used to secure overlapping parts of box construction;
- parts need to be clamped in place while adhering; and
- use Mowilith PVA emulsion adhesive or UHU glue sticks.
Art-sorb®
- moisture-sensitive silica material that absorbs and desorbs moisture as relative humidity conditions change. Conditioned to 50 % relative humidity and used to control moisture levels in sealed display cases or storage containers; and
- available as beads, in sheets or cassettes from conservation suppliers.
Archival Acid-free Tissue Paper
- unbuffered;
- contains cotton fibres with alpha cellulose from which all acid, lignin, alum and impurities have been removed;
- neutral pH 7;
- 16 gsm available as sheets or on a roll;
- used for storage of paper, photographs and textiles; and
- available from conservation suppliers but is more expensive than acid-free tissue paper.
Blotting Paper
- cotton fibre content varies from 30 % up to 100 %;
- all acids, lignin, alum and impurities have been removed; and
- usually pH neutral (pH 7) but may be buffered with calcium carbonate to pH 8.5.
Boxes
- standard polypropylene boxes are available from conservation suppliers;
- custom made polypropylene boxes are available from conservation suppliers but there is a cost for each box template; and
- custom made brown cardboard boxes are available from box manufacturers.
Buffered Acid-free Tissue Paper
- opaque white tissue that contains cotton fibres with alpha cellulose from which all acid, lignin, alum and impurities have been removed;
- buffered with 2 – 3 % calcium or magnesium carbonate to pH 8.5;
- 16 gsm;
- high stability and longevity;
- used to line non-archival storage boxes to stop acid migration from the box into stored objects and to pack vegetable fibre-based objects such as paper and cotton/linen textiles;
- not suitable for colour photographs, silk, leather, wood or metals; and
- available from conservation suppliers
Cellular Polyethylene Sheeting (Bubblewrap™, Sealed Air™)
- air pockets come in 10 mm and 20 mm diameters;
- used for cushioning in temporary packing and storage;
- the raised ‘bubble’ side should not be in direct contact with the object as the bubble pattern might transfer onto the surface of some objects;
- available from packaging suppliers
Cotton Tape
- is 100 % cotton and is available in 6 mm, 12 mm and 20 mm widths in 500 - 1000 metre rolls;
- extensively used to restrain objects in their storage boxes by securing them either through the base of the box or through a lining to the box;
- a Cell-Aire® strip can be threaded onto the cotton tape to provide a cushion between the tape and the object; and
- available from haberdashery suppliers
Double Sided Tape (Conservation Grade 3M Double Sided Tape)
- pH neutral and comes in widths of 6 mm, 12 mm, 20 mm and 25 mm;
- passes the Photographic Activity Test (PAT);
- many uses such as encapsulating archival material in Mylar, holding photo corners onto supporting boards; and
- available from conservation suppliers.
Foam Core Board (Fomecore™)
- contains a polystyrene foam core with acid-free alpha cellulose surface paper;
- is lightweight, cuts easily and is rigid;
- available in 3 mm and 5 mm thicknesses (10 mm board is not acid-free);
- used for supports, backboards and light weight storage boxes; and
- available from conservation and art suppliers.
Gummed Paper Tape
- acid-free paper buffered with calcium carbonate to pH 8.5;
- high tensile strength;
- used to cover corners when boxes are hand made and to seal the back of frames; and
- available from conservation suppliers.
Library Board
- archival-quality board made in Australia from long-fibred, fully bleached chemical wood, cotton or linen pulp;
- lignin-free buffered with 3 % calcium carbonate to pH 8;
- available in 240 gsm and 490 gsm;
- grey/green colour;
- used to make folders, phase boxes and supports for paper-based objects; and
- available from conservation suppliers.
Marvelseal® 360
- aluminium-based nylon and polyethylene barrier film used to seal wooden surfaces and to line transport boxes and crates, shelves or display plinths;
- puncture resistant;
- staple into position and cover with an acid-free foil sealing tape; and
- available from conservation suppliers.
Multi-purpose Corrugated Board
- blue-grey corrugated board;
- acid and lignin-free, manufactured from fully bleached wood, cotton or linen pulp;
- alkaline buffered with 2 – 3 % calcium or magnesium carbonate to pH 8;
- available in single (3 mm) and double (5 mm) wall;
- suitable for backboards, folders, as a support for flat fragile objects and for making storage boxes and components thereof; and
- available from conservation suppliers.
Polyester Fabric (Parasilk, Lining)
- used as a barrier between Ethafoam™ 220 and an object and to make cushions filled with polyester wadding; and
- available from fabric suppliers.
Polyester Film (Mylar®, Melinex®)
- clear polyester film available in three thicknesses 75 µm, 100 µm and 125 µm;
- used for interleaving, encapsulating, photographic sleeves, wrapping paintings and as a protective barrier between different materials; and
- available from conservation suppliers.
Polyester Wadding (Dacron™)
- comes as loose fibres (craft fibre) and as sheets of different thicknesses (100 gsm, 200 gsm) and thinner quilting wadding;
- while used for padding and filling soft sculpture supports, this wadding should never be used in direct contact with an object as the fibres are likely to get attached to the object’s surface; and
- available from fabric suppliers.
Polyethylene Foam (Ethafoam 220™)
- available in black and white in a variety of thicknesses up to 100 mm;
- is a firm foam that is easily carved to form supports for objects;
- very rough and should never be in direct contact with an object. Cover Ethafoam™ 220 either by hot gluing Cell-Aire® over the contact surface or by covering the foam with Parasilk or Tyvek®1443R; and
- available from Dunlop Flexible Foam.
Polyethylene Foam (Ethafoam PE30™)
- high density foam which good for absorbing vibration and other shocks during transport; and
- available from Dunlop Flexible Foam.
Polyethylene Foam Backing Rod
- comes in many different diameters and is useful for making circular cradles or bollards for object parts to snake around in storage; and
- available from building suppliers.
Polyethylene Foam Sheets (Cell-Aire®, Polycell)
- available in thicknesses of 1 mm, 2 mm, 4 mm, 6 mm, 8 mm and 10 mm;
- used for cushioning objects in boxes, in packing and on shelves;
- may be hot glued onto Ethafoam 220™ as a protective layer between the rough Ethafoam™ 220 surface and an object; and
- available from packaging suppliers.
Polyethylene Self Adhesive Tape (Tyvek Tape)
- is self-adhesive, spun-bonded polyethylene tape that is much stronger than paper tape;
- available in three widths (25 mm, 38 mm and 50 mm);
- used as tabs for closures, accessing trays within a box, mat hinges, book repairs; and
- available from conservation suppliers.
Polyethylene Sheeting
- available in 100 µm and 200 µm, various widths and in clear and black;
- virgin sheeting is best as cheaper varieties have a waxy finish which can transfer to objects;
- is not generally recommended for use as packing material as its electrostatic nature attracts dust. It can be used as a dust sheet however (better than nothing); and
- available from packaging suppliers.
Polyethylene Ziplock Bags
- are useful for the storage of small items;
- useful for isolating metal components from other sensitive material; and
- available from supermarkets.
Polypropylene Board
- used by conservation suppliers for making storage boxes of diverse sizes.
Polypropylene Corrugated Board (Coreflute®, Fluteboard®)
- available in 3 mm and 5 mm thicknesses;
- used as an alternative board for supports and box making where a larger format is required;
- care needs to be taken as the plastic is very sharp on the corners and needs to be rounded off;
- plastic surface needs to be sanded before hot glue is used to give it some tooth; and
- available from sign writers’ suppliers.
Polystrap and Buckles
- used to tie down heavier objects onto pallets;
- use a Cell-Aire® strip as a cushion between the polystrap and the object; and
- available from packaging suppliers.
Polystyrene Products
- not usually used in conservation due to the electrostatic properties and deterioration;
- sheets may be used as insulation when transporting crates of objects; and
- available from plastic product suppliers.
Polystyrene Bean Bags
- are purpose-made small bean bags of differing sizes;
- are a handy form of temporary support but must be used properly. Fold the bags so that the beans support an object rather than the object settle through the beans to an unsupported hard surface; and
- available from stores that stock bean bags and craft suppliers.
Polyurethane Products
- not used in conservation apart from water-based polyurethane sealants; and
- less stable than the other plastics.
Polyvinyl Chloride Products
- not used in conservation;
- less stable than the other plastics; and
- off gas detrimental acidic vapours as they break down.
Rising Museum Board
- 100% cotton board that is acid-free and buffered;
- available in 489 gsm, 978 gsm and 1948 gsm;
- available in diverse colours;
- used for supports and mounting; and
- available from conservation suppliers.
Silica Gel
- silica gel absorbs moisture, changing colour (from orange to green/pale yellow or colourless) as it becomes saturated;
- silica gel can be regenerated by heating until it regains the orange colour; and
- available from conservation suppliers
Spun Bonded Polyethylene Sheet (Tyvek® Sheet 1085D)
- spun bonded polyethylene sheet available in two thicknesses 43 gsm and 75 gsm;
- passes the Photographic Activity Test (PAT);
- does not tear and can be heat sealed;
- suitable for envelopes and folders for storing archival and photographic objects;
- available from conservation suppliers.
Spun Bonded Polyethylene Sheet (Tyvek® 1443R)
- very versatile spun bonded polyethylene fabric;
- allows water vapour to pass through in one direction;
- can be heat sealed or sewn and washed;
- used for dust covers, linings; and
- available from DuPont.
Straw Board
- is usually alkaline but contains harmful impurities;
- the colour runs in the presence of moisture; and
- is not suitable for conservation purposes.
Velcro Dots
- self adhesive Velcro dots;
- very useful as closures on box tabs; and
- available from haberdashery suppliers.
Webbing Tie Downs
- used to secure heavy objects on pallets; and
- available from hardware stores.
Appendix 7: Photographic Processes
Postive Photographic Images
On Metal
| A | Image is on highly polished silver. | Daguerreotype (1839-1860s) |
| B | Dull image on black or brown varnished iron | Ferrotype or Tintype (1852-1940s) |
| C | Image is on copper, aluminium, zinc. May be sepia, black and white or colour. | Carbon-transfer (1864-1930s) or Transferrotype (1884-1930s) |
| D | Image is on white enamelled copper plate. | Photo-ceramic (1860s on) |
On Miscellaneous Bases
| A | Synthetic ivory | Ivortype (1855-1910), Eburneum (1865-1910s) |
| B | Fabrics - cotton, silk, linen | Cloth print (1850 on) |
| C | Fabrics, oil cloth | Planotype (1854-1900) wet collodion positive |
| D | Fired glaze image on china or porcelain | Photo-ceramic (1860s on) |
| E | Image on wood, stone | Carbon transfer (1864-1930s) or Transferrotype (1884-1930’s) |
On Glass
| A | Dull negative image made positive by viewing against a dark background. | Collodion positive, also known as Ambrotype (1851-1870s) |
| B | Positive image on opal glass. | Opaltype (1880-1920) |
| C | Print on convex glass, translucent, hand tinted. | Crystolleum (1880s-1930s) |
| D | Images on 3¼" x 3¼" to 3½" x 4" glass plates - can be collodion, gelatin carbon, dyed or hand-tinted. | Lantern slides (1851-1900) |
Identification of Prints
(10 x – 30 x magnification)
Single Layer Paper Support
| A | Uncoated single layer paper. Paper fibres clearly visible with the image formed in the paper fibres. | Purple to warm sepia highlights, yellow especially at the edges. | Salted paper print (1840-1860s) |
| Neutral grey or brown image, no fading. | Platinotype (1880-1920s) | ||
| Bright blue image. | Cyanotype (1840s) Negative image Cyanotype (1880-1920) Positive image |
||
| Shows regular pattern. | Photomechanical process (1870-on) |
Double Layer Paper Support
| B | Double layer paper, fibres may be visible through the binder layer. | Purple to red brown image. Usually yellow in the highlights, cracking of binder layer. | Albumen print (1850-1920s) |
| Paper fibres visible. | No image fading. Can be any colour. Woodburytype is normally chocolate brown with distinct image relief. | Carbon print (1860-1900s) Pigment print or Woodburytype (1865-1890s) |
Triple Layer Paper Support
| C1 | Fibres visible. Water spot test shows swelling. | Warm purple to red brown image. | Gelatin printing out paper (1880-1920) |
| Paper fibres invisible. Water spot test shows swelling. | Silver mirroring may be seen in high density areas. | Gelatin developing out paper (1880-on) | |
| C2 | Paper fibres invisible. Water spot test has no effect. | Collodion printing out paper (1880-1920) | |
| Water spot test has no effect. | No image fading. Neutral image hue. | Matt collodion printing out paper with gold and platinum toning (1880-1920s) |
Negative Images
On Paper
| A | Plain uncoated writing paper | Calotype (1840-1860s) |
| Translucent waxed paper | Calotype (1851-1865) Waxed paper negative | |
| Oiled paper | Eastman negative paper (1884-1895) |
On Glass
| B | Image often creamy | Wet collodion (1851-1880s) |
| Dry collodion (1854-1885) | ||
| Albumen (1848-1920s) | ||
| Image is black and may be tarnished. | Gelatin dry plate (1880-on) |
It is difficult to differentiate between wet collodion, dry collodion and albumen images. An alcohol spot test which dissolves the collodion may be necessary
On Film
| C | There are no easily discernible visual differences between these film types | Cellulose nitrate (1889-1950) |
| Cellulose acetate and tri-acetate (1930-1960s) | ||
| Polyester (1965-on) |
These film types can be identified by putting a small sample in a test tube containing trichloroethylene. During a 10-second time test, the cellulose nitrate sinks to the bottom, the acetate hovers about the middle and the polyester floats to the top.
Alternatively, a small sample (pin-head size) can be examined by infra-red spectroscopy. This specialised and somewhat expensive technique will allow unambiguous identification.
Appendix 8: Galvanic Series
The galvanic series shown below was taken from Singley (1988). The most noble (least reactive) metals are shown at the top of the table with the least noble (most reactive) at the bottom. To determine which metal will corrode and which will be protected when two dissimilar metals come into contact, the metals’ positions in the series must be noted. The most noble metal (highest in the series) will be protected while the least noble will corrode. For example if aluminium bronze was in contact with lead, in the presence of moisture and oxygen, then the lead would corrode and the aluminium bronze would be protected.
| Most noble (least reactive) | platinum |
| gold | |
| graphite | |
| titanium | |
| silver | |
| stainless steel (passive) | |
| Monel | |
| nickel (passive) | |
| leaded tin bronze | |
| copper nickel (30 %) | |
| silicon bronze | |
| copper | |
| red brass | |
| aluminium bronze | |
| admiralty brass | |
| yellow cartridge brass | |
| nickel (active) | |
| naval brass | |
| manganese bronze | |
| Muntz metal | |
| tin | |
| lead | |
| stainless steel (active) | |
| lead-tin solder | |
| high nickel cast iron | |
| cast iron | |
| wrought iron | |
| low carbon steel | |
| aluminium | |
| galvanised steel and wrought iron | |
| zinc | |
| Least noble (most reactive) | magnesium |
Reference
Singley, K., 1988, The Conservation of Archaeological Artifacts from Freshwater Environments, Lake Michigan Maritime Museum, Michigan, p. 30.
Appendix 9: Spot Tests for Common Metals
Spot tests may be used to identify metals and to distinguish different metals which make up an alloy. Simple instructions and a list of the tests are provided to facilitate identification of a metal. Note that these tests are only qualitative, providing information regarding the components of a metal but not the proportions in which they are present. These tests follow the procedures described by Laver (1978).
General Electrolysis Instructions
Figure 1: Equipment set-up for metal spot tests (adapted from Laver 1978)
- tests should be carried out in unobtrusive spots on the artefact, as marks may be left;
- remove protective coatings such as lacquers and waxes from the area to be tested, since no reaction will occur otherwise;
- the test papers to be used in conjunction with electrolysis are best cut into triangles. When wet with distilled water or salt solution the paper should be shiny-wet, but not soaking;
- the clip needs to be touched firmly to an area of reasonably solid metal;
- touch the test paper in the tweezers to the surface of the object, about one centimetre away from the clip. Do not let the tweezers touch the metal;
- rinse with distilled water and dry wet spots of electrolyte (sodium chloride for example) or other reagents; and
- disconnect the battery and store it away from the tweezers and clip to avoid accidental discharging if the two should touch.
List of Tests
Antimony (Sb)
Procedure
- dip a small piece of antimony test paper in diluted hydrochloric acid (HCl, 2 %) and apply to the object.
Results
- the presence of Sb is indicated by an orange colour;
- the reaction is complete in five seconds on pure Sb using 2 % HCl. Surfaces containing traces of Sb will be much slower; and
- gold and silver surfaces remain unaffected by the test, lead is slightly darkened, copper and iron corrosion products change colour slightly.
Copper (Cu)
Procedure
- wet a small piece of commercial test paper (Cuprotesmo) with distilled water and place on the surface of the metal.
Results
- the copper metal or Cu+ and Cu2+ ions cause the pale yellow paper to turn pink-purple;
- this test works particularly well on corroded or patinated areas and leaves no trace of the test; and
- on highly polished or new surfaces the reaction is much slower, but may be accelerated by briefly applying the electrode to the paper (about five seconds is sufficient).
Gold (Au)
Procedure
- dip a small triangle of plain filter paper in a saturated aqueous solution of sodium chloride (NaCl);
- electrolyse for less than 15 seconds. Some darkening will probably be evident if copper is present. Leave the paper on the spot until slightly dried to ensure that gold is on the surface of the paper; and
- dip into a mixture of stannous chloride (SnCl2, 20 %) in HCl (15 %).
Results
- the presence of gold causes the paper turn black.
Iron (Fe)
Procedure
- for corroded objects, dip a small square of dipyridyl test paper in distilled water and place on the surface of the object. This leaves no visible effect on the object;
- for uncorroded objects, dip a long piece of dipyridyl test paper in a saturated NaCl solution so that the paper is quite wet;
- electrolyse; and
- the paper is long to prevent confusion with any colour reaction which occurs with the steel of the tweezers.
Results
- for both corroded and uncorroded objects, a red colour will appear on the white test paper after several seconds if iron is present.
Nickel (Ni)
Procedure
- dip a small piece of nickel test paper into a saturated NaCl solution; and
- electrolyse for about five seconds.
Results
- on drying, the following colours may be observed - pink-red for nickel, brown for iron, green for copper and yellow for gold.
Silver (Ag)
Procedure
- wet a filter paper with 10 % potassium chromate (K2CrO4) and touch the point of the triangle to the metal in an area that is as small as possible; and
- electrolyse for one second or less.
Results
- the presence of silver is indicated by the formation of red silver chromate (Ag2CrO4) in the spot on the metal; and
- this mark, if small, can be polished off very easily.
Tin (Sn)
Procedure
- dip a small piece of filter paper in a saturated, aqueous solution of cacotheline (0.6%);
- when the cacotheline dries slightly, dip the filter paper in a saturated solution of NaCl; and
- electrolyse.
Results
- A purple colour indicates tin; and
- shiny surfaces will become matt and slightly darker after two seconds of electrolysis.
Zinc (Zn)
Procedure
- dip a small piece of filter paper in sodium hydroxide solution (NaOH, 5 – 10 %);
- apply the paper to the surface of the object for five to ten seconds;
- electrolysis is recommended;
- when the sample has been absorbed in the filter paper, place this paper in the centre of a larger filter paper, making a wet spot; and
- wash this spot with successive drops of dithizone/carbon tetrachloride*.
Results
- pink (not orange) around the spot edges denotes zinc;
- any NaOH remaining on the metal of the object should be wiped off immediately. This can be done with the same filter paper on which the dithizone reaction is to be done;
- shiny zinc surfaces may be slightly darkened or dulled after electrolysis;
- there is a small effect on some copper corrosion products; and
- a lead surface tends to develop a shiny spot where the sodium hydroxide droplet was.
* Note that carbon tetrachloride is a known carcinogen and this test must be conducted in a fume cupboard.
Reference
Laver, M., 1978, Spot tests in conservation: metals and alloys, in Preprints, The International Council of Museums Committee for Conservation, 5th Triennial Meeting, Zagreb, 1978, vol.3, 78/23/8.
Glossary
| Acid | Substance which when dissolved in water gives a pH below 7. |
| Acid-free | Term used to describe a neutral or slightly alkaline pH. |
| Albumen | White of egg. Emulsion layer in most 19th century photo prints. |
| Alkali | Substance which when dissolved in water gives a solution with a pH above 7. |
| Ambient conditions | Natural prevailing conditions within an area or location. |
| Biocide | Substance used to kill plants and/or other organisms. |
| Bleed | Staining normally on paper and textiles when water or solvents are applied to dyes, etc. |
| Blueing | Colouring of iron metal either by chemical means or by heating. |
| Bronze disease | Corrosion of bronzes producing pustules of bright green spots on the surface (not a patina). |
| Carcinogen | Cancer producing substance. |
| Collagen | Protein found in bones. |
| Collodion | A solution of pyroxylin in ether, used in photography and surgery. |
| Crizzled | A condition of some glassware which is usually identifiable as a network of minute fractures. This unstable condition is not always visible to the naked eye. |
| Delamination | Separating of layers of an objects or substance (see Exfoliation). |
| Desiccant | A substance which removes moisture from the air and thereby lowers the relative humidity. |
| Direct light | Daylight or artificial light source which falls directly on an object. |
| Efflorescence | Crystallisation of salts on the surface of an object exposed to air or low relative humidity. |
| Ethnographic | Material relating to people and/or cultures. |
| Exfoliation | Coming off in scales or layers. |
| Fibrils | Miniature fibres or strands of fibres. |
| Foxing | Red-brown spots that appear on paper, prints, watercolours, etc. No certain cause is known although mould and impurities are the most likely. |
| Friability | The tendency of a material to crumble into a fine sand or powder. |
| Gelatin | Substance derived from animal skins commonly used in cooking and photography. |
| Gesso | A solid coating made with a water binder, either glue, casein, or gelatin solution. The dry ingredient is either whiting, chalk, or slaked plaster of Paris. Used as a painting ground or as a putty or modelling material. In the latter case it is made into a stiffer, plastic paste. |
| Hygrometer | Term used to describe an instrument for measuring humidity. |
| Hygroscopic material | Material which absorbs water vapour from the atmosphere at high relative humidity levels and releases it at low relative humidity levels. |
| Hyphae | Filaments of fungi; strand-like. |
| Infra-red (IR) | Light having a longer wavelength and lower energy than visible light. It produces a heating effect when it shines on an object. Sometimes referred to as radiant heat. |
| Inhibitor | A substance which slows down the rate at which a particular chemical reaction occurs. Generally refers in this text to substances which slow down the attack of acids on metal. |
| Keratin | Sulphur-containing protein forming the basis of horns, nails, hair, etc. |
| Micro-climate | Climate produced in a small space (such as in plastic bag, display case and like) which may be quite different from the climate in the rest of the room. |
| Microcrystalline | A substance composed of crystals which are very much smaller than normal. |
| Miscible | Liquids which are capable of being mixed together. For example, alcohol and water are miscible but oil and water are immiscible. |
| Oxidation | Chemical change produced by a reaction with oxygen or the same change produced by other means. |
| Oxidising agent | Any substance which is capable of causing oxidation. |
| Patina | The ‘skin’ or layer of corrosion products which forms on the surface of metal artefacts. The term is most commonly used in reference to bronze and copper objects. |
| Photochemical | Damage which is caused or accelerated by light (UV, visible, or IR) falling degradation on an object. |
| Polymerise | The joining together of a large number of small molecules (monomer units) to form a few much larger molecules (polymers). |
| Precipitation | The opposite process to dissolution; the formation of two separate phases from one phase. For example, when air temperatures fall the relative humidity increases until it reaches 100 %. If the temperature falls further the air can no longer contain all the water vapour and the excess precipitates as droplets of water (dew, rain or snow). |
| Reagent | Substance used to cause a chemical reaction or to detect another substance. |
| Refractive index | The extent to which light rays are bent when they pass through the material. |
| Repatinate | The formation of a replacement patina on an object. Generally done either to improve the appearance and/or to protect metal. |
| Sherds | Fragments of ceramic which result when a vase or other object is broken. |
| Silica gel | A crystalline substance that is used to extract moisture from the air. |
| Thermohygrograph | Instrument for measuring temperature and relative humidity and recording it on a graph, usually over seven days or one month periods. |
| Ultra-violet (UV) | Radiation that has a shorter wavelength and a higher energy than visible light. Can be very damaging to museum objects and should be eliminated whenever possible. |
| Vitrify | To heat to the point of glass formation. |
| White light | Light giving the same appearance to objects as does natural sunlight, but preferably without the ultra-violet and infra-red components of natural light. |
| W/V | Weight to volume ratio. Used to specify the concentration or strength of a solution by specifying the weight of a substance dissolved in a particular volume of another substance. |
| W/W | Weight to weight ratio. Used to specify the concentration or strength of a solution by specifying the weight of a substance dissolved in a particular weight of another substance. |
| X-ray diffraction | A process in which a beam of X-rays is passed through substance. The substance scatters the X-rays at various angles and by recording these scattered X-rays the arrangement of atoms within the substance can be determined and its chemical structure determined. |

